Introduction
When creating a query that involves more than one table,
you don't have to first link the tables in the Relationships window. If the
tables have a primary and a foreign keys, you can create their joins
directly in the Design View of a query, in the Object Filter window, or in a
Query Builder. In fact, the query has its own complete functionality when it
comes to data joins.
 Practical
Learning: Introducing Data Joins in Queries
Practical
Learning: Introducing Data Joins in Queries
- Start Microsoft Access
- Click Blank Desktop Database
- Set the file name as Lambda Square Apartments1 and click Create
- On the Ribbon, click File and click Options
- On the left side, click Current Database
- On the right side, under Document Window Options, click the Overlapping Windows radio button,
and click OK
- Read the message box and click OK
- On the Ribbon, click File and click Close
- In the list of files, click Lambda Square Apartments
- On the Ribbon, click External Data
- In the Import & Link section, click the Excel button

- Click the Browse button
- From the resources that accompany these lessons, select the Lambda Square Apartments
spreadsheet and click Open
- On the Get External Data dialog box, click OK
- In the first page of the wizard, click the Show Named Ranges radio
button and click MaritalsStatus and click Next
- On the second page of the wizard, click First Row Contains Column
Headings and click Next
- In the third page of the wizard, click Next
- Click Firat Row Contains Column Headings and
click Next
- Click the arrow of the combo box and select MaritalStatus
- Click Next
- Accept the name of the table as MaritalsStatus and click Finish
- On the dialog box, click Close
- In the Navigation Pane, right-click the MaritalsStatus table and click
Design View
- Change the following characteristics of the fields:
| Field Name |
Data Type |
Field Size |
| MaritalStatus |
|
20 |
| Description |
Long Text |
|
- Close the table
- When asked whether you want to save, click Yes
- You will also receive a message box that some data may be lost. Read it
and click Yes
- On the Ribbon, click External Data
- In the Import & Link section, click the Excel button
- Click the Browse button
- From the resources that accompany these lessons, select the Lambda Square Apartments
spreadsheet and click Open
- On the Get External Data dialog box, click OK
- In the first page of the wizard, click the Show Named Ranges radio
button, click OccupanciesStatus and click Next
- On the second page of the wizard, click First Row Contains Column
Headings and click Next
- In the third page of the wizard, click Next
- Click the arrow of the combo box and select OccupancyStatus
- Click Next
- Accept the name of the table as OccupanciesStatus and click Finish
- On the dialog box, click Close
- In the Navigation Pane, right-click the OccupanciesStatus table and click
Design View
- Change the following characteristics of the fields:
| Field Name |
Data Type |
Field Size |
| OccupancyStatus |
|
20 |
| Description |
Long Text |
|
- Close the table
- When asked whether you want to save, click Yes
- You will also receive a message box that some data may be lost. Read it
and click Yes
- On the Ribbon, click External Data
- In the Import & Link section, click the Excel button
- Click the Browse button
- From the resources that accompany these lessons, select the Lambda Square Apartments
spreadsheet and click Open
- On the Get External Data dialog box, click OK
- In the first page of the wizard, click the Show Named Ranges radio
button, make sure Apartments is selected and click Next
- On the second page of the wizard, make sure First Row Contains Column
Headings and click Next
- In the third page of the wizard, as ApartmentCode is selected, set he Data
Type to Short Text
- Click UnitNumber and set its Data Type to Integer
- Scroll to the right, click Bedrooms, and set the Data Type to Byte
- Click Bathrooms and set the Data Type to Single
- Click Next
- Click the arrow of the combo box, select ApartmentCode, and click Finish
- On the dialog box, click Close
- In the Navigation Pane, right-click Apartments and click
Design View
- Change the following characteristics of the fields:
| Field Name |
Field Size |
| ApartmentCode |
10 |
| Status |
20 |
- Close the table
- When asked whether you want to save, click Yes
- You will also receive a message box that some data may be lost. Read it
and click Yes
- On the Ribbon, click External Data
- In the Import & Link section, click the Excel button
- Click the Browse button
- From the resources that accompany these lessons, select the Lambda Square Apartments
spreadsheet and click Open
- On the Get External Data dialog box, click OK
- In the first page of the wizard, click the Show Named Ranges radio
button, click Employees and click Next
- On the second page of the wizard, click First Row Contains Column
Headings and click Next
- In the third page of the wizard, as EmployeeNumber is selected, set the
Data Type to Short Text, and click Next
- Click the arrow of the combo box and select EmployeeNumber
- Click Finish
- On the dialog box, click Close
- In the Navigation Pane, right-click the Employees table and click
Design View
- In the top side of the window, right-click Title and click Insert Rows
- Change the following characteristics of the fields:
| Field Name |
Data Type |
Field Size |
Expression |
Caption |
| EmployeeNumber |
|
10 |
|
|
| FirstName |
|
20 |
|
First Name |
| LastName |
|
20 |
|
Last Name |
| EmployeeName |
Calculated |
20 |
[FirstName] & " " & [LastName] |
|
| Title |
|
50 |
|
|
- Close the table
- When asked whether you want to save, click Yes
- You will also receive a message box that some data may be lost. Read it
and click Yes
- On the Ribbon, click External Data
- In the Import & Link section, click the Excel button
- Click the Browse button
- From the resources that accompany these lessons, select the Lambda Square Apartments
spreadsheet and click Open
- On the Get External Data dialog box, click OK
- In the first page of the wizard, click the Show Named Ranges radio
button, click Registrations and click Next
- On the second page of the wizard, make sure First Row Contains Column
Headings is selected, and click Next
- In the third page of the wizard, as RegistrationID is selected, set the
Data Type to Long Integer
- Scroll to the right and click ProcessedBy
- Set the Data Type to Short Text
- Click NumberOfChildren and set the Data Type to Byte
- Click PropNbr and set the Data Type to Short Text
- Click Next
- Click the arrow of the combo box and select RegistrationID
- Click Finish
- On the dialog box, click Close
- In the Navigation Pane, right-click the Registrations table and click
Design View
- Change the following characteristics of the fields:
| Field Name |
Field Size |
Caption |
| ProcessedBy |
10 |
|
| FirstName |
20 |
First Name |
| LastName |
20 |
Last Name |
| MaritalSituation |
20 |
|
| PhoneNumber |
50 |
|
| EmailAddress |
20 |
|
| PropNbr |
10 |
|
- Close the table
- When asked whether you want to save, click Yes
- You will also receive a message box that some data may be lost. Read it
and click Yes
- On the Ribbon, click External Data
- In the Import & Link section, click the Excel button
- Click the Browse button
- From the resources that accompany these lessons, select the Lambda Square Apartments
spreadsheet and click Open
- On the Get External Data dialog box, click OK
- In the first page of the wizard, click the Show Named Ranges radio
button, click Payments and click Next
- On the second page of the wizard, make sure First Row Contains Column
Headings is selected, and click Next
- In the third page of the wizard, as ReceiptNumber is selected, set the
Data Type to Long Integer
- Scroll to the right, click ProcessedBy, and set the Data Type to Short Text
- Click RegistrationNumber and set the Data Type to Long Integer
- Click Next
- Click the arrow of the combo box and select ReceiptNumber
- Click Finish
- On the dialog box, click Close
- In the Navigation Pane, right-click the Payments table and click
Design View
- Change the following characteristics of the fields:
| Field Name |
Field Size |
Field Size |
| ProcessedBy |
|
10 |
| Notes |
Long Text |
|
- Close the table
- When asked whether you want to save, click Yes
- You will also receive a message box that some data may be lost. Read it
and click Yes
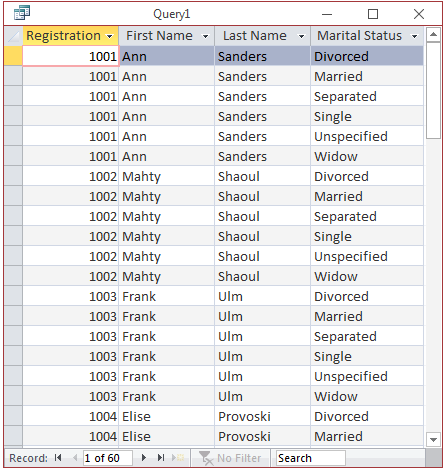
Cross Joins
A cross join creates a query of all records from two
tables (or two existing queries, or a table and an existing query) as follows: the first record from the parent
list is associated to
each record from the child list, then the second record from the parent
list is associated to each record from the child list, and so on. In
this case also, there is no need for a common column between both tables.
In other words, you will not use the ON clause.
The Relationships window implicitly supports cross join but
they can be viewed and examined only in a query. To visually create a cross join,
start a query in design and select the two desired tables (or two existing
queries, or a table and an existing query). In the top lists, select the fields you
will need. Then preview the results in the Datasheet View.
In the SQL, the primary formula to create a cross join is:
SELECT field(s) [, field(s)] FROM table1, table2
Start with the SELECT operator and create a list of
the desired fields from each table. As mentioned previously, it is a good idea to
qualify each field. After the FROM keyword, provide the name of each
table involved.
Practical
Learning: Creating a Cross Join
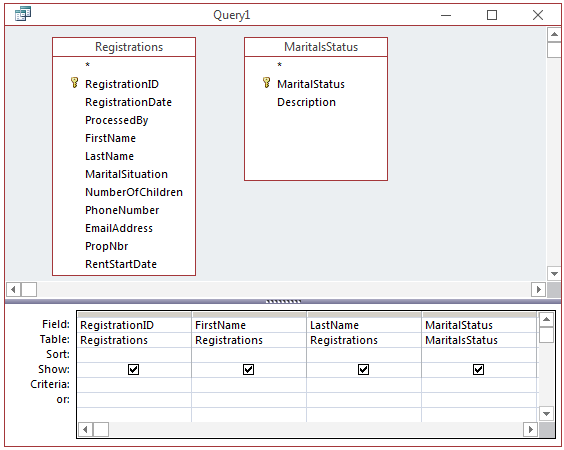
- On the Ribbon, click Create and click Query Design
- In the Show Table dialog box, double-click
Registrations and MaritalsStatus
- Click Close
- In the Registations list, double-click RegistrationID, FirstName, and
LastName
- In the MaritalsStatus list, double-click MaritalStatus
- Display the SQL View of the query:
SELECT Registrations.RegistrationID,
       Registrations.FirstName,
       Registrations.LastName,
       MaritalsStatus.MaritalStatus
FROM Registrations, MaritalsStatus;
- Switch the query to Datasheet View
- Close the quey without saving it
Inner Joins
An inner join in a query follows the description we saw for
inner joins in tables. To visually create an inner join in a query, start the query
in design and select the desired tables or existing queries. When you start a query, if you select two tables that have a
primary key and a foreign key with the same name and data type, and if no relationship was already
established between both tables, a visual link (a line) would automatically
be established between both keys. If the relationship is not obvious, you will have to
create it yourself. As we saw in Lesson 3: simply drag the primary key from the parent table
or query and drop it on the foreign key
in the child table or query.
To create an inner join in the SQL, specify the join-type
of our formula with the expression
INNER JOIN. Here is an example:
SELECT Persons.PersonID, Persons.FirstName, Persons.LastName, Persons.GenderID,
       Genders.GenderID AS [Gender ID], Genders.Gender
FROM   Persons INNER JOIN Genders ON Persons.GenderID = Genders.GenderID;
Practical
Learning: Introducing Inner Joins in Queries
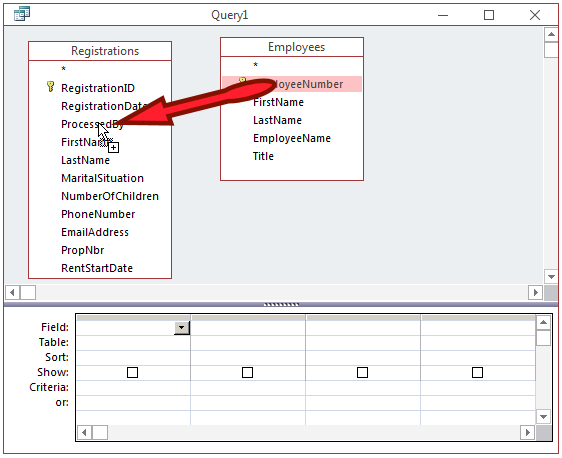
- On the Ribbon, click Create and click Query Design
- In the Show Table, double-click Registrations and Employees
- Click Close
- Drag EmployeeNumber from the Employees list and drop it on ProcessedBy on
the Registrations list
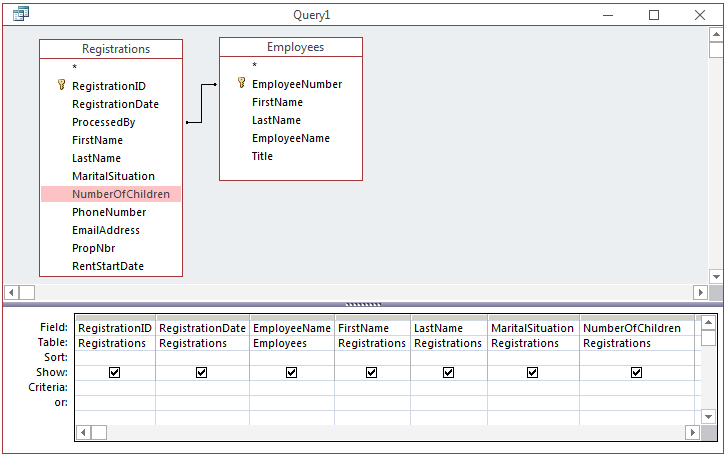
- In the Registrations list, double-click RegistrationID and
RegistrationDate
- In the Employees list, double-click EmployeeName
- In the Registrations list, double-click FirstName, LastName,
MaritalStatus, and NumberOfChildren
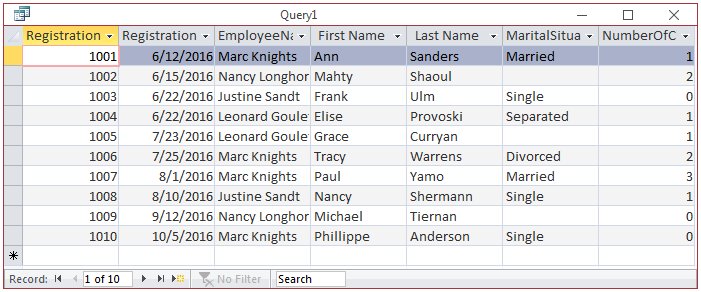
- Display the SQL View of the query:
SELECT Registrations.RegistrationID,
       Registrations.RegistrationDate,
       Employees.EmployeeName,
       Registrations.FirstName,
       Registrations.LastName,
       Registrations.MaritalSituation,
       Registrations.NumberOfChildren
FROM Employees INNER JOIN Registrations
ON Employees.EmployeeNumber = Registrations.ProcessedBy;
- Switch to the Datasheet View
- Close the query without saving it
Left Outer Joins
To create a left outer join in the SQL, replace
the join-type of our formula with either LEFT JOIN or
LEFT OUTER JOIN.
Practical Learning: Using Left Outer Joins
- Open the Cruise3 database from the previous
lesson
- On the Ribbon, click Create and click Query Design
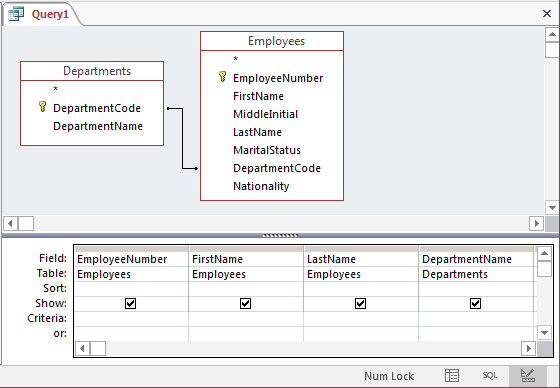
- In the Show Table, double-click Departments nd Employees
- Click Close
- Make sure there is a line between the DepartmentCode items.
In the lists, double-click EmployeeNumber, FirstNasme, LastName, and
DepartmentName
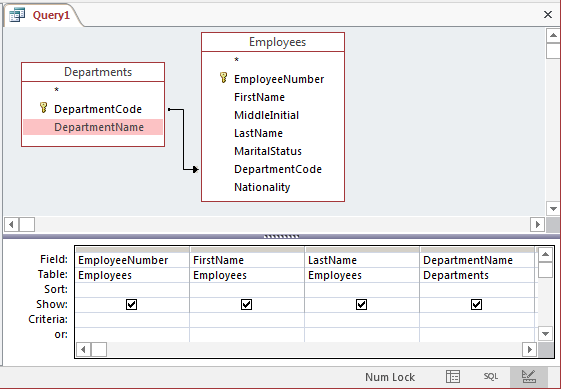
- Right-click the line between the DepartmentCode items and click Join
Properties
- In the Join Properties dialog box, click the 2 radio button:

- Click OK
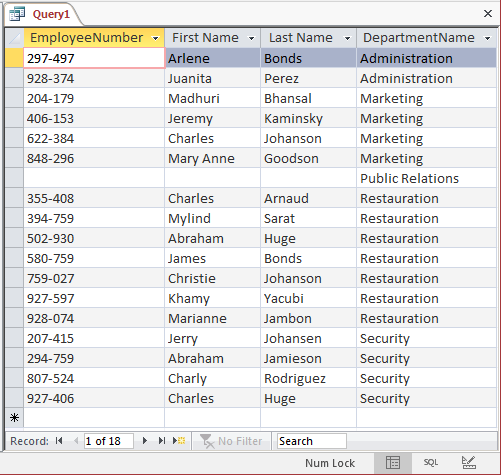
- Display the SQL View of the query:
SELECT Employees.EmployeeNumber,
       Employees.FirstName,
       Employees.LastName,
       Departments.DepartmentName
FROM   Departments LEFT JOIN Employees
       ON Departments.DepartmentCode = Employees.DepartmentCode;
- Switch to the Datasheet View
- Close the query without saving it
Right Outer Joins
To create a right outer join in
SQL, replace the join-type of our formula with
RIGHT JOIN or RIGHT OUTER JOIN.
Practical
Learning: Creating a Right Outer Joins in a Query
- Open the Lambda Square Apartments1 database created earlier
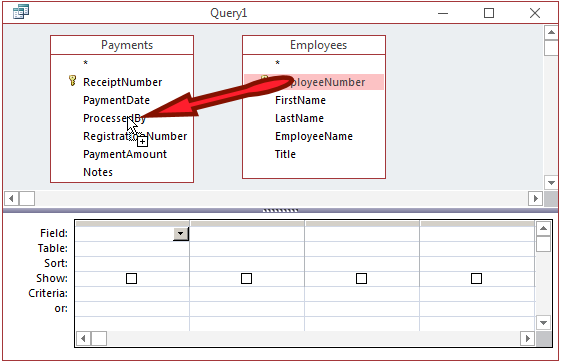
- On the Ribbon, click Create and click Query Design
- In the Show Table, double-click Payments and Employees
- Click Close
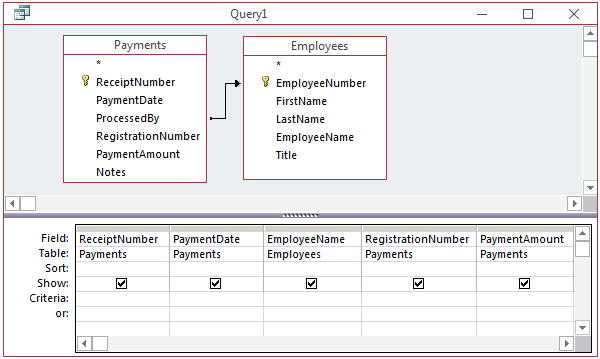
- Drag EmployeeNumber from the Employees list and drop it on ProcessedBy on
the Payments list
- In the lists, double-click ReceiptNumber, PaymentDate, EmployeeName,
RegistrationNumber, and PaymentAmount

- To preview the results, display the Datasheet View of the query

- Notice the number of records: 46.
Display the Design View of the
query
- Double-click the line between ProcessedBy and EmployeeNumber
- In the Join Properties dialog box, click the 3 radio button

- Click OK
- In the lists, double-click ReceiptNumber, PaymentDate, and EmployeeName
- Display the SQL View of the query:
SELECT Payments.ReceiptNumber,
       Payments.PaymentDate,
       Employees.EmployeeName,
       Payments.RegistrationNumber,
       Payments.PaymentAmount
FROM   Employees RIGHT JOIN Payments
       ON Employees.EmployeeNumber = Payments.ProcessedBy;
- Switch to the Datasheet View

- Close the query without saving it
- Close Microsoft Access
