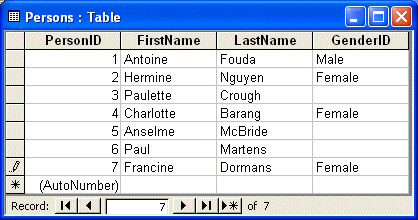
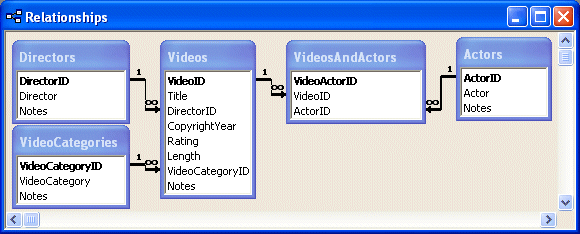
- Open the Music Collection1 database that you started in the previous lesson
- On the Database toolbar, click the Relationships button

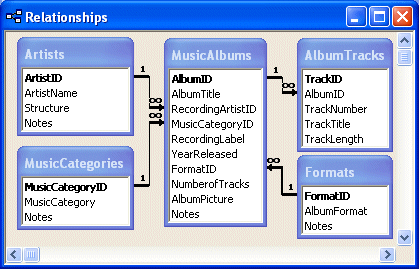
- On the Relationships window, click the joining line between the Artists table and the MusicAlbums table to select it
- On the main menu, click Relationships -> Edit Relationship…
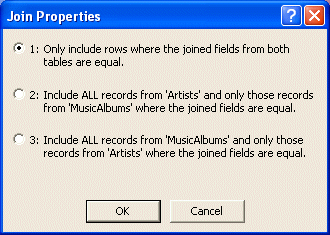
- After making sure that ArtistID and RecordingArtistID are selected in the combo boxes, click the Join Type button
In the Join Properties dialog box, click the first radio button (it should be selected already)
- Click OK twice
- Open the Rockville Techno database
- Open the CompanyAssets table in Design View
- Right-click Notes and click Insert Rows
- In the new empty field, type AssignedTo
 |
We are setting the name of this field to AssignedTo. This field will be linked to the EmployeeID field of the Employees table. In reality, you should set the name of such a field similar to the primary key it is linked to. We are using a different name here just to demonstrate how to create a relationship in the query Design View. In the future, always give the same name as the field it is related to, in the parent table. In this case, it should have been named EmployeeID. |
- Set its Data Type to Number
- In the lower section of the view, make sure the Field Size is set to
Long Integer. In the Caption field, type Assigned To
- Save the table and switch it to Datasheet View
- In the Assigned To column, type the numbers as follows:
|
Asset ID |
Asset Type |
Assigned To |
| 1 |
Printer |
|
| 2 |
Computer |
2 |
| 3 |
Laptop |
1 |
| 4 |
Printer |
|
| 5 |
Digital Camera |
|
| 6 |
Computer |
|
| 7 |
Computer |
1 |
| 8 |
Computer |
4 |
- Close the CompanyAssets table
- In the Database window, click the Forms button
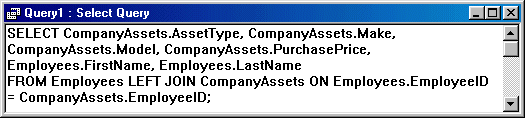
- To create a new query, on the main menu, click Insert -> Query and, in the New Query dialog box, double-click Design View
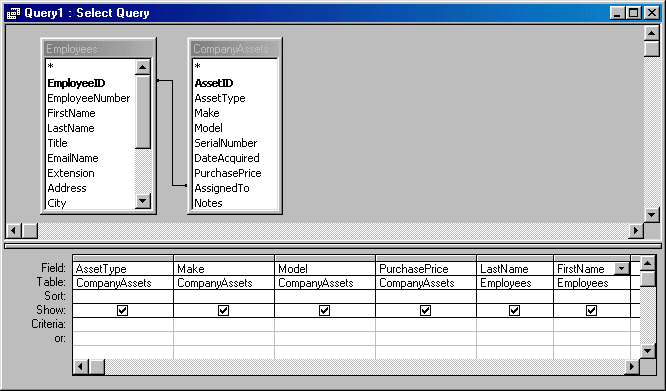
- In the Show Table dialog box, double-click Employees and CompanyAssets then click Close
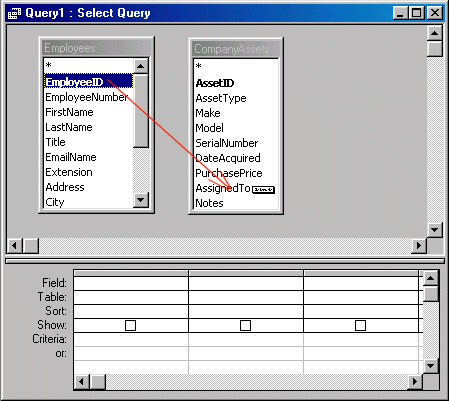
- From the Employees list, drag EmployeeID and drop it on top of AssignedTo in the CompanyAssets list:
- Notice that a line has been drawn between the tables and it joins both fields.
Right-click the line that joins the tables and click Join Properties
- Notice that the first radio button that represents an inner join is selected
Click OK
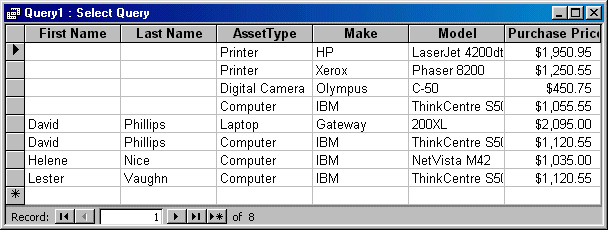
- To select the fields, in the CompanyAssets list, double-click AssetType, Make, Model, and PurchasePrice
- From the Employees list, double-click LastName and First Name
- To view the SQL statement, right-click the title bar of the window and click SQL View:

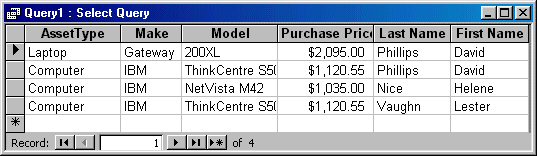
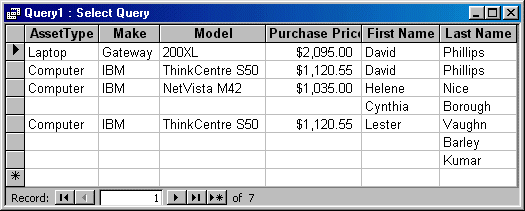
- To view the result of the query, on the Query Design toolbar, click Run

- Notice that, with this inner join, only the asset(s) assigned to an employee are displayed. Any asset not assigned to an employee does not display.
After viewing the query, close it. When asked whether you want to save it, click No
- Open the CompanyAssets table in Design View
- Change the Field Name of AssignedTo to EmployeeID and make sure it keeps its Caption as Assigned To
- Save the table and close it
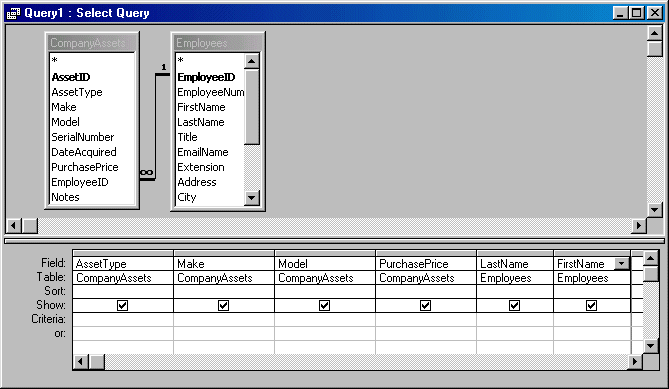
- As the CompanyAssets table is still selected in the Tables section of the Database window, to create a new query, on the Database toolbar, click the arrow of the New Object button and click Query. In the New Query dialog box, while Design View is selected, click OK
- Notice that the CompanyAssets table is already selected.
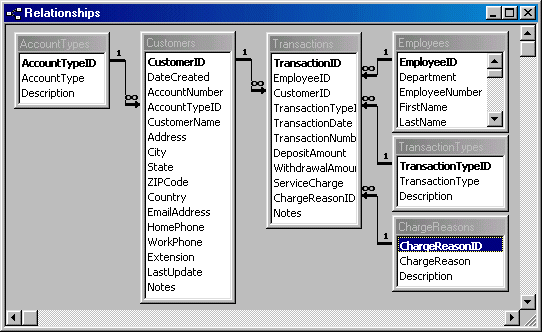
To create a relationship between the CompanyAssets table and the Employees table, right-click an empty area in the upper section of the window and click Relationships…
- Right-click an empty area in the Relationships window and click Show Table
- In the list of tables, double-click CompanyAssets (the Employees table should already be in the window; if not, add it also) and close the Show Table dialog box
- Drag EmployeeID from the Employees list and drop it on top of EmployeeID in the CompanyAssets list
- After making sure that EmployeeID is selected in both combo boxes, click Join Type. In the Join Properties dialog box, make sure the first radio button is selected and click OK
- In the Relationships dialog box, click the Enforce Referential Integrity check box and click
the check boxes under it
- Click Create
- Notice the 1 and infinity symbol between the CompanyAssets and the Employees tables
Save and close the Relationships window
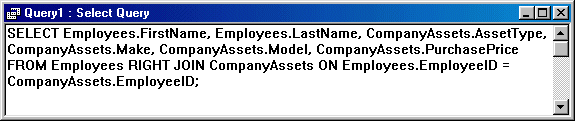
- To add a table, right-click an empty area on the Select Query window and click Show Table
- In the list of tables, double-click Employees and click Close
- To select the fields, in the CompanyAssets list, double-click AssetType, Make Model, and PurchasePrice
- From the Employees list, double-click LastName and First Name
- To view the SQL statement, right-click the title bar of the window and click SQL View
- To view the result of the query, on the Query Design toolbar, click Run
. The result is the same as the above result
- After viewing the query, close it. When ask whether you want to save it, click Yes
- Type Assets Assigned To Employees and press Enter
|