
The Characteristics of a Windows Control
|
|
The Characteristics of a Windows Control |
The Design of a Windows Control
|
The Caption of a Windows Control |
|
We studied how to get controls from the Ribbon to add them to a form or a report. Here is an example of a few controls added to a form: |
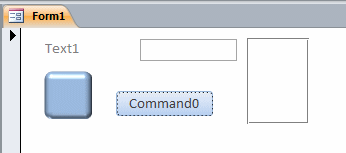
Notice that some controls display a string, such as Text1 or Command0. Some other objects, such as the toggle button or the rectangle, do not display a string on their body. For a Windows control, a caption is the word or group of words that the user sees on top of the control. As mentioned for the columns of a table, the caption of a control is not necessarily the same as its name.
When designing a form or report, if you select columns fields from a Field List and add those fields to a form or a report, Microsoft Access refers to the caption that was given to the column either in the Datasheet View or in the Design View of the table. If you had created the column in the Datasheet View only, its name and its caption would be the same and that's what Microsoft Access would use. If you had created the column in the Design View and specified a caption that was different from the name, Microsoft Access would display that caption for the control on the form or report.
Remember that not all controls have or display a caption. The controls that have a caption have a property named Caption in the Properties window.
|
|
|
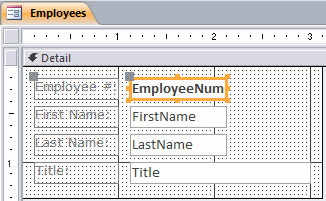
Whether you added a control from the Controls section of the Design tab of the Ribbon or you added a field from the Field List, you can change the caption of the control (independent or regardless of its name). To change the caption of a control on the form or report, first display it in Design View:
![]() Practical
Learning: Setting Objects Captions
Practical
Learning: Setting Objects Captions
|
The Name of a Control on a Form or Report |
In Lesson 6, we saw how to select an object from the Controls section of the Ribbon and place it on a form or a report. After adding a control like that, it receives a (somewhat random) default name. Most of the time, you will want to change that name. To change the name of a control on a form or a report, first switch to Design View and access the Properties window for the control. In the Properties window, you can click the Other or the All tab:
Also in Lesson 6, we saw that you could use items from a table, using the Field List, to add controls to a form or a report. If you add a control from the Field List, it uses the name of the column from the table. You can (and strongly should) keep that name. Otherwise, you can change it the same way you would change the name of a control added from the Controls section of the Ribbon.
![]() Practical
Learning: Naming Objects
Practical
Learning: Naming Objects
|
Record and Control Source |
If you create a form or a report based on a table, such as an Automatic Form or a report created from the Report Wizard, its Windows controls would be linked to the original table where they would get their data from. In Lesson 6, we saw how to use the Field List to add a table's fields to a form or report. Also, in Lesson 6, we saw how to add Windows controls that were independent of any table. If you add an object from the Controls section of the Design category of the Ribbon to a form or a report, the object is not directly linked to any field of a table.
To link a control to a field of a table, first switch the form or report to Design View and make sure you had set the form or report's Record Source property to the table that holds the field. Double-click the control to access its Properties window. In the Properties window, you can click either the Data or the All tab. Click the Control Source field and select an item from its combo box. In the same way, you can add as many controls as possible from the Controls section of the Ribbon to a form or report, and link those you want to the table as the Record Source of the form or report.
![]() Practical
Learning: Setting Control Sources of Objects
Practical
Learning: Setting Control Sources of Objects
|
The Visibility of a Control |
When you have added a control to a form or report, it is visible and can be displayed to the user. An object is referred to as visible if it can visually be located on the screen. A user can use an object only if it is visible. Most of the time, you will not be concerned with this aspect. Still, there are situations that will lead you to create a control but hide it from the user.
Depending on the host of the object(s):
If a control was previously hidden and you want to reveal it to the user, set its Visible property to Yes.
|
The Availability of a Control |
In order to use a control on a form or a report, the object that is hosting the control must allow it. For example, the user cannot type text or change the value of a text box if this action were not made possible. This aspect is controlled in two different ways. If the value of a text box is set by an expression, the user cannot change it. There is another technique. It involves a Boolean property named Enabled.
By default, the Enabled property is set to Yes for most controls, which means it is available. Otherwise:
If a control is disabled and you want to enable it, set the Enabled property to Yes.
![]() Practical
Learning: Disabling a Field
Practical
Learning: Disabling a Field
|
Locking a Control |
During data entry, a user usually clicks an object to give it focus and starts typing. Some fields get an automatic number set and controlled by Microsoft Access. Some other fields use data created from an expression. These types of fields do not support data entry and their content cannot be changed directly by the user. In some other circumstances, you will create fields but would not like the user to be able to change their value. In such a case, you can lock the control. When a control is locked, the user cannot change its value or content. This characteristic is directly related to data entry and is therefore available on controls positioned on a form or report only (not on a table).
To lock a control, after selecting it in Design View, access its Locked property in the Properties window and set it to Yes. If the control was previous locked, you can unlock it by setting this property to No.
![]() Practical
Learning: Locking a Field
Practical
Learning: Locking a Field
Providing Basic Help on Windows Controls
|
Tool Tip |
A tool tip is a small border-less box that appears
when the mouse is positioned on top of a control for a few seconds. It is
a fast means of providing help to the user. Because only the form displays
controls in a manner suitable for them, a control can display a tool tip
only on a form.
To create a tool tip for a control, while in the
Design View of the form, access the Properties window for the object. In
the Other or the All tab, enter a string in the ControlTip Text
field.
![]() Practical
Learning: Setting Tool Tips
Practical
Learning: Setting Tool Tips
|
Status Bar Text |
In Lesson 8, we saw that when a cell of a table received focus, you could display a sentence on the status bar. In the same way, when the focus moves to a control on a form, you can provide some guidance or suggestion to the user using the status bar. Because not all controls can receive focus, not all controls can display text on the status bar when they receive focus.
To create a status bar text for a field on a form, while in Design View, access the Properties window for the control. In the Other or the All tab, enter a sentence in the Status Bar Text property.
If you create a form whose data is based on a form, the controls would receive the status bar text for the controls that had the Description property set in the table design. If a column did not have its Description property specified, the corresponding Windows control would not show some text on the status bar. In this case, if you want the control to display text on the status bar, you must create it.
![]() Practical
Learning: Setting Status Bar Text for Fields
Practical
Learning: Setting Status Bar Text for Fields
The Font on Windows Controls
|
Introduction |
We introduced and reviewed the fonts in the previous lesson. The characteristics of fonts can also be applied to the Windows controls of a form or report with even more flexibility. As mentioned for tables, Microsoft Access uses some default fonts to display the Windows controls on forms and reports. If you decide to change the default font on the controls of a form or report, avoid using fancy fonts. If you plan to distribute your database, use the most common fonts found on most computers. If you apply an unusual font and distribute your database, when it is installed on someone else's computers, the operating system would try to find the closest font match to your selection. It may find and apply a font that is not exactly what you intended. As a result, the forms and report may not appear the same way you wanted to display them.
|
The Font of a Control |
When you add a control or field to a form or a report, Microsoft Access applies a default font to display the captions and texts of the different controls. To make the form or the report more attractive, you can keep or change that font. Unlike a table, you can set or change the individual fonts of controls. This means that each control or each group of controls can have a font of your liking.
To change the font of a control, first display its form or report in Design View:
The font you apply to any control on a form or a report doesn't have any influence on the columns of the base table.
![]() Practical
Learning: Specifying the Fonts of Controls
Practical
Learning: Specifying the Fonts of Controls
|
The Font Size of a Control |
To change or set the size of the font used to display the characters of a label or a field on a form or a report:
The font you apply to any control on a form or a report doesn't have any influence on the columns of the base table.
When a font is installed, a set of font sizes is created in the Font Size combo box. You can use those numbers but you can also set a new one. To do this, instead of selecting a value in the Font Size combo box, type the desired number and press Enter or Tab. The operating system would calculate the size and apply it.
![]() Practical
Learning: Setting the Font Sizes of Controls
Practical
Learning: Setting the Font Sizes of Controls
|
The Text Style of a Control |
Besides the font applied to a control and the size specified for its text, you can also use a style. This allows you to make the text bold, to italicize, or to underline it. The font style applies only to a control that can display text. When you add a text-based control to a form or a report, by default, Microsoft Access applies the Regular font style to it. you can change this characteristic if you want.
To change the font style of a control, switch the form
or report to Design View. Select the control or the group of controls. On
the Ribbon, click either Home or Format. In the Text Formatting section of
the Home tab or in the Font section of the Format tab, click the button
that represents the desired style: Bold
![]() ,
Italic
,
Italic
![]() ,
or Underline
,
or Underline
![]() .
.
You can specify more than one style on a control. To
do this, click the button of the desired style. When a style is valid for
a control and if you click that control, the style button is highlighted:
![]() ,
,
![]() ,
or
,
or
![]() .
To remove a style, click the undesired button. To add a style to another
style, simply click the desired button. Based on this, you can one, two or
three buttons highlighted in the combination of your choice.
.
To remove a style, click the undesired button. To add a style to another
style, simply click the desired button. Based on this, you can one, two or
three buttons highlighted in the combination of your choice.
Instead of the buttons on the Ribbon, you can apply a style or a combination of styles using the Properties window. To do this, access the Properties window for the control. If you want to apply the style to many controls, select them and access the Properties window for the group of selected controls. In the Properties window, click either the Format or the All tab:
As reviewed for the style buttons on the Ribbon, you can apply various styles using the Properties window. To do this, access the Properties window for the control or the group of controls and use the Font Weight, the Font Italic, or the Font Underline properties to set the styles as desired.
![]() Practical Learning: Setting the Font Style of a Control
Practical Learning: Setting the Font Style of a Control
|
Text Alignment |
Most fields or controls of a database display text. This includes labels, text boxes, and combo boxes, etc. To enhance the appearance of the fields or controls, you can specify the alignment of text of a control. This property has three values: left, center, or right.
By default, the alignment of text-based fields, including any caption on a label, is set to the left (following US English). The alignment of fields that display numbers or dates is set to the right. If you don't like these suggestions or for any other reason, you can change the text alignment of a field or control.
There are various ways you can change text alignment. To assist you with aligning text of a control, the Ribbon is equipped with the Text Formatting section in the Home tab and the Font section in the Format tab. After selecting a control and while in Design View, to change the alignment of its text, in the Text Formatting section of the Home tab or the Font section of the Format tab of the Ribbon, you can click:
Instead of the Ribbon, you can use the Properties window. To do this, you can double-click the control to access its Properties window. If you want to apply the alignment to more than one control, select the group of controls and access the Properties window for the group. In the Properties window, click either the Format or the All tab. Click the arrow of the Text Align combo box and select the desired option.
The Colors on a Windows Control
|
Introduction |
In the previous lesson, we saw how the colors can be used to aesthetically enhance the appearance of a table. As their characteristics are available on Forms and reports, the Windows controls go even further. For example, when you change a color aspect on a table, the color is applied to all the columns. On the other hand, each control of a form or a report is treated as an individual object. Furthermore, each control presents various categories of colors that can be applied to different parts of its body, including its background or its borders.
|
Font Color |
Most controls on a form or report are meant to accept or display some text to the user. To enhance the appearance of such a control, you can customize the color of its text. By default, a control displays its text in black. If you want, you can make it display in another color:
Then:
Alternatively:

![]() Practical Learning: Setting Text Font on Fields
Practical Learning: Setting Text Font on Fields
|
The Background Color of a Control |
You can enhance the appearance of a control by changing its background color. This aspect can be applied only to the object that is selected or to the controls that are selected:
After selecting the control(s):
If you don't want a control to be painted with a particular color, you can make it transparent. To do this, first select the control(s) on the form or report. Then:

![]() Practical
Learning: Setting Background Color
Practical
Learning: Setting Background Color
|
The Border Color of a Control |
You can enhance the appearance of a control by painting its borders with a color of your choice. First select a control or a group of controls. Then:
|
Special Effects |
|
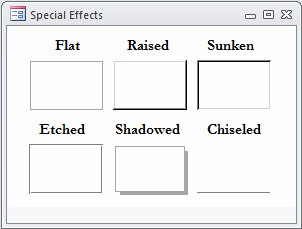
Classic Special Effects |
Besides the font and colors, the appearance of a control can be enhanced with various special effects. Microsoft Access (2010) presents two categories. Some special effects have been available since Microsoft Access 97. We refer to them as classic. They make a control appear raises or sunk, etc.
To apply the classic special effects, first select a control or a group of controls. Then:
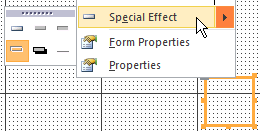
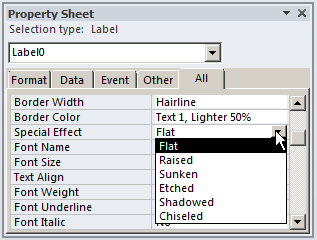
The available options are:
![]() Practical Learning: Using Special Effects
Practical Learning: Using Special Effects

|
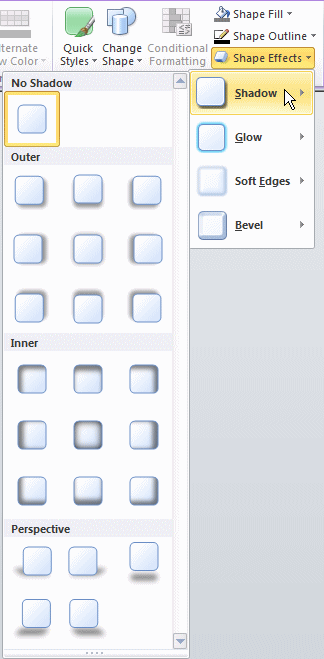
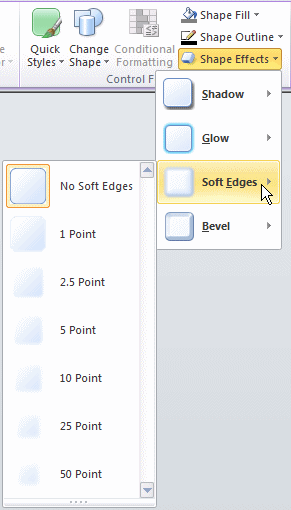
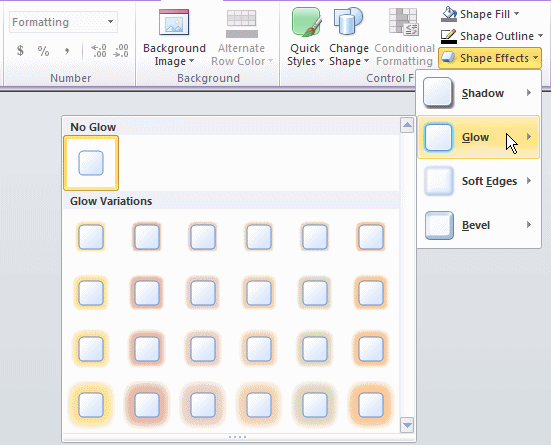
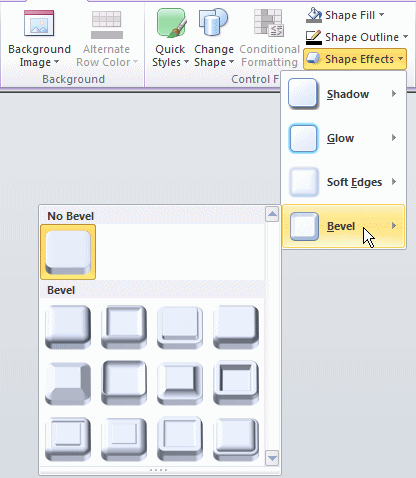
Enhanced Special Effects |
Microsoft Office Access 2010 brought new special effects available to some controls. To apply these new special effects, first select a control or a group of controls. Then, on the Ribbon, click Format. In the Control Formatting section, click the Special Effects button, position the mouse on one of the options and click the desired effect:
 |
 |
The Borders of a Windows Control
|
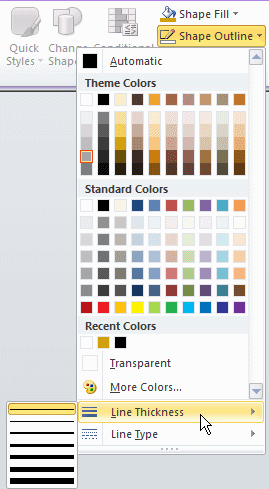
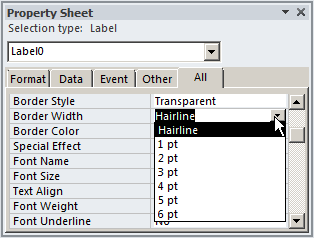
The Thickness of a Border |
To indicate its limits, a control is surrounded by a border. By default, the border appears as a solid line. If you want, you can control how the border of a control is drawn. To specify the thickness of the borders of a control or a group of controls, first select it or select them. Then:
|
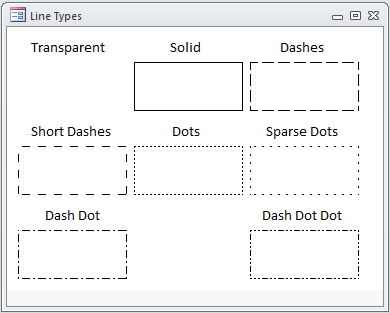
The Line Type of a Border |
Besides the thickness, you can control the border of an object with a certain style. To do this, first select the control or a group of controls. Then
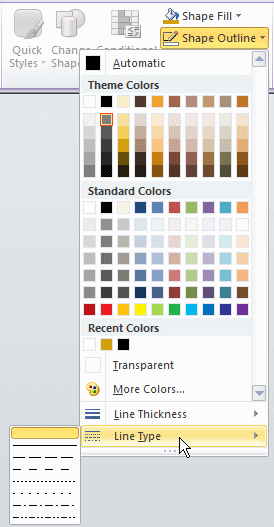
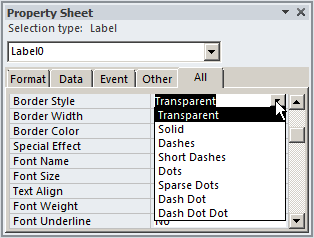
The available options are:
The Border Style characteristic can be used in combination with the Special Effect property. Some of these effects depend on the Special Effect value and may not appear as expected.
The Border Color property can be used to control the color used to draw the border of a label or a field. It is used as we described for the Fore Color property.
The Border Width property is used as the Line/Border Width button of the Formatting toolbar.