Sealing a Class

Sealing a Class
A Sealed Class
Introduction
A sealed class is a class that cannot serve as a base class in inheritance. That is, you cannot derive a class from a sealed class.
![]() Practical Learning: Introducing Static Classes
Practical Learning: Introducing Static Classes
body {
    background-color: white;
}

.centered                { text-align:       center;         }
.content                 { width:            450px;
                           margin:           auto;           }
.summary                 { width:            300px;
                           margin:           auto;           }
input[type=text]         { width:            80px;
                           float:            right;
                           height:           28px;
                           border:           1px solid gray; }
input[type=text]:focus   { outline:          2px solid blue; }
.main-title              { width:            450px;
                           margin:           auto;
                           border-bottom:    2px solid gray; }
input[type=submit]       { border:           0;
                           border-radius:    6px;
                           font-size:        14px;
                           width:            130px;
                           margin-left:      100px;
                           background-color: blue;
                           padding:          0.75em;
                           color:            lightblue;      }
input[type=submit]:hover { color:            white;
                           cursor:           pointer;
background-color: navy; }namespace PayrollPreparation11.App_Code
{
public class Calculations
{
}
}Static Classes
As seen in previous lessons, a static class is a class marked with the static keyword and whose all members are static. When a class has been made static, no class can be derived from it. This means that when you create a static class, it becomes automatically sealed.
![]() Practical Learning: Creating a Static Class
Practical Learning: Creating a Static Class
namespace PayrollPreparation11.App_Code
{
    public static class Calculations
    {
        public static double Add(double a, double b)
        {
            return a + b;
        }

        public static double Add5(double a, double b, double c, double d, double e)
        {
            return a + b + c + d + e;
        }

        public static double Subtract(double a, double b)
        {
            return a - b;
        }

        public static double Multiply(double a, double b)
        {
            return a * b;
        }
    }

    public class Operations : Calculations
    {
    }
}namespace PayrollPreparation11.App_Code
{
public static class Calculations
{
public static double Add(double a, double b)
{
return a + b;
}
public static double Add5(double a, double b, double c, double d, double e)
{
return a + b + c + d + e;
}
public static double Subtract(double a, double b)
{
return a - b;
}
public static double Multiply(double a, double b)
{
return a * b;
}
}
}Sealing a Class
A regular class, that is, a non-static class, can be sealed so it would not act as a base class for another class. To let you seal a class, the C# language provides the sealed keyword. Therefore, to seal a class, type the sealed keyword to the left of the class keyword.
If the class is marked with an access modifier, the sealed keyword can appear before or after the access modifier. Here are examples:
sealed public class TimeWorked
{

}

public sealed class WorkingTime
{

}
A class that is derived from another can also be sealed. Here is an example:
public abstract class Triangle
{
}

sealed public class Irregular : Triangle
{
}
Remember that once a class is sealed, it cannot serve as a parent of another class. As an alternative, the class can be used to create a property in another class that would use it as a pseudo-parent.
![]() Practical Learning: Creating a Sealed Class
Practical Learning: Creating a Sealed Class
namespace PayrollPreparation11.App_Code
{
    public sealed class Payroll
    {
        private double hSalary;
        private double timeSpecified;

        public Payroll(double salary, double time)
        {
            hSalary = salary;
            timeSpecified = time;
        }

        public double HourSalary
        {
            get { return hSalary; }
            set { hSalary = value; }
        }

        public double OvertimeSalary
        {
            get { return Calculations.Multiply(hSalary, 1.50); }
        }

        public double RegularTime
        {
            get
            {
                if (timeSpecified <= 40.00)
                    return timeSpecified;
                else
                    return 40.00;
            }
        }

        public double Overtime
        {
            get
            {
                if (timeSpecified <= 40.00)
                    return 0.00;
                else
                    return Calculations.Subtract(timeSpecified, 40.00);
            }
        }

        public double RegularPay
        {
            get
            {
                return Calculations.Multiply(hSalary, RegularTime);
            }
        }

        public double OvertimePay
        {
            get
            {
                return Calculations.Multiply(OvertimeSalary, Overtime);
            }
        }

        public double NetPay
        {
            get
            {
                return Calculations.Add(RegularPay, OvertimePay);
            }
        }
    }

    public class TimeSheet : Payroll
    {

    }
}namespace PayrollPreparation11.App_Code
{
public sealed class Payroll
{
private double hSalary;
private double timeSpecified;
public Payroll(double salary, double time)
{
hSalary = salary;
timeSpecified = time;
}
public double HourSalary
{
get { return hSalary; }
set { hSalary = value; }
}
public double OvertimeSalary
{
get { return Calculations.Multiply(hSalary, 1.50); }
}
public double RegularTime
{
get
{
if (timeSpecified <= 40.00)
return timeSpecified;
else
return 40.00;
}
}
public double Overtime
{
get
{
if (timeSpecified <= 40.00)
return 0.00;
else
return Calculations.Subtract(timeSpecified, 40.00);
}
}
public double RegularPay
{
get
{
return Calculations.Multiply(hSalary, RegularTime);
}
}
public double OvertimePay
{
get
{
return Calculations.Multiply(OvertimeSalary, Overtime);
}
}
public double NetPay
{
get
{
return Calculations.Add(RegularPay, OvertimePay);
}
}
}
}<!DOCTYPE html>
<html>
<head>
<title>Payroll Preparation</title>
<link rel="stylesheet" type="text/css" href="~/Content/PayrollPreparation.css" />
</head>
<body>
@{
double friday = 0.00;
double salary = 0.00;
double monday = 0.00;
double tuesday = 0.00;
double thursday = 0.00;
double totalTime = 0.00;
double wednesday = 0.00;
PayrollPreparation11.App_Code.Payroll preparation = new PayrollPreparation11.App_Code.Payroll(0.00, 0.00);
if (IsPost)
{
salary = Convert.ToDouble(Request["HourlySalary"]);
monday = Convert.ToDouble(Request["Monday"]);
tuesday = Convert.ToDouble(Request["Tuesday"]);
wednesday = Convert.ToDouble(Request["Wednesday"]);
thursday = Convert.ToDouble(Request["Thursday"]);
friday = Convert.ToDouble(Request["Friday"]);
totalTime = PayrollPreparation11.App_Code.Calculations.Add5(monday, tuesday, wednesday, thursday, friday);
preparation = new PayrollPreparation11.App_Code.Payroll(salary, totalTime);
}
}
<h1 class="main-title centered">Payroll Preparation</h1>
<br>
<form name="PayrollPreparation" method="post">
<div class="content">
<table>
<tr>
<td>Hourly Salary:</td>
<td><input type="text" name="HourlySalary" value=@salary /></td>
</tr>
</table>
<hr />
<table>
<tr>
<td>Monday</td>
<td>Tusday</td>
<td>Wednesday</td>
<td>Thursday</td>
<td>Friday</td>
</tr>
<tr>
<td><input type="text" name="Monday" value=@monday /></td>
<td><input type="text" name="Tuesday" value=@tuesday /></td>
<td><input type="text" name="Wednesday" value=@wednesday /></td>
<td><input type="text" name="Thursday" value=@thursday /></td>
<td><input type="text" name="Friday" value=@friday /></td>
</tr>
</table>
</div>
<p style="text-align: center"><input type="submit" name="txtCalculate" value="Calculate" /></p>
<div class="summary">
<table>
<tr>
<td> </td>
<td style="text-align: center">Time</td>
<td style="text-align: center">Pay</td>
</tr>
<tr>
<td>Regular:</td>
<td style="text-align: center"><input type="text" name="RegularTime" value=@preparation.RegularTime.ToString("F") /></td>
<td style="text-align: center"><input type="text" name="RegularPay" value=@preparation.RegularPay.ToString("F") /></td>
</tr>
<tr>
<td>Overtime:</td>
<td style="text-align: center"><input type="text" name="Overtime" value=@preparation.Overtime.ToString("F") /></td>
<td style="text-align: center"><input type="text" name="OvertimePay" value=@preparation.OvertimePay.ToString("F") /></td>
</tr>
<tr>
<td>Total:</td>
<td style="text-align: center"><input type="text" name="TotalTime" value=@totalTime.ToString("F") /></td>
<td style="text-align: center"><input type="text" name="TotalPay" value=@preparation.NetPay.ToString("F") /></td>
</tr>
</table>
</div>
</form>
</body>
</html>


body {
    background-color: #FFF;
}

.centered                { text-align:       center;        }
.main-title              { border-bottom:   1px solid gray; }
.container               { margin:           auto;
                           width:            620px;         }
input[type=text]         { padding:          10px 10px;
                           margin:           10px 0;
                           box-sizing:       border-box;    }
input[type=submit]       { width:            150px;
                           padding:          10px 10px;
                           border-radius:    10px;
                           background-color: #6a0505;
                           color:            white;         }
input[type=submit]:hover { color:            antiquewhite;
background-color: #900c0c; }namespace Geometry17.App_Code
{
public class Quadrilateral
{
public virtual double CalculateArea()
{
return 0.00;
}
}
}using System;
namespace Geometry17.App_Code
{
public class Rhombus : Quadrilateral
{
public double Horizontal { get; set; }
public double Vertical { get; set; }
public Rhombus(double length, double high)
{
Vertical = high;
Horizontal = length;
}
}
}Characteristics of a Sealed Class
If you use the sealed keyword on a class, the whole class becomes sealed, but you may not want the whole class to be sealed. Sometimes, you may want only some members to be sealed.
One of the charateristics of inheritance is that a derived class can provide a new behavior of a parent's method. This can be done by overriding a method of the parent. Sometimes when creating a non-sealed class, you may want to prevent the deriving class(es) from overriding a certain method. In this case, you can seal the method. A sealed method is one doesn't allow deriving classes to override it.
If you create a new method in a derived class, that is, a method that does not exist in the parent class, you cannot seal it. This means that you can seal only a method that can be overridden. Therefore, before sealing a method, you must first create it in a class. You must mark that method as abstract or virtual.
Remember that, in a derived class, you must override every parent's abstract or virtual method. To seal a method, in the derived class, precede the return type by the sealed keyword. The sealed keyword can appear before or after override. Here are examples:
using System;

public abstract class RoundShape
{
    public virtual  double Radius { get; set; }
    public abstract double Diameter { get; }
}

public class Circle : RoundShape
{
    private double rad;

    public sealed override double Radius // sealed before override
    {
        get
        {
            return this.rad;
        }

        set
        {
            this.rad = value;
        }
    }

    public override sealed double Diameter // override before sealed = same thing
    {
        get
        {
            return this.rad * 2;
        }
    }
}
![]() Practical Learning: Creating a Sealed Method
Practical Learning: Creating a Sealed Method
using System;
namespace Geometry17.App_Code
{
public class Rhombus : Quadrilateral
{
public double Horizontal { get; set; }
public double Vertical { get; set; }
public Rhombus(double length, double high)
{
Vertical = high;
Horizontal = length;
}
public sealed override double CalculateArea()
{
return Horizontal * Vertical / 2.00;
}
}
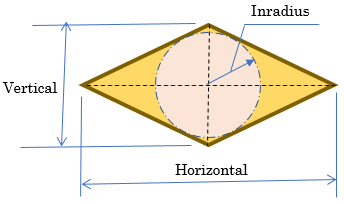
}A property from a class A is said to be sealed if no class B deriving from class A is allowed to provide a new version of the property.
As seen for a method, before creating a sealed property, its class must be derived from another class. Here is an example of such as class created as abstract:
public abstract class RoundShape
{
    public virtual  double Radius { get; set; }
    public abstract double Diameter { get; }
}
Of course, you must derive a class from such as class. Before sealing a property, you must override it from the parent class. That is, you must mark the property in the derived class as override. To seal a property, type the sealed keyword close to the override keyword. The sealed keyword can appear before or after override.
![]() Practical Learning: Creating a Sealed Property
Practical Learning: Creating a Sealed Property
namespace Geometry17.App_Code
{
    public class Quadrilateral
    {
        public virtual double CalculateArea()
        {
            return 0.00;
        }

        public virtual double Inradius { get; }
    }
}using static System.Math; namespace Geometry17.App_Code { public class Rhombus : Quadrilateral { public double Horizontal { get; set; } public double Vertical { get; set; } public Rhombus(double length, double high) { Vertical = high; Horizontal = length; } public sealed override double CalculateArea() { return Horizontal * Vertical / 2.00; } public override sealed double Inradius { get { if( (Horizontal == 0.00) || (Vertical == 0.00) ) return 0.00; // http://mathworld.wolfram.com/Rhombus.html return (Horizontal * Vertical) / (2.00 * Sqrt((Horizontal * Horizontal) + (Vertical * Vertical))); } } } }
<!DOCTYPE html>
<html>
<head>
<title>Geometry - Rhombus</title>
<link rel="stylesheet" type="text/css" href="~/Content/Geometry.css" />
</head>
<body>
@{
double horizontal = 0.00;
double vertical = 0.00;
Geometry17.App_Code.Rhombus quad = new Geometry17.App_Code.Rhombus(0.00, 0.00);
if (IsPost)
{
horizontal = Convert.ToDouble(Request["Horizontal"]);
vertical = Convert.ToDouble(Request["Vertical"]);
quad = new Geometry17.App_Code.Rhombus(length: horizontal, high: vertical);
}
}
<div class="container">
<h1 class="centered main-title">Geometry - Rhombus</h1>
<form name="Geometry" method="post">
<table>
<tr>
<td style="width: 380px" rowspan="9">
<img src="~/Images/Rhombus.png" width="344" height="204" alt="Geometry - Rhombus">
</td>
<td style="width: 150px">Horizontal:</td>
<td><input type="text" name="Horizontal" value="@horizontal" /></td>
</tr>
<tr>
<td>Vertical:</td>
<td><input type="text" name="Vertical" value="@vertical" /></td>
</tr>
<tr>
<td> </td>
<td class="centered"><input type="submit" name="btnSubmit" value="Calculate" /></td>
</tr>
<tr>
<td>Height:</td>
<td><input type="text" name="Inradius" value="@quad.Inradius" /></td>
</tr>
<tr>
<td>Area:</td>
<td><input type="text" name="TotalArea" value="@quad.CalculateArea()" /></td>
</tr>
</table>
</form>
</div>
</body>
</html>


Built-In Classes: The Object Class
Introduction
The .NET Framework is a huge library made of various classes and constants you can directly use in your C# project, sometimes without necessarily explicitly loading an external library.
To assist you with creating effective classes, the .NET Framework provides a vast collection of classes in various categories and for different goals. Some of the classes are abstract, which means you can only use classes derived from them. Many other classes are sealed, created either as formally sealed or static.
To start, the main library of C# provides a class called object. When you create a class in your C# project, your class automatically inherits its primary characteristics from the parent of all classes: object.
Equality of Two Class Variables
When you declare and initialize two variables, one of the operations you may want to subsequently perform is to compare their values. To support this operation, the Object class provides its children with a method named Equals. The Equals() method comes in two versions. The first has the following syntax:
public virtual bool Equals(object obj);
This version allows you to call the Equals() method on a declared variable and pass the other variable as argument. Here are examples:
using static System.Math;
using System.Collections.Generic;
using System.Linq;
using System.Web;

namespace Geometry17.App_Code
{
    public class Rhombus : Quadrilateral
    {
        public double Horizontal { get; set; }
        public double Vertical { get; set; }

        public Rhombus(double length, double high)
        {
            Vertical = high;
            Horizontal = length;
        }

        public sealed override double CalculateArea()
        {
            return Horizontal * Vertical / 2.00;
        }

        public override sealed double Inradius
        {
            get
            {
                if( Horizontal.Equals(0.00) )
                    return 0.00;

                if( Vertical.Equals(0.00) )
                    return 0.00;

                if( Horizontal.Equals(Vertical) )
                    return 0.00;

                // http://mathworld.wolfram.com/Rhombus.html
                return (Horizontal * Vertical) / (2.00 * Sqrt((Horizontal * Horizontal) + (Vertical * Vertical)));
            }
        }
    }
}
The first version of the Object.Equals method is declared as virtual, which means you can override it if you create your own class. The second version of the Object.Equals() method is:
public static bool Equals(object obj2, object obj2);
As a static method, to use it, you can pass the variables of the two classes whose values you want to compare. Here are examples:
using static System.Math;
using System.Collections.Generic;
using System.Linq;
using System.Web;

namespace Geometry17.App_Code
{
    public class Rhombus : Quadrilateral
    {
        public double Horizontal { get; set; }
        public double Vertical { get; set; }

        public Rhombus(double length, double high)
        {
            Vertical = high;
            Horizontal = length;
        }

        public sealed override double CalculateArea()
        {
            return Horizontal * Vertical / 2.00;
        }

        public override sealed double Inradius
        {
            get
            {
                if( object.Equals(Horizontal, 0.00) )
                    return 0.00;

                if( object.Equals(Vertical, 0.00) )
                    return 0.00;

                if( object.Equals(Horizontal, Vertical) )
                    return 0.00;

                // http://mathworld.wolfram.com/Rhombus.html
                return (Horizontal * Vertical) / (2.00 * Sqrt((Horizontal * Horizontal) + (Vertical * Vertical)));
            }
        }
    }
}
In both cases, if the values of the variables are similar, the Equals() method returns true. If they are different, the method returns false. If you are using the Equals() method to compare the variables of two primitive types, the comparison should be straight forward. If you want to use this method on variables declared from your own class, you should provide your own implementation of this method.
Stringing an Object
In previous lessons, we learned that, to convert the value of a variable declared from a primitive type to a string, you could call the ToString() method of that variable. To support this operation, the Object class provides an a method named ToString. It syntax is:
public virtual string ToString();
Although the Object class provides this method as non abstract, its implemented version is more useful if you use a primitive type such as int or decimal. Probably the best way to rely on this method is to override it in your own class. Here is an example:
abstract public class Vehicle
{
    public string Make  { get; set; }
    public string Model { get; set; }
    public int    Year  { get; set; }
}

public class Van : Vehicle
{
    public override string ToString()
    {
        return this.Year + " " + this.Make + " " + this.Model;
    }
}
Boxing and Un-Boxing
When we studied inheritance, we learned that all data types used in a C# program are "based on" an object called object. As mentioned alreardy, you can use this data type to declare a variable that would hold any type of value. Because this is some type of a "universal" data type, it can also be initialized with any value. Here are examples:
@{
    object Number = 244;
    object Thing  = "Professor Kabba";
}
When an object variable is initialized, the compiler finds out the type of value that was assigned to it. This is referred to as boxing. This mechanism is transparently done in C# (and in Visual).
If you declare a variable using a primitive data type (decimal or int, etc), at one time, you may be interested in converting the value of that variable into an object. Here is an example:
@{
    int Number = 244;

	object Thing  = Number;
}
This operation is referred to as unboxing. As you can see, this operation is performed transparently.
Finalizing a Variable
While a constructor, created for each class, is used to instantiate a class, the object class provides the Finalize() method as a type of destructor.
![]() Practical Learning: Ending the Lesson
Practical Learning: Ending the Lesson
|
|
||
| Previous | Copyright © 2002-2019, FunctionX | Next |
|
|
||