|
A TreeView consists of displaying a hierarchical view of items arranged in
a parent-child format. It is typically used to show items that belong to interrelated categories,
such as parent to child and child to grandchild, etc; or folder to subfolder to file.
The starting item of the tree is called the Root and illustrates the beginning
of the tree. Each item, including the root, that belongs to the tree is referred to as a node.
In the following charts, the down arrow  means, "has the following child or children"
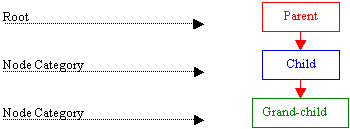
A TreeView is not limited to a one-to-one correspondence. Not only can an item
have more than one dependency, but also a child can make the tree stop at any category. Categories of a
TreeView are organized by levels. The most used trees have one parent called the root;
then under the root start the dependents.
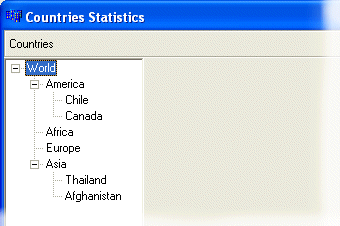
Here is an example representing the world and some countries:

The children of a parent are recognized by their belonging to the same level
but can have different behaviors; for example, while one child might have another child (or other
children), an item on the same level does not necessarily abide by a set rule. Everything usually
depends on the tree designer.
Consider the following tree:

|
 Practical Learning: Preparing a Tree View
|
|
- Create a new project with its starting form.
- To save the project, on the Standard toolbar, click Save All
- Locate the folder where the exercises are selected.
- Click the Create New Folder button, type Countries and press Enter twice to display the new folder in the Save In combo box.
- Click Save twice to save the unit and the project names.
- Change the caption of the form to Countries Statistics
- From the Standard tab of the Component Palette, double-click the Panel
control

- Set the following properties: Align = alTop, Alignment =
taLeftJustify, BevelInner = bvRaised, bvOuter =
bvLowered, Height = 28
- To type the caption, click the Caption field, press Delete, press Space, and type
Countries
- Click an unoccupied area of the form to deselect the panel
- From the Standard tab, double-click the Panel control again.
- Set its Align property to alBottom, its BevelOuter to
bvLowered, delete the value of its Caption, and set its Height to 20
C++ Builder provides an exceptional way of creating a tree view at design time; in other words, you can create a complete tree view without writing a single line of
code.
A member of a TreeView is called a node. Visually, a node on a TreeView displays its text in one of two states: selected or not selected. On another visual front, a node has a child or it is standing alone. When a node has a child, it displays a + (collapsed) or – (expanded). These last two details will be important because at times you will need to know whether a node is selected or not, whether a node has a child or not. The first issue is to know how to create a
TreeView and how to assign a child or children to a node.
To create a tree view, use the TreeView control from the Win32 tab of
the Component Palette. After placing the control on the form, create its children using the
Items property. To include pictures on your tree, use an ImageList control.
|
 Practical Learning: Designing a Tree View
|
|
- Click in the middle of the form. On the Win32 tab of the Component Palette
double-click the TreeView control
- While the new TreeView1 control is still selected, on the Object Inspector, set its
Align property to alLeft and its Width to 140
- Click the Items field and click its ellipsis button

- On the TreeView Items Editor dialog box, click the New Item button
- Type World and press Enter
- Type Universe
- On the dialog box, click Universe and click Delete
- Click World and click the New Subitem button.
- Type America and press Enter
- Type Africana and press Enter
- Type Europe
- Click Africana and using the Text edit box, edit it to display Africa and press Enter
- Type Asia
- Click America and click New Subitem
- Type Chile and press Enter.
- Type Canada
- Click Asia and click New Subitem
- Type Thailand and press Enter
- Type Afghanistan
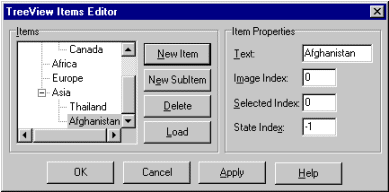
- Click OK.
- To test the tree view, press F9
- Notice the + sign on the World item.
- Click + and notice the – sign.
- Click the other + signs to expand the tree items and click the – buttons
- After using the form, close it and save the project
- To use some images, make sure the Component Palette displays the Win32 tab. Click the ImageList control.
- Click anywhere on the form.
- On the form, double-click the ImageList button
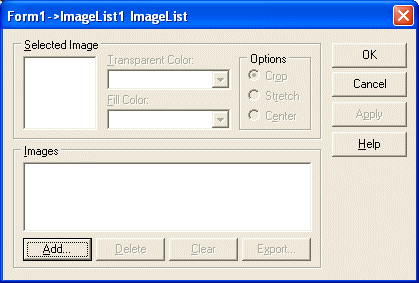
- On the Form1->ImageList1 ImageList dialog box, click the Add button.
- Locate the folder where the exercises are located and display the Bitmaps folder.
- Click World and click Open
- Repeat the same process to add Band, Dans, Category, Insert, and Records

- Click OK.
- On the form, click TreeView1 to select it.
- On the Object Inspector, set the Images property to ImageList1.
- While the tree view control is still selected, click the Items field and click its ellipsis button.
- On the TreeView Items Editor dialog box, click World to select it. Set its
Image Index to 0 and its Selected Index to
1
- Click the + on World to expand it.
- Click America to select it.
- Set its Image Index to 2 and its Selected Index to 3
- Set the other images according to the following table:
|
Item – Text |
Image Index |
Selected Index |
|
World |
0 |
1 |
|
America / Africa/ Europe / Asia |
2 |
3 |
|
Chile / Canada / Thailand / Afghanistan |
4 |
5 |
- Click OK
- To test the TreeView, press F9
- Click the various + to expand and click items to select them. Notice the change of
graphics
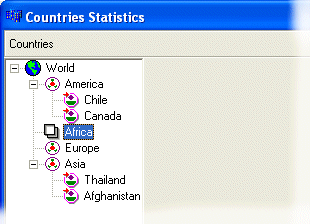
- After using the form, close it and save the application
|
Programmatically Creating a TreeView |
|
C++ Builder provides three classes equipped with various properties and functions to deal with a
tree view. The basic class that manages the TreeView control is the TTreeView. This class controls the visual settings such as background color, borders,
dimensions, etc. Each node is managed by the
TTreeNode class. The class is used as a descriptor of the control. For example, it can be used to find out what node is selected, whether the node is expanded or collapsed, whether a node has children. The
TTreeNodes class is used to manage a TreeView; it combines various operations such as creating the
treeview, adding, inserting or deleting nodes, or updating the list of items.
To create a tree view, position a TreeView control on the form (although you can still create it completely with code). Once the control is placed, you can customize its window settings derived from the
TControl class. The nodes are usually created from the OnCreate event of the host form.
|
 Practical Learning: Programmatically Creating a Tree View
|
|
- Create a new project with its starting form.
- On the Win32 tab of the Component Palette
double-click the TreeView control
- While the new TreeView control is still selected, set its Align property to alLeft and its width to
175
- To create the treeview, double-click an unoccupied area of the form to access the form’s OnCreate event.
- Implement the event as follows:
//---------------------------------------------------------------------------
void __fastcall TForm1::FormCreate(TObject *Sender)
{
    // The root node
    TreeView1->Items->Add(NULL, "World");

    // First child and its children
    TreeView1->Items->AddChild(TreeView1->Items->Item[0], "Africa");
    TreeView1->Items->AddChild(TreeView1->Items->Item[1], "Botswana");
    TreeView1->Items->AddChild(TreeView1->Items->Item[1], "Benin");

    // Second child and its children
    TreeView1->Items->AddChild(TreeView1->Items->Item[0], "Europe");
    TreeView1->Items->AddChild(TreeView1->Items->Item[4], "Belgium");
    TreeView1->Items->AddChild(TreeView1->Items->Item[4], "Denmark");
    TreeView1->Items->AddChild(TreeView1->Items->Item[4], "Poland");

    // Third child and its children
    TreeView1->Items->AddChild(TreeView1->Items->Item[0], "America");
    TreeView1->Items->AddChild(TreeView1->Items->Item[8], "Panama");
    TreeView1->Items->AddChild(TreeView1->Items->Item[8], "Colombia");

    // Fourth child and its children
    TreeView1->Items->AddChild(TreeView1->Items->Item[0], "Asia");
    TreeView1->Items->AddChild(TreeView1->Items->Item[11], "Bangladesh");
}
//---------------------------------------------------------------------------
|
- To test the treeview, press F9.
- Expand the various nodes to display their children
- Close the form.
- To implement a more professional treeview creation, change the listing of the OnCreate event as follows:
//---------------------------------------------------------------------------
void __fastcall TForm1::FormCreate(TObject *Sender)
{
    TTreeNode *World, *Continent;

    // The root node
    TreeView1->Items->Add(NULL, "World");
    World = TreeView1->Items->Item[0];

    // First child of the root
    TreeView1->Items->AddChild(World, "Africa");
    Continent = TreeView1->Items->Item[1];

    // Children of first node
    TreeView1->Items->AddChild(Continent, "Botswana");
    TreeView1->Items->AddChild(Continent, "Benin");

    // Second child of the root
    TreeView1->Items->AddChild(World, "Europe");
    Continent = TreeView1->Items->Item[4];

    // Children of second node
    TreeView1->Items->AddChild(Continent, "Belgium");
    TreeView1->Items->AddChild(Continent, "Denmark");
    TreeView1->Items->AddChild(Continent, "Poland");

    // Third child of the root
    TreeView1->Items->AddChild(World, "America");
    Continent = TreeView1->Items->Item[8];

    // Children of the third node
    TreeView1->Items->AddChild(Continent, "Panama");
    TreeView1->Items->AddChild(Continent, "Colombia");

    // Fourth child of the root
    TreeView1->Items->AddChild(World, "Asia");
    Continent = TreeView1->Items->Item[11];

    TreeView1->Items->AddChild(Continent, "Asia");
    TreeView1->Items->AddChild(Continent, "Bangladesh");
}
//---------------------------------------------------------------------------
|
- To display the form, press F12.
We have seen than a tree view's nodes are created from a combination of the TTreeNode and the TTreeNodes
classes. The images associated with nodes are handled by the Images property from the
TCustomTreeView class.
To use images on a treeview, first include an ImageList control to the form. Using the Form ImageList dialog box, add the desired images to the list of images. Note the position of each image in the
list because you will need to know the position of each image.
To associate an image to a node, first declare a TTreeNode object and set or assign it a position. The
TTreeNode object needs to know the position of the node for almost any operation that node will be involved in. The most important property related to an image is the
ImageIndex; this is the position of the image on the list created previously. The other image you might be interested in is the
Selected Index: this informs the
TreeNode object about the position of the image the node will display when selected.
|
 Practical Learning: Adding Pictures to a Tree View
|
|
- To add some pictures to the treeview, from the Win32 tab, double-click the ImageList to add it to the form.
- On the form, double-click the ImageList icon
- Click Add.
- From the Icons folder, include the following icons: Options, World,
Target, Dans, Botswana, Belgium, Denmark, and Columbia.
- Click OK
- On the form, click the TreeView control.
- On the Object Inspector, set the Images field to ImageList1.
- To assign the images to the appropriate nodes, at the end of the OnCreate
even, just before the closing curly bracket, type the following:
//---------------------------------------------------------------------------
void __fastcall TForm1::FormCreate(TObject *Sender)
{
    TTreeNode *World, *Continent;

 	...

    TreeView1->Items->Item[2]->ImageIndex = 4;
    TreeView1->Items->Item[5]->ImageIndex = 5;
    TreeView1->Items->Item[6]->ImageIndex = 6;
    TreeView1->Items->Item[10]->ImageIndex = 7;
}
//---------------------------------------------------------------------------
|
- To test the treeview, press F9
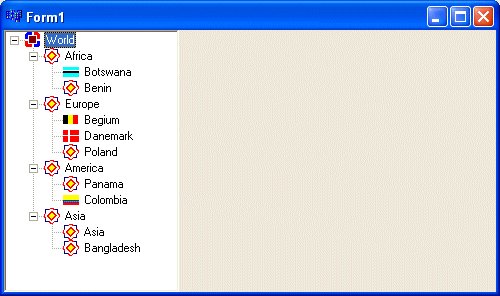
- After viewing and using the form, close it.
|
|


