Introduction to Corel Quattro Pro


Introduction

 
Corel Quattro Pro is a spreadsheet application used to process business and financial transactions of various kinds. To carry its various tasks, Corel Quattro Pro organizes each one of its notebooks into worksheets. You can have just one worksheet in a notebook or you can have a lot of worksheets in a notebook.

When Corel Quattro Pro starts, it is ready to receive your instructions. The application opens with an empty document, impressive and quite unfamiliar the first time you launch it. If you are new to this kind of spreadsheet application, you will feel comfortable in no time. First, get acquainted with the interface, spend some time using the software; that's how you will build your experience.
 

Meet Corel Quattro Pro

 
To start Corel Quattro Pro, from the Taskbar, click Start -> Programs -> WordPerfect Office 2002 -> Quattro Pro 10:


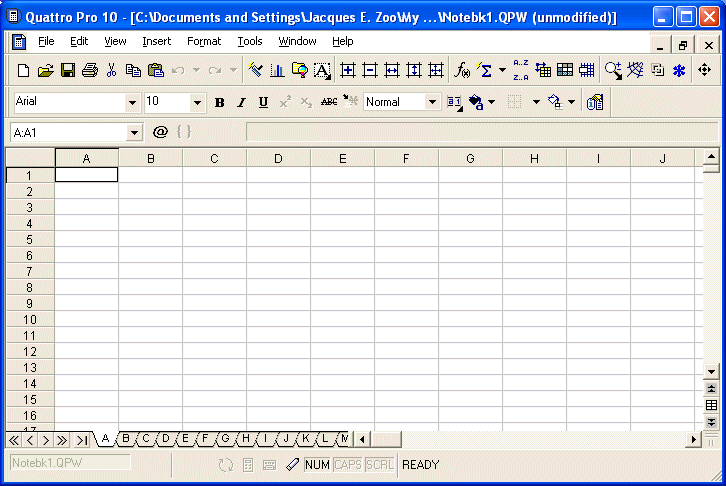
Quattro Pro is a classic computer application. On top of the application, you see the title bar with a small icon on the left side:

Right to this system icon is the name of the program, in this case, Quattro Pro 10. The application's name is followed by the location of the Notebook, including its name, notebk1.QPW

Quattro Pro identifies each one of its files as a notebook, and by default, a starting document in Corel Quattro Pro is called notebk1.

Corel Quattro Pro is a Multiple Document Interface (MDI), which means that you can open more that one file, more than one notebook, inside the application. Therefore, if you create or initialize more than one notebook in Quattro Pro, subsequent notebooks would be called notebk2, notebk3, notebkX.


Practical Learning: Introduction to Quattro Pro

  1. To see what you can do with the title bar, double-click on the title bar.
  2. To restore the application, double-click the title bar again.
  3. The File menu allows you to create either a new empty notebook or a notebook based on one of the templates that ships with the application. You can also use the File menu to save the current notebook, to close the current file, or to configure or initialize printing. The File menu allows you to perform other various actions.
    To see the File menu, click File
  4. Besides the File menu, there are other menu items that allow you to do many other things. For example, while the File menu is still displaying, position the mouse on Tools, move the mouse down and click Settings.
  5. From the Options dialog box, click the General property sheet:
  6. Click Display
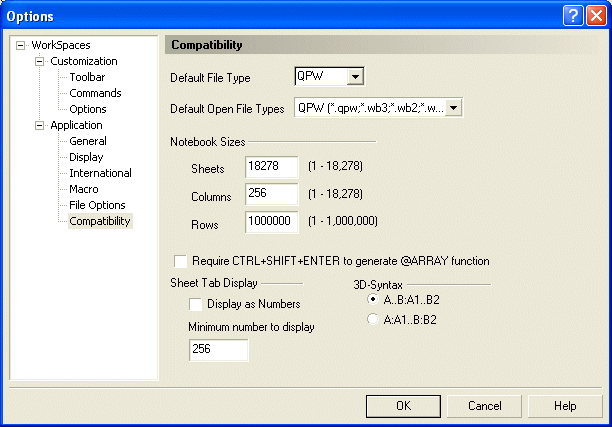
  7. Click Compatibility:
     
  8. Click Cancel.
  9. There are various categories of menus in Quattro Pro (and in most other applications). Let's review five of the most popular.
    a) A menu that stands by itself will perform a simple action, some of those actions even occur behind the scenes, sometimes giving you the impression that nothing happened when you clicked them. Examples of such menus include File -> Save, Format -> Default, etc (The File -> Save menu will behave like the next category if the notebook has not been saved yet).
    To see an example, on the main menu, click Edit -> Copy
  10. Notice that (apparently) nothing happened. In later lessons, we will find what happens with some of these actions.
  11. b) Another category of menu consists of one that is gray. A gray menu indicates that the action that is associated with it is not possible at this time; therefore, the menu is disabled. Such a menu would depend on another, intermediary action.
    To see an example, on the main menu, click Edit and observe that the Undo and Redo menu items are disabled.
  12. While the Edit menu is still opened, click Redo and notice that nothing happens.
  13. Click the Edit menu again to close it
  14. c) There is another category of menu: those that have three dots on their line. The three dots on the menu indicate that this menu will require an intermediary action. As a result, most menus that display three dots would call a dialog when you click them.
    To see an example, click File, observe that the Open... sub-menu has three dots, just like the Save As..., and the Page Setup...
  15. To see an example, on the main menu, click Format and notice the various sub-menus with three dots.
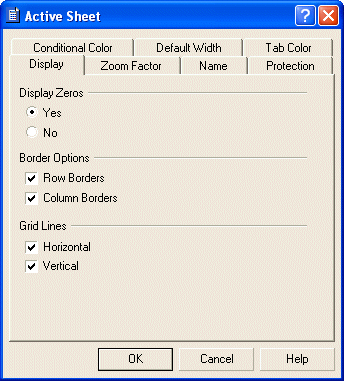
  16. Click Sheet Properties...:
  17. Click Cancel.
  18. d) Some menu items have a right pointing arrow. You don't need to click these menus, the arrow means that they have a sub-menu; just position your mouse on them and you will have access to the sub-menu.
    To see an example, on the main menu, click File, then position your mouse on Notebook Group. Observe the sub-menus.
  19. Position the mouse on Send To and observe the sub-menus. To dismiss the menu, click File again.
  20. e) The last category of menus have either a check mark or a radio button.
     
    A radio button is a big round dot that appears on the menu. A radio button is used in a group of items where only one item of the group can be selected. The radio button indicates which item of the group is selected at this time.
    To see an example, on the main menu, click View and observe the group of views.
  21. Notice that, currently, the Draft View is selected.
    Click Objects Page
  22. On the main menu again, lick View and click Page
  23. Once more, click View and click Draft View
  24. A check mark on the menu usually indicates that the item is displaying at this time. Such a menu allows you to toggle the appearance and the disappearance of the item with which it is associated.
    To see an example, on the main menu, click View and click Application Bar.
  25. Notice that the Application Bar has disappeared.
  26. On the main menu click View -> Status Bar to redisplay the Status Bar.
  27. Once again, on the main menu, click View and position your mouse on Toolbars.
  28. Whether a menu falls under one of our categories or not, some menu items display a combination of keys on their line, these are shortcuts. A shortcut is a key or a combination of keys that you press (simultaneously) to perform an action.
    To see some of the shortcuts, on the main menu, click Edit and notice the shortcuts on Cut or Copy.
  29. Whenever you have opened a menu by mistake or you simply want to get rid of it, you usually can click somewhere else or the same menu.
    To cancel the open menu, press Esc. Because still has focus, press Esc again.
  30. To perform a single key shortcut, you can press the corresponding key. To perform a shortcut that is a combination of keys, you will press and hold the first key, then press the second key once.
    To see a shortcut in action, notice the name of the notebook on the title bar (it should be notebk1); press and hold Ctrl, then press N once, and release Ctrl.
  31. Notice that this shortcut creates a new notebook, by the name of the new file on the title bar (notebk2).
    From now on, if I ask you to press Ctrl + O, I mean press and hold Ctrl, then press the letter O once and release Ctrl.
  32. Some shortcuts can be seen on the menu. Some others are hidden or they universally apply to all applications that run on the operating system.
    To see an example, and to close the current notebook, press Ctrl + F4 (Ctrl + F4 is an operating system's shortcut, it is used to close a (child) window). If you are asked whether you want to save anything, click No.
  33. Under the menu bar, the Notebook toolbar provides some of the most regularly used actions performed on the main menu. A toolbar provides the same actions you would perform from the main menu, only faster, so that instead of going through the menu to save a notebook, you can just use the Save button.
     
    Since there are various buttons and sometimes they are unpredictable, to know what a particular button is used for, position your mouse on top of a button, a small yellowish box appears and lets you know what that particular button is used for, that small box is called a tool tip. You can also use context sensitive help to get information about a button.
     
    To see how this works, position your mouse (don't click) on the first button that looks like a white piece of paper, and keep it there for two seconds:
     
  34. After seeing the tool tip, move the mouse to another button to observe other tool tips.
  35. To use context sensitive help and find out about a button, press Shift + F1, then position your mouse on the button that looks like a floppy disk. Observe that this time, a help file provides more information.
  36. Under the Notebook toolbar, there is another toolbar called the Property Bar. This second toolbar offers the formatting features that we will use as we move along. Its buttons also provide tool tips and respond to context sensitive help. Besides other buttons, the Property bar is equipped with combo boxes, and each combo box can display an appropriate tool tip.
    Position the mouse on the first combo box on the Property bar and observe the tool tip (Change The Font Type). 
  37. Under the Property bar, there is another toolbar called the Formula Bar. It is made of three sections.
    a) On the left side you see a white box displaying a name like A:A1, that small box can be referred to as the Name Box.
    b) On the right side of the name box, there is a button with the @ sign.
    Position your mouse on it. The tool tip displays Insert A Pre-Existing Formula. We will call it the Formula button. In later lessons, we will learn what to do with it.
  38. Still in the middle section of the Formula bar, there is another button with an opening and a closing parentheses. We will eventually learn what to do with it.
    Position your mouse on it to find out that we will call the Macro button.
  39. c) On the right side of the Macro button is a long empty box or section. We will called the Formula Bar.
    Click it to activate it.
  40. Notice that there are two new button in the middle section of the current toolbar. 
  41. Under the name box there are gray boxes called rows. Each row is labeled with a number, starting at 1 on top, then 2, and so on.
     
    Under the Formula bar and especially under the Formula bar, there is another series of gray boxes with letters such as A, B, C, D, etc. Each one of these boxes is called a column. 
      
    The main area of Quattro Pro is made of cells. A cell is the intersection of a column and a row. A cell is identified by its name and every cell has a name. By default, Quattro Pro identifies a cell as follows: the name of the spreadsheet in which the cell is selected, a colon, the name of the column, and the the name of the row. Therefore, the first cell in the top left corner, when the first spreadsheet is selected, is called A:A1. The name of a cell always displays in the name box. To see different cells names, find the cell that intersects a column and a row.
    For example, press the down arrow key and observe the Name Box.
  42. On the right side of the cells area, there is a vertical scroll bar that allows you to scroll up and down in case your worksheet cannot display everything at a time.
    Click and hold the down pointing arrow of the vertical scroll bar for a few seconds, then release it.
  43. Press Ctrl + Home to return to cell A:A1. 
    On the lower right section of the main window, there is a horizontal scroll bar that allows you to scroll left and right if your worksheet has more items than can be displayed all at once.
    To experiment with it, click and hold the right pointing arrow on the horizontal scroll bar for a few seconds, then release.
  44. Press Ctrl + Home.
  45. On the left side of the horizontal scrollbar, there are the spreadsheet tabs. You can work with any of them and switch to another at any time. You can also delete some worksheets or add other worksheets as your work needs more or less. You can also change the names of worksheets anytime to suit their purpose.
    Click spreadsheet A, click F, click A.
  46. On the left side of the worksheet tabs, there are five navigation buttons. If you happen to use a lot of worksheets or the worksheet names are using a lot space, which will result in some worksheets hidden under the horizontal scroll bar, you can use the navigation buttons to move from one worksheet to another. 
    Under the navigation buttons and the worksheet tabs, the Status Bar provides a lot of information about the job that is going on.
    From now on, I will refer to a Quattro Pro document as a notebook.


Note

In many applications, the equivalent of Corel's Application Bar is called a Status Bar.


Note

On this tutorial, each toolbar is called by its name. To know the names of toolbars, right-click a button on any toolbar to display a list.


Note

In this tutorial, every button on a toolbar be named conforming to its tool tip. For example, when the mouse is positioned on top of the button that looks like a floppy disk, the tool tip that appears displays "Save The Current Document". Therefore, that button will be referred to as The Save Button.


Introduction to Cells

 
As you are aware, when Quattro Pro starts, it opens a notebook made of three worksheets. A worksheet is simply made of cells that are patiently waiting for you. You should first practice typing different kinds of stuff and see what happens.

At all times, at least one of the cells on the worksheet you are working on has focus. That cell is referred to as the default cell. That cell is surrounded with a thicker border. If you type something, it goes into the default cell. If you click a cell and start typing, the new entry will replace the content of that cell, whether that cell had data or not, this could be advantageous or disastrous.

The thing you type in a cell is called a datum and the plural is data; sometimes the word data refers to both singular and plural. Data you type in a cell can consist of any kinds of characters, letters, numbers, etc. Sometimes, a long text will look like covering more than one cell; unless you merge cells, the text you type goes into one cell regardless of the length of the text.
 

Practical Learning: Introducing Cells

  1. Press Ctrl + Home. Observe the cell's name in the Sheet Area.
  2. Press the down arrow key. Observe the cell's name in the Sheet Area.
  3. Press the right arrow key twice.
  4. Press the down arrow key.
  5. Press the left arrow key.
  6. Click cell A2.
  7. Click cell B4.
  8. Click cell D12.
  9. Click cell B4, type Honda. Press Enter. Notice that text is left aligned.
  10. Type Buick, press Enter.
  11. Type Mazda, press the down arrow key.
  12. Type Folks Wagon, on the main menu, click Edit -> Undo typing. That deletes the content of cell B7. Type VW press the down arrow key.
  13. Type H and notice that the cell is auto-completed with Honda.
  14. Click cell B2, type Make, press Tab.
  15. Type Model, press Tab.
  16. Type Month, press the right arrow key.
  17. Type Miles, press the right arrow key.
  18. Type rice, press Esc. Type Price. Press Tab.
  19. Type Contact, press the right arrow key.
  20. Type Published
  21. Click cell C4, type Corolla and observe the signs on the left of the Edit Formula button on the Formula Bar.
  22. Click the Cancel button on the Formula Bar .
  23. Type Accord, press Tab.
  24. Type 1988
    Notice that the number is left aligned. Press Tab, notice that the number is right aligned now.
  25. Type 172460 and press right arrow key.
  26. Type 2350 and press Tab.
  27. Type Brenda
  28. Press the right arrow key.
  29. Type 08/15/1999 and press Enter.
  30. Notice that the date is converted to a valid date.
  31. Click cell D2 and type Year
  32. Notice that when you click a cell and start typing, the new word replaces the old cell content. That's how you can replace the content of a cell.
  33. Press Enter.
  34. Click cell B8. Double-click Honda in the Formula Bar to select it. Type Ford
  35. Double-click cell E2. Notice that the cursor is positioned in the cell.
  36. Press End, press Backspace to delete s, type age
  37. Now the cell displays Mileage
    Click cell G5 and type David
  38. Press the down arrow key.
  39. Type B and press Enter. Notice that Quattro Pro completed the word Brenda for you.
  40. In cell G7, type Alex and press Enter.
  41. To undo your last action, press Ctrl + Z. Now cell G7 is empty.
  42. To redo the last action, press Ctrl + Y. That puts Alex back in cell G7. 

The Zoom Settings

 
The zoom dialog box helps to increase or decrease the view of the interface. Although it doesn't affect the actual display of the characters sizes or cells contents, using the zoom setting can make the worksheet a little easier to read. 

To change the zoom setting, on the main menu, you can click View -> Zoom... and then select one of the radio buttons or customize the desired zoom ratio.
 

Practical Learning: Zooming Cells

  1. On the main menu, click View -> Zoom...
  2. Notice that the default view is et to 100%. Click the 200% radio button:
     
  3. Click OK.
  4. On the main menu, click View -> Zoom...
  5. Click the Variable radio button, type 82 and press Enter.
  6. Press F10 to give focus to the menu. Press v and press z. That will call the Zoom dialog box.
  7. Click the 100% radio button and click OK.


Notebook Properties

 
Every notebook has some characteristics, attributes, and features that make it unique as a file, these are its properties. 

You can access a notebook's properties from three main areas on the computers. 

If the file is saved on the desktop and/or it has a shortcut on the desktop, if you open My Computer, Windows Explorer, or the folder (as a window) where the file is stored, right-click the notebook and click Properties. If the file was saved on the desktop, you will see only some of its properties, the most you can do there is to assign a Read-Only attribute. In My Computer and Windows Explorer, you will be able to change the file's properties. 

Before opening a file or while in the Open dialog box, you can view some of the notebook's properties although you won't be able to change them. 

When the notebook is opened in Corel Quattro Pro, click File -> Properties to access its properties. 

A notebook's properties are used for various reasons. You can always find out how much size the file is using, where it is located (the hosting folder), who created the filed, or who was the last person to access or modify it. The Properties dialog box is also a good place to leave messages to other users of the same notebook, about anything, whether you work as a team or you simply want to make people aware of a particular issue regarding the file. 
 

Practical Learning: Setting Properties

  1. While the Allentown Car Sales notebook is still opened, on the main menu, click File -> Properties (in Corel Quattro Pro 2000, if you don't see the Properties menu, double-click the File menu; you can also press Alt, f, i).
  2. Click the General tab. Notice the icon associated/registered with the file. Review the created, modified and accessed dates. 
  3. Click Summary.
  4. Click the Title text box and type Allentown Car Sales. 
  5. Click the Subject text box and type Weekly car sales summary.
  6. Click the Manager text box and type Georgia Delaine.
  7. Click the Category text box and type Employees Sales Results.
  8. Click the Keywords text box and type accounting, sales, review, employees, cars.
  9. Click the Comments text box and type This is an attempted summary sales review, if you have any concern, please contact Georgia Delaine, the Sales Accounts Manager. If you make any changes, send her an e-mail immediately.
  10. Click the Statistics, Contents, and Custom tabs to review their content.
  11. Click OK to register the changes and close the dialog box. 

Saving a Notebook

 
A Quattro Pro notebook gets saved like any traditional Windows application file. You need to pay attention to two primary things. Whenever you decide to save a file for the first time, you need to provide a file name and a location. The file name helps the computer identify that particular file and registers it in its database (the Registry). 


A file name can consist of up to 255 characters, you can include spaces and dashes in a name. Although there are many characters you can use in a name (such as exclamation points, etc), try to stay away from fancy names. Give your notebook a name that is easily recognizable, a little explicit. For example such names as Time Sheets, employee's Time Sheets, GlobalEX First Invoice are explicit enough. Like any file of the Corel Windows operating systems, a Corel Quattro Pro file has an extension, which is .qpw but you don't have to type it in the name. Personally, I would recommend you don't worry about that, let the computer take care of such details.

The second important piece of information you should pay attention to when saving you notebook is the location. The location is the folder where the file will be saved. By default, Corel Quattro Pro saves its notebooks in the C:\My Documents folder. You can change that very easily in the Save As dialog box. Just click the arrow of the Save In combo box and select the folder you want.

Quattro Pro allows you to save its files in a type of your choice. To save a notebook in another format than the default Corel Quattro Pro notebook, from the Save As dialog box, click the arrow of the Save As Type combo box and select a format of your choice.

There are other things you can do in the Save As dialog box, we will address them as we move along.

Practical Learning: Saving a Workbook

  1. To save a file for the first time, you can click File on the main menu, then click Save (if the file has not been saved before, the File -> Save menu will call the Save As dialog box). You can also click the Save button on the Standard toolbar. You can as well press Ctrl + S. Other alternatives include pressing F12, Alt + F2, or Shift + F12.
  2. To save the current notebook, from the main menu, click File -> Save As...
  3. Type Allentown Car Sales.
  4. Click the arrow on the Save In combo box, select (C:) which is your hard drive.
  5. From the list in the dialog box, double-click My Documents. That displays My Documents in the Save In combo box.
  6. Double-click MS Quattro Pro Exercises. Now the Save In combo box displays MS Quattro Pro Exercises.
  7. After making sure that the MS Quattro Pro Exercises is the folder displayed in the Save In combo box, click the Save button. 

Opening a Notebook

 
The notebooks you use could be created by you or someone else. They could be residing on your computer, on a floppy disk (or other media), or on a network. Once one of them is accessible, you can open it in your application.

You can open a notebook either by double-clicking its icon in Windows Explorer, in My Computer, from the Find Files Or Folders window, in Network Neighborhood, or by locating it in the Open dialog box. To access the open dialog box, on the main menu, click File -> Open... You can also click the Open button on the Standard toolbar. A shortcut to call the Open dialog box is Ctrl + O.
 

Practical Learning: Opening a Workbook

  1. On the main menu, click File -> Open...
  2. In the Open dialog box, click the arrow of the Look In combo box, select (C:); the (C:) represents your hard drive.
  3. Double-click My Documents. That puts the My Documents folder in the Look In combo box.
  4. Double-click MS Quattro Pro Exercises. The Look In combo box now displays MS Quattro Pro Exercises.
  5. Click Allentown Car Sales1
  6. Click the Open button. 

The Quattro Pro Defaults Options

 
Like any Corel Office application, MS Quattro Pro opens and saves by default to C:\My Documents, this is just one of the default settings that your application uses. And like many other software products, you can change these values to ease your experience with the software. 

Practical Learning: Using Default Options

  1. From the main menu, click Tools -> Options...
  2. Click the General property sheet.
  3. In the Settings section, increase the Recently Used File List to 6.
  4. Increase the Sheets In New Notebook to 5.
  5. Click the arrow of the Standard Font combo box and select Verdana from the list.
  6. Click the arrow of the Size combo box and select 12 from the list.
  7. Change the Default File Location to C:\Windows.
  8. Click the View property sheet.
  9. Remove the check mark of the Gridlines check box.
  10. Click OK. If you receive a message saying that for the changes to take effect..., click OK.
  11. To close Corel Quattro Pro completely, on the main menu, click File -> Exit.
  12. To restart Corel Quattro Pro, click Start ->Programs -> Corel Quattro Pro.
  13. Notice that the cells are wider and bigger. Notice also that the notebook started with 5 worksheets.
  14. Type Treasure and press Enter. Notice that the characters are unusually large. 
    On the main menu, click File -> Open... Notice that the Windows folder displays in the Open dialog box.
  15. Press Esc to dismiss the Open dialog box.
  16. On the main menu, click Tools -> Options...
  17. Click the General property sheet. Set the Sheets In New Notebook spin button to 3. Set the Standard Font to Arial. Set the font Size to 10. Set the default File Location to C:\My Documents\MS Quattro Pro Exercises.
  18. Click the View property sheet. Click the check mark on the Gridlines check box (actually this one doesn't get saved, it is only configured for the worksheet you are working on).
  19. Click OK.
  20. To close Corel Quattro Pro, click the top most X close button. You will receive a message asking whether you want to save the file, click No. 

Home Next

Copyright © 2002-2009 FunctionX