
Introduction to Tables
|
|
Introduction to Tables |
Introduction to the Tables of a Database
Overview
A database is a list of values. Such a list of values is called a table. The most fundamental object of a database is the table. A table is presented as a spreadsheet, made of columns and rows. Here is an example:
| First Name | Last Name | Date Hired | Hourly Salary |
To identify the objects, such as tables, of a database, Microsoft Access provides a general class or object named AccessObject. This class holds the properties and methods that each type of object has.
The objects of a database are stored in different collections. The tables of a Microsoft Access database are stored in a collection named AllTables. Each table is of type AccessObject.
 Practical Learning: Introducing Tables
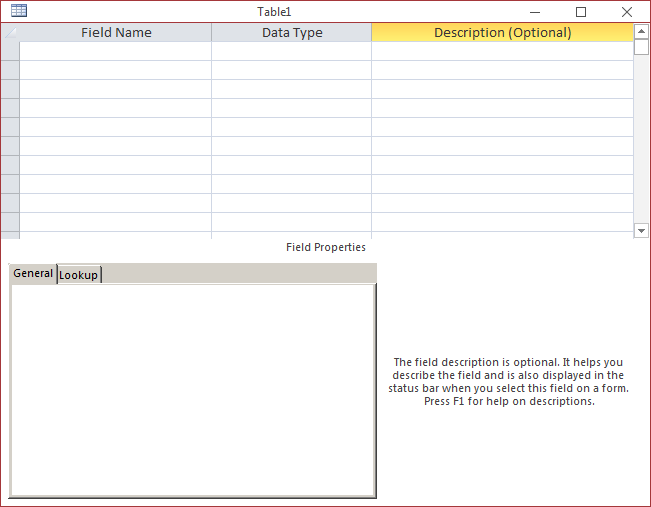
Visually Creating a Table
As a database application, Microsoft Access provides the tools you need to create the necessary tables of your database. To visually create a table in Microsoft Access, on the Ribbon, click Create.
In the Tables section of the Ribbon, click the Table button ![]() . This would display a spreadsheet-like window. Another way to create or modify a table consists of displaying it in Design View. To do this, on the Ribbon, click Create. In the Tables section, click the
Table Design button
. This would display a spreadsheet-like window. Another way to create or modify a table consists of displaying it in Design View. To do this, on the Ribbon, click Create. In the Tables section, click the
Table Design button ![]() .
.
Programmatically Creating a Table
To programmatically start a new table in Design View, call the DoMenuItem() method of the DoCmd class.
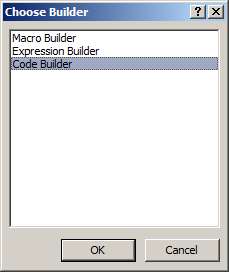
![]() Practical Learning:
Starting a Table in the Design View
Practical Learning:
Starting a Table in the Design View
Private Sub Command0_Click()
    DoCmd.DoMenuItem 1, A_FILE, 3, 0, A_MENU_VER20
End Sub
Creating a Table in SQL
In the SQL, the language part that deals with the creationg and management of objects is the Data Definition Language or DDL. In the DDL, the expression used to create a table starts with CREATE TABLE followed by the name of the table. The formula starts with:
CREATE TABLE Name;
The CREATE TABLE expression must be used to let the SQL interpreter know that you want to create a table. The Name specifies the name of the new table. The Name can use the rules and suggestions we used for variables. A table would start as follows::
CREATE TABLE Employees(. . .)
After formulating the SQL statement, you can pass it to the RunSQL() method of the DoCmd object. Here is an example that creates a table named Employees:
Private Sub Command0_Click()
    DoCmd.RunSQL "CREATE TABLE Employees(...);"
End Sub
Although you should usually use one-word names for tables, you can use a name made of various parts. In this case, start the name with [ and end it with ]. Here is an example:
Private Sub Command0_Click()
    DoCmd.RunSQL "CREATE TABLE [Full Time Consultants](...);"
End Sub
Columns Fundamentals
Introduction
A table organizes its values in categories. Each category is called a column or a field.
|
|
From now on, we will use the words "column" and "field" interchangeably and they will always mean the same thing. |
Here is an example of a table:
| First Name | Last Name | Date Hired | Hourly Salary |
In this case, examples of columns are First Name, Last Name, Date Hired, and Hourly Salary.
In Microsoft Access, a column is based on a class named Field.
![]() Practical
Learning: Introducing the Columns of a Table
Practical
Learning: Introducing the Columns of a Table
Visually Creating a Column
If you start creating a table by clicking Create and then creating Table on the Ribbon, the table is said to display in Datasheet View. If you start a table like that, Microsoft Access creates and gives it one default column. You can then add new columns. To do this:
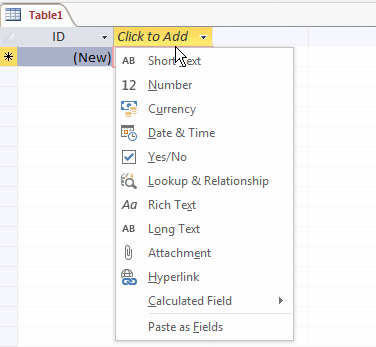
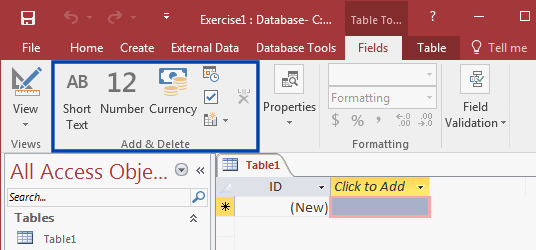


If you are visually creating a table in the Design View, to specify the data type of a column, you can select an option in the corresponding Data Type section.
When creating a column, you must give it a name. To name a column, use the same rules we have applied to variables.
Creating the Columns of a Table in SQL
Introduction
To create a column in the SQL, specify its name, followed by its data type, and some possible options. In the parentheses of the CREATE TABLE TableName() expression, the formula to create a column is:
ColumnName DataType Options
Notice that there is only space that separates the sections of the formula. This formula is for creating one column. If you want the table to have more than one column, use this formula as many times as possible but separate them with commas. This would be done as follows:
CREATE TABLE TableName(ColumnName DataType Options, ColumnName DataType Options)
When creating a column, the first information you must provide is its name. Here is an example that starts a table with a column named FirstName:
Private Sub Command0_Click()
   DoCmd.RunSQL "CREATE TABLE Customers(FirstName . . .);"
End Sub
Although we used the name in one word, you can use a name that is made of many parts. In this case, the name must start with [ and end with ]. Here is an example:
Private Sub Command0_Click()
   DoCmd.RunSQL "CREATE TABLE Customers([First Name] . . .);"
End Sub
Introduction to SQL Data Types
Besides its name, the second most fundamental detail you must provide about a column is the type of value it would hold. This is the job of the data type. The data types of columns are closely related to those we introduced in Lesson 2, but the SQL has more.
Short Text Fields
Microsoft Access and Short Text
A field is made for short text if it can hold 0 to 255 characters. To visually create such a field:
By default, after specifying the data type of a field as Short Text, it can use up to 255 characters. If you want to limit it:
![]() Practical Learning: Introducing Short Text Fields
Practical Learning: Introducing Short Text Fields
The SQL and the Short Text
To create a column that would hold regular text in the SQL, you can use the String data type we have been using for variables. Additionally, the SQL provides data types named TEXT, CHAR, and VARCHAR (remember that the SQL is not case-sensitive). Each one of them produces the same effect. Here are examples:
CREATE TABLE Customers(FirstName Text, LastName Char);
If the SQL statement is long, you can create it on different lines.
A field created with the string, the text, the char, or the varchar type can hold a maximum of 255 characters or symbols. One of the characteristics of a text-based field is that it allows you to specify the maximum number of characters or symbols it can hold. To provide this information, you must add parentheses to the data type. In the parentheses, enter a number for the maximum number of characters. Here are examples:
CREATE TABLE Customers
(
    FirstName String(26),
    LastName Text(26),
    CustomerName text(40),
    Address string(100),
    City varchar(32),
    State CHAR(2),
    ZIPCode char(10)
);
![]() Practical Learning:
Creating Text-Based Fields
Practical Learning:
Creating Text-Based Fields
CREATE TABLE Regions
(
    Region Text(25)
);
Long Text Fields
Microsoft Access and Long Text
A data field supports long text if it can hold up to 32,000 characters. To create a field for that:
Microsoft Access and Rich Text
Text is referred to as rich if it can display characters in different colors and styles. Also, its paragraphs can use bullets. There are many other characteristics associated with rich text. To create a field for rich text, you must work in the Datasheet View. To proceed:
Long Text Fields in the SQL
To support long text fields, the SQL provides additional data types named MEMO, NOTE, and LONGTEXT. Here are examples of fields created with these types:
CREATE TABLE Employees
(
FullName varchar(50),
R�sum� MEMO,
SampleEssay LONGTEXT,
JobDescription NOTE
);
![]() Practical Learning: Introducing Long Text Fields
Practical Learning: Introducing Long Text Fields
CREATE TABLE Regions
(
    Region Text(25),
    Description LONGTEXT
);A Field for Natural Numbers
Natural Numbers in Microsoft Access
Microsoft Access supports small, medium, and very large natural numbers. To apply a natural number to a field, you should work in the Design View. To proceed, set the Data Type of the field to Number. In the bottom side of the window, click the arrow of the Field Size combo box and select Byte, Integer, or Long Integer (we already reviewed them in previous lessons).
![]() Practical Learning:
Introducing Integer Fields
Practical Learning:
Introducing Integer Fields
The SQL and Natural Numbers
When studying variables, we saw that the Visual Basic languages provides the Byte, the Integer, and the Long types. These data types can also be used to create fields for a table in a SQL statement. Here are examples:
CREATE TABLE Students
(
    StudentNumber LONG,
    Age BYTE,
    Grade INTEGER,
    DisciplineSummary LONGTEXT
);
The SQL supports additional types. For example, in place of the BYTE type, you can use a data type named INTEGER1.
In addition to the VBA INTEGER type, to let you create a field for small to medium numbers, the SQL provides data types named SMALLINT, SHORT, and INTEGER2. They are made for columns that use numbers between �32,768 and 32,767.
If you want to create a field that can hold large numbers, besides the LONG type of the VBA language, the SQL provides the INT, the INTEGER, and the INTEGER4 types.
Fields and Floating-Point Numbers
Floating-Point Numbers in Microsoft Access
We saw that the Visual Basic language supports decimal values with the Single and the Double types. Before applying one of those types to a field, you can first specify its data type as number:
To specify the type of numbers that a field should carry
The SQL and Floating-Point Numbers
The SQL supports floating-point data types the same way we used them in variables. The SQL provides additional types.
Besides the SINGLE data type, the SQL supports floating-point number with single-precision through a data type named REAL. Here is an example of using it:
CREATE TABLE Pupils
(
    StdNumber String(15),
    Age REAL
);
In addition to the DOUBLE type in the VBA, the SQL supports floating-point numbers with double-precision in various data types named FLOAT, NUMBER, NUMERIC, FLOAT8, and IEEEDOUBLE. Here are examples of columns created with these types:
CREATE TABLE Pupils
(
    StdNumber String(15),
    Age REAL,
    Height FLOAT,
    Weight NUMBER
);
Money-Based Fields
Currency Fields in Microsoft Access
Microsoft Access supports money-based fields. To visually create such as field:
The SQL and Currency Fields
We know that the VBA language supports monetary values through a data type named Currency. In addition, the MONEY data type can be used in the same context as the CURRENCY type. Here are examples:
CREATE TABLE StoreItem
(
    ItemNumber char(12),
    UnitPrice CURRENCY,
    DiscountAmount MONEY,
    MarkedPrice money
);
Boolean Fields
Microsoft Access and Boolean Values
As seen already, a Boolean value is one that can have a True or a False value. In the same way, a field can hold a Boolean value. To visually create a field that supports Boolean values:
The SQL and Boolean Fields
To create a Boolean-based field in SQL, set its data type to YESNO, BIT, or LOGICAL. Here are examples:
Private Sub cmdTable_Click()
    DoCmd.RunSQL "CREATE TABLE Contractors" & _
                 "(" & _
                 "	FullName TEXT, " & _
                 "	AvailableOnWeekend BIT, " & _
                 "	OwnsACar LOGICAL, " & _
                 	"CanShareOwnCar YESNO" & _
                 ");"
End Sub
These are equivalent to Microsoft Access' Yes/No and to Microsoft Visual Basic's Boolean data type.
Binary and Image-Based Fields
The binary data type can let a column accept any type of data but it is equipped to interpret the value. For example, it can be used to receive hexadecimal numbers. To specify this when programmatically creating a column using SQL, set its data type to one of the following: IMAGE, OLEOBJECT, LONGBINARY, or GENERAL.
Additional Types
Microsoft Access provides additional types that give you the ability to create, display, or include pictures, hyperlinks, collections of pictures, and other types of items.
![]() Practical
Learning: Introducing Data Analysis
Practical
Learning: Introducing Data Analysis
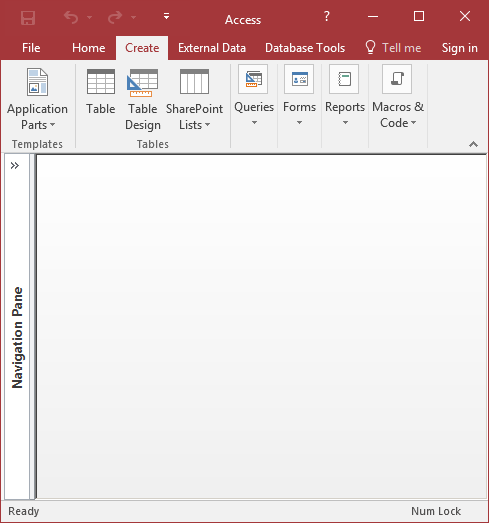
Introduction
The left section of Microsoft Access displays the Navigation Pane. It shows the objects, such as tables, of a database by categories. It has a Shutter Bar Open/Close Button. To display or hide the Navigation Pane:
![]() Practical Learning: Using the Navigation Pane
Practical Learning: Using the Navigation Pane
Refreshing the Navigation Pane
When you create a table with code, it may not show right away in the Navigation Pane. To show it, you have various options. If you create a table using a control on a form, if you switch the form to Design View, the action would refresh the list of objects in the Navigation Pane. As a better alternative, the Application class provides a method named RefreshDatabaseWindow. Its syntax is:
Public Sub Application.RefreshDatabaseWindow
As you can see, this method doesn't take any argument. It is simply used to refresh the Navigation Pane.
In the same way, as you create more tables, their names appear under Tables in the Navigation Pane.
Managing the Categories in the Navigation Pane
You can expand or collapse a category in the Navigation Pane. If you want to expand all categories at once, you can right-click any section header and click Expand All. In the same way, if you want to collapse all categories, right-click any section header and click Collapse All.
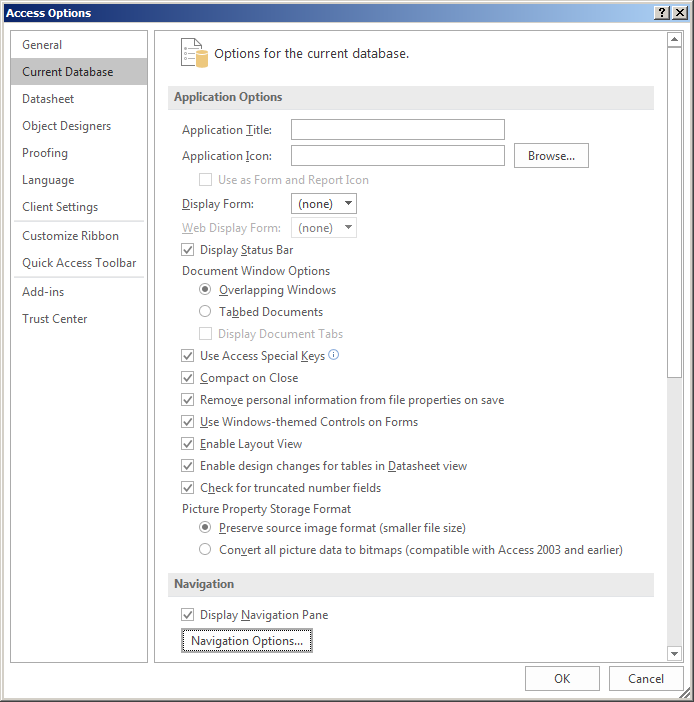
The Navigation Pane gives you ample flexibility on how the objects appear in it and how the categories are organized. For example, you can show the tables only, the forms only, or all objects. One way you can decide is to right-click an empty area of the Navigation Pane and click Navigation Options. This would open the Navigation Options dialog box:

The Navigation Options dialog box allows you to do many things. For example, to decide what categories to show or hide, put or remove check marks next to their name in the right list. The dialog box also allows you to create new categories.
Using a Table
Selecting a Table
Before performing most operations on a table, you may need to select it. This is a routine operation that is usually done transparently but in some cases, it is a prerequisite. If you select a table, some operations you perform may affect it, depending on how such operations are carried out. A table indicates that it is selected when it is highlighted in the Navigation Pane.
To programmatically select a table, you can use the DoCmd object that is equipped with the SelectObject() method. The syntax to use would be:
DoCmd.SelectObject acTable, [object-name][, indatabasewindow]
The first argument must be acTable in this case because you want to select a table. The second argument is the name of the table you want to select. If you want to select the table and only highlight it in the Navigation Pane, pass the third argument as True. Here is an example:
Private Sub Command0_Click()
    DoCmd.SelectObject acTable, "Employees", True
End Sub
If the table is already opened and it is displaying, it is most likely in the background. If you omit the third argument or pass it as False, the table would be displayed in the foreground. If the table is not opened and you omit the third argument or pass it as False, you would receive an error.
To open a table, in the Navigation Pane:
To let you programmatically open a table, the DoCmd object is equipped with a method named OpenTable. Its syntax is:
DoCmd.OpenTable tablename[, view][, datamode]
The first argument of this method is the name of the table that you want to open. The second argument is a constant value as follows:
| View Name | Result |
| acViewDesign | The table will display in Design View |
| acViewNormal | The table will display in Datasheet View |
| acViewPreview | The table will display in Print Preview |
This second argument is optional. If you omit it, the acViewNormal option applies. The third argument, also optional, has to do with data entry. You can omit it.
Practical Learning:
Opening a Table
Private Sub Command0_Click()
    DoCmd.OpenTable "States", AcView.acViewNormal, AcOpenDataMode.acEdit
End SubAfter using a table, you can close it. If there is a structural change that needs to be saved, Microsoft Access would prompt you. To manually close a table:
To let you programmatically close a table, the DoCmd class is equipped with a method named Close. Its syntax is:
DoCmd.Close ObjectType, [object-name], [save]
The first argument is a member of the AcObjectType enumeration. For a table, the syntax to use is:
DoCmd.Close AcObjectType.acTable, [object-name], [save]
You can omit the AcObjectType:
DoCmd.Close acTable, [object-name], [save]
The first argument must be specified as acTable because you are trying to close a table. The second argument must be the name of the table you want to close. If you suspect that there might be a need to save the structure of the table, you can pass the third argument with one of the following values:
| View Name | Result |
| acSaveNo | The table doesn't need to be saved |
| acSavePrompt | Prompt the user to save the changes |
| acSaveYes | Save the table without having to prompt the user |
Here is an example:
Private Sub Command0_Click()
    DoCmd.AcObjectType.acTable, "Companies", AcCloseSave.acSaveYes
End Sub
Introduction to Table Maintenance
Overview
Table maintenance consists of renaming, copying, or deleting a table. Once again, Microsoft Access supports all of the necessary operations. Before performing a maintenance operation on a table, you should make sure that the action is necessary and possible. If the table is opened, you cannot perform any maintenance operation on it. If the table is involved in an expression, when attempting a maintenance operation on it, sometimes you will be warned and sometimes you will be prevented from performing the operation.
The Tables Collection
Each table of this collection can be identified by its name or its index. To identify a table in the AllTables collection, you can access it using its name if you know it. To help with this, each table of the collection has a property called Name that represents the name of the table. Here is an example that shows the name of each table of the current database:
Private Sub Command0_Click()
    Dim obj As AccessObject
    Dim dbs As Object

    Set dbs = Application.CurrentData

    ' Check each object of the AllTables collection
    For Each obj In dbs.AllTables
        ' When you find a table, display its name
        MsgBox obj.Name
    Next obj
End Sub
When working on a database, the total number of its tables is stored as the Count property of the AllTables collection.
When using the Name property of a table, you are supposed to know the name of the table you want to access. In some cases, you may not know the name of a table. An alternative is to access a table by its index in the collection. To support this, the AllTables collection is equipped with the Item() property. In the parentheses, you can enter the index of the desired table. The first table has an index of 0, the second has an index of 1, and so on. Here is an example that would access the name of the third table of the current database:
Application.CurrentData.AllTables(2).Name
The ability to identify a table by name allows you to check the existence of a table in a database. For example, since Microsoft Access would not allow you to create a table if another table with the same name exists already, you can check to find out if a table exists already with the name you are trying to use. Here is an example:
' This function is used to search the tables in the current database.
' The function receives the name of the table to look for.
' If a table with that name exists already, the function returns true.
' If no table with that name is found, the function returns false
Private Function TableExists(ByVal tblName As String) As Boolean
    Dim obj As AccessObject, dbs As Object
    Set dbs = Application.CurrentData
    Dim exists As Boolean

    exists = False

    For Each obj In dbs.AllTables
        If obj.Name = tblName Then
            exists = True
        End If
    Next obj

    TableExists = exists
End Function

Private Sub cmdCreateTable_Click()
    If TableExists("Units") = True Then
        MsgBox "The table you are trying to create exists already."
    Else
        REM Create the table here
    End If
End Sub
Renaming a table consists of changing its name from the original or previous name. To programmatically rename a table, you can use the DoCmd object that provides the Rename() method. The syntax to use is:
DoCmd.Rename(NewName, acTable, OldName)
Here is an example:
Private Sub Command0_Click()
    DoCmd.Rename "Staff Members", acTable, "Employees"
End Sub
When you rename a table, you get the same table with a new name. This preserves the structure and contents of the table. An alternative to this approach consists of making a copy of an existing table. With this technique, you would get two tables that share the same structure and have the same contents, with different names.
To programmatically make a copy of a table, you can use the DoCmd object that is equipped with the CopyObject() method. The syntax to use is:
DoCmd.CopyObject [destinationdatabase][, newname], acTable, sourceobjectname]
The first argument to this method is the name or path of the database where the copied table would be transferred to. If you are making a copy of the table in the same database that is opened, you can omit this argument. The second argument is the name that you want the new table to have. It is the same string you would provide to the Paste Table As dialog box. The third argument must be acTable because in this case you are copying a table. The last argument is the current name of the existing table.
Here is an example:
Private Sub Command0_Click()
    DoCmd.CopyObject, "Rental Contracts", acTable, "LoansAllocations"
End Sub
Introduction
If you happen to have a table you don't need anymore in your database, you can remove it. When you delete a table, all of its contents, including its columns, are permanently lost.
To manually delete a table, in the Navigation Pane, right-click it and click Delete. You will be prompted to confirm your intentions.
To let you programmatically delete a table, the DoCmd class is equipped with a method named DeleteObject. The syntax to use is:
DoCmd.DeleteObject acTable, [object-name]
The acTable argument indicates that you want to delete a table. If you select a table in the Navigation Pane when this method is called, you can omit the second argument and the selected table would be deleted. Otherwise, to specify the table you want to delete, pass its name as the second argument of the method. Here is an example:
Private Sub Command0_Click()
    DoCmd.DeleteObject acTable, "Customers"
End Sub
Deleting a Table in the SQL
To delete a table in SQL, create a DROP TABLE expression followed by the name of the table. The formula to use is:
DROP TABLE TableName;
Replace the TableName of our formula with the name of the table you want to delete. Here is an example:
DROP TABLE LoansAllocations;
Introduction to Column Maintenance
Introduction to the Field Object
To programmatically use a field, declare a variable of type Field. Here is an example:
Private Sub Command0_Click()
    Dim fldEmployeeName As Field

    . . .

End Sub
The columns of a table are stored in a collection named Fields. Like every collection, this one uses the same classic characteristics such as the Count property that represents the number of columns of a table.
Identifying a Field in a Table
To identify a column of a table, you can use the Item property of the Fields collection. Pass the name or the index of the column to the Item() indexed property. Here is an example:
Fields.Item("[Last Name]")
Because Item is the default property of any collection, you can omit it. Here is an example:
Fields("[Last Name]")
If you don't know the name of a column or you prefer to access it by its index, you can pass that index to the Item property. Remember that the index starts at 0, followed by 1, and so on. Based on this, to access the third column of a table, you would use either of these two:
Fields.Item(2)
Fields(2)
The name is the most fundamental characteristic of a column. To let you get the name of a column, the Field class is equipped with a property named Name.
Renaming a Column
To rename a column, you must put it into edit mode. To do this:
Once the name is in edit mode, type the desired name and press Enter.
To rename a field in Design View, click it and type the new name.
![]() Practical
Learning: Renaming a Column
Practical
Learning: Renaming a Column
Inserting a New Column
To add a new column:
![]() Practical
Learning: Inserting a New Column
Practical
Learning: Inserting a New Column
Adding a New Column in the SQL
In the SQL, to perform maintenance on a column, start with an ALTER TABLE expression as follows:
ALTER TABLE TableName ...
The TableName must specify the table on which the maintenance will be performed. After the table name, you can then issue the desired command.
To add a new column, in an ALTER TABLE statement, include an ADD COLUMN expression using the following formula:
ALTER TABLE TableName
ADD COLUMN ColumnName DataType
The ColumnName must be a valid name. The data type must be one of those we reviewed.
Private Sub cmdDeleteColumn_Click()
    DoCmd.RunSQL "ALTER TABLE Contractors ADD COLUMN CellPhone TEXT;"
End Sub
Deleting a Column
Deleting a Column in the SQL
To delete a column using the SQL, after the ALTER TABLE TableName expression, follow it with a DROP COLUMN expression as in this formula:
ALTER TABLE TableName DROP COLUMN ColumnName;
Replace the name of the undesired column with the ColumnName factor of our formula. Here is an example:
Private Sub cmdAlterPersons_Click()
    DoCmd.RunSQL "ALTER TABLE Persons DROP COLUMN FullName"
End Sub
![]() Practical
Learning: Ending the Lesson
Practical
Learning: Ending the Lesson
|
|
||
| Previous | Copyright © 2016-2022, FunctionX, Inc. | Next |
|
|
||