Workbooks and Worksheets
|
|
Workbooks and Worksheets |
|
Characteristics of a Worksheet |
|
Introduction to Worksheets |
|
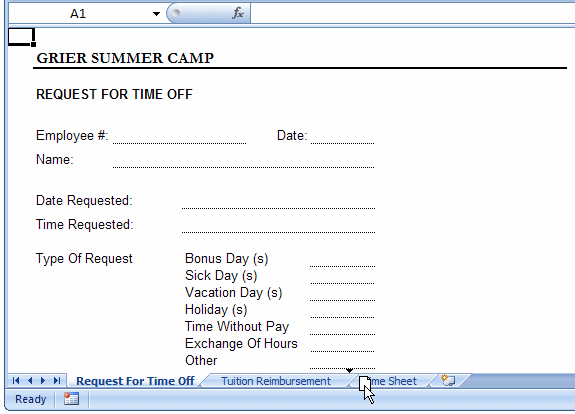
Microsoft Excel provides various easy means of creating a list. It starts with a concept that resembles a piece of paper divided in vertical and horizontal sections. This electronic piece of paper designed for a list is referred to as a spreadsheet. In MS Excel, such a spreadsheet is called a worksheet. Because it is not unusual to work on different lists at the same time, Microsoft Excel makes it possible to access more than one worksheet. Each worksheet is represented in the bottom section of the interface with a tab. The most left tab is marked Sheet1. The second from left is marked Sheet2. The last is marked Sheet3: |
 The various worksheets of a workbook are stored in a collection called Worksheets. Another collection that contains the worksheets of a workbook is called Sheets. In most cases, you can use either of these two collections. Each worksheet is an object of type Worksheet. As mentioned, the worksheets of a workbook are stored in a collection. Each worksheet can be located based on an indexed property named Item. The Item property is a natural number that starts at 1. Based on this, the most left worksheet has an index of 1. The second worksheet from left has an index of 2, and so on. To access a worksheet, type one of the above collections, followed by the period operator, followed by Item() and, between the parentheses, type the index of the worksheet you want. For example, the following code will access the second worksheet from left. Private Sub CommandButton1_Click()
Sheets.Item(2)
End Sub
The number of worksheets that a Worksheets or a Sheets collection contains is represented by the Count property. Based on this, Worksheets.Count or Sheets.Count can give you the number of worksheets in the current workbook.
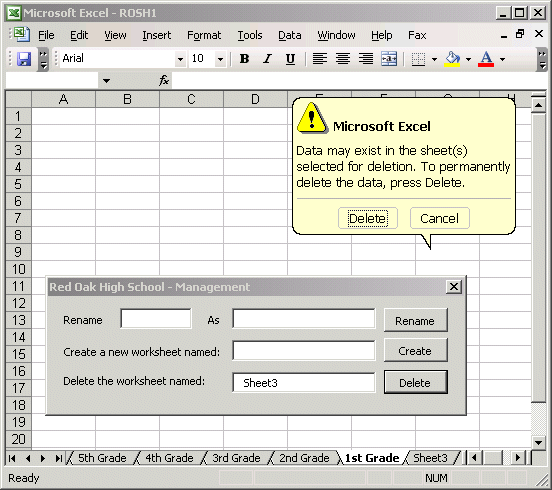
To differentiate the various worksheets in a document, each must have a name. When Microsoft Excel starts, it creates three worksheets by default. The first worksheet is named Sheet1. The second is named Sheet2, and the third is named Sheet3. The name of a worksheet also displays on its tab in the lower-left section of the interface. These are the default names assigned by MS Excel. You can change the name of any worksheet as you wish. To rename a worksheet:
To programmatically rename a worksheet, pass its index or its default name as a string to the Sheets (or the Worksheets) collection, then access the Name property of the collection and assign the desired name. Here is an example: Private Sub cmdRename_Click()
Sheets("Sheet1").Name = "Employees Records"
End Sub
This code will change the name of the Sheet1 worksheet to Employees Records.
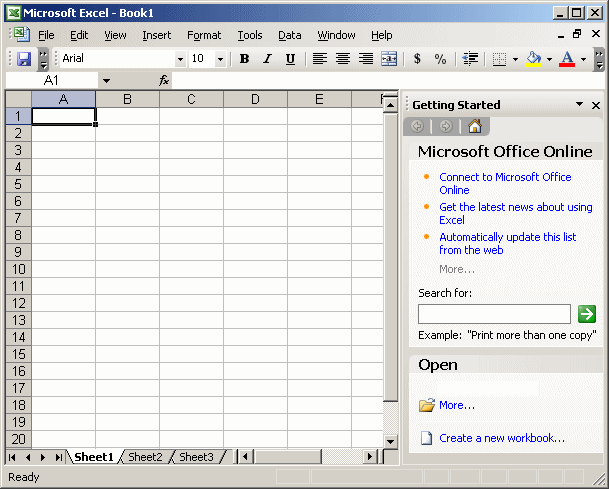
A group of worksheets that belong to the same document is called a workbook. When Microsoft Excel starts a new workbook, it creates three worksheets on the workbook. Even though they belong to the same document, worksheets can be treated as independent entities. When you start a new document, that is, a new workbook in Microsoft Excel, it displays a new worksheet represented with Sheet1 and with a white tab. This is also the default worksheet. If you start typing, the characters would be assigned to the selected worksheet. To select or change a worksheet, you can click its tab. To select a worksheet using the mouse, you can press and hold Ctrl. Then press either Page Up or Page Down. Once the desired worksheet has been selected, you can release Ctrl. To programmatically select a worksheet, access the Sheets collection, pass the name of the desired worksheet as string, and call Select. Here is an example that assumes that there is a worksheet named Tuition Reimbursement on the current workbook: Private Sub cmdRename_Click()
Sheets("Tuition Reimbursement").Select
End Sub
The worksheet that is selected and that you are currently working on is called the active worksheet of the workbook. It is programmatically identified as the ActiveSheet property.
By default, worksheets are positioned in a numbered format that makes it easy to count them. More often you will find that, after creating a few of them, you are not satisfied with their positions. You should be able to reposition them in a manner that suits your particular scenario. To move a worksheet, click and hold the mouse on its tab, then move the mouse in the direction of your choice. While you are moving the worksheet, the mouse pointer will turn into a white piece of paper and a small down-pointing triangle will guide you. Here is an example:
Once the small triangle is positioned in the desired location, release the mouse. To programmatically move a worksheet, use the Move() method of its collection. The syntax of this method is: Worksheets.Move(Before, After) Both arguments are optional. If you don't specify any argument, Microsoft creates a new workbook with one worksheet using the index passed to the collection with a copy of that worksheet. Suppose you are (already) working on a workbook that contains a few worksheets named Sheet1, Sheet2, and Sheet3. If you call this method on a collection with the index set to one of these worksheets, Microsoft Excel would make a copy of that worksheet, create a new workbook with one worksheet that contains a copy of that worksheet. For example, the following code with create a new workbook that contains a copy of the Sheet2 of the current workbook: Private Sub CommandButton1_Click()
Sheets.Item("Sheet2").Move
End Sub
In this cases, the name of the worksheet you are passing as argument must exist. Otherwise you would receive an error. Instead of using the name of the worksheet, you can pass the numeric index of the worksheet that you want to copy. For example, the following code will create a new workbook that contains one worksheet named Sheet3 Private Sub CommandButton1_Click()
Sheets.Item(3).Move
End Sub
If calling the Item property, make sure the index is valid, otherwise you would receive an error. To actually move a worksheet, you must specify whether it would be positioned to the left or the right of an existing worksheet. To position a worksheet to the left of a worksheet, assign it the Before factor. To position a worksheet to the left of a worksheet, assign it the After. Consider the following code: Private Sub cmdMove_Click()
Worksheets("Sheet3").Move After:=Worksheets("Sheet1")
End Sub
This code will move the worksheet named Sheet3 to the right of a worksheet named Sheet1.
When you start a new workbook in Microsoft Excel, by default, it creates or assigns three worksheets to it. If you need more than three, you can add new worksheets as you see fit. If you want Microsoft Excel to always start with less or more worksheets, you can change its default settings in the Options dialog box accessible from the Tools menu. Some workbooks are quite complete with just one worksheet, but others need as many worksheets as possible. The number of worksheets you use in a particular workbook is conditioned by your needs and the memory of your computer. To insert a new worksheet in your workbook
If you want to create a new worksheet using code, you can specify whether you want it to precede or succeed an existing worksheet. To programmatically create a new workbook, call the Add() method of the Sheets collection. Its syntax is: Sheets.Add(Before, After, Count, Type) All of these arguments are optional. This means that you can call this method as follows: Private Sub cmdNewWorksheet_Click()
Sheets.Add
End Sub
If you call the method like that, a new worksheet would be created and added to the left side of the active worksheet. If you want to create a new worksheet on the left side of any worksheet you want, you can first select that worksheet and call the Add() method. For example, suppose you have three worksheets named Sheet1, Sheet2, and Sheet3 from left to right and you want to insert a new worksheet between Sheet2 and Sheet3, you can use code as follows: Private Sub cmdNewWorksheet_Click()
Sheets("Sheet2").Select
Sheets.Add
End Sub
To be more precise, you can specify whether the new worksheet will be positioned to the left or to the right of another worksheet used as reference.
As your work progresses, you will decide how many worksheets you need for your particular workbook. Just as we learned to add worksheets, you can delete or remove the worksheets you don't need anymore. Since a worksheet is not a file, when you delete a worksheet, it is permanently gone; that is why you will get a confirmation message. If you want Microsoft Excel to always start with less than the default three worksheets, you can change its default settings in the Options dialog box accessible from the Tools menu. To delete a workbook, you can right-click its tab and click Delete. To programmatically remove a worksheet, call the Delete() method of its collection. When calling this method, pass the name of the worksheet you want to remove to the collection.
As mentioned already, by default, Microsoft makes three worksheets available to you. We also reviewed how you can add new ones or delete some of them. Instead of deleting a worksheet, you can hide it for any reason you judge necessary. If the workbook contains more than one worksheet, you can hide one or more worksheets or even the entire workbook. To hide a worksheet in a workbook, click any cell in that worksheet to make it active. On the main menu, click Format -> Sheet -> Hide. The worksheet’s tab will disappear from the screen although it is not deleted. To hide a group of worksheets, select the desired worksheets. Then, on the main menu, click Format -> Sheet -> Hide. To unhide the hidden worksheets, on the main menu, click Format -> Sheet -> Unhide. You are presented with a list of the hidden worksheets. If you have more than one hidden sheet, select the desired worksheet and click OK.
As the Internet has become significantly important and unavoidable, you can publish your data and make it available to almost any computer in the world. An intranet is a privately owned, company centered, group of computers connected inside of a particular company using the same technology as the Internet to share and exchange information. This allows you to publish your information inside of the company even if different employees use different computers and operating systems. In Microsoft Excel, you can publish just one worksheet or the whole workbook. To perform publishing, first decide on what you want to publish, a worksheet or the whole workbook. We will save the current workbook as a web page. |
|
|
|
|
Workbooks |
|
Introduction |
A workbook is a group of worksheets that belong to the same document. When you work on more than one workbooks in Microsoft Excel. The group of workbooks you are using is considered a collection and it is store in a collection called Workbooks. |
|
Creating a Workbook |
|
Creating a workbook is equivalent to creating a file. To proceed, you can click the New button on the Standard toolbar or on the main menu, you can click File -> New... To programmatically create a workbook, call the Add() method of the Workbooks collection. |
| Previous | Copyright © 2002-2007 FunctionX, Inc. | Next |