Introduction to Database Visual Support
|
Introduction to Database Visual Support |
|
A Data Source
Introduction
To make database development user friendly and graphically-driven, Microsoft Visual Studio provides its own set of tools. Some of these tools are available from the Toolbox. Some other tools are provided as classes you can use. As an example, we defined a data set as a system of values. The values are kept in one or more lists. We also saw that, to support this system, the .NET Framework provides a class named DataSet. This class is represented in the Data section of the Toolbox of Microsoft Visual Studio by the object of the same name.
|
|
|
Adding a Data Source |
Instead of using the DataSet object from the Toolbox, Microsoft Visual Studio provides a technique that allows you to automatically get a data set object by creating a connection to a database. The data set would be filled with the tables from the database. To use it, you can first display the Data Source window. To display the Data Source, on the main menu, click Data -> Show Data Sources.
To create a data source:
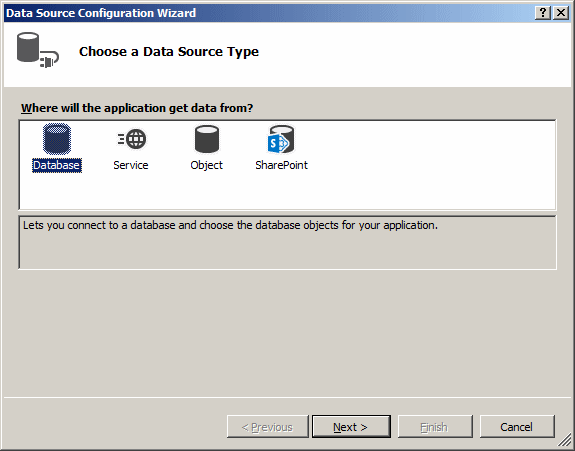
In the first page of the Data Source Configuration Wizard, you must specify the type of data source you want to create:
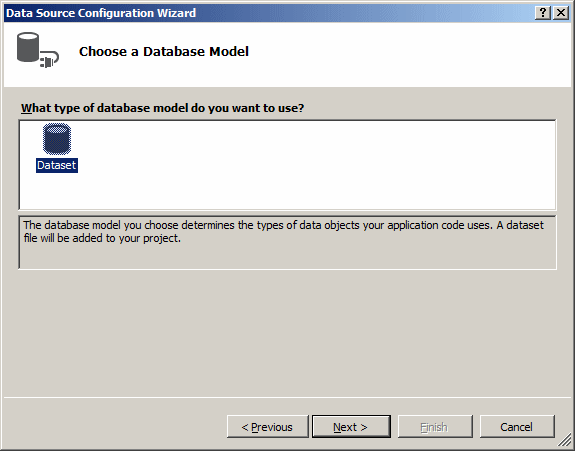
If you click Database and click Next, the second page of the wizard allows you to create a data set:
The third page of the wizard allows you to select an existing connection or create a new one. To select an existing connection, you can click the arrow of the combo box and select from the list. If you click the New Connection button, the Add Connection dialog box would come up. If you have many server or you have Microsoft SQL Server installed on many computers, click the arrow of the Server Name combo box and select the name of the server:
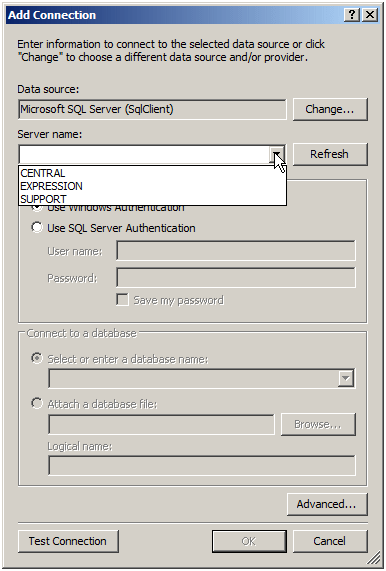
If you are going to use a database on the same computer where you are creating the application, type (local). Next, in the Connect to a Database section, to select a database, click the arrow of the Select or Enter a Database Name combo box to display the list of available databases from the selected server. After making the selections, you can click Test Connection to make sure the connection is alright. Once everything is alright, click OK.
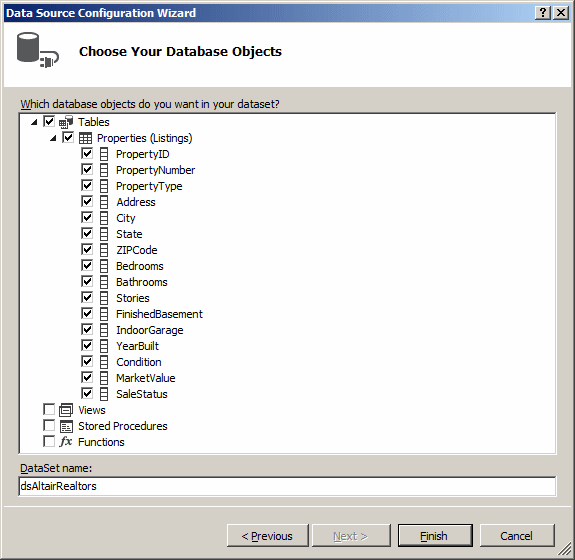
After making the selection, click Next. In the third page of the wizard, you would specify a name for the connection string, and click Next. In the fourth page of the wizard, you have the option of selecting one or more tables (and other types of objects) to include in your data set. To do this, you can click the check boxes in the list. If you do not specify the tables, you can click Finish and, later on, you can reconfigure the data source and select the tables (and/or other types of objects). After making your selection, you can click Finish.
|
|
|
The Characteristics of a Data Set |
When you click the Finish button of the Data Source Configuration Wizard, Microsoft Visual Studio generates many classes (XML Schemas) and creates a data set object specially made and configured for your database. Practically, the studio creates a class named after the name you gave to the data set and this class would be derived from the DataSet class. To examine this created class, from the Solution Explorer, you can open the file that holds the name of the data set followed by .Designer.cs.
Among the objects created in the data set class is a class that represents the table (or each table) you selected in the last page of the Data Source Configuration Wizard. This class for the table is derived from the DataTable class and implements the System.Collections.IEnumerable interface. In order to use this new table in your code, you must declare a variable for it. Once you have done that, you can access the characteristics (properties and methods) of the table or its parent.
Although the data set created from the Toolbox and the one generated from creating a data source have many differences, they still share the common definition of being data sets. As mentioned earlier, a data set created from adding a data source contains the table(s) (including its (their) column(s) and record(s), if any) you would have selected. This allows you to access any of the characteristics of a data set.
|
Introduction |
Microsoft SQL Server does not provide user-friendly objects that a user can use to perform the necessary operations of a regular application. That is why you use Microsoft Visual Studio to create an application made of good looking Windows controls. The controls of a Windows application are meant to serve all types of applications, not just databases. If you want a Windows control of your application to use the values of your database, you must create a type of link between the control and the column of a table. This process is referred to as binding. The object that serves this connection is referred to as a binding source.
|
Creating a Binding Source |
To support binding sources, the .NET Framework
provides the BindingSource class from the
System.Windows.Forms namespace. To visually create a binding
source, from the Data section of the Toolbox, click BindingSource
![]() and click the form or container of your application. Because it is a
non-visual object, its label would be positioned under the form. You can
then specify its characteristics in the Properties window.
and click the form or container of your application. Because it is a
non-visual object, its label would be positioned under the form. You can
then specify its characteristics in the Properties window.
To programmatically create a binding source, declare a variable of type BindingSource. The class is equipped with three constructors. The default constructor allows you to simply declare the variable. Here is an example:
private void btnBindingSource_Click(object sender, EventArgs e)
{
    BindingSource bsNames = new BindingSource();
}
|
The Data Source of a Binding Source |
If you create a binding source, obviously you must give it a name. If you create it from the Toolbox, you can accept or change its name in the Properties window. Besides its name, the second most important detail of a binding source is the list that holds its values. This list is referred to as the data source. To make the binding source as flexible as possible, the data source can be almost any type of list, including an array. In reality, any class that implements the IList interface is a candidate to be a data source.
To support data sources, the BindingSource class is equipped with a property named DataSource, which is of type object. The idea of using the vague object type indicates that many types, but not all types, of objects or lists can be used as data sources.
To programmatically specify the data source of a binding source, first create your list, then assign it to the DataSource property of your BindingSource object. Here is an example:
private void btnBindingSource_Click(object sender, EventArgs e)
{
    BindingSource bsNames = new BindingSource();
    List<string> strNames = new List<string>();

    strNames.Add("Vicky Bisso");
    strNames.Add("Amy Warren");
    strNames.Add("Chrissie Childs");
    strNames.Add("Martial Otto");

    bsNames.DataSource = strNames;
}
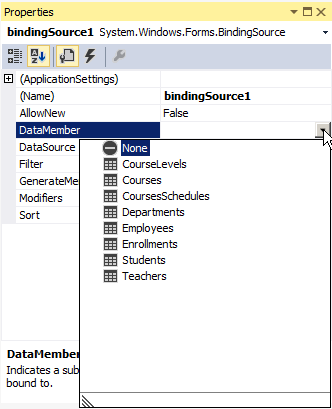
To visually specify the data source of a binding source, access the Properties window of your BindingSource object. In the Properties window, click DataSource and click the arrow of its combo box:

|
|
Introduction
After creating a data set and a data source, the next step is to indicate to each control where its data would come from. To assist you with this task, Microsoft Visual Studio includes a tool that allows you to create an object that can retrieve the values (data) from a table and make them available to the Windows controls. This object is called a table adapter.
Creating a Table Adapter
There are various ways you can create a table adapter:
|
|
|
The Binding Navigator |
|
Introduction |
If you drag a table from the Data Source window and drop it on a form, Microsoft Visual Studio adds the necessary Windows controls to the form and binds them to the columns of the table. To move from one record to another, you would need a way to navigate among the records. You can manually take care of this if you want. Alternatively, the .NET Framework provides a class named BindingNavigator that contains all the necessary functionality for this task.
|
Creating a Binding Navigator |
There are various ways you can create a binding navigator:
|
|
| Column | HeaderText | Width |
| PropertyID | Prop ID | 50 |
| PropertyNumber | Property # | 65 |
| PropertyType | Type | 90 |
| Address | 130 | |
| City | 90 | |
| State | 40 | |
| ZIPCode | ZIP Code | 60 |
| Bedrooms | Beds | 40 |
| Bathrooms | Baths | 50 |
| Stories | 60 | |
| FinishedBasement | Finished Basement? | 110 |
| IndoorGarage | Indoor Garage? | 90 |
| YearBuilt | Year | 40 |
| Condition | 70 | |
| MarketValue | Value | 70 |
| SaleStatus | Status | 60 |


|
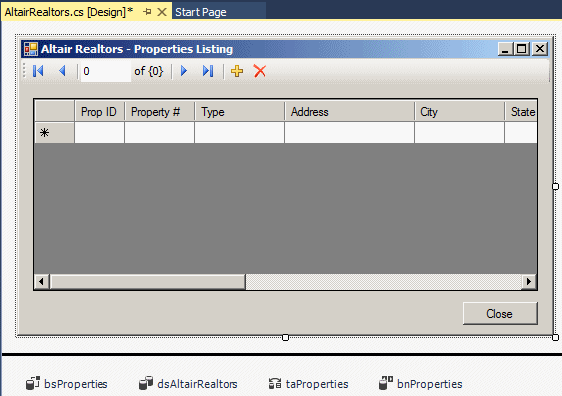
Automatically Generating the Visual Objects |
Instead of manually adding the visual objects as we have done so far, you can ask Microsoft Visual Studion to generate those objects for you and make them part of your database. When you add a data source to your project, Microsoft Visual creates a button for each of the database objects (tables, views, stored procedures) you will have selected for your data set in the wizard. All you have to do is to add each of those buttons to the appropriate form.
|
|

 |
||||||||||||||||||||||||
|
||||||||||||||||||||||||
using System;
using System.Collections.Generic;
using System.ComponentModel;
using System.Data;
using System.Drawing;
using System.Linq;
using System.Text;
using System.Threading.Tasks;
using System.Windows.Forms;
namespace LambdaSquareApartments1
{
public partial class LambdaSquareApartments : Form
{
public LambdaSquareApartments()
{
InitializeComponent();
}
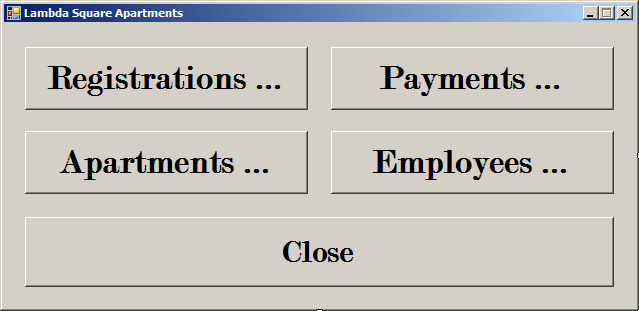
private void btnRegistrations_Click(object sender, EventArgs e)
{
Registrations regs = new Registrations();
regs.Show();
}
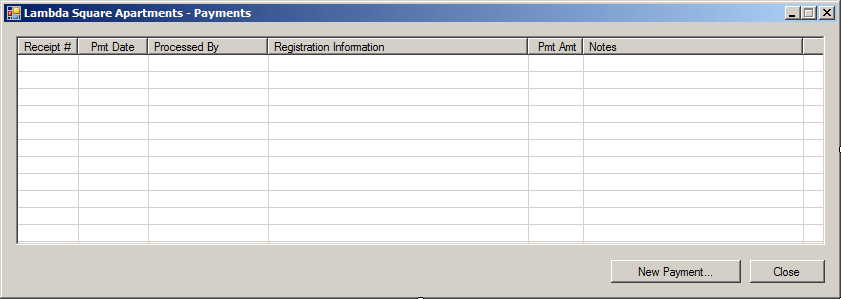
private void btnRentPayments_Click(object sender, EventArgs e)
{
Payments pmts = new Payments();
pmts.Show();
}
private void btnApartments_Click(object sender, EventArgs e)
{
Apartments aparts = new Apartments();
aparts.Show();
}
private void btnEmployees_Click(object sender, EventArgs e)
{
Employees empls = new Employees();
empls.Show();
}
private void btnClose_Click(object sender, EventArgs e)
{
Close();
}
}
}
| Employee # | First Name | Last Name | Title |
| 40685 | Justine | Sandt | Rent Manager |
| 73048 | Raymond | Wilkinson | |
| 60949 | Mark | Reason | Maintenance Technician |
| 38408 | Marc | Knights | Rent Associate |
| 93947 | Leonard | Goulet | Owner - General Manager |
| 20448 | Nancy | Longhorn | Rent Associate |
| Regist Date | Employeee # | Tenant Code | First Name | Last Name | Marital Status | Tenancy | Children | Phone # | Email Address | Unit | Start Date |
| 2014-06-12 | 38408 | 29-485-05 | Ann | Sanders | Married | Active | 1 | (240) 524 -2831 | annsanders@emailcity.com | 139749 | 2014-07-01 |
| 2014-06-15 | 20448 | 83-400-85 | Mahty | Shaoul | Married | Active | 2 | 202-729-1574 | mshaoulman@gmail.com | 928364 | 2014-09-01 |
| 2014-06-22 | 40685 | 48-602-73 | Frank | Ulm | Single | Active | 0 | (301) 882-0704 | fulm112244@yaho.com | 729397 | 2014-07-01 |
| 2014-06-22 | 93947 | 24-385-30 | Elizabeth | Provoski | Separated | Active | 1 | (443) 974-9631 | eprevalence@yahoo.com | 844850 | 2014-08-01 |
| 2014-07-23 | 93947 | 92-048-11 | Grace | Curryan | Married | Active | 1 | (240) 927-0993 | gcarrier@gmail.com | 297297 | 2014-09-01 |
| 2014-07-25 | 38408 | 51-304-58 | Tracy | Warrens | Divorced | Active | 2 | 202-793-6924 | twarrior12@hotmail.coom | 492739 | 2014-08-01 |
| 2014-08-01 | 38408 | 72-384-04 | Paul | Yamo | Married | Active | 3 | (410-792-7045 | pyamo@hr.umd.edu | 384068 | 2014-10-01 |
| 2014-08-10 | 40685 | 62-405-29 | Nancy | Shermann | Single | Active | 1 | (703) 338-2973 | nsherre@emailcity.com | 829475 | 2014-09-01 |
| 2014-09-12 | 20448 | 72-484-04 | Michael | Tiernan | Single | Active | 0 | 301-274-9285 | resdev.globelan.net | 829479 | 2014-11-01 |
| 2014-10-05 | 38408 | 60-285-83 | Phillippe | Anderson | Single | Active | 0 | 202-729-1574 | philanders@gmail.com | 496055 | 2014-11-01 |
| Pmt Date | Employee # | Regist Date | Amt Paid | Notes |
| 2014-06-12 | 38408 | 1001 | 650.0000 | This is the payment for the security deposit. |
| 2014-06-20 | 40685 | 1003 | 500.0000 | Security Deposit |
| 2014-07-27 | 38408 | 1003 | 925.0000 | |
| 2014-07-28 | 38408 | 1001 | 1150.0000 | |
| 2014-08-01 | 40685 | 1006 | 850.0000 | Security Deposit |
| 2014-08-08 | 40685 | 1007 | 850.0000 | Security Deposit |
| 2014-08-08 | 40685 | 1008 | 500.0000 | Security Deposit |
| 2014-08-13 | 40685 | 1004 | 600.0000 | Security Deposit |
| 2014-08-14 | 20448 | 1002 | 850.0000 | Payment for security deposit |
| 2014-08-25 | 38408 | 1001 | 1150.0000 | |
| 2014-08-25 | 38408 | 1002 | 1350.0000 | |
| 2014-08-26 | 20448 | 1003 | 925.0000 | |
| 2014-08-27 | 40685 | 1004 | 1100.0000 | |
| 2014-08-30 | 38408 | 1006 | 1350.0000 | |
| 2014-09-17 | 40685 | 1009 | 650.0000 | Security Deposit |
| 2014-09-18 | 20448 | 1005 | 550.0000 | Security Deposit |
| 2014-09-25 | 20448 | 1004 | 1100.0000 | |
| 2014-09-25 | 20448 | 1006 | 1350.0000 | |
| 2014-09-25 | 20448 | 1008 | 885.0000 | |
| 2014-09-28 | 20448 | 1001 | 1150.0000 | |
| 2014-09-28 | 40685 | 1002 | 1350.0000 | |
| 2014-09-28 | 40685 | 1005 | 1150.0000 | |
| 2014-10-05 | 38408 | 1003 | 925.0000 | |
| 2014-10-08 | 40685 | 1010 | 500.0000 | Security Deposit |
| 2014-10-24 | 38408 | 1004 | 1100.0000 | |
| 2014-10-24 | 38408 | 1005 | 1150.0000 | |
| 2014-10-25 | 40685 | 1006 | 1350.0000 | |
| 2014-10-25 | 40685 | 1007 | 1250.0000 | |
| 2014-10-27 | 93947 | 1001 | 1150.0000 | |
| 2014-10-29 | 93947 | 1008 | 885.0000 | |
| 2014-10-30 | 38408 | 1002 | 1350.0000 | |
| 2014-10-31 | 40685 | 1003 | 925.0000 | |
| 2014-11-26 | 38408 | 1002 | 1350.0000 | |
| 2014-11-26 | 38408 | 1008 | 885.0000 | |
| 2014-11-27 | 38408 | 1006 | 1350.0000 | |
| 2014-11-28 | 20448 | 1004 | 1100.0000 | |
| 2014-11-28 | 38408 | 1005 | 1150.0000 | |
| 2014-11-28 | 38408 | 1007 | 1250.0000 | |
| 2014-11-29 | 93947 | 1001 | 1150.0000 | |
| 2014-11-30 | 38408 | 1003 | 925.0000 | |
| 2014-11-30 | 20448 | 1009 | 1150.0000 | |
| 2014-11-30 | 20448 | 1010 | 895.0000 | |
| 2014-12-25 | 38408 | 1006 | 1350.0000 | |
| 2014-12-25 | 38408 | 1007 | 1250.0000 | |
| 2014-12-27 | 20448 | 1009 | 1150.0000 | |
| 2014-12-28 | 20448 | 1001 | 1150.0000 | |
| 2014-12-28 | 38408 | 1004 | 1100.0000 | |
| 2014-12-28 | 38408 | 1005 | 1150.0000 | |
| 2014-12-28 | 38408 | 1010 | 895.0000 | |
| 2014-12-30 | 20448 | 1003 | 925.0000 | |
| 2014-12-31 | 38408 | 1002 | 1350.0000 | |
| 2014-12-31 | 20448 | 1008 | 885.0000 | |
| 2015-01-23 | 20448 | 1005 | 1150.0000 | |
| 2015-01-26 | 38408 | 1001 | 1150.0000 | |
| 2015-01-28 | 93947 | 1003 | 925.0000 | |
| 2015-01-29 | 93947 | 1002 | 1350.0000 | |
| 2015-02-10 | 20448 | 1004 | 100.0000 | This is a fee for late payment. |
| 2015-02-10 | 20448 | 1004 | 1100.0000 | |
| 2015-02-20 | 20448 | 1001 | 1150.0000 | |
| 2015-02-25 | 20448 | 1005 | 1150.0000 | |
| 2015-02-26 | 38408 | 1002 | 1350.0000 | |
| 2015-03-01 | 38408 | 1004 | 1100.0000 | |
| 2015-03-03 | 40685 | 1003 | 925.0000 |