|
In this exercise, we will use progress bars and
timers.
Prerequisites:
Besides the Progress control, Visual C++ provides two other progress-oriented controls: the Microsoft Progress Control Version 5.0 and the Microsoft Progress Control Version 6.0 with the main difference on their ability to assume one or two orientations. |
|
Practical Learning: Introducing Body Monitor |
|
- Start Microsoft Visual C++ and create a new MFC AppWizard (exe)
application named BodyMonitor
- Create the project as a Dialog Based and set the Dialog Title
as Body Monitor without the About Box
- Delete the TODO line and move the buttons to the bottom section of the dialog
|
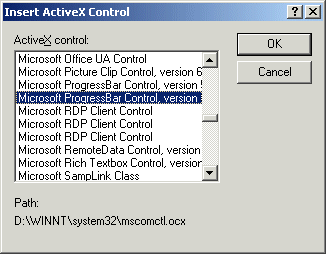
To add a progress bar to your application, from the Insert ActiveX Control dialog box, select the desired one. For this lesson, because everything available in Version 5.0 is also available in Version 6.0, we will use the later.
After adding a progress bar to a parent window, it assumes a horizontal display. This is controlled by the Orientation property (not available in Version 5.0) whose default value is 0 –
ccOrientationHorizontal. If you want the progress bar to be vertical, change this property to a
1 – ccOrientationVertical value.
The range of values that a progress bar can assume is set using the Min property for the minimum value and the Max field for the highest
value.
|
Practical Learning: Creating Progress Bars |
|
- Right-click anywhere on the dialog box and click Insert ActiveX Control
- In the ActiveX Control list of the Insert ActiveX Control dialog box, click Microsoft ProgressBar Control, version 6.0
- Click OK
- Right-click the newly added control and click Properties. In the
Properties window, click the Control tab and change the Orientation property to
1 – ccOrientationVertical
- On the dialog box, right-click the ProgressBar and click Copy. Right-click anywhere on the dialog box and click Paste many times until you get 10 ProgressBar controls
- Design the dialog box as follows (only the top labels and the
ProgressBar controls need IDs):
 |
| Control |
ID |
Caption |
Additional Properties |
| Static Text |
 |
IDC_VAL_BLOOD |
000 |
Align Text: Center |
| Static Text |
|
IDC_VAL_HEART |
000 |
Align Text: Center |
| Static Text |
|
IDC_VAL_KIDNEY |
000 |
Align Text: Center |
| Static Text |
|
IDC_VAL_BRAIN |
000 |
Align Text: Center |
| Static Text |
|
IDC_VAL_LLUNG |
000 |
Align Text: Center |
| Static Text |
|
IDC_VAL_RLUNG |
000 |
Align Text: Center |
| Static Text |
|
IDC_VAL_PANCREAS |
000 |
Align Text: Center |
| Static Text |
|
IDC_VAL_LIVER |
000 |
Align Text: Center |
| Static Text |
|
IDC_VAL_BLADDER |
000 |
Align Text: Center |
| Static Text |
|
IDC_VAL_STOMACH |
000 |
Align Text: Center |
| ProgressBar |
|
IDC_PRGR_BLOOD |
000 |
Align Text: Center |
| ProgressBar |
|
IDC_PRGR_HEART |
|
|
| ProgressBar |
|
IDC_PRGR_KIDNEY |
|
|
| ProgressBar |
|
IDC_PRGR_BRAIN |
|
|
| ProgressBar |
|
IDC_PRGR_LLUNG |
|
|
| ProgressBar |
|
IDC_PRGR_RLUNG |
|
|
| ProgressBar |
|
IDC_PRGR_PANCREAS |
|
|
| ProgressBar |
|
IDC_PRGR_LIVER |
|
|
| ProgressBar |
|
IDC_PRGR_BLADDER |
|
|
| ProgressBar |
|
IDC_PRGR_STOMACH |
|
|
|
- Press Ctrl + W to access the ClassWizard. Add a CString Value Variable for
each label that has an ID and Add a CProgressBar Control Variable
for each ProgressBar control as follows:
| Identifier |
Value Variable |
Control Variable |
| IDC_VAL_BLOOD |
m_ValBlood |
|
| IDC_VAL_HEART |
m_ValHeart |
|
| IDC_VAL_KIDNEY |
m_ValKidney |
|
| |
m_ValBrain |
|
| |
m_ValLLung |
|
| |
m_ValRLung |
|
| |
m_ValPancreas |
|
| |
m_ValLiver |
|
| |
m_ValBladder |
|
| |
m_ValStomach |
|
| IDC_PRGR_BLOOD |
|
m_Blood |
| IDC_PRGR_HEART |
|
m_Heart |
| IDC_PRGR_KIDNEY |
|
m_Kidney |
| IDC_PRGR_BRAIN |
|
m_Brain |
| IDC_PRGR_LLUNG |
|
m_LLung |
| IDC_PRGR_RLUNG |
|
m_RLung |
| IDC_PRGR_PANCREAS |
|
m_Pancreas |
| IDC_PRGR_LIVER |
|
m_Liver |
| IDC_PRGR_BLADDER |
|
m_Bladder |
| IDC_PRGR_STOMACH |
|
m_Stomach |
- Click OK
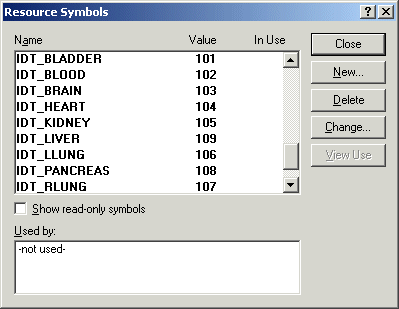
- Using the Resource Symbols dialog box, add ten new identifiers as
IDT_BLOOD, IDT_HEART, IDT_KIDNEY, IDT_BRAIN, IDT_LLUNG, IDT_RLUNG,
IDT_PANCREAS, IDT_LIVER, IDT_BLADDER, and IDT_STOMACH
- Click Close
- In the OnInitDialog() event of the dialog class, create the following timers and generate a random seed:
BOOL CBodyMonitorDlg::OnInitDialog()
{
	CDialog::OnInitDialog();

	// Set the icon for this dialog.  The framework does this automatically
	//  when the application's main window is not a dialog
	SetIcon(m_hIcon, TRUE);			// Set big icon
	SetIcon(m_hIcon, FALSE);		// Set small icon

	// TODO: Add extra initialization here
	SetTimer(IDT_BLOOD, 650, NULL);
	SetTimer(IDT_HEART, 200, NULL);
	SetTimer(IDT_KIDNEY, 450, NULL);
	SetTimer(IDT_BRAIN, 1000, NULL);
	SetTimer(IDT_LLUNG, 750, NULL);
	SetTimer(IDT_RLUNG, 850, NULL);
	SetTimer(IDT_PANCREAS, 800, NULL);
	SetTimer(IDT_LIVER, 1200, NULL);
	SetTimer(IDT_BLADDER, 550, NULL);
	SetTimer(IDT_STOMACH, 1500, NULL);

	srand(static_cast<unsigned>(time(NULL)));

	return TRUE;  // return TRUE  unless you set the focus to a control
}
|
- Save All
|
|