Home

MFC Collections: The CArray Class


A Collection as an Array


Introduction

A collection is a series of items that can be described using the same characteristics. That is, a collection is a list of items where all object share the same properties. A simple collection can be a list of numbers. Another simple collection can be a list of names. A complex collection can be made of objects created from a class. An example of such a collection would be a list of people or a list cars.

To support lists, the MFC library provides a rich series of collection classes. The MFC library divides its collection classes in two categories: template-based and non-template classes. The template classes are CArray, CList, CMap, CTypedPtrArray, CTypedPtrList, and CTypedPtrMap. The non-template classes are CObArray, CByteArray, CDWordArray, CPtrArray, CStringArray, CWordArray, CUIntArray, CObList, CPtrList, CStringList, CMapPtrToWord, CMapPtrToPtr, CMapStringToOb, CMapStringToPtr, CMapStringToString, CMapWordToOb, and CMapWordToPtr.

Most template-based classes use the same member functions and the same functionality. As an example of a template-based class, we are going to review the CArray class. We will review the non-template classes when we study serialization.

Introduction to the CArray Class

The primary type of collection offered by the C language is a string, which is a list of characters. C also supports arrays, which as series of items. Here is an example:

void CExerciseDlg::OnBnClickedCollectionBtn()
{
    int numbers[] = { 712003, 605729, 384759, 728802 };
}

In the MFC, to get a collection of names, you can create it as an array of CString values. Here is an example:

void CExerciseDlg::OnBnClickedCollectionBtn()
{
    int numbers[] = { 712003, 605729, 384759, 728802 };
    CString lstItemsNames[] = { L"Women Coat", L"Men Jacket", L"Teen Jeans",
	                        L"Women Bathing Suit", L"Children Playground Dress" };
}

In the same way, you can create array of various types. These are collections.

An MFC Collection as an Array

The MFC library provides a vast collection of classes that you can use to create lists. The MFC library provides two categories of collection classes: template-based and not. If you want to use one of the template-based classes, you must include the afxtempl.h header file in the document where you plan to use the class.

One of the template classes provided by the MFC library is called CArray. The CArray class accomplishes two purposes: it provides the same functionality as a C/C++ array but beyond that, it can grow and shrink at will, which is the main limitation of a C/C++ array.

Practical LearningPractical Learning: Introducing Collections

  1. Start Microsoft Visual C++ or Visual Studio
  2. To create a new application, on the main menu, click File -> New Project...
  3. In the middle list, click MFC Application. Set the Name to DepartmentStore1
  4. Click OK
  5. In the first page of the wizard, click Next
  6. In the second page of the wizard, click Dialog-Based
  7. Click Next
  8. In the third page of the wizard, click Next
  9. In the fourth page, click Next
  10. In the last page, click Finish
  11. Click the TODO line and press Delete
  12. While the OK button is selected, press Delete
  13. Change the caption of the Cancel button to Close
  14. Design the dialog box as follows:
     
    Department Store
    Control Caption ID Other Properties
    Static Text   Item #:  
    Edit Control   IDC_ITEMNUMBER  
    Static Text Item Name:    
    Edit Control   IDC_ITEMNAME  
    Static Text Item Size:    
    Edit Control   IDC_ITEMSIZE  
    Static Control UnitPrice:    
    Edit Control   IDC_UNITPRICE Align Text: Right
    Button | < IDC_FIRST  
    Button << IDC_PREVIOUS  
    Static Text 000 of 000 IDC_RECORDNUMBER  
    Button >> IDC_NEXT  
    Button > | IDC_LAST  
    Button Close IDCANCEL  
  15. Right-click each edit control and the 000 of 000 static control then click Add Variable...
  16. Create the Value variables as follows:
     
    ID Value Variable Variable Type
    IDC_ITEMNUMBER m_ItemNumber CString
    IDC_ITEMNAME m_ItemName CString
    IDC_ITEMSIZE m_ItemSize CString
    IDC_UNITPRICE m_UnitPrice double
    IDC_RECORDNUMBER m_RecordNumber CString
  17. In the Solution Explorer, right-click DepartmentStore1 -> Add -> Class...
  18. In the Add Class dialog box, click C++ Class and click Add
  19. Set the Class Name to CStoreItem
  20. Click Finish
  21. Change the StoreItem.h header file as follows:
    #pragma once
    
    class CStoreItem
    {
    public:
    	CStoreItem();
    	CStoreItem(CString number, CString name,
    		   CString size, double price);
    	CStoreItem(const CStoreItem &item);
    	CStoreItem &operator=(const CStoreItem& item);
    	virtual ~CStoreItem();
    
    private:
    	CString nbr;
    	CString nm;
    	CString sz;
    	double  uprice;
    
    public:
    	CString CStoreItem::getItemNumber();
    	void setItemNumber(CString no);
    	CString getItemName();
    	void setItemName(CString desc);
    	CString getItemSize();
    	void setItemSize(CString s);
    	double getUnitPrice();
    	void setUnitPrice(double price);
    };
  22. Access the StoreItem.cpp source file and change it as follows:
    #include "StdAfx.h"
    #include "StoreItem.h"
    
    CStoreItem::CStoreItem(void)
    	: nbr(_T("")), nm(_T("")), sz(_T("")), uprice(0.00)
    {
    }
    
    CStoreItem::CStoreItem(CString number, CString name,
    		       CString size, double price)
    	: nbr(number), nm(name), sz(size), uprice(price)
    {
    	
    }
    
    CStoreItem::CStoreItem(const CStoreItem &item)
    {
    	nbr    = item.nbr;
    	nm     = item.nm;
    	sz     = item.sz;
    	uprice = item.uprice;
    }
    	
    CStoreItem &CStoreItem::operator=(const CStoreItem& item)
    {
    	nbr    = item.nbr;
    	nm     = item.nm;
    	sz     = item.sz;
    	uprice = item.uprice;
    
    	return *this;
    }
    
    CStoreItem::~CStoreItem(void)
    {
    }
    
    // CStoreItem member functions
    
    CString CStoreItem::getItemNumber()
    {
    	return nbr;
    }
    
    void CStoreItem::setItemNumber(CString no)
    {
    	nbr = no; 
    }
    
    CString CStoreItem::getItemName()
    {
    	return nm;
    }
    
    void CStoreItem::setItemName(CString desc)
    {
    	nm = desc;
    }
    
    CString CStoreItem::getItemSize()
    {
    	return sz;
    }
    
    void CStoreItem::setItemSize(CString s)
    {
    	sz = s;
    }
    
    double CStoreItem::getUnitPrice()
    {
    	return uprice;
    }
    
    void CStoreItem::setUnitPrice(double price)
    {
    	uprice = price;
    }

Creating an Array List

If you plan to create a collection of CArray values or objects, you must first decide the type of values of the collection. You can use one of the existing primitive data types of the C language (int, short, double, and their variants). You can also use one of the MFC defined classes. If none of the C++ data types and none of the MFC classes suit you, you can create your own class as you see fit.

To declare a CArray variable, type the name of the class followed by <>. Inside <>, provide two parameters: the type of value that the operations will produce and the type of values that the member functions will access. Here is an example:

// ExampleDlg.cpp : implementation file
//

#include "stdafx.h"
#include "Exercise1.h"
#include "ExampleDlg.h"
#include "afxdialogex.h"
#include <afxtempl.h>

. . .

void CExampleDlg::OnBnClickedCollectionBtn()
{
    CArray<int, int> iNumbers;
}

If you are creating a collection of objects (each item is of a type class), you should pass the second parameter as a reference.

Practical LearningPractical Learning: Initializing a CArray List

  1. In the Solution Explorer, double-click stdafx.h
  2. Include the afxtempl.h template library:
    // stdafx.h : include file for standard system include files,
    // or project specific include files that are used frequently,
    // but are changed infrequently
    
    #pragma once
    
    #ifndef VC_EXTRALEAN
    #define VC_EXTRALEAN		// Exclude rarely-used stuff from Windows headers
    #endif
    
    // Modify the following defines if you have to target a platform prior to the ones specified below.
    // Refer to MSDN for the latest info on corresponding values for different platforms.
    #ifndef WINVER				// Allow use of features specific to Windows 95 and Windows NT 4 or later.
    #define WINVER 0x0400		// Change this to the appropriate value to target Windows 98 and Windows 2000 or later.
    #endif
    
    #ifndef _WIN32_WINNT		// Allow use of features specific to Windows NT 4 or later.
    #define _WIN32_WINNT 0x0400		// Change this to the appropriate value to target Windows 98 and Windows 2000 or later.
    #endif						
    
    #ifndef _WIN32_WINDOWS		// Allow use of features specific to Windows 98 or later.
    #define _WIN32_WINDOWS 0x0410 // Change this to the appropriate value to target Windows Me or later.
    #endif
    
    #ifndef _WIN32_IE			// Allow use of features specific to IE 4.0 or later.
    #define _WIN32_IE 0x0400	// Change this to the appropriate value to target IE 5.0 or later.
    #endif
    
    #define _ATL_CSTRING_EXPLICIT_CONSTRUCTORS	// some CString constructors will be explicit
    
    // turns off MFC's hiding of some common and often safely ignored warning messages
    #define _AFX_ALL_WARNINGS
    
    #include <afxwin.h>         // MFC core and standard components
    #include <afxext.h>         // MFC extensions
    #include <afxdisp.h>        // MFC Automation classes
    
    #include <afxdtctl.h>		// MFC support for Internet Explorer 4 Common Controls
    #ifndef _AFX_NO_AFXCMN_SUPPORT
    #include <afxcmn.h>			// MFC support for Windows Common Controls
    #endif // _AFX_NO_AFXCMN_SUPPORT
    #include <afx.h>
    
    #include <afxtempl.h>
    
  3. In the Solution Explorer, double-click DepartmentStore1Dlg.h
  4. In the header file, declare a private CArray variable named StoreItems as follows:
    // DepartmentStore1Dlg.h : header file
    //
    
    #pragma once
    
    #include "StoreItem.h"
    
    // CDepartmentStore1Dlg dialog
    class CDepartmentStore1Dlg : public CDialogEx
    {
    // Construction
    public:
    	CDepartmentStore1Dlg(CWnd* pParent = NULL);// standard constructor
    
    // Dialog Data
    	enum { IDD = IDD_DEPARTMENTSTORE1_DIALOG };
    
    	protected:
    	virtual void DoDataExchange(CDataExchange* pDX);// DDX/DDV support
    
    	CArray<CStoreItem, CStoreItem&> StoreItems;
    	INT_PTR CurrentPosition;
    
    // Implementation
    protected:
    	HICON m_hIcon;
    
    	// Generated message map functions
    	virtual BOOL OnInitDialog();
    	afx_msg void OnSysCommand(UINT nID, LPARAM lParam);
    	afx_msg void OnPaint();
    	afx_msg HCURSOR OnQueryDragIcon();
    	DECLARE_MESSAGE_MAP()
    public:
    	CString m_ItemNumber;
    	CString m_ItemName;
    	CString m_ItemSize;
    	double m_UnitPrice;
    	CString m_RecordNumber;
    };

Operations on Arrays


An Empty Collection

When a CArray variable has been declared, its list is primarily empty, until you start adding items to it. At any time, to find out whether the list is empty or not, you can check the returned value of the CArray::IsEmpty() member function. Its syntax is:

BOOL IsEmpty() const;

This member function allows you to find out if the list already contains at least one member. Here is an example of calling this member function:

void CExampleDlg::OnBnClickedCollectionBtn()
{
    CArray<int, int> iNumbers;

    if( iNumbers.IsEmpty() )
	AfxMessageBox(L"The list is currently empty.");
    else
	AfxMessageBox(L"The collection already contains at least one value.");
}

Practical LearningPractical Learning: Checking List Emptiness

  1. On the main menu, click View -> Class Wizard...
  2.  In the Class Name combo box, select CDepartmentStore1Dlg and click the Commands tab
  3. In the Objects IDs list, double-click IDC_FIRST
  4. Accept the suggested name of the event and click OK
  5. In the Objects IDs list, double-click IDC_PREVIOUS
  6. Accept the suggested name of the event and click OK
  7. In the Objects IDs list, double-click IDC_NEXT
  8. Accept the suggested name of the event and click OK
  9. In the Objects IDs list, double-click IDC_LAST
  10. Accept the suggested name of the event and click OK
  11. Click Edit Code
  12. Implement the events as follows:
    void CDepartmentStore1Dlg::OnBnClickedFirstBtn()
    {
    	// TODO: Add your control notification handler code here
    	if( this->StoreItems.IsEmpty() == TRUE )
    		return;
    }
    
    void CDepartmentStore1Dlg::OnBnClickedPreviousBtn()
    {
    	// TODO: Add your control notification handler code here
    	if( this->StoreItems.IsEmpty() == TRUE )
    		return;
    }
    
    void CDepartmentStore1Dlg::OnBnClickedNextBtn()
    {
    	// TODO: Add your control notification handler code here
    	if( this->StoreItems.IsEmpty() == TRUE )
    		return;
    }
    
    void CDepartmentStore1Dlg::OnBnClickedLastBtn()
    {
    	// TODO: Add your control notification handler code here
    	if( this->StoreItems.IsEmpty() == TRUE )
    		return;
    }

Adding an Item to the Collection

The CArray class provides various options to add an item to its list. The classic technique consists of calling an add-based function. To support this tradition, the CArray class is equipped with the Add() member function. Its syntax is:

INT_PTR Add(ARG_TYPE newElement);

This member function expects as argument the value that would be added. The CArray::Add() member function is mostly meant to add an item at the end of the list. If the list doesn't yet contain any value, then Add() would create its first item. Here is an example:

void CExampleDlg::OnBnClickedCollectionBtn()
{
    CArray<int, int> iNumbers;

    if( iNumbers.IsEmpty() )
	AfxMessageBox(L"The list is currently empty.");
    else
	AfxMessageBox(L"The collection already contains at least one value.");

    iNumbers.Add(712003);

    if( iNumbers.IsEmpty() )
	AfxMessageBox(L"The list is currently empty.");
    else
	AfxMessageBox(L"The collection already contains at least one value.");
}

In the same way, you can keep calling this member function to add as member values as you want. Here is an example:

void CExampleDlg::OnBnClickedCollectionBtn()
{
	CArray<int, int> iNumbers;

	iNumbers.Add(712003);
	iNumbers.Add(605729);
	iNumbers.Add(384759);
	iNumbers.Add(400284);
	iNumbers.Add(728802);
}

Practical LearningPractical Learning: Adding an Item to the Collection

  1. In the Resource View, right-click the name of the project -> Add -> Resource...
  2. In the Add Resource dialog box, click Dialog and click New
  3. In the Properties window, change its ID to IDD_ITEMEDITOR
  4. Design the dialog box as follows:
     
    Fun Department Store - Item Editor
    Control ID Caption Other Properties
    Static Text   Item #:  
    Edit Control IDC_ITEMNUMBER    
    Static Text   Item Name:  
    Edit Control IDC_ITEMNAME    
    Static Text   Item Size:  
    Edit Control IDC_ITEMSIZE    
    Static Control   UnitPrice:  
    Edit Control IDC_UNITPRICE   Align Text: Right
  5. Right-click an unoccupied area of the dialog box and click Class Wizard...
  6. On the right side of the MFC Class Wizard dialog box, click Add Class
  7. In the Class Name, type CItemEditorDlg
  8. In the Base Class, select CDialogEx
  9. In the Dialog ID, select IDD_ITEMEDITOR
     
    MFC Add Class Wizard
  10. Click Finish
  11. In the Class Name, make sure CItemEditorDlg is selected.
    Click the Member Variables tab
  12. In the Member Variables, click IDC_ITEMNUMBER
  13. Click Add Variable...
  14. Set the Member Variable Name to m_ItemNumber
  15. Set the Category to Value and make sure the Variable Type is set to CString
     
    Add Member Variable
  16. Click OK
  17. In the same way, using the IDs in the Member Variable, add the member variables as follows:
     
    ID Value Variable Variable Type
    IDC_ITEMNUMBER m_ItemNumber CString
    IDC_ITEMNAME m_ItemName CString
    IDC_ITEMSIZE m_ItemSize CString
    IDC_UNITPRICE m_UnitPrice double
    MFC Class Wizard
  18. Click OK
  19. Display the first dialog box
  20. Add a new button to it and, using the Properties window, change the following characteristics:
    Caption: Add New Item...
    ID: ID_ADDNEW
     
    Fun Department Store - Item Editor
  21. Double-click the Add New Item... button
  22. Implement its event as follows:
    void CDepartmentStore1Dlg::OnBnClickedAddnew()
    {
        CItemEditorDlg dlg;
    
        if(	dlg.DoModal() == IDOK )
        {
    	CStoreItem si(dlg.m_ItemNumber, dlg.m_ItemName, 
    		      dlg.m_ItemSize, dlg.m_UnitPrice);
    	StoreItems.Add(si);
    
    	OnClickedFirst();
        }
    }


The Initial Size of a Collection

After declaring a CArray variable, you should set its initial size. This is done by calling the CArray::SetSize() member function. Its syntax is:

void SetSize(INT_PTR nNewSize, INT_PTR nGrowBy = -1);

The first argument must be a positive number. If you are creating a brand new list, you should set this argument to 0.

The second argument specifies how much the list will need to grow when it becomes necessary. It may be good idea to let the compiler take care of this aspect. For this reason, this argument is optional.

Here is an example of calling this member function:

void CExampleDlg::OnBnClickedCollectionBtn()
{
    CArray<int, int> iNumbers;

    iNumbers.SetSize(5);
}

When a new item is being added to the list, the compiler increases the amount of memory allocated to the list. Sometimes, the amount increased may be more than was necessary. If you want to intervene in releasing any extra memory that is not used, you can call the CArray::FreeExtra() member function. Its syntax is:

void FreeExtra();

This member function can be used to release unused memory that was allocated when the list of items was increased.

Practical LearningPractical Learning: Setting the Initial Size of a Collection

  1. Scroll up and access the constructor and the CDepartmentStore1Dlg class
  2. Initialize the CArray variable by calling its SetSize() member function and pass 0 to it:
    CDepartmentStore1Dlg::CDepartmentStore1Dlg(CWnd* pParent /*=NULL*/)
    	: CDialog(CDepartmentStore1Dlg::IDD, pParent)
    	, m_ItemNumber(_T(""))
    	, m_ItemName(_T(""))
    	, m_ItemSize(_T(""))
    	, m_UnitPrice(0)
    	, m_RecordNumber(_T(""))
    {
    	m_hIcon = AfxGetApp()->LoadIcon(IDR_MAINFRAME);
    
    	this->StoreItems.SetSize(0);
    }

The Number of Items in the List

As mentioned already, one of the strengths of the CArray class over the regular C++ array is that its list can grow or shrink at will. This means that, when an item is added to, or inserted into, the list, the number of items in the list increases.

To know the number of items in the list, you can call the CArray::GetCount() member function:

INT_PTR GetCount() const;

Since the list is zero-based, the actual number of items is the total - 1. Here is an example:

void CExampleDlg::OnBnClickedCollectionBtn()
{
	CArray<int, int> iNumbers;

	iNumbers.SetSize(5);

	iNumbers.Add(712003);
	iNumbers.Add(605729);
	iNumbers.Add(384759);
	iNumbers.Add(400284);
	iNumbers.Add(728802);

	iNumbers.SetAt(2, 100040);

	CString strNumber;

	strNumber.Format(L"The collection contains %d items", iNumbers.GetCount());
	AfxMessageBox(strNumber);
}

Besides GetCount(), you can call the CArray::GetSize() member function to know the size of the list. The syntax of the GetSize() member function is:

INT_PTR GetSize() const;

This member function returns the size of the list. Like GetCount(), the GetSize() member function returns the total number of items - 1.

Practical LearningPractical Learning: Accessing the Members of an Array

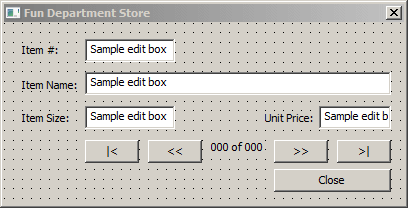
  1. Change the code of the navigation buttons as follows:
    void CDepartmentStore1Dlg::OnClickedFirst()
    {
        // TODO: Add your control notification handler code here
        if( this->StoreItems.IsEmpty() == TRUE )
    	return;
    	
        CurrentPosition = 0;
        CStoreItem curItem = this->StoreItems[CurrentPosition];
    
        this->m_ItemNumber = curItem.getItemNumber();
        this->m_ItemName   = curItem.getItemName();
        this->m_ItemSize   = curItem.getItemSize();
        this->m_UnitPrice  = curItem.getUnitPrice();
        this->m_RecordNumber.Format(_T("%d of %d"),
        	CurrentPosition+1, StoreItems.GetCount());
    	
        UpdateData(FALSE);
    }
    
    void CDepartmentStore1Dlg::OnClickedPrevious()
    {
        // TODO: Add your control notification handler code here
        if( this->StoreItems.IsEmpty() == TRUE )
    	return;
    
        if( CurrentPosition == 0 )
    	return;
        else
        {
    	CurrentPosition--;
    	CStoreItem curItem = this->StoreItems[CurrentPosition];
    
    	this->m_ItemNumber = curItem.getItemNumber();
    	this->m_ItemName   = curItem.getItemName();
    	this->m_ItemSize   = curItem.getItemSize();
    	this->m_UnitPrice  = curItem.getUnitPrice();
    	this->m_RecordNumber.Format(_T("%d of %d"),
    	CurrentPosition+1, StoreItems.GetCount());
        }
    
        UpdateData(FALSE);
    }
    
    void CDepartmentStore1Dlg::OnClickedNext()
    {
        // TODO: Add your control notification handler code here
        if( this->StoreItems.IsEmpty() == TRUE )
    	return;
    
        if( CurrentPosition == StoreItems.GetUpperBound() )
    	this->OnClickedLast();
        else
        {
    	CurrentPosition++;
    	CStoreItem curItem = this->StoreItems[CurrentPosition];
    
    	this->m_ItemNumber = curItem.getItemNumber();
    	this->m_ItemName   = curItem.getItemName();
    	this->m_ItemSize   = curItem.getItemSize();
    	this->m_UnitPrice  = curItem.getUnitPrice();
    	this->m_RecordNumber.Format(_T("%d of %d"),
    			CurrentPosition+1, StoreItems.GetCount());
        }
    
        UpdateData(FALSE);
    }
    
    void CDepartmentStore1Dlg::OnClickedLast()
    {
        // TODO: Add your control notification handler code here
        if( this->StoreItems.IsEmpty() == TRUE )
    	return;
    
        CurrentPosition = this->StoreItems.GetUpperBound();
        CStoreItem curItem = this->StoreItems[CurrentPosition];
    
        this->m_ItemNumber = curItem.getItemNumber();
        this->m_ItemName   = curItem.getItemName();
        this->m_ItemSize   = curItem.getItemSize();
        this->m_UnitPrice  = curItem.getUnitPrice();
        this->m_RecordNumber.Format(_T("%d of %d"),
    		CurrentPosition+1, StoreItems.GetCount());
    
        UpdateData(FALSE);
    }
  2. Execute the application
  3. Click the New Store Item continuously and create the following items:
     
    Item # Item Name Size Unit Price
    712-003 Women Cashmere Lined Glove 8 115.95
    605-729 Men Trendy Jacket Medium 45.85
    384-759 Women Stretch Flare Jeans Petite 27.75
    400-284 Women Belted Sweater Large 15.95
    728-802 Girls Classy Handbag One Size 95.95
    576-807 Women Casual Dress Shoes 9.5M 45.95
    447-205 Boys Hooded Sweatshirt M (7/8) 15.95
    586-807 Girls Velour Dress 10 12.55
    586-686 Women Lace Desire Panty Medium 7.15
    836-973 Infant Girls Ballerina Dress 12M 22.85
    486-960 Men Classic Pinstripe Suit 38 145.95
    240-284 Merino Square Neck Sweater Dress Medium 128.00
  4. Then click the Store Inventory tab
     
    Department Store - Inventory
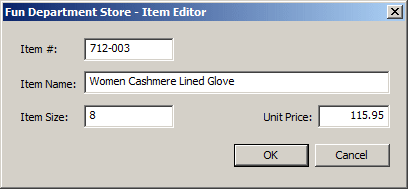
  5. Click the navigation buttons to review the list of items
     
    Department Store - Inventory
     
    Department Store - Inventory
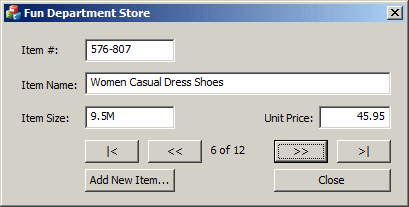
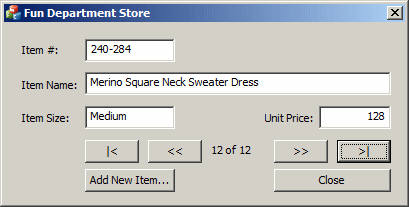
  6. Close the dialog box and return to your programming environment

Copying a Collection

If you already have a CArray collection, you can assign it to another collection. To let you perform this operation, the CArray class provides the Copy() member function whose syntax is:

void Copy(const CArray& src);

This member function takes a CArray collection as argument. Here is an example of calling it:

void CExampleDlg::OnBnClickedCollectionBtn()
{
	CArray<int, int> iNumbers;

	iNumbers.SetSize(5);

	iNumbers.SetAt(0, 712003);
	iNumbers.SetAt(1, 605729);
	iNumbers.SetAt(2, 384759);
	iNumbers.SetAt(3, 400284);
	iNumbers.SetAt(4, 728802);

	CArray<int, int> iValues;

	iValues.Copy(iNumbers);
}

When this function has been called, the elements of the arguments are assigned to the variable that called it. After doing this, you can use the new collection as you see fit. You can even add new elements to it.

Appending a Collection

An alternative to copying a collection is to add an existing collection at the end of another collection. To support this operation, the CArray is equipped with a member function named Append. Its syntax is:

INT_PTR Append(const CArray& src);

This member function takes a CArray collection as argument. Here is an example:

void CExampleDlg::OnBnClickedCollectionBtn()
{
	CArray<int, int> iNumbers;

	iNumbers.SetSize(5);

	iNumbers.SetAt(0, 712003);
	iNumbers.SetAt(1, 605729);
	iNumbers.SetAt(2, 384759);
	iNumbers.SetAt(3, 400284);
	iNumbers.SetAt(4, 728802);

	CArray<int, int> iValues;

	iValues.Append(iNumbers);
}

After assigning the old collection to the new one, you can add new elements to the new list. Here is an example:

void CExampleDlg::OnBnClickedCollectionBtn()
{
	CArray<int, int> iNumbers;

	iNumbers.SetSize(5);

	iNumbers.SetAt(0, 712003);
	iNumbers.SetAt(1, 605729);
	iNumbers.SetAt(2, 384759);
	iNumbers.SetAt(3, 400284);
	iNumbers.SetAt(4, 728802);

	CArray<int, int> iValues;

	iValues.Append(iNumbers);

	iValues.Add(209749);
}

Using the Index of an Item


Introduction

Probably the most regularly performed operation on a collection consists of retrieving the values of its members. In C++, you access an element of an array using its index. To let you perform the same operation, the CArray class provides various options. One way you can locate an item in the list consists of using the square brackets, the same way you would proceed for a C++ array. The square bracket operator was overloaded with the following syntaxes:

TYPE& operator[](INT_PTR nIndex);
const TYPE& operator[](INT_PTR nIndex) const;

As you can see, this operator takes the index of the desired item and returns the value that is stored at that index. Because the list is zero-based like a C++ array, the first item has an index of 0; the second has an index of 1, and so on. Here is an example of using the square brackets:

void CExampleDlg::OnBnClickedCollectionBtn()
{
    CArray<int, int> iNumbers;

    iNumbers.Add(712003);
    iNumbers.Add(605729);
    iNumbers.Add(384759);
    iNumbers.Add(400284);
    iNumbers.Add(728802);

    CString strNumber;

    for(int i = 0; i < iNumbers.GetCount(); i++)
    {
	strNumber.Format(L"%d", iNumbers[i]);
	AfxMessageBox(strNumber);
    }
}

Setting an Item

If you had declared a CArray variable and allocated memory for it, to assign the a value to an element, you can apply the square brackets [] to the variable, exactly as done on an array in C, and assign the desired value to it. Here is an example:

void CExampleDlg::OnBnClickedCollectionBtn()
{
    CArray<int, int> iNumbers;
    iNumbers.SetSize(5);

    iNumbers[0] = 712003;
    iNumbers[1] = 605729;
    iNumbers[2] = 384759;
    iNumbers[3] = 400284;
    iNumbers[4] = 728802;

    CString strNumber;

    for(int i = 0; i < iNumbers.GetCount(); i++)
    {
	strNumber.Format(L"%d", iNumbers[i]);
	AfxMessageBox(strNumber);
    }
}

If you had created a collection and had added a few items to it, to change the value of an element, apply the square brackets [] to the variable, pass the desired index to the square brackets, and assign the desired value to it.

An alternative to the square brackets is to call the CArray::SetAt() member function. Its syntax is:

void SetAt(INT_PTR nIndex, ARG_TYPE newElement);

The first argument of this member function is the index that the new item will occupy in the list. The second argument is the item that will be added to the list. Here are examples:

void CExampleDlg::OnBnClickedCollectionBtn()
{
    CArray<int, int> iNumbers;

    iNumbers.SetSize(5);

    iNumbers.SetAt(0, 712003);
    iNumbers.SetAt(1, 605729);
    iNumbers.SetAt(2, 384759);
    iNumbers.SetAt(3, 400284);
    iNumbers.SetAt(4, 728802);

    CString strNumber;

    for(int i = 0; i < iNumbers.GetCount(); i++)
    {
	strNumber.Format(L"%d", iNumbers[i]);
	AfxMessageBox(strNumber);
    }
}

Getting an Item by its Index

Besides the square brackets, the CArray class provides the ElementAt() member function used to get an item based on its index in the list. The CArray::Element() member function is overloaded with two versions whose syntaxes are:

TYPE& ElementAt(INT_PTR nIndex);
const TYPE& ElementAt(INT_PTR nIndex) const;

In both cases, the function takes an index as argument and it produces the element located at that index. Here is an example of calling it:

void CExampleDlg::OnBnClickedCollectionBtn()
{
    CArray<int, int> iNumbers;

    iNumbers.SetSize(5);

    iNumbers.SetAt(0, 712003);
    iNumbers.SetAt(1, 605729);
    iNumbers.SetAt(2, 384759);
    iNumbers.SetAt(3, 400284);
    iNumbers.SetAt(4, 728802);

    CString strNumber;

    for(int i = 0; i < iNumbers.GetCount(); i++)
    {
	strNumber.Format(L"Number[%d]: %d", i + 1, iNumbers.ElementAt(i));
	AfxMessageBox(strNumber);
    }
}

Besides the ElementAt() member function, the CArray class provides the GetAt() function that is provided in two versions. Their syntaxes are:

TYPE& GetAt(INT_PTR nIndex);
const TYPE& GetAt(INT_PTR nIndex)const;

This function produces the element at the index passed as argument.

The Index of the Last Item of the Collection

The members of a CArray list are stored contiguously like the values of a C/C++ array. Each member of a CArray collection can be located by its index, which is of type INT_PTR.

To know the index of the last member of the list, you can call the CArray::GetUpperBound() member function. Its syntax is:

INT_PTR GetUpperBound() const;

This member function produces the index of the last member of the array. Here is an example:

void CExampleDlg::OnBnClickedCollectionBtn()
{
    CArray<int, int> iNumbers;

    iNumbers.SetSize(5);

    iNumbers.SetAt(0, 712003);
    iNumbers.SetAt(1, 605729);
    iNumbers.SetAt(2, 384759);
    iNumbers.SetAt(3, 400284);
    iNumbers.SetAt(4, 728802);

    CString strNumber;

    strNumber.Format(L"The index of the last item is %d", iNumbers.GetUpperBound());
    AfxMessageBox(strNumber);
}

Accessing the Members of an Array

To store all the members of the list in one pointer, you can call the CArray::GetData() member function that is overloaded with two versions whose syntaxes are:

const TYPE* GetData() const;
TYPE* GetData();

This member function can help you access all members of the list as one.

Inserting an Element

Inserting an element consists of adding one inside the collection at the index of your choice. To perform this operation, you can call the InsertAt() member function that is overloaded with two versions. The syntax of the first is:

void InsertAt(INT_PTR nIndex, ARG_TYPE newElement, INT_PTR nCount = 1);

The nIndex argument is the position where the new element will be located. The newElement will be added at that position. The third argument is optional. Here is an example of calling this function without the third argument:

void CExampleDlg::OnBnClickedCollectionBtn()
{
    CArray<int, int> iNumbers;
    iNumbers.SetSize(5);

    iNumbers[0] = 712003;
    iNumbers[1] = 605729;
    iNumbers[2] = 384759;
    iNumbers[3] = 400284;
    iNumbers[4] = 728802;

    iNumbers.InsertAt(2, 500500);
    
    CString strNumber;

    for(int i = 0; i < iNumbers.GetCount(); i++)
    {
	strNumber.Format(L"%d", iNumbers[i]);
	AfxMessageBox(strNumber);
    }
}

If you don't pass the third argument, one sample of the newElement will be added. If you want to insert more than one sample, pass the third argument.

The second version of this member function is:

void InsertAt(INT_PTR nStartIndex, CArray* pNewArray);

The second argument is a CArray collection that you want to insert inside the collection that called this function. The nStartIndex argument is the position where to insert the pNewArray collection. Here is an example of calling this version:

void CExampleDlg::OnBnClickedCollectionBtn()
{
    CArray<int, int> iNumbers;
    iNumbers.SetSize(5);

    iNumbers[0] = 712003;
    iNumbers[1] = 605729;
    iNumbers[2] = 384759;
    iNumbers[3] = 400284;
    iNumbers[4] = 728802;

    iNumbers.InsertAt(1, 500500);

    CArray<int, int> iValues;
    iValues.Add(111333);
    iValues.Add(222444);

    iNumbers.InsertAt(3, &iValues);

    CString strNumber;

    for(int i = 0; i < iNumbers.GetCount(); i++)
    {
	strNumber.Format(L"%d", iNumbers[i]);
	AfxMessageBox(strNumber);
    }
}

Deleting Items


Deleting an Item

If your CArray collection contains an item you don't need anymore, you can delete it. To delete an item from the list, you can call the RemoveAt() member function. Its syntax is:

void RemoveAt(INT_PTR nIndex, INT_PTR nCount = 1);

The first argument to this member function is the index of the item you want to delete from the list. The value of this argument must be between the bounds of the list. If you pass only one argument, only the item at that position would be deleted. Here is an example:

void CExampleDlg::OnBnClickedCollectionBtn()
{
    CArray<int, int> iNumbers;

    iNumbers.SetSize(5);

    iNumbers.SetAt(0, 712003);
    iNumbers.SetAt(1, 605729);
    iNumbers.SetAt(2, 384759);
    iNumbers.SetAt(3, 400284);
    iNumbers.SetAt(4, 728802);

    CString strNumber;

    strNumber.Format(L"The index of the last item is %d",
    		     iNumbers.GetUpperBound());
    AfxMessageBox(strNumber);

    iNumbers.RemoveAt(2);

    strNumber.Format(L"The index of the last item is %d",
		     iNumbers.GetUpperBound());
    AfxMessageBox(strNumber);
}

If you want to delete more than one item, pass the desired number as the second argument.

Clearing the Collection

To delete all items from a CArray list, call its RemoveAll() member function. Its syntax is:

void RemoveAll( );

When called, this CArray::RemoveAll() member function will clear the list of all members.


Home Copyright © 2004-2010 FunctionX, Inc.