Home

Linked Lists


Linked Lists Fundamentals


Introduction

A linked list is collection with the following rules:

  • Each item in the list is called a node (this is not an actual rule but a habit or a suggestion)

Node

  • If the list is empty, the new node added becomes the first element
  • If the list contains at least one node, whenever a new node is added, that new node is positioned as the last in the list. This is because the new node is added next to the existing node
  • If the list has only one node, that node represents the first and the last item

Node

  • If the list contains more than one node, each item holds a reference to the object next to it

Nodes of a Linked List

In reality, there are various types of linked lists. A singly linked list is a one-way directional list where each item points (only) to the item next to it (in a somewhat right direction). The description we just gave is conform to a singly linked list. Another type is the doubly linked list in which:

  • Each item in the list is called a node (again, this is not a real rule)
  • If the list is empty, the first node is added as the first in the collection
  • If the list contains one node, that node has two references to itself: one reference as the next and the other reference as its previous
  • If the list contains two nodes:
    • One node is the first. That first node holds a reference to the other node as its next
    • The other node is the last. That last node holds a reference to the first node as its previous item
  • If the list contains more than two nodes:
    • The first node holds a reference to the next node (in the right direction)
    • The last node holds a reference to the node previous to it (in the left direction)
    • Each node holds two references: one reference to the previous node and one reference to the next node

Nodes of a Linked List

The last type of linked list is called a circular linked list. This list is primarily created as either a singly linked list or a doubly linked list:

  • In a circular singly linked list, the list primarily follows the rules of a singly linked list. then:
    • If the list has two nodes, the first node holds a reference to the other node as its next and its previous node
    • If the list has more than one node:
      • The first node holds a reference to the last node as its previous node
      • The last node holds a reference to first node as its next

Circular Singly Linked List

  • In a doubly linked list, the list includes the rules of the doubly linked list and combines with those of the circular singly linked list:
    • The first node has a reference to the last node as its previous node
    • The last node has a reference to the first node as its next node
    • Each node has two references: its previous and its next nodes

Circular Doubly Linked List

Practical LearningPractical Learning: Introducing Linked Lists

  1. Start Microsoft Visual Studio
  2. To create a new application, on the main menu, click File -> New Project...
  3. In the middle list, click MFC Application. Set the Name to ApartmentsForRent1
  4. Click OK
  5. In the first page of the wizard, click Next
  6. In the second page of the wizard, click Dialog-Based
  7. Click Next
  8. In the third page of the wizard, click Next
  9. In the fourth page, click Next
  10. In the last page, click Finish
  11. Click the TODO line and press Delete
  12. While the OK button is selected, press Delete
  13. Change the caption of the Cancel button to Close
  14. Design the dialog box as follows:
     
    Apartment for Rent
    Control ID Caption Other Properties
    Static Text   Unit #:  
    Edit Control IDC_UNITNUMBER    
    Static Text   Unit Type:  
    Edit Control IDC_UNITTYPE    
    Static Text   Bedrooms:  
    Edit Control IDC_BEDROOMS   Align Text: Right
    Static Control   Bathrooms:  
    Edit Control IDC_BATHROOMS   Align Text: Right
    Static Text   Condition:  
    Edit Control IDC_CONDITION    
    Static Text   Monthly Rent:  
    Edit Control IDC_MONTHLYRENT   Align Text: Right
    Button IDC_FIRST | <  
    Button IDC_PREVIOUS <<  
    Button IDC_NEXT >>  
    Button IDC_LAST > |  
    Button IDCANCEL Close  
  15. Right-click each edit control and the 000 of 000 static control then click Add Variable...
  16. Create the Value variables as follows:
     
    ID Value Variable Variable Type
    IDC_UNITNUMBER m_UnitNumber CString
    IDC_UNITTYPE m_UnitType CString
    IDC_BEDROOMS m_Bedrooms int
    IDC_BATHROOMS m_Bathrooms float
    IDC_CONDITION m_Condition CString
    IDC_MONTHLYRENT m_MonthlyRent double
  17. In the Solution Explorer, right-click ApartmentsForRent1 -> Add -> Class...
  18. In the Add Class dialog box, click C++ Class and click Add
  19. Set the Class Name to CApartment
  20. Click Finish
  21. Change the StoreItem.h header file as follows:
    #pragma once
    class CApartment
    {
    public:
    	CApartment(void);
    	CApartment(CString number, CString type, int beds,
    		   float baths, CString status, double rate);
    	CApartment(const CApartment &unit);
    	CApartment &operator=(const CApartment& unit);
    	~CApartment(void);
    
    public:
    	CString UnitNumber;
    	CString UnitType;
    	int Bedrooms;
    	float Bathrooms;
    	CString Condition;
    	double  MonthlyRent;
    };
  22. Access the StoreItem.cpp source file and change it as follows:
    #include "StdAfx.h"
    #include "Apartment.h"
    
    CApartment::CApartment(void)
    	: UnitNumber(_T("")), UnitType(_T("")),
    	  Bedrooms(0), Bathrooms(0.00F),
    	  Condition(_T("")), MonthlyRent(0.00)
    {
    }
    
    CApartment::CApartment(CString number, CString type, int beds,
    		       float baths, CString status, double rate)
       : UnitNumber(number), UnitType(type), 
         Bedrooms(beds), Bathrooms(baths),
         Condition(status), MonthlyRent(rate)
    {
    }
    
    CApartment::CApartment(const CApartment &unit)
    {
    	UnitNumber = unit.UnitNumber;
    	UnitType = unit.UnitType;
    	Bedrooms = unit.Bedrooms;
    	Bathrooms = unit.Bathrooms;
    	Condition = unit.Condition;
    	MonthlyRent = unit.MonthlyRent;
    }
    
    CApartment &CApartment::operator=(const CApartment& unit)
    {
    	UnitNumber = unit.UnitNumber;
    	UnitType = unit.UnitType;
    	Bedrooms = unit.Bedrooms;
    	Bathrooms = unit.Bathrooms;
    	Condition = unit.Condition;
    	MonthlyRent = unit.MonthlyRent;
    
    	return *this;
    }
    
    CApartment::~CApartment(void)
    {
    }

Creating a Linked List

Although you can create a linked list collection class from scratch, to assist you, the MFC library provides many classes. Some of them use templates and some don't. The primary template-based class is named CList. If you plan to use it, include the afxtempl.h header file in your project.

Since CList is a template-based class, to use it, declare its variable and use the angle brackets. Here is an example:

void CExampleDlg::OnBnClickedLinkedlistBtn()
{
    CList<double, double> numbers;
}

Practical LearningPractical Learning: Creating a Linked List

  1. In the Solution Explorer, double-click stdafx.h
  2. Include the afxtempl.h template library:
    // stdafx.h : include file for standard system include files,
    // or project specific include files that are used frequently,
    // but are changed infrequently
    
    #pragma once
    
    #ifndef _SECURE_ATL
    #define _SECURE_ATL 1
    #endif
    
    #ifndef VC_EXTRALEAN
    #define VC_EXTRALEAN
    #endif
    
    #include "targetver.h"
    
    #define _ATL_CSTRING_EXPLICIT_CONSTRUCTORS
    
    #define _AFX_ALL_WARNINGS
    
    #include <afxwin.h>         // MFC core and standard components
    #include <afxext.h>         // MFC extensions
    
    #include <afxdisp.h>        // MFC Automation classes
    
    #ifndef _AFX_NO_OLE_SUPPORT
    #include <afxdtctl.h>
    #endif
    #ifndef _AFX_NO_AFXCMN_SUPPORT
    #include <afxcmn.h>             // MFC support for Windows Common Controls
    #endif // _AFX_NO_AFXCMN_SUPPORT
    
    #include <afxcontrolbars.h>     // MFC support for ribbons and control bars
    
    #include <afxtempl.h>
  3. In the Solution Explorer, double-click ApartmentsForRent1Dlg.h
  4. In the header file, declare a private CList variable named apartments as follows:
    // AppartmentsForRent1Dlg.h : header file
    //
    
    #pragma once
    #include "Apartment.h"
    
    // CAppartmentsForRent1Dlg dialog
    class CAppartmentsForRent1Dlg : public CDialogEx
    {
    // Construction
    public:
    	CAppartmentsForRent1Dlg(CWnd* pParent = NULL);	// standard constructor
    
    // Dialog Data
    	enum { IDD = IDD_APPARTMENTSFORRENT1_DIALOG };
    
    	protected:
    	virtual void DoDataExchange(CDataExchange* pDX); // DDX/DDV support
    
    	int index;
    	POSITION CurrentPosition;
    	CList<CApartment, CApartment&> apartments;
    
    // Implementation
    protected:
    	HICON m_hIcon;
    
    	// Generated message map functions
    	virtual BOOL OnInitDialog();
    	afx_msg void OnSysCommand(UINT nID, LPARAM lParam);
    	afx_msg void OnPaint();
    	afx_msg HCURSOR OnQueryDragIcon();
    	DECLARE_MESSAGE_MAP()
    };
  5. Return to the dialog box

Fundamental Operations on a Linked List


Introduction

In the CList class, a node is of type TYPE. When you declare a CList variable, that is, when you start the collection, you can specify how much memory to allocate for it. In fact, the CList class has one constructor that takes an optional argument. Its syntax is:

CList(INT_PTR nBlockSize = 10);

The constructor takes an integer as argument. Here is an example:

void CExampleDlg::OnBnClickedLinkedlistBtn()
{
    CList<double, double> numbers(5);
}

If you pass this argument, the value you provide specifies the initial capacity of the collection. This represents the intial amount of memory you request for the collection. As you add new items, if or when the compiler juges it necessary, new memory would be allocated for the variable.

An Empty List

Before performing any operation on a linked list, you should first check whether it has at least one element. To help you with this, the CList class is equipped with a member function named IsEmpty. Its syntax is:

BOOL IsEmpty() const;

When this member function is called, if there is no item in the list, the function returns TRUE. If there is at least one element, it returns FALSE.

The Position of a Node

In the next sections, we will see how to add new nodes to a linked list. When a node has been added, it occupies a position, which is somewhat equivalent to an index in an array. To identify the position of a node, the MFC defines a structure named POSITION. The MFC document defines the position as a key. This means that POSITION neither is an integer not does it represent the index of a node. It is just a way (a key) to identify the position of a node. This also means that you cannot directly use POSITION in a for loop the way you would use an int.

Practical LearningPractical Learning: Introducing Node Positions

  1. On the dialog box, double-click the | < button
  2. Return to the dialog box and double-click the << button
  3. Return to the dialog box and double-click the >> button
  4. Return to the dialog box and double-click the > | button

Adding a Node

The primary operation to perform on a linked list is to add a new node to it. To support it, the CList class is equipped with various methods. One of them is named AddTail and it is overloaded in two versions. One of them uses the following syntax:

POSITION AddTail(ARG_TYPE newElement);

This method expects the new value as argument. Here is an example of calling it:

void CExampleDlg::OnBnClickedLinkedlistBtn()
{
    CList<double, double> numbers;

    numbers.AddTail(52739.470);
}

Another version of this method is:

void AddTail(CList* pNewList);

This version expects a pointer to CList as argument. Here is an example of calling it:

void CExampleDlg::OnBnClickedLinkedlistBtn()
{
	CList<double, double> numbers;

	numbers.AddTail(52739.470);

	CList<double, double> values;

	values.AddTail(&numbers);
}

This second version of the AddTail() member function can be used to copy a CList or to assign one to another.

The Number of Nodes of a List

To let you know the number of items in a CList collection, the class is equipped with a member function named GetCount. Its syntax is:

INT_PTR GetCount() const;

Routine Operations on a Linked List


Adding a New Node

When dealing with a linked list, you have many options on how to add a new node. As mentioned already, a linked list has a first node, a last node, and one or more nodes between them. All nodes have and use some references with regards to the node(s) close to them. Based on this, when adding a new node, you have to specify whether you want it as the first node, the last node, the node before a certain node, or the node after a certain one.

We saw that you could call the AddTail() member function to add a new node. In reality, there is no such a thing as simply adding a new node to a linked list. When a linked list has just been created and it is empty, it holds a reference to a NULL node. You have the option of adding a new node as the first or the last item. This would not make any difference because there is no other node in the list.

After adding a node, it becomes a reference that new nodes can use. If you call the AddTail() member function, the new node would be added after any existing node in the collection. By contrast, you can call a member function named AddHead. It is overloaded with teo versions. The syntax of one of them is:

POSITION AddHead(ARG_TYPE newElement);

This function takes an object as argument. Here is an example of calling it:

void CExampleDlg::OnBnClickedLinkedlistBtn()
{
    CList<double, double> numbers(5);

    numbers.AddTail(52739.470);
    numbers.AddTail(82.63);
    numbers.AddHead(374.0052);
    numbers.AddTail(1.864);
    numbers.AddTail(29374.04);
}

The syntax of the other version is:

void AddHead(CList* pNewList);

This version takes a CList collection as argument. If you call this version, the pNewList list will be added to the beginning of the list.

Practical LearningPractical Learning: Adding a Node

  1. In the Resource View, right-click the name of the project -> Add -> Resource...
  2. In the Add Resource dialog box, click Dialog and click New
  3. In the Properties window, change its ID to IDD_APARTMENT
  4. Design the dialog box as follows:
     
    Apartment For Rent
    Control ID Caption Other Properties
    Static Text   Unit #:  
    Edit Control IDC_UNITNUMBER    
    Static Text   Unit Type:  
    Edit Control IDC_UNITTYPE    
    Static Text   Unit Type:  
    Edit Control IDC_BEDROOMS   Align Text: Right
    Static Control   Bathrooms:  
    Edit Control IDC_BATHROOMS   Align Text: Right
    Static Text   Condition:  
    Edit Control IDC_CONDITION    
    Static Control   Monthly Rent:  
    Edit Control IDC_MONTHLYRENT   Align Text: Right
  5. Right-click an unoccupied area of the dialog box and click Class Wizard...
  6. On the right side of the MFC Class Wizard dialog box, click Add Class
  7. In the Class Name, type CApartmentDlg
  8. In the Base Class, select CDialogEx
  9. In the Dialog ID, select IDD_APARTMENT
  10. Click Finish
  11. In the Class Name, make sure CItemEditorDlg is selected.
    Click the Member Variables tab
  12. In the Member Variables, click IDC_ITEMNUMBER
  13. Click Add Variable...
  14. Set the Member Variable Name to m_UnitNumber
  15. Set the Category to Value and make sure the Variable Type is set to CString
  16. Click OK
  17. In the same way, using the IDs in the Member Variable, add the member variables as follows:
     
    ID Value Variable Variable Type
    IDC_UNITNUMBER m_UnitNumber CString
    IDC_UNITTYPE m_UnitType CString
    IDC_BEDROOMS m_Bedrooms int
    IDC_BATHROOMS m_Bathrooms float
    IDC_CONDITION m_Condition CString
    IDC_MONTHLYRENT m_MonthlyRent double
     
    MFC Class Wizard
  18. Click OK
  19. Display the first dialog box
  20. Add four buttons and change its design as follows:
     
    Apartment for Rent
    Control Caption ID
    Button Add First... IDC_ADDFIRST
    Button Add Last... IDC_ADDLAST
    Button Insert Before... IDC_INSERTBEFORE
    Button Insert After... IDC_INSERTAFTER
  21. Double-click the Add First... button and implement its event as follows:
    #include "stdafx.h"
    #include "ApartmentsForRent1.h"
    #include "ApartmentsForRent1Dlg.h"
    #include "ApartmentDlg.h"
    #include "afxdialogex.h"
    
    #ifdef _DEBUG
    #define new DEBUG_NEW
    #endif
    
    ... No Change
    
    void CApartmentsForRent1Dlg::OnBnClickedAddfirst()
    {
        // TODO: Add your control notification handler code here
        CApartmentDlg dlg;
    
        if(	dlg.DoModal() == IDOK )
        {
    	CApartment apt(dlg.m_UnitNumber, dlg.m_UnitType,
    	               dlg.m_Bedrooms, dlg.m_Bathrooms,
    		       dlg.m_Condition, dlg.m_MonthlyRent);
    	CurrentPosition = apartments.AddHead(apt);
    
    	OnBnClickedFirst();
        }
    }
  22. Return to the dialog box and double-click the Add Last button
  23. Implement its event as follows:
    void CApartmentsForRent1Dlg::OnBnClickedAddlast()
    {
        // TODO: Add your control notification handler code here
        CApartmentDlg dlg;
    
        if(	dlg.DoModal() == IDOK )
        {
    	CApartment apt(dlg.m_UnitNumber, dlg.m_UnitType,
    	               dlg.m_Bedrooms, dlg.m_Bathrooms,
    		       dlg.m_Condition, dlg.m_MonthlyRent);
    	CurrentPosition = apartments.AddTail(apt);
    
    	OnBnClickedFirst();
        }
    }
  24. Return to the dialog box
  25. To execute, press F5
  26. Click the following records using either the Add First or the Add Last button:
     
    Unit # Unit Type Bedrooms Bathroms Condition Monthly Rent
    2A Apartment 1 1 Excellent 885
    4D Efficiency 0 1 Good Shape 675
    1B Apartment 3 1 Needs Paint 1050
    1E Duplex 3 2 Excellent 1155
    3C Apartment 2 1 Needs Carpet 955
    2B Duplex 4 2 Excellent 1295
  27. Close the dialog box and return to your programming environment


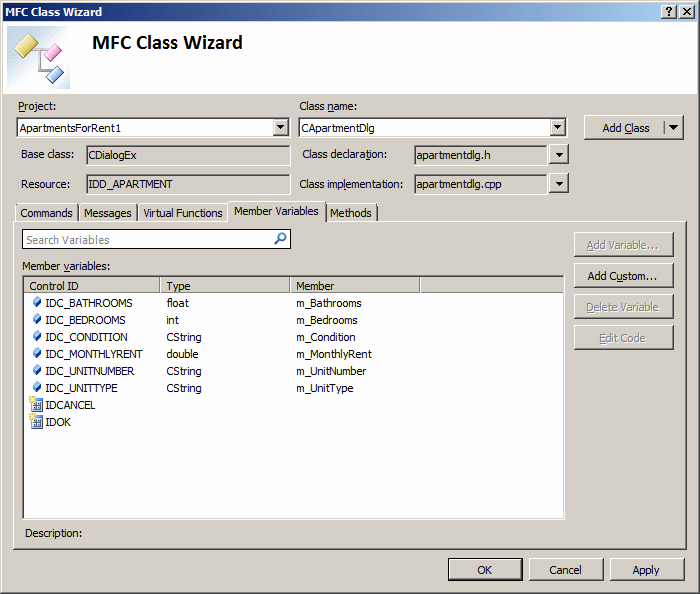
Inserting a Node Before a Specific Position

A linked list supports the concept of inserting a node. With a linked list, you must add a node before or after an existing node used as reference. Before inserting a node, you must identify the position where you want to put it. That is, you must identify what node you will use as reference:

Inserting a New node Before a Node

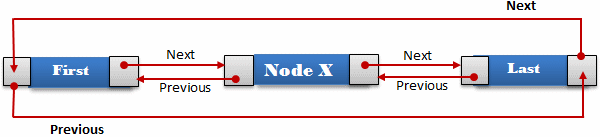
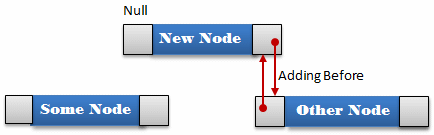
In this case, you want to insert a new node before the Other Node. Behind the scenes, the reference between the two existing nodes must be brocken. Then the new node points to the Other Node as its next and the Other Node points at the New Node as its previous:

Inserting a New node Before a Node

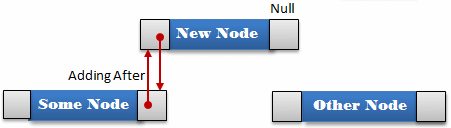
After the new node has been added, it must point to the previous node (Some Node in our example) as its previous item. The previous node (Some Node in our example) must now point to the new node as its next item:

Inserting a New node Before a Node

As you may imagine, to insert a node, you must provides two pieces of information: a reference to the node that will succeed the new node, and the new node (or its value). If the referenced node is the first item of the list, the new node would become the new first object.

To assist you with this operation, the CList class provides a method named InsertBefore. This method is overloaded with two versions whose syntaxes are:

POSITION InsertBefore(POSITION position, ARG_TYPE newElement);

The second argument is the new node to be inserted. The first argument is the position before which the new node will be inserted. Here is an example:

void CExampleDlg::OnBnClickedLinkedlistBtn()
{
    CList<double, double> numbers(5);

    numbers.AddTail(52739.470);
    numbers.AddTail(82.63);
    numbers.AddHead(374.0052);
    POSITION pos = numbers.AddTail(1.864);
    numbers.AddTail(29374.04);

    CString strNumber;

    numbers.InsertBefore(pos, 991155);

    pos = numbers.GetHeadPosition();

    for(int i = 0; i < numbers.GetCount(); i++)
    {
	strNumber.Format(L"%.4f", numbers.GetNext(pos));
	MessageBox(strNumber, L"Linked List");
    }
}

Practical LearningPractical Learning: Inserting a Node Before a Position

  1. Double-click the Insert After button
  2. Implement its event as follows:
    void CApartmentsForRent1Dlg::OnBnClickedInsertafter()
    {
        // TODO: Add your control notification handler code here
        CApartmentDlg dlg;
    
        if(	dlg.DoModal() == IDOK )
        {
    	CApartment apt(dlg.m_UnitNumber, dlg.m_UnitType,
    	               dlg.m_Bedrooms, dlg.m_Bathrooms,
    		       dlg.m_Condition, dlg.m_MonthlyRent);
    	apartments.InsertBefore(CurrentPosition, apt);
    
    	OnBnClickedFirst();
        }
    }
  3. Return to the dialog box

Inserting a Node After a Specific Position

Instead of inserting a node before a certain position, you can add it after one. The approach is logically the same as inserting a node before a position, except that the sequence is reversed. First identify the node whose position that will be used as reference. Start the process to add the new node after that one. Behind the scenes, the referenced node will point to the new node as its next and the new node will point to the existing node as its previous:

Inserting a New node After an Existing Node

After the new node as been added, it will point to the node after it as its next. The other node will point to the new node as its previous:

Inserting a New node After an Existing Node

If the new node is added after the last node, the new node will become the new last node.

To let you insert a node after a certain position, the CList class is equipped with a member function named InsertAfter. Its syntax is:

POSITION InsertAfter(POSITION position, ARG_TYPE newElement);

The arguments follow the same description as the InsertBefore() member function. Here is an example:

void CExampleDlg::OnBnClickedLinkedlistBtn()
{
    CList<double, double> numbers(5);

    numbers.AddTail(52739.470);
    POSITION pos = numbers.AddTail(82.63);
    numbers.AddHead(374.0052);
    numbers.AddTail(1.864);
    numbers.AddTail(29374.04);

    CString strNumber;

    numbers.InsertAfter(pos, 991.155);

    pos = numbers.GetHeadPosition();

    for(int i = 0; i < numbers.GetCount(); i++)
    {
	strNumber.Format(L"%.4f", numbers.GetNext(pos));
	MessageBox(strNumber, L"Linked List");
    }
}

Practical LearningPractical Learning: Inserting a Node After a Position

  1. Double-click the Insert Before button
  2. Implement its event as follows:
    void CApartmentsForRent1Dlg::OnBnClickedInsertbefore()
    {
        // TODO: Add your control notification handler code here
        CApartmentDlg dlg;
    
        if(	dlg.DoModal() == IDOK )
        {
    	CApartment apt(dlg.m_UnitNumber, dlg.m_UnitType,
    	               dlg.m_Bedrooms, dlg.m_Bathrooms,
    		       dlg.m_Condition, dlg.m_MonthlyRent);
    	apartments.InsertAfter(CurrentPosition, apt);
    
    	OnBnClickedFirst();
        }
    }
  3. Return to the dialog box

Accessing a Node


The Position of the Head Node

Besides adding a new node to a linked list, probably the second most routine operation is to access one of the elements. The CList class provides various options.

As mentioned already, a linked list that has at least one node has an element known as the head. That first node of a linked list occupies a position identified with the GetHeadPosition() member function. The syntax of this member function is:

POSITION GetHeadPosition() const;

The primary purose of this member function is to let you get to the first node of the linked list. This function returns a POSITION value that you can use as necessary.

Practical LearningPractical Learning: Using the Head Position

  • Access the OnInitDialog event of the ApartmentsForRent1Dlg.cpp source file and initialize the CurrentPosition variable as follows:
    BOOL CApartmentsForRent1Dlg::OnInitDialog()
    {
    	CDialogEx::OnInitDialog();
    
    	// Add "About..." menu item to system menu.
    
    	// IDM_ABOUTBOX must be in the system command range.
    	ASSERT((IDM_ABOUTBOX & 0xFFF0) == IDM_ABOUTBOX);
    	ASSERT(IDM_ABOUTBOX < 0xF000);
    
    	CMenu* pSysMenu = GetSystemMenu(FALSE);
    	if (pSysMenu != NULL)
    	{
    		BOOL bNameValid;
    		CString strAboutMenu;
    		bNameValid = strAboutMenu.LoadString(IDS_ABOUTBOX);
    		ASSERT(bNameValid);
    		if (!strAboutMenu.IsEmpty())
    		{
    			pSysMenu->AppendMenu(MF_SEPARATOR);
    			pSysMenu->AppendMenu(MF_STRING, IDM_ABOUTBOX, strAboutMenu);
    		}
    	}
    
    	// Set the icon for this dialog.  The framework does this automatically
    	//  when the application's main window is not a dialog
    	SetIcon(m_hIcon, TRUE);			// Set big icon
    	SetIcon(m_hIcon, FALSE);		// Set small icon
    
    	// TODO: Add extra initialization here
    	index = 0;
    	CurrentPosition = apartments.GetHeadPosition();
    
    	return TRUE;  // return TRUE  unless you set the focus to a control
    }

The Position of the Tail Node

The reverse of the head is the tail node. To give you access to it, the CList class has a function named GetTailPosition. Its syntax is:

POSITION GetTailPosition() const;

Practical LearningPractical Learning: Using the Tail Position

  1. Access the OnBnClickedLast member function and change it as follows:
    void CApartmentsForRent1Dlg::OnBnClickedLast()
    {
        // TODO: Add your control notification handler code here
        if( !apartments.IsEmpty() )
        {
    	CApartment apart = apartments.GetTail();
    
    	m_UnitNumber = apart.UnitNumber;
    	m_UnitType = apart.UnitType;
    	m_Bedrooms = apart.Bedrooms;
    	m_Bathrooms = apart.Bathrooms;
    	m_Condition = apart.Condition;
    	m_MonthlyRent = apart.MonthlyRent;
    
    	index = apartments.GetCount();
    	CurrentPosition = apartments.GetTailPosition();
        }
    	
        UpdateData(FALSE);
    }
 

The Node Next to a Node

If a linked list has more than one node, each node has an item next to it. To let you get to that next node, the CList class provides a function named GetNext. It has two syntaxes as fo:

TYPE& GetNext(POSITION& rPosition);
const TYPE& GetNext(POSITION& rPosition) const;

This function takes as argument the position of the node whose next item you want to get. Here is an example of calling this function:

void CExampleDlg::OnBnClickedLinkedlistBtn()
{
    CList<double, double> numbers(5);

    numbers.AddTail(52739.470);
    numbers.AddTail(82.63);
    numbers.AddTail(374.0052);
    numbers.AddTail(1.864);
    numbers.AddTail(29374.04);

    POSITION pos = numbers.GetHeadPosition();

    CString strNumber;
	
    strNumber.Format(L"The value of the node next to the head is %.34f",
    		     numbers.GetNext(pos));
    AfxMessageBox(strNumber);
}

In the same way, you can combine these member functions to iterate through a collection to visit each member. Here is an example:

void CExampleDlg::OnBnClickedLinkedlistBtn()
{
    CList<double, double> numbers(5);

    numbers.AddTail(52739.470);
    numbers.AddTail(82.63);
    numbers.AddTail(374.0052);
    numbers.AddTail(1.864);
    numbers.AddTail(29374.04);

    CString strNumber;

    POSITION pos = numbers.GetHeadPosition();

    for(int i = 0; i < numbers.GetCount(); i++)
    {
	strNumber.Format(L"%.4f", numbers.GetNext(pos));
	AfxMessageBox(strNumber);
    }
}

Practical LearningPractical Learning: Using the Next Position

  1. Access the code of the OnBnClickedFirst() member function and change it as follows:
    void CApartmentsForRent1Dlg::OnBnClickedFirst()
    {
        // TODO: Add your control notification handler code here
        if( !apartments.IsEmpty() )
        {
    	CurrentPosition = apartments.GetHeadPosition();
    	CApartment apart = apartments.GetNext(CurrentPosition);
    
    	m_UnitNumber  = apart.UnitNumber;
    	m_UnitType    = apart.UnitType;
    	m_Bedrooms    = apart.Bedrooms;
    	m_Bathrooms   = apart.Bathrooms;
    	m_Condition   = apart.Condition;
    	m_MonthlyRent = apart.MonthlyRent;
    
    	index = 0;
        }
    	
        UpdateData(FALSE);
    }

The Previous Node to a Node

To let you get the node succeeding another node, the CList class provides a member function named GetPrev. Its syntax is:

TYPE& GetPrev(POSITION& rPosition);
const TYPE& GetPrev(POSITION& rPosition) const;

Practical LearningPractical Learning: Getting to the Previous Node

  • Access the OnBnClickedPrevious member function and change it as follows:
    void CApartmentsForRent1Dlg::OnBnClickedPrevious()
    {
    	// TODO: Add your control notification handler code here
    	if( apartments.IsEmpty() )
    		return;
    
    	if( index <= 1 )
    	{
    		CApartment apart = apartments.GetHead();
    
    		m_UnitNumber  = apart.UnitNumber;
    		m_UnitType    = apart.UnitType;
    		m_Bedrooms    = apart.Bedrooms;
    		m_Bathrooms   = apart.Bathrooms;
    		m_Condition   = apart.Condition;
    		m_MonthlyRent = apart.MonthlyRent;
    
    		index = 0;
    		CurrentPosition = apartments.GetHeadPosition();
    	}
    	else
    	{
    		CApartment apart = apartments.GetPrev(CurrentPosition);
    
    		m_UnitNumber = apart.UnitNumber;
    		m_UnitType = apart.UnitType;
    		m_Bedrooms = apart.Bedrooms;
    		m_Bathrooms = apart.Bathrooms;
    		m_Condition = apart.Condition;
    		m_MonthlyRent = apart.MonthlyRent;
    
    		index--;
    	}
    
        UpdateData(FALSE);
    }

Getting a Node by its Position

To let you access a node based on its position, the CList class provides the GetAt() method that is overloaded with two versions. Their syntaxes are:

TYPE& GetAt(POSITION position);
const TYPE& GetAt(POSITION position) const;

As you can see, this method takes an index as argument and produces the node at that index. Here is an example:

void CExampleDlg::OnBnClickedLinkedlistBtn()
{
    CList<double, double> numbers(5);

    numbers.AddTail(52739.470);
    numbers.AddTail(82.63);
    numbers.AddTail(374.0052);
    numbers.AddTail(1.864);
    numbers.AddTail(29374.04);

    CString strNumber;
    POSITION pos = numbers.GetHeadPosition();

    strNumber.Format(L"The value of the first node is %.4f", numbers.GetAt(pos));
    AfxMessageBox(strNumber);
}

Editing a Node

Editing a node consists of changing its value. To support this operation, the CList class provides the SetAt() function. Its syntax is:

void SetAt(POSITION pos, ARG_TYPE newElement);

When calling this function, for the first argument, pass the position of the node you want to edit. The second argument is the value that must be set at that position.

The First and the Last Nodes

As mentioned already, a linked list has a first and a last nodes, also called heal and tail. To let you access the first node, the CList class is equippped with the GetHead() member function. Its syntax is:

const TYPE& GetHead() const;
TYPE& GetHead();

This member function produces the first node of the collection. Here is an example of using it:

void CExampleDlg::OnBnClickedLinkedlistBtn()
{
    CList<double, double> numbers(5);

    numbers.AddTail(52739.470);
    numbers.AddTail(82.63);
    numbers.AddTail(374.0052);
    numbers.AddTail(1.864);
    numbers.AddTail(29374.04);

    CString strNumber;

    strNumber.Format(L"The value of the first node is %.4f", numbers.GetTail());
    AfxMessageBox(strNumber);
}

The opposite of the first node is the last. To get it, you can call the GetTail() member function whose syntax is:

TYPE& GetTail();
const TYPE& GetTail() const;

Practical LearningPractical Learning: Accessing a First or Last Node

  1. Access the OnBnClickedNext member function and change it as follows:
    void CApartmentsForRent1Dlg::OnBnClickedNext()
    {
    	// TODO: Add your control notification handler code here
    	if( apartments.IsEmpty() )
    		return;
    
    	if( index >= apartments.GetCount() - 1 )
    	{
    		CApartment apart = apartments.GetTail();
    
    		m_UnitNumber = apart.UnitNumber;
    		m_UnitType = apart.UnitType;
    		m_Bedrooms = apart.Bedrooms;
    		m_Bathrooms = apart.Bathrooms;
    		m_Condition = apart.Condition;
    		m_MonthlyRent = apart.MonthlyRent;
    
    		index = apartments.GetCount();
    		CurrentPosition = apartments.GetTailPosition();
    	}
    	else
    	{
    		CApartment apart = apartments.GetNext(CurrentPosition);
    
    		m_UnitNumber = apart.UnitNumber;
    		m_UnitType = apart.UnitType;
    		m_Bedrooms = apart.Bedrooms;
    		m_Bathrooms = apart.Bathrooms;
    		m_Condition = apart.Condition;
    		m_MonthlyRent = apart.MonthlyRent;
    	
    		index++;
    	}
    
        UpdateData(FALSE);
    }
  2. Locate the Clicked event of the Last button and change it as follows:
    void CApartmentsForRent1Dlg::OnBnClickedLast()
    {
        // TODO: Add your control notification handler code here
        if( !apartments.IsEmpty() )
        {
    	CApartment apart = apartments.GetTail();
    
    	m_UnitNumber = apart.UnitNumber;
    	m_UnitType = apart.UnitType;
    	m_Bedrooms = apart.Bedrooms;
    	m_Bathrooms = apart.Bathrooms;
    	m_Condition = apart.Condition;
    	m_MonthlyRent = apart.MonthlyRent;
    
    	index = apartments.GetCount();
    	CurrentPosition = apartments.GetTailPosition();
        }
    	
        UpdateData(FALSE);
    }

Finding a Node

With a collection that contains elements already, you may want to look for a particular nodes. One of the member functions you can use is named Find. Its syntax is:

POSITION Find(ARG_TYPE searchValue, POSITION startAfter = NULL) const;

This function takes one required and one option arguments. The searchValue is the node to look for in the collection. The second argument is optional. Here is an example of calling this function:

void CExampleDlg::OnBnClickedLinkedlistBtn()
{
	CList<double, double> numbers(5);

	numbers.AddTail(52739.470);
	numbers.AddTail(82.63);
	numbers.AddTail(374.0052);
	numbers.AddTail(1.864);
	numbers.AddTail(29374.04);

	POSITION index = numbers.Find(374.0052);

	if( index != NULL )
		AfxMessageBox(L"374.0052 exists in the list.");
	else
		AfxMessageBox(L"374.0052 was not found in the list.");
}

If you omit the second argumen, the compiler would start looking for the searchValue from the beginning of the list. Otherwise, you can ask the compiler to start looking at a specific position. To provide this information, pass the second argument.

The CList class provides an alternative to the Find() member function. It is called FindIndex and its syntax is

POSITION FindIndex(INT_PTR nIndex) const;

Deleting Nodes


Deleting the First Node

When it comes time to delete a node, you have many options, such as deleting the first or the last node of the list. To let you delete the first node, the CList class provides the RemoveHead() member function. Its syntax is:

TYPE RemoveHead();

As you can see, this member function takes no argument. When it is called, it deletes the first node and returns it. Here are examples of calling it:

void CExampleDlg::OnBnClickedLinkedlistBtn()
{
    CList<double, double> numbers(5);

    numbers.AddTail(52739.470);
    numbers.AddTail(82.63);
    numbers.AddHead(374.0052);
    numbers.AddTail(1.864);
    numbers.AddTail(29374.04);

    CString strNumber;

    for(int i = 0; i < numbers.GetCount(); i++)
    {
	double number = numbers.RemoveHead();
	strNumber.Format(L"The number that was deleted is %.4f", number);
	MessageBox(strNumber, L"Linked List");
    }
}

Deleting the Last Node

To delete the last node, you can call the RemoveTail() method whose syntax is:

TYPE RemoveTail();

This member function deletes the last node and returns it.

Deleting a Node Based on Position

To delete a node using its position, you can call the RemoveAt() member function. Its syntax is:

void RemoveAt(POSITION position);

When calling this method, pass the position as argument.

Clearing a Linked List

Clearing a list consists of deleting all of its item. To do this, you could continuous call one of the remove-based member functions. A faster solution is to call RemoveAll(). Its syntax is:

void RemoveAll();


Home Copyright © 2010-2016, FunctionX