Home

Managing Windows Controls


The Values of a Windows Control


Introduction


As we reviewed when we introduced messages, an event is an action resulting from a generated message. As there are various types of controls, there are also different types of messages available on controls and even the type of window considered. After adding a control to your application, whether you visually added it or created it dynamically, you will also decide how the handle the possible actions that the user can perform on the control.

There are various ways you can write an event for a message. If the message is sent from a class, first select the class in Class View. Then, in the Properties window, click either the Events Events, the Messages Messages, or the Overrides button Overrides, depending on the type of member function you want to write.

Some of the most regular actions the user can perform on a control consist of clicking. Objects that receive click messages range from static controls to command buttons, as we will see eventually.

Practical LearningPractical Learning: Introducing Windows Controls

  1. Start Microsoft Visual Studio
  2. To create a new application, on the main menu, click File -> New Project...
  3. In the middle list, click MFC Application
  4. Set the Name to Geometry2
  5. Click OK
  6. In the first page of the MFC Application Wizard, click Next
  7. In the second page of the wizard, click Dialog Box
  8. Click Next
  9. In the third page of the wizard, click About Box to remove the check mark on it
  10. Change the Dialog Title to Geometry - Square
  11. Click Next twice
  12. Click Finish
  13. On the dialog box, click TODO: and press Delete
  14. Test the application to make sure it is working fine
  15. Close the dialog box and return to your programming environment
  16. On the Toolbox, click the Static Text control and click the dialog box
  17. While the control is still selected, in the Properties window, click Caption and type Side:
  18. Complete the design of the dialog box as follows:
     Square
    Control ID Caption
    Static Text   Side:
    Edit Control IDC_SIDE_EDT  
    Button IDC_BTN_SCALC Calculate
    Static Text   Perimeter:
    Edit Control IDC_PERIMETER_EDT  
    Static Text   Area:
    Edit Control IDC_AREA_EDT  Edit
    Button IDOK OK
  19. Save All

Control's Control Variables

After visually adding a control to your application, if you want to refer to it in your code, you can declare a variable based on, or associated with, that control. The MFC library allows you to declare two types of variables for some of the controls used in an application: a value or a control variables.

A control variable is a variable based on the class that manages the control. For example, a static control is based on the CStatic class. Therefore, if you add a static control to your application and you want to refer to it later on, you can declare a CStatic variable in the header of its parent window. Here is an example:

class CExchangeDlg : public CDialog
{
    . . .
public:
    CStatic stcAdvanced;
};

The control variable is available for all controls.

Author Note It is a habit for Visual C++ programmers to start the name of a control variable with m_

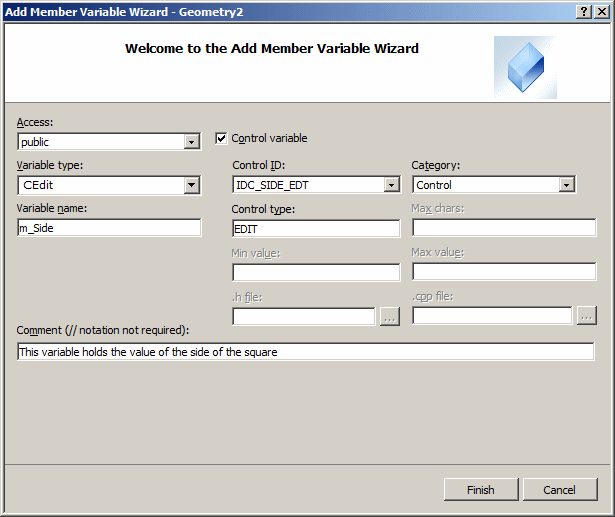
To visually create a control variable for an object:

  • On the dialog box, right-click the control and click Add Variable... This would display the Add Member Variable Wizard. The Access box allows you to specify the access level where the variable will be declared. You can select public, protected, or private. Click the Control Variable option or make sure it is checked. In the Variable Type, select the class of the control. For most control, there is only one option in the list. In the Control ID, you can accept the selected option. If you want to create a variable for another control, select its ID. In the Category, select Control. In the Variable Name, enter the desired name for the variable. You must follow the rules of C++ names. As mentioned already, it is a habit, not a rule, to start the name of a variable with m_. In the Control Type, accept the name of the class or change it. In the Comment text box, you can enter normal text that serve as guide. When you are ready, click Finish
  • Display the MFC Class Wizard. Click the Member Variables tab. In the Member Variables list, either click the ID of the control and click Add Variable, or double-click the ID of the control. In the Add Member Variable that displays, enter the name of the variable. In the Category, select Control. In the Variable Type, select the name of the class of the control. Once you are ready, click OK

Practical LearningPractical Learning: Creating a Control's Variable

  1. On the dialog box, right-click the top edit control and click Add Variable...
  2. In the Category box, make sure Control is selected.
    In the Variable Name, type m_Side
     
    Add Member Variable
  3. Click Finish
  4. On the main menu, click Project -> Class Wizard...
  5. Click the Member Variables tab
  6. In the Member Variables list, click IDC_PERIMETER_EDT
  7. Click the Add Variable button
  8. In the Member Variable Name, type m_Perimeter and make sure Control is selected as the Category
     
    MFC Class Wizard
  9. Click OK
  10. Click Finish
  11. In the Member Variables list, double-click IDC_AREA_EDT
  12. In the Member Variable Name, type m_Area
  13. Make sure Control is selected in the Category and press Enter
     
    MFC Class Wizard
  14. In the MFC Class Wizard, click OK
  15. In the Solution Explorer, double-click Geometry2Dlg.h to open the header file to see the variables that were declared:
    public:
    	CEdit m_Side;
    	CEdit m_Perimeter;
    	CEdit m_Area;
    };
  16. Save all

The Control's Data Exchange

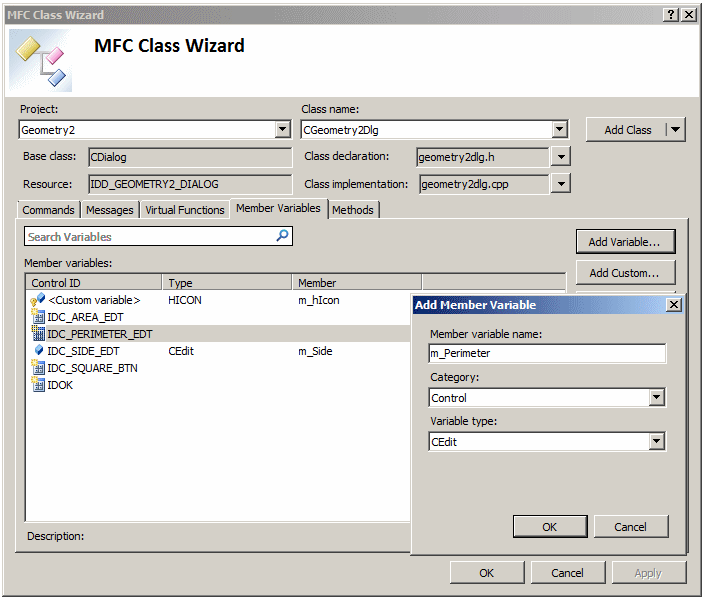
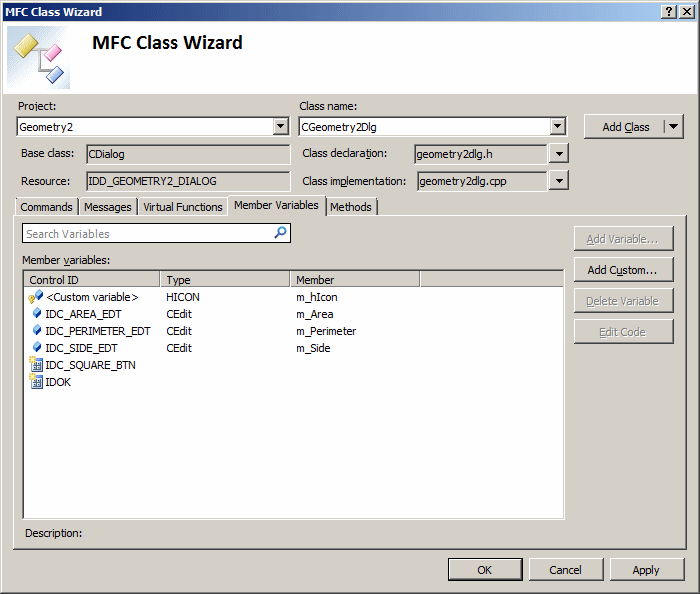
After declaring the variable, you must "map" it to the control it is referring to, otherwise the variable would behave just like any other and it cannot directly access the control you wanted it to refer to. To specify what control your variable refers to, you must call the DDX_Control() framework function. The syntax of this function is:

void AFXAPI DDX_Control(CDataExchange* pDX, int nIDC, CWnd& rControl);

The first argument, pDX, is a pointer to CDataExchange. The nIDC argument is the identifier of the control your variable will refer to. The rControl argument is the name you gave to your variable. An example of calling this function would be:

DDX_Control(pDX, IDC_STATIC_ADV, stcAdvanced);

The pDX argument in reality handles the mapping. It creates the relationship between your rControl variable and the nIDC control that rControl must refer to. Besides that, pDX insures that information can flow easily between both entities. The CDataExchange class, to which the pDX argument points, is a parent-less class, meaning it is based neither on CObject nor on CWnd.

The DDX_Control() function can be called for each variable you intend to map to a control. When calling any of these functions, the mappings must be performed in the CWnd::DoDataExchange() event. Its syntax is:

virtual void DoDataExchange(CDataExchange* pDX);

As you can see, this event is passed a CDataExchange pointer. This pointer in turn will become the first argument to the DDX_Control() function. Behind the scenes, this allows the dialog box, the parent of the controls to better manage the exchange of information between the application and the controls.

This review helps to have an idea of how variables would be declared and associated with the intended controls. In reality, this job is usually, and should always be, handled by Microsoft Visual C++ for you. When you create a dialog-based object, such as a dialog box, a form, a property sheet, or a property page, the CDialog::DoDataExchange() event is created and made ready for you. To declare a variable you want to associate to a control, unless you have a good reason to proceed manually, use either the MFC Class Wizard or the Add Member Variable Wizard. When you do this, the wizard will take care of all the mapping for you.

Author Note After adding a variable using a wizard and once the variable mapping has been performed, if you change the name of the variable in the header file, you must manually change its name in the DoDataExchange() event.
 

Practical LearningPractical Learning: Checking Control Variables

  • Click the Geometry2Dlg.cpp tab to access the source file and verify that the DDX_Control() functions were created:
    void CGeometry2Dlg::DoDataExchange(CDataExchange* pDX)
    {
    	CDialog::DoDataExchange(pDX);
    	DDX_Control(pDX, IDC_SIDE_EDT, m_Side);
    	DDX_Control(pDX, IDC_PERIMETER_EDT, m_Perimeter);
    	DDX_Control(pDX, IDC_AREA_EDT, m_Area);
    }

Adding an Event Handler

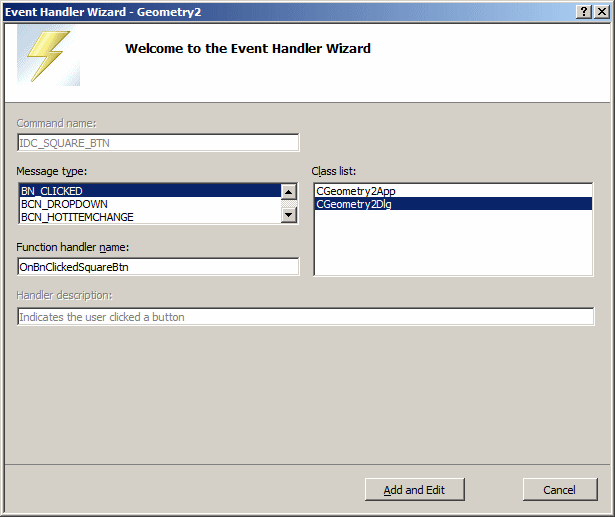
To generate code for a control that is positioned on a dialog-based object, display its parent window. Then, right-click the control and, on the context menu, click Add Event Handler. This would display the Event Handler Wizard with as much information as you need to set or select to configure the event. Once you have finish specifying the necessary information for the event, click Add and Edit. This would take you to the new event in the Code Editor where you can write the rest of the code for the event.

If you use the wizard to generate the event, the necessary arguments and part of the code for the event would be supplied to you. If you decide to write the event from scratch, you will need to especially remember the arguments of the event, otherwise the code may not work at all.

Practical LearningPractical Learning: Adding an Event Handler

  1. On the dialog box, right-click the Calculate button and click Add Event Handler
     
    Event Handler Wizard
  2. In the Message Type, make sure BN_CLICKED is selected.
    In the Class List, make sure CGeometry2Dlg is selected.
    Click Add And Edit

Control's Value Variables

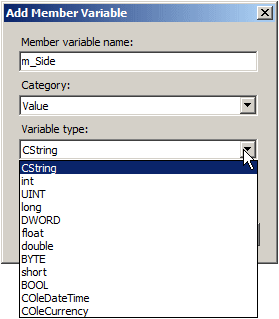
Another type of variable you can declare for a control is the value variable. Not all controls provide a value variable. The value variable must be able to handle the type of value stored in the control it is intended to refer to. For example, because a text-based control is used to handle text, you can declare a text-based data type for it. This would usually be a CString variable. Here is an example:

class CExchangeDlg : public CDialog
{
    . . .
public:
    CStatic stcAdvanced;
    CString strFullName;
};

On the other hand, as we will learn that some controls handle a value that can be true or false at one time, namely the check box, you can declare a Boolean variable for such controls. Some other controls are used to hold a numeric value such as a natural or a floating-point number. You can declare an integer-based or a float-based value variable for such controls. Some other controls are not meant to hold an explicit or recognizable type of data, an example would be the tab control. For such controls, there is no value variable available. For such controls, you can only declare a control variable.

After declaring the value variable, as done with the control variable, you must “map” it to the intended control. To do this, you must call an appropriate framework function. The functions are categorized based on the type of data held by the variable. For example, if the control holds text and you had declared a CString value variable for it, you can call the DDX_Text() function to map it. The DDX_Text() function is provided in various versions as follows:

void AFXAPI DDX_Text( CDataExchange* pDX, int nIDC, BYTE& value );
void AFXAPI DDX_Text( CDataExchange* pDX, int nIDC, short& value );
void AFXAPI DDX_Text( CDataExchange* pDX, int nIDC, int& value );
void AFXAPI DDX_Text( CDataExchange* pDX, int nIDC, UINT& value );
void AFXAPI DDX_Text( CDataExchange* pDX, int nIDC, long& value );
void AFXAPI DDX_Text( CDataExchange* pDX, int nIDC, DWORD& value );
void AFXAPI DDX_Text( CDataExchange* pDX, int nIDC, CString& value );
void AFXAPI DDX_Text( CDataExchange* pDX, int nIDC, float& value );
void AFXAPI DDX_Text( CDataExchange* pDX, int nIDC, double& value );
void AFXAPI DDX_Text( CDataExchange* pDX, int nIDC, COleCurrency& value );
void AFXAPI DDX_Text( CDataExchange* pDX, int nIDC, COleDateTime& value );

The first argument, pDX, is a pointer to CDataExchange. The second argument, nIDC, is the identifier the of the control you want to refer to. The third argument, value, if the name of the value variable you had previously declared.

If a control holds a valid value, you can declare both a control variable and a value variable if you need them. Here is an example:

class CExchangeDlg : public CDialog
{
    . . .
public:
    CStatic stcAdvanced;
    CString valAdvanced;
    CString strFullName;
};

When mapping such variable, make a call to DDX_Control() for the control variable and a separate call to DDX_X() for the value variable. Because there are various types of DDX_ functions for the controls, X stands for the type of control referred to.

Like the DDX_Control(), the DDX_X() function can be called for each variable you intend to map to a control and this is performed in the CWnd::DoDataExchange() event. This CDataExchange pointer is passed as the first argument to the DDX_ X() functions. This argument allows the dialog box to update the values held by the controls.

Once again, avoid declaring and mapping value variables manually. Instead, use either the Class Wizard or the Add Member Variable Wizard to add a variable that you want to associate with a control on a dialog-based object.

Control's Value Variables

Besides the control variable, a control van use a value variable. While a control variable is based on the class of the control, a value variable represents the value of the variable. It can be based on a CString or a primitive data type (int, float, double, etc).

As mentioned for a control variable, you can manually create a value variable or you can benefit from Microsoft Visual C++.

To visually create a value variable:

  • On the dialog box, right-click the control and click Add Variable...
    In the Add Member Variable Wizard, specify the level of access in the Access box.
    Uncheck the Control Variable option.
    In the Variable Type, select the data type you intend to use for the values of the control:

    Add Member Variable

    In the Variable Name, enter the desired name for the variable. When you are ready, click Finish
  • Display the MFC Class Wizard. Click the Member Variables tab. In the Member Variables list, either click the ID of the control and click Add Variable, or double-click the ID of the control. In the Add Member Variable that displays, enter the name of the variable. In the Category, select Value. In the Variable Type, select the desired data type:


    Depending on the data type you will have selected, the dialog box may show one or two text boxes that allow you either to specify the maximum number of characters for a string or the minimum and maximum values for a number. After specifying the values, click OK

Controls Values Update

The controls used in your application are designed to work as a group, exchanging data with one another and with the window that hosts them. For their various operations to work, the dialog-based object that is hosting the controls needs to be able to update their values. If you are using control variables, because these controls are based on CWnd, they can perform their own validations.

If you are using value controls, and if the user must be able to change the values held by a dialog's controls, you can decide how and when the values should be updated by the parent window. This can be done by calling the CWnd::UpdateData() method. Its syntax is:

BOOL UpdateData(BOOL bSaveAndValidate = TRUE);

The bSaveAndValidate argument specifies whether the parent window, usually a dialog-based object, must update the values of variables at the time this method is called. This member variable works in conformance with the CDialog::DoDataExchange() event of the dialog that owns the controls. If it is called with no argument or the TRUE default value, this indicates that the dialog is ready to communicate with the variables mapped in DoDataExchange(). After such a call, you can let the user do what is necessary on the controls. When this method is called a FALSE value for the bSaveAndValidate argument, it indicates that the dialog box can take ownership of operations and the controls have stopped updating their information.

You can handle this when the user clicks a button such as Submit or OK after changing values on controls. Normally, the call with a FALSE argument means that the dialog box is being either initialized or reinitialized, which is done when its OnInitDialog() event fires.


The Characteristics of Windows Controls


The Bounding Rectangle of a Control

A Windows control that is positioned on a host uses a rectangular confinement known as its bounding rectangle. To assist you with knowing what that rectangular area is, the CWnd class is equipped with a method named GetWindowRect. Its syntax is:

void GetWindowRect(LPRECT lpRect) const;

When calling this method, pass a RECT or or a CRect variable by reference. When this function exits, it returns the argument that was passed:

CRect Recto;

m_Panel.GetWindowRect(&Recto);

The Screen and Client Coordinates of a Control

As mentioned already, the origin of the screen is positioned on the top-left corner of the monitor. This is referred to as, or is said that the location uses, screen coordinates. The origin of a client area is placed on its top-left corner. This is referred to as, or is said that the location uses, client coordinates. For example, the origin used by the above GetWindowRect() method is based on the screen. If you want the rectangle resulting from a call to either the GetClientRect() or the GetWindowRect() methods to be based on the client area (on client coordinates) of the control that called it, you can transfer the origin from the screen to the client. This is conveniently done with a call to the CWnd::ClientToScreen() method. It is overloaded as follows:

void ClientToScreen(LPPOINT lpPoint) const;
void ClientToScreen(LPRECT lpRect) const;

If the location you had requested is a point, pass its POINT or its CPoint variable to the ClientToScreen() method. If the value you requested is a rectangle, pass its RECT or its CRect variable. Here is an example:

CRect Recto;

m_Panel.GetWindowRect(&Recto);

. . . Some Code

ScreenToClient(Recto);
dc.Rectangle(Recto);

This time, even if the dialog box moves, the GetWindowRect() method returns the same rectangle.

If the location and/or dimension are given in client coordinates, to convert them to screen coordinates, call the ScreenToClient() method. It is overloaded as follows:

void ScreenToClient(LPPOINT lpPoint) const;
void ScreenToClient(LPRECT lpRect) const;

This method follows the opposite logic of the ClientToScreen() method.

The Text of a Control

For you the programmer, the control identifier may be one of the most important properties of a window. For the user, this is not the case. For a text-based control, the most important part, as far as the user is concerned, may be its text. Many controls use text. In fact, one of the most obvious items on most windows such as dialog boxes is the text they display. This text allows the user to identify a window.

We saw that some of the controls that use text would allow you to change the Caption property at design time. On the other hand, while a using is interacting with your application, depending on various circumstances, at a certain time you may want to change the text that a Windows control is displaying or holding. To assist you with this, the CWnd class is equipped with a method named SetWindowText. Its syntax is:

void SetWindowText(LPCTSTR lpszString);

The lpszString argument is a null-terminated string that holds the value you want to display. It can be configured using any of the valid null-terminated string operations. Here is an example that changes the title of a dialog box when the window displays. The text is provided as a null-terminated string passed to the method:

BOOL CDismissDlg::OnInitDialog()
{
    CDialog::OnInitDialog();

    SetWindowText("Windows Fundamentals");

    return TRUE;
}

Another technique you can use consists of first declaring a null-terminated string variable, assigning it a value, and then passing it as the lpszString argument to the SetWindowText() function.

If you are using resources in your MFC application, you can also create a global value in the string table to be used as the window name. You can call the string of such an identifier, store it in a CString variable, and then pass it to the CWnd::SetWindowText() method. Here is an example:

    CString Str;
    Str.LoadString(IDS_CURAPPNAME);

    SetWindowText(Str);

To change the name of a window, instead of calling SetWindowText(), you can call the CWnd::SendMessage() method. Since you want to change the text, the message argument must be WM_SETTEXT. The wParam argument is not used. The lParam argument holds the string that will be the new value of the window name. You must cast the string to LPARAM. Here is an example that allows the user to click a menu item that changes the title of the frame window:

char NewTitle[] = "Introduction to Windows Programming";

SendMessage(WM_SETTEXT, NULL, reinterpret_cast<LPARAM>(NewTitle));

To retrieve the name of a window (always remember that the name of a window is not the name of a class) or the text stored in a control, you can call the CWnd::GetWindowText() function. Its syntax is:

int GetWindowText(LPTSTR lpszStringBuf, int nMaxCount) const;

The lpszStringBuf is the null-terminated string that will store the window name. The nMaxCount is the minimum number of characters of the lpszStringBuf. If you specify more characters than the name is made of, the compiler would reduce this number to the actual length of the string. Therefore, it is safe to provide a high number.

Practical LearningPractical Learning: Setting Text for a Control

  1. Implement the event as follows:
    void CGeometry2Dlg::OnBnClickedSquareBtn()
    {
    	// TODO: Add your control notification handler code here
    	CString strSide;
    	CString strPerimeter;
    	CString strArea;
    
    	double side;
    	double perimeter;
    	double area;
    
    	this->m_Side.GetWindowTextW(strSide);
    
    	side = _wtof(strSide);
    	perimeter = side * 4;
    	area = side * side;
    
    	strPerimeter.Format(_T("%.3f"), perimeter);
    	strArea.Format(_T("%.3f"), area);
    
    	this->m_Perimeter.SetWindowTextW(strPerimeter);
    	this->m_Area.SetWindowTextW(strArea);
    }
  2. Scroll up in the source file to locate the OnInitDialog() function and change it as follows:
    BOOL CGeometry2Dlg::OnInitDialog()
    {
    	CDialog::OnInitDialog();
    
    	// Set the icon for this dialog.  The framework does this automatically
    	//  when the application's main window is not a dialog
    	SetIcon(m_hIcon, TRUE);			// Set big icon
    	SetIcon(m_hIcon, FALSE);		// Set small icon
    
    	// TODO: Add extra initialization here
    	this->m_Side.SetWindowTextW(_T("0.00"));
    	this->m_Perimeter.SetWindowTextW(_T("0.00"));
    	this->m_Area.SetWindowTextW(_T("0.00"));
    
    	return TRUE;  // return TRUE  unless you set the focus to a control
    }
  3. Execute the application to see the result
  4. In the Side text box, type 42.58 and click Calculate
     
    Square
  5. After viewing the result, click OK

Moving a Control 

We saw how to manually specify a control's location and size during design:

Location and Dimension

Once a window or a control has been positioned on the screen or in its confined client area, it keeps these attributes until specified otherwise. When dealing with a main window, such as dialog box, the user can move it around the screen as necessary and if possible. This is usually done by dragging the title bar.

When the user grabs the title bar of a dialog box and starts dragging to move it, the window sends the WM_MOVING message. The WM_MOVING event fires the OnMoving() event. This event is usually left alone as it allows the user to use an application as regularly as possible. The syntax of the OnMoving() event is:

afx_msg void OnMoving(UINT nSide, LPRECT lpRect);

The OnMoving() event fires while the window is being moved. The nSide argument specifies the side of window that is moving. As the window is moving, this event returns its location and size as the values of the lpRect member variables.

If you create a certain type of window and you do not want the user to move it around, you can write code for the WM_MOVING message. In the following example, the user cannot move the window as its location and dimensions are restored with a #define WS_TABSTOP 0x00010000L.

Here is an example that prevents the user from moving a dialog box:

void CExerciseDlg::OnMoving(UINT fwSide, LPRECT pRect)
{
	CDialog::OnMoving(fwSide, pRect);

	// TODO: Add your message handler code here
	CRect CurRect;
	
	// Find out the location and the dimensions of the window
	GetWindowRect(&CurRect);
	
	// You ain't moving nothin'
	pRect->left = CurRect.left;
	pRect->top = CurRect.top;
	pRect->right = CurRect.right;
	pRect->bottom = CurRect.bottom;
}

To programmatically move a window, call the CWnd::SetWindowPos() method. Its syntax is:

BOOL SetWindowPos(const CWnd* pWndInsertAfter,
		  int x, int y, int cx, int cy,
		  UINT nFlags);

The pWndInsertAfter argument is used to specify the window that will positioned in the Z coordinate on top of the window that called this method. If you have the class name or the CWnd name of the other window, pass it as the pWndInsertAfter argument. Otherwise, this argument can have one of the following values:

Value Description
wndBottom This window will be positioned under all the other windows, unless it is already at the bottom. If this window is a topmost window, it will not be anymore
wndTop This window will be positioned on top of all the other windows, unless it is already on top
wndTopMost This window becomes positioned on top of all other window as if it were created with the WS_EX_TOPMOST extended style. In other words, even if its parent window is sent under other window, this particular one stays on top.
wndNoTopMost If this window is not a top most window, it becomes positioned on top of all other windows, except the window that is top most.
If this window was top most when it called this method, it is not top most anymore. If there is another top most window on the screen, that one becomes top most but this one becomes positioned under that one.

If you are not trying to reposition the window in the Z coordinate, pass this argument as NULL or include the SWP_NOZORDER value for the nFlags argument.

The nFlags argument is used to define how the location arguments (x and y) and the dimensions (cx and cy) will be dealt with. These other arguments have the following roles:

Argument Description The argument is ignored if nFlags has the following value
x This specifies the new distance from the left border of the parent to the left border of this window. This depends on the type of window and the type of parent. SWP_NOMOVE
y This specifies the new distance from the top border of the parent to the top border of this window. This depends on the type of window and the type of parent SWP_NOMOVE
cx This is the new width of this window SWP_NOSIZE
cy The argument is the new height of this window SWP_NOSIZE

Additionally, the nFlags argument can have one of the following values or one of the above nFlags values can be combined with the following values:

Value Description
SWP_DRAWFRAME Draws a frame around the window
SWP_FRAMECHANGED This value sends a WM_NCCALCSIZE message to the window
SWP_HIDEWINDOW Hides this window
SWP_NOACTIVATE If the pWndInsertAfter value specified that the window should be repositioned and activated, which is done if the window is to be positioned on top of another, this value lets the pWndInsertAfter be performed but the window will not be activated
SWP_NOCOPYBITS Normally, after a window has been repositioned, its controls are restored to their corresponding relative locations and dimensions. It you want this validation to be ignored, pass this value
SWP_NOOWNERZORDER SWP_NOREPOSITION If this value is passed, this method will not reposition the windows in the z coordinate
SWP_NOREDRAW When this value is set, the client area of the window will not be redrawn
SWP_NOSENDCHANGING When this value is set, the window cannot receive a WM_WINDOWPOSCHANGING message
SWP_SHOWWINDOW Displays the window


In the following example, a window named m_Panel is repositioned and resized:

void CTestDialog::OnBtnMovePanel()
{
    m_Panel.SetWindowPos(NULL, 40, 72, 100, 86, SWP_NOZORDER);
}

If you specify negative values for the left and top distances, either the left or the top borders, respectively, will be hidden.

The Color of a Control

After a control has been created, if you need to perform some type of drawing such as changing its color, you can use the WM_CTLCOLOR message which fires the OnCtlColor() event

Left Text Alignment

Text-based controls (the controls that display text) align their text to the left by default. This means that when the control displays, its text starts on the left side of its area (for US English and other Latin-based versions of Microsoft Windows). To align text to the left on a control that allows it, at design time, select the Left value in the Align Text combo box

Control's Focus

A control is said to have focus if it is ready to receive input from the user. For example, if a text-based control has focus and the user presses a character key, the corresponding character would be displayed in the control.

Controls show different ways of having focus. For example, when a text box has focus, a caret is blinking in it. When a button has focus, it displays a thick border or a dotted rectangle around its caption:

Button With Focus

There are two main ways a control receives focus: based on a user's action or an explicit request from you. To give focus to a control, the user usually presses Tab, which allows navigating from one control to another.

To allow you to programmatically give focus to a control, the CWnd class is equipped with a method named SetFocus. Its syntax is:

CWnd* SetFocus( );

This method gives focus to the control that called it. In the following example, an edit box identified as IDC_EDIT1 will receive focus when the user clicks the button:

CButton *btnFirst;
btnFirst = (CButton *)GetDlgItem(IDC_EDIT1);

btnFirst->SetFocus();

Once a control receives focus, it initiates a WM_SETFOCUS message, which fires an OnSetFocus() event. The syntax of the CWnd::OnSetFocus() event is:

afx_msg void OnSetFocus(CWnd* pOldWnd);

You can use this event to take action when, or just before, the control receives focus. At anytime, to find out what control has focus, call the CWnd::GetFocus() method. Its syntax is:

static CWnd* PASCAL GetFocus();

This method returns a handle to the control that has focus at the time the method is called. While the user is interacting with your application, the focus changes constantly. For this reason, you should avoid using the return type of this method from various events or member functions. In other words, do not globally declare a CWnd variable or pointer, find out what control has focus in an event Event1 and use the returned value in another event Event2 because, by the time you get to Event2, the control that had focus in Event1 may have lost focus. In fact, the dialog box that holds the control or the main application may have lost focus. Therefore, use the GetFocus() method only locally.

Control's Visibility

After a control has been created, for the user to take advantage of it, it must be made visible. When it comes to their visibility, there are two types of windows: those the user can see and interact with, and those invisible controls that work only behind the scenes and cannot be displayed to the user.

During control design, a window can be displayed to the user by setting its Visible property to True in the Properties window or by adding it the WS_VISIBLE style.

If you did not set the Visible property to True or did not add the WS_VISIBLE style, the control would be hidden (but possibly available). To help you display a hidden control, the CWnd class is equipped with a method named ShowWindow. Its syntax is:

BOOL ShowWindow(int nCmdShow);

This method is used to display or hide any window that is a descendent of CWnd. Its argument, nCmdShow, specifies what to do with the appearance or disappearance of the object. Its possible values are:

Value Description
SW_SHOW Displays a window and makes it visible
SW_SHOWNORMAL Displays the window in its regular size. In most circumstances, the operating system keeps track of the last location and size a window such as Internet Explorer or My Computer had the last time it was displaying. This value allows the OS to restore it
SW_SHOWMINIMIZED Opens the window in its minimized state, representing it as a button on the taskbar
SW_SHOWMAXIMIZED Opens the window in its maximized state
SW_SHOWMINNOACTIVE Opens the window but displays only its icon. It does not make it active
SW_SHOWNA As previous
SW_SHOWNOACTIVATE Retrieves the window's previous size and location and displays it accordingly
SW_HIDE Used to hide a window
SW_MINIMIZE Shrinks the window and reduces it to a button on the taskbar
SW_RESTORE If the window was minimized or maximized, it would be restored to its previous location and size

To use one of these constants, pass it to the ShowWindow() method. For example, to minimize a window that is minimizable, you would use code as follows:

ShowWindow(SW_SHOWMINIMIZED);

Remember that this method is used to either hide or to display a control by passing the appropriate constant, SW_HIDE to hide and SW_SHOW to display it. Here is an example that displays a control that missed the WS_VISIBLE property when it was created:

void CSecondDlg::OnFirstControl()
{
    CWnd *First = new CWnd;
    CString StrClsName = AfxRegisterWndClass(CS_VREDRAW | CS_HREDRAW,
					     LoadCursor(NULL, IDC_CROSS),
					     (HBRUSH)GetStockObject(BLACK_BRUSH),
					     LoadIcon(NULL, IDI_WARNING));

    First->Create(StrClsName, NULL, WS_CHILD);
    First->ShowWindow(SW_SHOW);
}

When the ShowWindow() method is called with the SW_SHOW value, if the control was hidden, it would become visible; if the control was already visible, nothing would happen. In the same way, when this method is called with the SW_HIDE argument, the control would be hidden, whether it was already hidden or not.

To help you check the visibility of a control before calling the ShowWindow() method, the CWnd class is equipped with a method named IsWindowVisible. Its syntax is:

BOOL IsWindowVisible() const;

This method returns TRUE if the control that called it is already visible. If the control is hidden, the method returns FALSE.

Control's Availability

We saw that when a control has been created, it is available to the user who can interact with its value. This is because a control usually has its Disable property set to False in the Properties window. A control is referred to as disabled if the user can see it but cannot change its value.

If for any reason a control is disabled, to let you enable it, the CWnd class is equipped with the EnableWindow() method. In fact, the EnableWindow() method is used either to enable or to disable a window. Its syntax is:

BOOL EnableWindow(BOOL bEnable = TRUE);

Here is an example that disables a control called Memo:

void CSecondDlg::OnDisableMemo()
{
    memo->EnableWindow(FALSE);
}

When calling the EnableWindow() method, if you pass the FALSE value, the control is disabled, whether it was already disabled or not. If you pass the TRUE constant, it gets enabled even it was already enabled. Sometimes you may want to check first whether the control is already enabled or disabled. To help you with this, CWnd class provides the IsWindowEnabled() method. Its syntax is:

BOOL IsWindowEnabled( ) const;

This method checks the control that called it. If the control is enabled, the member function returns TRUE. If the control is disabled, this method returns FALSE. Here is an example:

void CSecondDlg::OnDisableMemo()
{
    if( memo->IsWindowEnabled() == TRUE )
	memo->EnableWindow(FALSE);
    else // if( !memo->IsWindowEnabled() )
	memo->EnableWindow();
}

Here is a simplified version of the above code:

void CSecondDlg::OnDisableMemo()
{
    memo->EnableWindow(!Memo->IsWindowEnabled());
}


Home Copyright © 2010-2016, FunctionX