Home

Windows Controls: Radio Buttons


Introduction to Radio Buttons


Description

A radio button is a control that appears as a (proportionately big) dot surrounded by a round box Radio Button. In reality, a radio button is accompanied by one or more other radio buttons that appear and behave as a group. The user decides which button is valid by selecting only one of them. When a radion button gets clicked, its round box fills with a (big) dot: Radio Button.

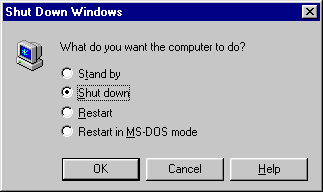
When one button is selected, the other round buttons of the (same) group are empty Radio Button. The user can select another by clicking a new choice, which empties the previous selection. Here is an example from the Microsoft Windows 95 Shut Down dialog box:

Shut Down Windows

This technique of selecting is referred to as mutually-exclusive.

To indicate what a radio butto is used for, it may be 
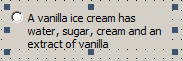
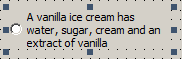
accompanied by static text. That text is simply a string and it can be 
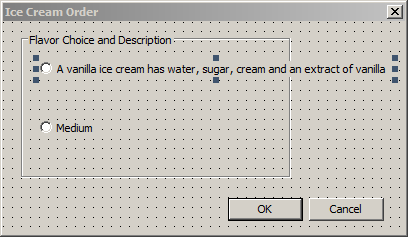
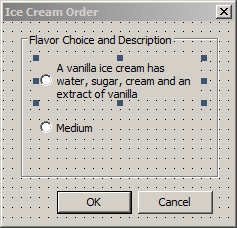
positioned to the left, above, to the right, or under the round box.

Practical LearningPractical Learning: Introducing Radio Buttons

  1. Start Microsoft Visual Studio
  2. To start a new project, on the main menu, click File -> New Project...
  3. In the middle list, click MFC Application and set the name to Operations
  4. Click OK
  5. In the first page of the MFC Application Wizard, click Next
  6. In the second page of the wizard, click Dialog Based and click Next
  7. In the third page of the wizard, click Finish

Creating Radio ButtonsCreating Radio Buttons

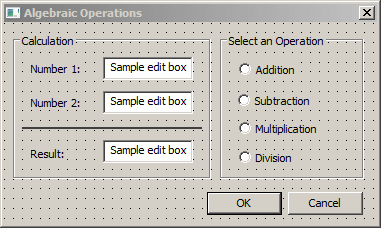
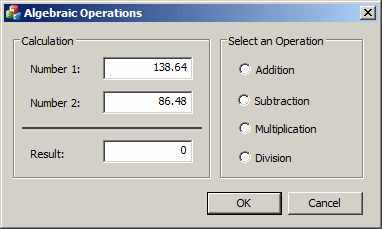
Radio buttons usually come in a group. Based on this, before creating radio buttons, you should first add a group box (or any appropriate container) to a dialog box (or to the object that will host the radio buttons; an example would be a Picture frame).

To visually create a radio button, on the Toolbox, click the Radio Button object and click the desired area on the host window. In the same way, add one or more radio buttons.

As a Windows control, the radio button is based on the CButton class which, like all other constrols, is based on CWnd. As far as the Win32 and the MFC libraries are concerned, a radio button is first of all, a button. Therefore, to programmatically create a radio button, declare a variable or a pointer to CButton using its default constructor. Like all other MFC controls, the CButton class provides a Create() member function to initialize it. The syntax of this member function for a button is:

BOOL Create(LPCTSTR lpszCaption,
	    DWORD dwStyle,
	    const RECT& rect,
	    CWnd* pParentWnd,
	    UINT nID);

The lpszCaption argument is the string of the label that accomponies the radio button. The differences of radio buttons are set using the dwStyle argument. A radio button must have the BS_RADIOBUTTON value.

When setting the rect argument, provide enough space for the control because, by default, it will be confined to that rectangle and cannot display beyond that. Here are two examples:

BOOL CExerciseDlg::OnInitDialog()
{
    CDialog::OnInitDialog();

    // Set the icon for this dialog. The framework does this automatically
    // when the application's main window is not a dialog
    SetIcon(m_hIcon, TRUE); // Set big icon
    SetIcon(m_hIcon, FALSE); // Set small icon
    
    // TODO: Add extra initialization here
    CButton *rdoSmall = new CButton;
    CButton *rdoMedium = new CButton;
    
    rdoSmall->Create(Something,
		WS_CHILD | WS_VISIBLE | BS_RADIOBUTTON,
		CRect(130, 40, 200, 50), this, 0x12);

    rdoMedium->Create(Something,
		WS_CHILD | WS_VISIBLE | BS_RADIOBUTTON,
		CRect(130, 70, 200, 80), this, 0x14);

    return TRUE; // return TRUE unless you set the focus to a control
}

Practical LearningPractical Learning: Creating Radio Buttons

  1. Design the dialog box as follows:
     
    Algebraic Operations
    Control  Caption ID  Align Text
    Group Box Group Box Calculation     
    Static Text Static Text Number &1:     
    Edit Control Edit Control    IDC_OPERAND1 Right 
    Static Text Static Text Number &2:     
    Edit Control Edit Control   IDC_OPERAND2 Right 
    Picture  Picture        
    Static Control Static Text Result:     
    Edit Control Edit Control   IDC_RESULT  Right
    Group Box Group Box Select an Operation     
    Radio Button Radio Button      
    Radio Button Radio Button      
    Radio Button Radio Button      
    Radio Button Radio Button      
  2. Right-click each of the edit controls and click Add Variable... Then create the variables as follows:
     
    ID
    Category Type Name
    IDC_OPERAND1 Value double m_Operand1
    IDC_OPERAND2 Value double m_Operand2
    IDC_RESULT Value double m_Result

Primary Characteristics of Radio Buttons

   .

The Caption of a Radio Button

The text a radio button displays is referred to as its caption. That text should be explicit enough for the user to figure out the role of an item in the group. To visually specify the caption of a radio button, after adding the control, replace the value of the Caption field in the Properties window. If you are programmatically creating the control, pass its caption as the first argument. Here are examples:

BOOL CExerciseDlg::OnInitDialog()
{
    CDialog::OnInitDialog();

    // Set the icon for this dialog. The framework does this automatically
    // when the application's main window is not a dialog
    SetIcon(m_hIcon, TRUE); // Set big icon
    SetIcon(m_hIcon, FALSE); // Set small icon
    
    // TODO: Add extra initialization here
    CButton *rdoSmall = new CButton;
    CButton *rdoMedium = new CButton;
    
    rdoSmall->Create(_T("Small"),
		WS_CHILD | WS_VISIBLE | BS_RADIOBUTTON,
		CRect(130, 40, 200, 50), this, 0x12);

    rdoMedium->Create(_T("Medium"),
		WS_CHILD | WS_VISIBLE | BS_RADIOBUTTON,
		CRect(130, 70, 200, 80), this, 0x14);

    return TRUE; // return TRUE unless you set the focus to a control
}

If the control exists already, to programmaticalyl change its caption, call the CWnd::SetWindowText() member function.

Practical LearningPractical Learning: Setting the Captions of Radio Buttons

  1. On the dialog box, click the first radio button
  2. In the Properties window, click Caption and type &Addition
  3. Change the captions of the other radio buttons as follows:
  4. Design the dialog box as follows:
     
    Algebraic Operations
    Control  Caption ID 
    Group Box Group Box Select an Operation   
    Radio Button Radio Button &Addition IDC_ADDITION
    Radio Button Radio Button &Subtraction IDC_SUBTRACTION
    Radio Button Radio Button &Multiplication IDC_MULTIPLICATION
    Radio Button Radio Button &Division IDC_DIVISION

The Selected Radio Button

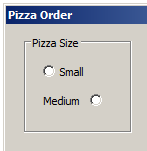
As described already, to select a radio button, the user can click it. To indicate to the user that a button has been selected, it should display a dot in its round box. To visually allow the user to automatically display its dot, in the Properties window, set the Auto property to True. To programmatically allow the user to select a radio button, when creating it, add the BS_AUTORADIOBUTTON style. Here are examples:

int CExerciseDlg::OnCreate(LPCREATESTRUCT lpCreateStruct)
{
    if (CDialogEx::OnCreate(lpCreateStruct) == -1)
	return -1;

    // TODO:  Add your specialized creation code here
    CWnd *ctlGroupBox = new CWnd;
    CButton *rdoSmall = new CButton;
    CButton *rdoMedium = new CButton;
    CButton *rdoLarge = new CButton;

    ctlGroupBox->Create(_T("BUTTON"),
			_T("Pizza Size"),
			WS_CHILD | WS_VISIBLE | BS_GROUPBOX,
			CRect(10, 10, 200, 160),
			this,
			IDC_PIZZASIZE);

    rdoSmall->Create(_T("Small"),
		     WS_CHILD | WS_VISIBLE | BS_AUTORADIOBUTTON,
		     CRect(40, 40, 120, 60), this, 0x12);
    rdoMedium->Create(_T("Medium"),
             	      WS_CHILD | WS_VISIBLE | BS_AUTORADIOBUTTON,
             	      CRect(40, 70, 120, 100), this, 0x14);
    rdoLarge->Create(_T("Large"),
	             WS_CHILD | WS_VISIBLE | BS_AUTORADIOBUTTON,
	             CRect(40, 100, 120, 140), this, 0x16);

    return 0;
}

While using the radio buttons, the user is presented with the controls and requested to select one. To make a selection, the user must click the desired choice. The control selected fills its circle with a (big) dot. To programmatically change the state of a radio button, you have various options.

The easiest way to select a radio button consists of calling the CWnd::CheckRadioButton() member function (actually, you should call this member function as CDialog::CheckRadioButton()). Its syntax is:

void CheckRadioButton(int nIDFirstButton,
 		      int nIDLastButton,
		      int nIDCheckButton);

To use this member function, you must know the identifiers of the radio buttons involved. The nIDFirstButton is the identifier of the first radio button of the group. The nIDLastButton is the identifier of the last radio button of the group. The last argument, nIDCheckButton is the identifier of the radio button that must be selected. Here is an example:

void CExerciseDlg::OnBtnSelect2() 
{
    // TODO: Add your control notification handler code here
    CheckRadioButton(IDC_RADIO1, IDC_RADIO3, IDC_RADIO3);
}

To change the state of a radio button, you can call the CButton::SetCheck() member function. Its syntax is:

void SetCheck(int nCheck);

The nCheck value indicates how to fill the control's circle. To fill it with the selection dot, pass the value of 0. To deselect a radio button, pass the argument as 1. Here is an example:

void CExerciseDlg::OnBtnSelect2()
{
    // TODO: Add your control notification handler code here
    CButton *btnSecond;

    btnSecond = reinterpret_cast<CButton *>(GetDlgItem(IDC_RADIO2));
    btnSecond->SetCheck(1);
}

To find out what radio button of a group is selected, you can call the CWnd::GetCheckedRadioButton(). Its syntax is:

int GetCheckedRadioButton( int nIDFirstButton, int nIDLastButton );

When calling this member function, you must specify the identifier of the first radio button of the group as nIDFirstButton and the identifier of the last radio button of the group as nIDLastButton. The member function returns the identifier of the radio button whose circle is filled.

Alternatively, to find the selected radio button, call the CButton::GetCheck() member function. Its syntax is:

int GetCheck( ) const;

This member function returns 0 if the radio button is not selected. Otherwise, it returns 1 if the radio button is selected.

If you want to want to find whether a particular radio button is currently selected, you can call the CWnd::IsDlgButtonChecked() member function. Its syntax:

UINT IsDlgButtonChecked(int nIDButton) const;

When calling this member function, pass the identifier of the radio button as the nIDButton argument. This member function will check the state of the radio button. If the radio button is selected, the member function will return 1. If the radio button is not selected, the 
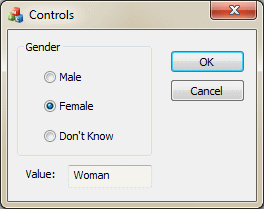
member function returns 0.

Because a radio is first of all a control of CButton type, when it is clicked, it generates the BN_CLICKED message. You can use this message to take action in response to the user's.

We have mentioned already that a control can have two types of variables: Control or Value. For a radio button, you can declare or add either a CButton or a regular C++ variable. If you decide to use a CButton variable, you can call the necessary member function to take advantage of the class. On the other hand, if you want to use a value instead, you can add a variable for only the first radio button of the group, the radio button that has the Group property set to true. The variable should be an integer, such as int. In such a case, each radio button of the group can be referred to by a number. The first radio button of the group would have the index 0, the second would be 1, etc.

Here is an example:

Header File

// ExerciseDlg.h : header file
//

#pragma once

// CExerciseDlg dialog
class CExerciseDlg : public CDialogEx
{
// Construction
public:
	CExerciseDlg(CWnd* pParent = NULL);	// standard constructor

// Dialog Data
	enum { IDD = IDD_CONTROLS_DIALOG };

	protected:
	virtual void DoDataExchange(CDataExchange* pDX);	// DDX/DDV support


// Implementation
protected:
	HICON m_hIcon;

	// Generated message map functions
	virtual BOOL OnInitDialog();
	afx_msg void OnPaint();
	afx_msg HCURSOR OnQueryDragIcon();
	DECLARE_MESSAGE_MAP()

public:
	int m_Gender;
	CString m_Value;
	afx_msg void OnBnClickedMale();
	afx_msg void OnBnClickedFemale();
	afx_msg void OnBnClickedDontKnow();
};

Source File

Let the// ExerciseDlg.cpp : implementation file
//

#include "stdafx.h"
#include "Controls.h"
#include "ExerciseDlg.h"
#include "afxdialogex.h"

#ifdef _DEBUG
#define new DEBUG_NEW
#endif

// CExerciseDlg dialog

CExerciseDlg::CExerciseDlg(CWnd* pParent /*=NULL*/)
	: CDialogEx(CExerciseDlg::IDD, pParent), m_Gender(0), m_Value(_T(""))
{
	m_hIcon = AfxGetApp()->LoadIcon(IDR_MAINFRAME);
}

void CExerciseDlg::DoDataExchange(CDataExchange* pDX)
{
	CDialogEx::DoDataExchange(pDX);
	DDX_Text(pDX, IDC_VALUE, m_Value);
}

BEGIN_MESSAGE_MAP(CExerciseDlg, CDialogEx)
	ON_WM_PAINT()
	ON_WM_QUERYDRAGICON()
	ON_BN_CLICKED(IDC_MALE, &CExerciseDlg::OnBnClickedMale)
	ON_BN_CLICKED(IDC_FEMALE, &CExerciseDlg::OnBnClickedFemale)
	ON_BN_CLICKED(IDC_DONT_KNOW, &CExerciseDlg::OnBnClickedDontKnow)
END_MESSAGE_MAP()

// CExerciseDlg message handlers

BOOL CExerciseDlg::OnInitDialog()
{
	CDialogEx::OnInitDialog();

	// Set the icon for this dialog.  The framework does this automatically
	//  when the application's main window is not a dialog
	SetIcon(m_hIcon, TRUE);			// Set big icon
	SetIcon(m_hIcon, FALSE);		// Set small icon

	// TODO: Add extra initialization here

	return TRUE;  // return TRUE  unless you set the focus to a control
}

// If you add a minimize button to your dialog, you will need the code below
//  to draw the icon.  For MFC applications using the document/view model,
//  this is automatically done for you by the framework.

void CExerciseDlg::OnPaint()
{
	if (IsIconic())
	{
		CPaintDC dc(this); // device context for painting

		SendMessage(WM_ICONERASEBKGND,
			    reinterpret_cast<WPARAM>(dc.GetSafeHdc()), 0);

		// Center icon in client rectangle
		int cxIcon = GetSystemMetrics(SM_CXICON);
		int cyIcon = GetSystemMetrics(SM_CYICON);
		CRect rect;
		GetClientRect(&rect);
		int x = (rect.Width() - cxIcon + 1) / 2;
		int y = (rect.Height() - cyIcon + 1) / 2;

		// Draw the icon
		dc.DrawIcon(x, y, m_hIcon);
	}
	else
	{
		CDialogEx::OnPaint();
	}
}

// The system calls this function to obtain the cursor to display while the user drags
//  the minimized window.
HCURSOR CExerciseDlg::OnQueryDragIcon()
{
	return static_cast<HCURSOR>(m_hIcon);
}

void CExerciseDlg::OnBnClickedMale()
{
	// TODO: Add your control notification handler code here
	m_Value = _T("Man");
	UpdateData(FALSE);
}

void CExerciseDlg::OnBnClickedFemale()
{
	// TODO: Add your control notification handler code here
	m_Value = _T("Woman");
	UpdateData(FALSE);
}

void CExerciseDlg::OnBnClickedDontKnow()
{
	// TODO: Add your control notification handler code here
	m_Value = _T("Unknown");
	UpdateData(FALSE);
}

Radio Button


Practical LearningPractical Learning: Selecting a Radio Button

  1. On the dialog box, double-click the Addition radio button
  2. Implement its event as follows:
    void COperationsDlg::OnBnClickedAddition()
    {
    	// TODO: Add your control notification handler code here
    	UpdateData();
    
    	m_Result = m_Operand1 + m_Operand2;
    
    	UpdateData(FALSE);
    }
  3. Return to the dialog box and double-click the Subtraction radio button
  4. Implement its event as follows:
    void COperationsDlg::OnBnClickedSubtraction()
    {
    	// TODO: Add your control notification handler code here
    	UpdateData();
    	m_Result = m_Operand1 - m_Operand2;
    	UpdateData(FALSE);
    }
  5. Return to the dialog box and double-click the Multiplication radio button
  6. Implement its event as follows:
    void COperationsDlg::OnBnClickedMultiplication()
    {
    	// TODO: Add your control notification handler code here
    	UpdateData();
    	m_Result = m_Operand1 * m_Operand2;
    	UpdateData(FALSE);
    }
  7. Return to the dialog box and double-click the Division radio button
  8. Implement its event as follows:
    void COperationsDlg::OnBnClickedDivision()
    {
    	// TODO: Add your control notification handler code here
    	UpdateData();
    	m_Result = m_Operand1 / m_Operand2;
    	UpdateData(FALSE);
    }
  9. To execute the application to test the radio buttons, press F5
  10. Enter some values in the edit boxes and click the radio buttons
     
    Algebraic Operations
     
    Algebraic Operations
     
    Algebraic Operations
     
    Algebraic Operations
  11. Close the dialog box and return to your programming environment

Separating Radio Buttons in Groups

For either the user or the programmer, radio buttons must behave as entities of one group. When you freshly add radio buttons to a host, they are created as a group. If your dialog box will be made of only a few radio buttons, you may not need to do much. Imagine you want to create a dialog box with more than one set of radio buttons. In this case, you must separate them into groups. To do that, set the Group property of each new button of a group to True. To do this programmatically, add the WS_GROUP style to the CButton object.

Imagine you will use two sets of group buttons in a dialog box. Add the first radio button and set its Group property to True or add the WS_GROUP value to its style. Then, add the other radio buttons of the set but set their Group property to False or do not add the WS_GROUP value to their styles.

When starting the new set, add a new radio button and set its Group property to True. Add the other radio buttons with the Group property set to False or without the WS_GROUP style.

Practical LearningPractical Learning: Selecting Radio Buttons

  1. To start a new application, on the main menu, click File -> New Project...
  2. In the middle list, click MFC Application and set the name to ClarksvilleIceScream1
  3. Press Enter
  4. In the first page of the MFC Application Wizard, click Next
  5. In the second page, click Dialog Based and click Next
  6. Click Finish
  7. Design the dialog box as follows:
     
    Ice Cream
    Control  Caption
    Group Box Group Box Flavors 
    Radio Button Radio Button Vanilla
    Radio Button Radio Button Cream of Cocoa
    Radio Button Radio Button Chocolate Chip
    Radio Button Radio Button Butter Pecan
    Radio Button Radio Button Chunky Butter
    Radio Button Radio Button Strawberry Vanilla
    Radio Button Radio Button Chocolate Cookies
    Group Box Group Box Containers
    Radio Button Radio Button Cup
    Radio Button Radio Button Cone
    Radio Button Radio Button Bowl
    Group Box Group Box Ingredients
    Radio Button Radio Button None
    Radio Button Radio Button M && M
    Radio Button Radio Button Mixed Nuts
    Group Box Group Box Scoops
    Radio Button Radio Button One
    Radio Button Radio Button Two
    Radio Button Radio Button Three
  8. To execute the application, press F5
  9. Click the radio buttons from different group boxes and notice that all radio buttons seem to belong to the same group
  10. Close the dialog box and return to your programming environment
  11. On the dialog box, click the Vanilla radio button
  12. In the Properties window, double-click Group to set its value to True
  13. On the dialog box, click the Cup radio button
  14. In the Properties window, double-click Group to set its value to True
  15. On the dialog box, click the None radio button
  16. In the Properties window, double-click Group to set its value to True
  17. On the dialog box, click the One radio button
  18. In the Properties window, double-click Group to set its value to True
  19. Press F5 to execute the application
  20. Click the radio buttons in different sections
  21. Close the dialog box and return to your programming environment


Other Characteristics of Radio Buttons


The Caption Alignment

When adding a radio button to a host, it displays its caption to the right side of its round box. If you prefer to position the label to the left of the small circle, set the Left Text property to True. To manually align the caption to the right, in the Properties window, set the Left Text value to True:

Left Text Radio Button

If you are programmatically creating the radio button, add the BS_LEFTTEXT style.

In the same way, you can add other radio buttons and individually configure each. For harmony, all radio of a group should have the same design.

A Caption on Multiple Lines

The caption that accompanies a radio button is static text that is included in a rectangular shape. Since the radio button by default is configured to display one line of text, the round box is located to the left side of the label. If your radio button has a long caption, the string may expand beyond its rectangle. Consider the following example:

Radio Button

One alternative is to use multiple lines of text for the caption. To visually specify this, in the Propertiws window, set the Multiline value to true. After doing this, resize the area of the button so its caption would fit. Here is an example:

Radio Button

If you are programmatically creating the radio button or in the resource file, add the BS_MULTILINE style. If you are programmatically creating the control using either the CWnd or the CButton class, in the Create() member function, add the BS_MULTILINE style.

The Vertical and Horizontal Alignment

Once the text can fit in the allocated area, you can accept the default alignment of the label or change it as you see fit. The alignment of text is visually specified using the Horizontal Alignment and the Vertical Alignment properties. Here are the possible combinations:

Left Text: False
Horz Align: Default or Left
Vert Align: Top
Vertical and Horizontal Alignment
Left Text: False
Horz Align: Default or Left
Vert Align: Default or Center
Vertical and Horizontal Alignment
Left Text: False
Horz Align: Default or Left
Vert Align: Bottom
Vertical and Horizontal Alignment
Left Text: True
Horz Align: Default or Left
Vert Align: Top
Vertical and Horizontal Alignment
Left Text: True
Horz Align: Default or Left
Vert Align: Default or Center
Vertical and Horizontal Alignment
Left Text: True
Horz Align: Default or Left
Vert Align: Bottom
Vertical and Horizontal Alignment

A Push Radio Button

Once the radio buttons belong to the same group, if the user clicks one that is empty Radio Button, it gets filled with a big dot Radio Button and all the others become empty Radio Button. This is the default and most common appearance these controls can assume. Alternatively, you can give them the appearance of a regular command button with 3-D borders. To do this, set the Push-Like property to True. When the radio buttons appear as command buttons, the control that is selected appear pushed or down while the others are up:

If you do not want the default 3-D design of radio buttons, you can make them flat by setting the Flat property to True.

Practical LearningPractical Learning: Implementing the Push Radio Buttons

  1. To start a new application, on the main menu, click File -> New Project...
  2. In the middle list, click MFC Application and set the name to ElementaryAlgebra
  3. Click OK
  4. In the first page of the MFC Application Wizard, click Next
  5. In the second page, click Dialog Based and click Next
  6. In the third page of the wizard, set the title to Elementary Algebra
  7. Click Finish
  8. Click the TODO line and press Delete
  9. While the OK is selected, press Delete
  10. Change the caption of the Cancel button to Close
  11. Design the dialog box as follows:
     
    Elementary Algebra
    Control Caption Group ID Text Align Push Like
    Group Box Group Box Select Your Level        
    Radio Button Radio Button Level 1 True IDC_LEVEL1   True
    Radio Button Radio Button Level 2 True IDC_LEVEL2   True
    Radio Button Radio Button Level 3 True IDC_LEVEL3   True
    Radio Button Radio Button Level 4 True IDC_LEVEL4   True
    Group Box Group Box Select the Operation        
    Radio Button Radio Button Addition True IDC_ADDITION   True
    Radio Button Radio Button Subtraction True IDC_SUBTRACTION   True
    Radio Button Radio Button Multiplication True IDC_MULTIPLICATION   True
    Radio Button Radio Button Division True IDC_DIVISION   True
    Static Text Static Text 000   IDC_OPERAND1 Right   
    Button Button New Operation   IDC_NEW_OPERATION    
    Static Text Static Text +   IDC_OPERATION Center  
    Static Text Static Text 000   IDC_OPERAND2 Right   
    Picture  Picture           
    Static Text Static Text =        
    Edit Control Edit Control     IDC_RESULT Right  
    Button Button Check Result   IDC_CHECK_RESULT    
    Button Button Close   IDCANCEL    
  12. Right-click each of the IDs of the following controls and click Add Variable... Then create the variables as follows:
     
    ID
    Category Type Name
    IDC_LEVEL1 Control CButton m_Level1
    IDC_LEVEL2 Control CButton m_Level2
    IDC_LEVEL3 Control CButton m_Level3
    IDC_LEVEL4 Control CButton m_Level4
    IDC_ADDITION Control CButton m_Addition
    IDC_SUBTRACTION Control CButton m_Subtraction
    IDC_MULTIPLICATION Control CButton m_Multiplication
    IDC_DIVISION Control CButton m_Division
    IDC_OPERAND1 Value double m_Operand1
    IDC_OPERATION Value CString m_Operation
    IDC_OPERAND2 Value double m_Operand2
    IDC_RESULT Value double m_Result
  13. Click each of the following radio buttons and, in the Properties window, set their Group property to False: IDC_LEVEL2, IDC_LEVEL3, IDC_LEVEL4, IDC_SUBTRACTION, IDC_MULTIPLICATION, and IDC_DIVISION
  14. Double-click the New Operation button on the dialog box
  15. Locate the OnInitDialog event and change it as follows:
    BOOL CElementaryAlgebraDlg::OnInitDialog()
    {
    	CDialogEx::OnInitDialog();
    
    	// Add "About..." menu item to system menu.
    
    	// IDM_ABOUTBOX must be in the system command range.
    	ASSERT((IDM_ABOUTBOX & 0xFFF0) == IDM_ABOUTBOX);
    	ASSERT(IDM_ABOUTBOX < 0xF000);
    
    	CMenu* pSysMenu = GetSystemMenu(FALSE);
    	if (pSysMenu != NULL)
    	{
    	    BOOL bNameValid;
    	    CString strAboutMenu;
    	    bNameValid = strAboutMenu.LoadString(IDS_ABOUTBOX);
    	    ASSERT(bNameValid);
    	    if (!strAboutMenu.IsEmpty())
    	    {
    		pSysMenu->AppendMenu(MF_SEPARATOR);
    		pSysMenu->AppendMenu(MF_STRING, IDM_ABOUTBOX, strAboutMenu);
    	    }
    	}
    
    	// Set the icon for this dialog.  The framework does this automatically
    	//  when the application's main window is not a dialog
    	SetIcon(m_hIcon, TRUE);			// Set big icon
    	SetIcon(m_hIcon, FALSE);		// Set small icon
    
    	// TODO: Add extra initialization here
    	m_Level1.SetCheck(1);
    	m_Addition.SetCheck(1);
    	m_Operation = _T("+");
    	UpdateData(FALSE);
    
    	return TRUE;  // return TRUE  unless you set the focus to a control
    }
  16. Scroll down and implement the new event as follows:
    void CElementaryAlgebraDlg::OnBnClickedNewOperation()
    {
        // TODO: Add your control notification handler code here
        UpdateData();
        int Number1 = 0;
        int Number2 = 0;
        srand(time(NULL));
        
        // If the user clicked the Level 1 button,
        // the operation will be performed on numbers from 1 to 9
        if( m_Level1.GetCheck() == true )
        {
            Number1 = rand() % 10 + 1;
            Number2 = rand() % 10 + 1;
        }
        else if( m_Level2.GetCheck() == true )
        {
            // If the user clicked the Level 2 button,
            // the operation will be performed on numbers from 10 to 19
            Number1 = rand() % 10 + 11;
            Number2 = rand() % 10 + 11;
        }
        else if( m_Level3.GetCheck() == true )
        {
            // If the user clicked the Level 3 button,
            // the operation will be performed on numbers from 21 to 49
            Number1 = rand() % 30 + 21;
            Number2 = rand() % 30 + 21;
        }
        else if( m_Level4.GetCheck() == true )
        {
            // If the user clicked the Level 4 button,
            // the operation will be performed on numbers from 51 to 99
            Number1 = rand() % 50 + 50;
            Number2 = rand() % 50 + 50;
        }
    
        // Display the numbers to the user
        CString strNumber1, strNumber2;
    
        strNumber1.Format(_T("%d"), Number1);
        strNumber2.Format(_T("%d"), Number2);
        m_Operand1 = Number1;
        m_Operand2 = Number2;
    
        m_Result = 0.00;
    
        UpdateData(FALSE);
    }
  17. Return to the dialog box and double-click the Level 1 button
  18. Implement the event as follows:
    void CElementaryAlgebraDlg::OnBnClickedLevel1()
    {
    	// TODO: Add your control notification handler code here
    	OnBnClickedNewOperation();
    }
  19. Return to the dialog box and double-click the Level 2 button
  20. Implement its event as follows:
    void CElementaryAlgebraDlg::OnBnClickedLevel2()
    {
    	// TODO: Add your control notification handler code here
    	OnBnClickedNewOperation();
    }
  21. Return to the dialog box and double-click the Level 3 button
  22. Implement its event as follows:
    void CElementaryAlgebraDlg::OnBnClickedLevel3()
    {
    	// TODO: Add your control notification handler code here
    	OnBnClickedNewOperation();
    }
  23. Return to the dialog box and double-click the Level 4 button
  24. Implement its event as follows:
    void CElementaryAlgebraDlg::OnBnClickedLevel4()
    {
    	// TODO: Add your control notification handler code here
    	OnBnClickedNewOperation();
    }
  25. Return to the dialog box and double-click the Addition button
  26. Implement its event as follows:
    void CElementaryAlgebraDlg::OnBnClickedAddition()
    {
        // TODO: Add your control notification handler code here
        UpdateData();
        m_Operation = _T("+");
        UpdateData(FALSE);
    }
  27. Return to the dialog box and double-click the Subtraction button
  28. Implement its event as follows:
    void CElementaryAlgebraDlg::OnBnClickedSubtraction()
    {
        // TODO: Add your control notification handler code here
        UpdateData();
        m_Operation = _T("-");
        UpdateData(FALSE);
    }
  29. Return to the dialog box and double-click the Multiplication button
  30. Implement its event as follows:
    void CElementaryAlgebraDlg::OnBnClickedMultiplication()
    {
        // TODO: Add your control notification handler code here
        UpdateData();
        m_Operation = _T("*");
        UpdateData(FALSE);
    }
  31. Return to the dialog box and double-click the Division button
  32. Implement its event as follows:
    void CElementaryAlgebraDlg::OnBnClickedDivision()
    {
    	// TODO: Add your control notification handler code here
        UpdateData();
        m_Operation = _T("/");
        UpdateData(FALSE);
    }
  33. Return to the dialog box and double-click the Check Result button
  34. Implement its event as follows:
    void CElementaryAlgebraDlg::OnBnClickedCheckResult()
    {
        // TODO: Add your control notification handler code here
        UpdateData();
        double Number1, Number2;
        double UserResult, OurResult;
        srand(time(NULL));
    
        CString Congratulations[] = {
        		_T("Right :) - WOW - Good Answer!"),
    		_T("Good Answer :) - You are Impressive"), 
                    _T("Right Answer :) - What a Good Job!"), 
                    _T("Good :) - You Are Greaaaaaaaaaaaat"), 
                    _T("Wonderful Answer :) - You Know It") };
        CString WrongAnswers[] = { 
                _T("Uhhhhhhhhhh - Bad Answer"),
                _T("Wrong - You will do better next time"), 
                _T("Nop"),
                _T("Common - You can do Better Than That!"),
                _T("No - You are probably getting tired") };
    
        // Make sure the user provides a result
        if( m_Result == 0 )
        {
            MessageBox(_T("You must provide a result before clicking the button"),
    		   _T("Elementary Algebra"));
            return;
        }
    
        // Use exception handling to get the result
        UserResult = m_Result;
    
        Number1 = m_Operand1;
        Number2 = m_Operand2;
    
        // Get the user's answer
        if( m_Addition.GetCheck() == true )
        {
            OurResult = Number1 + Number2;
        }
    
        if( m_Subtraction.GetCheck() == true )
        {
            OurResult = Number1 - Number2;
        }
    
        if( m_Multiplication.GetCheck() == true )
        {
            OurResult = Number1 * Number2;
        }
    
        if( m_Division.GetCheck() == true)
        {
            OurResult = Number1 / Number2;
        }
    
        // Check if the user's answer is the right one
        if( OurResult == UserResult )
            MessageBox(Congratulations[rand() % 4],
                       _T("Elementary Operations"));
        else
        {
            MessageBox(WrongAnswers[rand() % 4],
                            _T("Elementary Operations"));
        }
    
        // After checking the user's answer, generate a new operation
        OnBnClickedNewOperation();
    	
        UpdateData(FALSE);
    }
  35. Close the dialog box. If asked whether you want to save, click Yes
  36. On the main menu, click File -> Open File...
  37. click BooleanAlgebra.rc
  38. In the bottom right section of the Open dialog box, click the down-pointing arrow of the Open button and click Open With...
  39. In the Open With dialog box, click Source Code (Text) Editor
     
    Open File
  40. Click OK.
    If you asked whether to open a file, click Yes
  41. Locate the following line:
    FONT 8, _T("MS Shell Dlg", 0, 0, 0x1
  42. Change it as:
    FONT 24, _T("Times New Roman", 0, 0, 0x1
  43. Close the file
  44. When asked whether you want to save, click Yes
  45. To execute, press F5
     
    Elementary Algebra
  46. Perform a few operations
  47. Close the dialog box and return to your programming environment


Home Copyright © 2010-2016, FunctionX