 |
Topics on Windows Programming: Tick Counter |
|
|
|
The Win32 library provides a special function used to
count a specific number of lapses that have occurred since you started your
computer. This information or counter is available through the
GetTickCount() function. Its syntax is:
|
DWORD GetTickCount(VOID);
This function takes no argument. If it succeeds in
performing its operation, which it usually does, it provides the number of
milliseconds that have elapsed since you started your computer. Just like
the timer control, what you do with the result of this function is up to
you and it can be used in various circumstances. For example, computer
games and simulations make great use of this function.
After retrieving the value that this function
provides, you can display it in a text-based control.
|
 Practical
Learning: Counting the Computer's Ticks Practical
Learning: Counting the Computer's Ticks
|
|
- To start a new application, on the main menu, click File -> New
Project...
- In the middle list, click MFC Application
- Set the name to TickCounter
- Click OK
- In the first page of the wizard, click Next
- In the second page of the wizard, click Dialog based
- Click Next
- In the third page of the wizard, click Finish
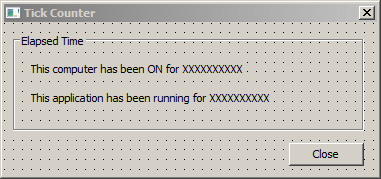
- Design the dialog box box as follows:
 |
| Control |
Caption |
ID |
| Group Box |
 |
Elapsed Time |
|
| Static Text |
 |
This computer has been ON for XXXXXXXXXX |
IDC_COMPUTER_TIME |
| Static Text |
|
This application has been running for XXXXXXXX |
IDC_APPLICATION_TIME |
| Button |
 |
Close |
IDCANCEL |
|
- Right-click IDC_COMPUTER_TIME and click Add Variable...
- Set Category to Value and the Variable Type to CString
- Set the name to m_ComputerTime and click Finish
- Right-click IDC_APPLICATION_TIME and click Add Variable...
- Set the Category to Value and the Variable Type to CString
- Set the name to m_ApplicationTime and click
Finish
- In the Solution Explorer, in the Header Files section,
double-click TickCounterDlg
- Declare an unsigned integer as follows:
public:
    CString m_ComputerTime;
    CString m_ApplicationTime;
    unsigned int ComputerTime;
};
- In the Class View, click CTickCounterDlg and, in the lower part,
double-click OnInitDialog
- Change the event as follows:
BOOL CTickCounterDlg::OnInitDialog()
{
    CDialogEx::OnInitDialog();

    // Add "About..." menu item to system menu.

    // IDM_ABOUTBOX must be in the system command range.
    ASSERT((IDM_ABOUTBOX & 0xFFF0) == IDM_ABOUTBOX);
    ASSERT(IDM_ABOUTBOX < 0xF000);

    CMenu* pSysMenu = GetSystemMenu(FALSE);
    if (pSysMenu != NULL)
    {
	BOOL bNameValid;
	CString strAboutMenu;
	bNameValid = strAboutMenu.LoadString(IDS_ABOUTBOX);
	ASSERT(bNameValid);
	if (!strAboutMenu.IsEmpty())
	{
		pSysMenu->AppendMenu(MF_SEPARATOR);
		pSysMenu->AppendMenu(MF_STRING, IDM_ABOUTBOX, strAboutMenu);
	}
    }

    // Set the icon for this dialog.  The framework does this automatically
    //  when the application's main window is not a dialog
    SetIcon(m_hIcon, TRUE);			// Set big icon
    SetIcon(m_hIcon, FALSE);		// Set small icon

    // TODO: Add extra initialization here
    ComputerTime = GetTickCount();
    SetTimer(1, 100, NULL);

    return TRUE;  // return TRUE  unless you set the focus to a control
}
- In the Class View, click CTickCounterDlg
- In the Properties window, click the Messages button

- Click the WM_TIMER field and click the arrow of its box
- Select <Add> OnTimer and implement the event as follows:
- implement it as follows:
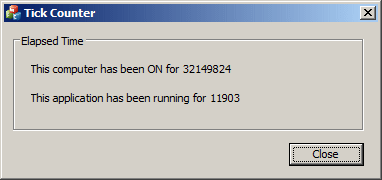
void CTickCounterDlg::OnTimer(UINT_PTR nIDEvent)
{
    // TODO: Add your message handler code here and/or call default
    unsigned long CurTickValue = GetTickCount();
    unsigned int Difference = CurTickValue - ComputerTime;

    m_ComputerTime.Format(_T("This computer has been ON for %d"),
    				  CurTickValue);
    m_ApplicationTime.Format(_T("This application has been running for %d"),
    				   Difference);

    UpdateData(FALSE);

    CDialogEx::OnTimer(nIDEvent);
}
- To test the application, press F5
- After testing the application, close the dialog box and return to
your programming environment
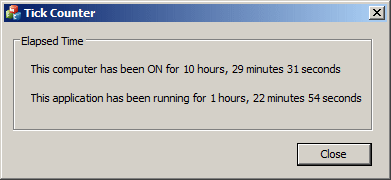
- To make the values easier to read, change the code of the OnTimer
event as follows:
void CTickCounterDlg::OnTimer(UINT_PTR nIDEvent)
{
    // TODO: Add your message handler code here and/or call default
    unsigned long CurTickValue = GetTickCount();
    unsigned int Difference = CurTickValue - ComputerTime;

    unsigned int ComputerHours, ComputerMinutes, ComputerSeconds;
    unsigned int ApplicationHours, ApplicationMinutes, ApplicationSeconds;

    ComputerHours = (CurTickValue / (3600 * 999)) % 24;
    ComputerMinutes = (CurTickValue / (60 * 999)) % 60;
    ComputerSeconds = (CurTickValue / 999) % 60;
    ApplicationHours = (Difference / (3600 * 999)) % 24;
    ApplicationMinutes = (Difference / (60 * 999)) % 60;
    ApplicationSeconds = (Difference / 999) % 60;

    m_ComputerTime.Format(_T("This computer has been ON for %d hours, %d minutes %d seconds"),
		ComputerHours, ComputerMinutes, ComputerSeconds);
    m_ApplicationTime.Format(_T("This application has been running for %d hours, %d minutes %d seconds"),
		ApplicationHours, ApplicationMinutes, ApplicationSeconds);

    UpdateData(FALSE);
    CDialogEx::OnTimer(nIDEvent);
}
- To test the application, press F5

- After testing the application, close the dialog box and return to
your programming environment
|
|