Techniques Of Displaying Strings In A Dialog


Displaying Strings In A Dialog Box

Introduction


This exercise addresses various ways of displaying something on an edit box of a dialog box.

Usually, the thing you display in an edit box is called a "string". The way the content of the edit box is handled makes the whole difference. For example, to display a classic and simple string, you can use the String = "My message" and you will be fine, provided the object in the edit box is of type CString. If you create the string from a CEdit class, use the CEdit::SetWindowText() function to display the string. If you are planning to display a number in the edit box, you can treat that number as a string; but if the number is derived from a calculation, you need to format it before displaying it; otherwise you would get an awkward result. 


Creating The Dialog

  1. Start Microsoft  Visual C++ if you didn't yet.

  2. From the main menu, click File->New

  3. From the Projects tab, click MFC AppWizard(exe).

  4. In the Project name box, type: Strings Display

  5. In the Location box, specify the directory where you want to create your app and click OK

  6. In the MFC AppWizard Step 1, choose Dialog based. Click Next.

  7. In Step 2, the only change you will make is to type the title of the dialog as:
    Examples of Displaying Strings

  8. Then click Next.

  9. In Step 3, refuse the comments.

  10. In Step 4, you don't have to change anything. Just click Finish to be presented with the New Project Information dialog.

  11. If you like what you see, in other words, if you like the files and features that AppWizard is about to create for you, click OK.

  12. Back in the WorkSpace, click Build->Set Active Configuration... and double-click: addition - Win32 Release.


Designing the Dialog

  1. Now, we will customize our dialog.

  2. Delete the Cancel button, we will not need it.

  3. If you are using VC++6.0, your dialog is probably very big for this application. Regardless, reduce its dimensions to an acceptable size.

  4. Change the caption of your IDOK button to: E&xit

  5. You can delete the Cancel button because it is not important for this exercise.

  6. We will add three check boxes, 2 buttons, and three edit boxes as follows:
    Dialog Identifiers
    Item Identifier Caption
    Button 1 IDC_BTN_CLERK &Clerk
    Button 2 IDC_BTN_CUST &Customer
    Edit Box 1 IDC_CLERK
     
    Edit Box 2 IDC_CUSTOMER  
    Check box IDC_CSHRIMP_CASHEW &Shrimp With Cashew .........................$ 9.95
    Check box IDC_CHICKEN_WALNUT

    &Walnut Chicken .................................$ 8.95

    Check box IDC_CSEAFOOD_NEST

    S&eafood Bird's Nest .........................$ 14.95

    Button 3 IDC_BTN_ADD Show &Addition
    Edit Box 3 IDC_DISPLAY  
     
    For the IDC_BTN_ADD edit box properties, in the Styles tab, click the Read-only check box (we don't want the user to change the display of our addition).


Introduction

  1. What we have to do now is to code our app.
    To access ClassWizard, press Ctrl + W.

  2. Click the Member Variables tab and add the following variables:
     

    Member Variables
    Control ID Type Member
    IDC_CSHRIMP_CASHEW BOOL m_ChickenWalnut
    IDC_CLERK CString m_Clerk
    IDC_CSEAFOOD_NEST BOOL m_SeaNest
    IDC_CHICKEN_WALNUT BOOL m_ShrimpCashew
    IDC_CUSTOMER CEdit m_Customer
    IDC_DISPLAY CString m_Display

    MFC ClassWizard
     
  3. Click the Message Maps tab. Make sure the class name is specified as: CStringsDisplayDlg.
    In the Object IDs list box, click IDC_BTN_ADD. In the Messages list box, double-click BN_CLICKED, click the Add Function... button and change the name of the suggested function to: OnAddition
  4. In the same way, create the following functions:

    Object ID Message
    IDC_BTN_ADD OnAddition
    IDC_BTN_CLERK OnClerk
    IDC_BTN_CUST OnCustomer
    IDC_CHICKEN_WALNUT OnChickenWalnut
    IDC_CSEAFOOD_NEST OnCSeafoodNest
    IDC_CSHRIMP_CASHEW OnCShrimpCashew


Coding The Dialog

  1. It is a little easier to display characters in an edit box when the string to display is of type CString.

  2. In the Object IDs list, click IDC_BTN_CLERK. In the Messages list, click BN_CLICKED.

  3. Click the Edit Code button.

  4. Edit the function to display as follows:

      void CStringsDisplayDlg::OnClerk() 
      {
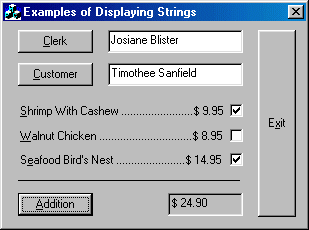
      	m_Clerk = "Josiane Blister";
      	UpdateData(FALSE);
      }
  5. To test your application, press Ctrl + F5.

  6. Once the dialog application is running, click the Clerk button. After viewing the result, to close the dialog box, click Exit.

  7. To display a string in an edit box that is derived from a CEdit class, change the next function as follows:

    void CStringsDisplayDlg::OnCustomer() 
    {
    	m_Customer.SetWindowText("Timothee Sanfield");
    }
  8. To test your application, press Ctrl + F5.

  9. Once the dialog application is running, click the Customer button. After viewing the result, to close the dialog box, click Exit.

  10. Now, we will learn how to display a float value in an edit box; we need some gymnastics to get the right result.

  11. To manipulate the value of a food item, we need to assign a double value to each check box.
    If necessary, expand the ClassView in the Workspace section. 
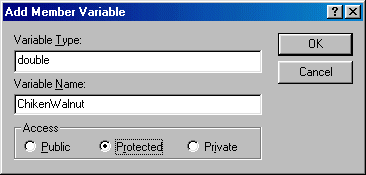
Right-click CStringDisplayDlg and click Add Member Variable.

  12. In the Variable Type edit box, type double

  13. In the Variable Name edit box, type ChickenWalnut

  14. In the Access section, click the Protected radio butto

    Add Member Variable

  15. Click OK.

  16. In the same way, create a protected member variable named SeafoodNest

  17. Create one more protected member variable named ShrimpCashew

    protected:
      double ShrimpCashew;
      double SeafoodNest;
      double ChikenWalnut;
  18. In the CStringDisplayDlg::OnInitDialog() function, initialize these variables as follows:
    // TODO: Add extra initialization here
    ShrimpCashew = 0;
    SeafoodNest = 0;
    ChikenWalnut = 0;
    return TRUE; // return TRUE unless you set the focus to a control
  19. From the WorkSpace window, expand the CStringDisplayDlg folder and double-click the OnChickenWalnut() function to access its implementation.
    In coding our check boxes, since each of our check boxes has a variable attached to it, we first need to transfer the current content of that variable to the control:

    UpdateData(TRUE);

    Then, we need to evaluate the control's variable by cheking its boolean state: if the box is checked, we assign it a variable, in this case the price of the Walnut Chiken; if the box is not checked, we keep it as zero:

    void CStringsDisplayDlg::OnChickenWalnut() 
    {
      UpdateData(TRUE);
    	
      if( m_ChickenWalnut==TRUE )
        ChikenWalnut = 8.95;
      else
        ChikenWalnut = 0;
    }
  20. Code the other two functions accordingly. When you finish, your functions should look like this:
    void CStringsDisplayDlg::OnCSeafoodNest() 
    {
      UpdateData(TRUE);
    
      if( m_SeaNest == TRUE )
        SeafoodNest = 14.95;
      else
        SeafoodNest = 0;
    }
    
    void CStringsDisplayDlg::OnCShrimpCashew() 
    {
      UpdateData(TRUE);
    
      if( m_ShrimpCashew == TRUE )
        ShrimpCashew = 9.95;
      else
        ShrimpCashew = 0;
    }
  21. We are now ready to display the result of the user's choice(s). Based on the boxes that are checked, we first sum up the corresponding values to the boxes that are checked or not checked, since we assigned a double number to each. Then we will use the CEdit::Format() function to format that number in order to display it in an Edit box. Finally, we transfer the new result to the screen display of IDC_BTN_ADD:
    void CStringsDisplayDlg::OnAddition() 
    {
    	double Sum;
    	
    	Sum = ChikenWalnut + SeafoodNest + ShrimpCashew;
    	m_Display.Format( "$ %.2f", Sum );
    	UpdateData(FALSE);
    }
  1. To test the application, press Ctrl + F5.


Converting A String To A Floating Variable


Creating The Dialog


Create a dialog-based application as follows:


Writing Code

  1. Implement the Calculate function as follows:

    void CSphere1Dlg::OnBtnCalculate() 
    {
    	const double PI = 3.14159;
    	double Radius, Area, Volume;
    
    	UpdateData(TRUE);
    	Radius = atof(m_Radius);
    	Area = 4 * pow(Radius, 2) * PI;
    	Volume = 4 * pow(Radius, 3) * PI / 3;
    
    	m_Area.Format("%.2f", Area);
    	m_Volume.Format("%.2f", Volume);
    	UpdateData(FALSE);
    }


Copyright © 2000 FunctionX