MFC Dialog Boxes: Dialog Bars


Overview

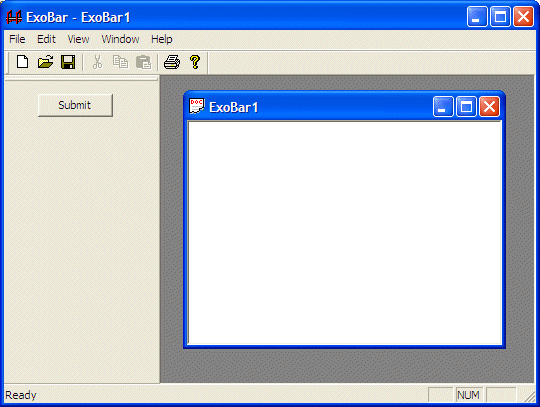
A dialog bar is an object of the family of Control Bars. These are objects used to complete an interface when the frame needs extra real estate to carry the desired controls of an application. One of the main justifications of control bars is that the user can display or hide them at will.

A dialog bar is a sort of intermediary between a dialog box and a toolbar. Like a dialog box or a toolbar, a dialog bar is mainly used as a container or host of other controls.

Creating a Dialog Bar

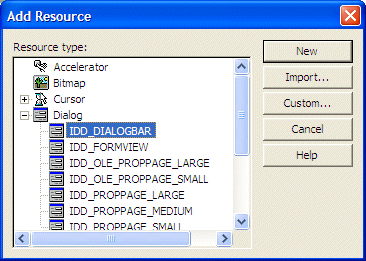
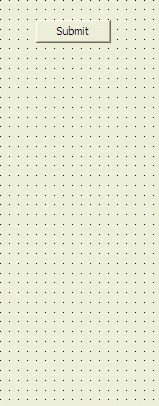
Like a dialog box, a dialog bar is created from a dialog-based resource. To create a dialog box, toolbar, you can display the Add Resource dialog box, expand the Dialog node and double-click Dialog bar. This would add a border-less dialog resource to your application. You have two options: you can keep the dialog bar as is or you can derive a class from it. Keeping the dialog bar as created is probably easier because it is ready to be recognized by the other classes, namely the frame and the document, of your application.

To add a dialog bar to your project, in the frame header class, you can declare a CDialogBar variable. To display and attach it to your interface, you can programmatically create it in the OnCreate() event of your frame class using one of the overloaded CDialog::Create() method:

virtual BOOL Create(
   CWnd* pParentWnd,
   LPCTSTR lpszTemplateName,
   UINT nStyle,
   UINT nID 
);
virtual BOOL Create(
   CWnd* pParentWnd,
   UINT nIDTemplate,
   UINT nStyle,
   UINT nID 
);


Practical Learning Practical Learning: Introducing Dialog Bars

  1. Create an MFC Application named ExoBar then click OK and Finish
  2. To add a dialog box, on the main menu, click Project -> Add Resource...
  3. Expand the Dialog node and click Dialog Bar
     
  4. Click New
  5. Change its ID to IDD_TOOLBOX
  6. Delete the TO DO line
  7. Resize the dialog bar to have a taller height and a narrower width
  8. Add a Button to the dialog bar. Change its ID to IDC_SUBMIT_BTN and its Caption to Submit
     
  9. Right-click the Submit button and click Add Event Handler...
  10. In the Class List, click the view class
     
  11. Click Add and Edit
  12. Implement the event as follows:
     
    void CExoBarView::OnBnClickedSubmitBtn()
    {
    	// TODO: Add your control notification handler code here
    	AfxMessageBox("Thank you for your consideration\n"
    		         "Your application has been submitted to Human Resources\n"
    		         "Once we have reviewed, we will contact you");
    }
  13. Access the header file of your frame and declare a CDialogBar variable named m_wndToolbox in the same section where the toolbar and the status bar are declared:
     
    // MainFrm.h : interface of the CMainFrame class
    //
    
    
    #pragma once
    class CMainFrame : public CMDIFrameWnd
    {
    	DECLARE_DYNAMIC(CMainFrame)
    public:
    	CMainFrame();
    
    // Attributes
    public:
    
    // Operations
    public:
    
    // Overrides
    public:
    	virtual BOOL PreCreateWindow(CREATESTRUCT& cs);
    
    // Implementation
    public:
    	virtual ~CMainFrame();
    #ifdef _DEBUG
    	virtual void AssertValid() const;
    	virtual void Dump(CDumpContext& dc) const;
    #endif
    
    protected:  // control bar embedded members
    	CStatusBar  m_wndStatusBar;
    	CToolBar    m_wndToolBar;
    	CDialogBar	m_wndToolbox;
    
    // Generated message map functions
    protected:
    	afx_msg int OnCreate(LPCREATESTRUCT lpCreateStruct);
    	DECLARE_MESSAGE_MAP()
    };
  14. Access the source file of the frame class and create the dialog bar as follows:
     
    int CMainFrame::OnCreate(LPCREATESTRUCT lpCreateStruct)
    {
    	if (CMDIFrameWnd::OnCreate(lpCreateStruct) == -1)
    		return -1;
    	
    	if (!m_wndToolBar.CreateEx(this, TBSTYLE_FLAT, WS_CHILD | WS_VISIBLE | CBRS_TOP
    		| CBRS_GRIPPER | CBRS_TOOLTIPS | CBRS_FLYBY | CBRS_SIZE_DYNAMIC) ||
    		!m_wndToolBar.LoadToolBar(IDR_MAINFRAME))
    	{
    		TRACE0("Failed to create toolbar\n");
    		return -1;      // fail to create
    	}
    
    	m_wndToolBar.SetWindowText("Standard");
    
    	// Create the dialog bar using one of its Create() methods
    	if( !m_wndToolbox.Create(this,
    			          IDD_TOOLBOX,
    			   CBRS_LEFT | CBRS_GRIPPER | CBRS_TOOLTIPS | CBRS_FLYBY,
    			          IDD_TOOLBOX) )
    	{
    		TRACE0(_T("Failed to create the toolbox\n"));
    		return -1;
    	}
    
    	// When the dialog bar is undocked, display a caption on its title bar
    	m_wndToolbox.SetWindowText("Toolbox");
    
    	if (!m_wndStatusBar.Create(this) ||
    		!m_wndStatusBar.SetIndicators(indicators,
    		  sizeof(indicators)/sizeof(UINT)))
    	{
    		TRACE0("Failed to create status bar\n");
    		return -1;      // fail to create
    	}
    	// TODO: Delete these three lines if you 
    	// don't want the toolbar to be dockable
    	m_wndToolBar.EnableDocking(CBRS_ALIGN_ANY);
    	// Allow the dialog bar to be dockable
    	// on the left or the right of the frame
    	m_wndToolbox.EnableDocking(CBRS_ALIGN_LEFT | CBRS_ALIGN_RIGHT);
    
    	EnableDocking(CBRS_ALIGN_ANY);
    
    	DockControlBar(&m_wndToolBar);
    	DockControlBar(&m_wndToolbox);
    
    	return 0;
    }
  15. Test the application

Sample Application:

Column Chart


Copyright © 2004-2010 FunctionX, Inc.