Introduction to Relational Databases

Introduction to Relational Databases
The Key to a Relationship
Introduction
A relational database is a system in which information flows from one database object, such as a table, to another database object, such as another table. To make this possible, you can create some types of relationships among the tables of the database.
To manage the flow of information from one table A to another table B, there are various issues that must be dealt with:
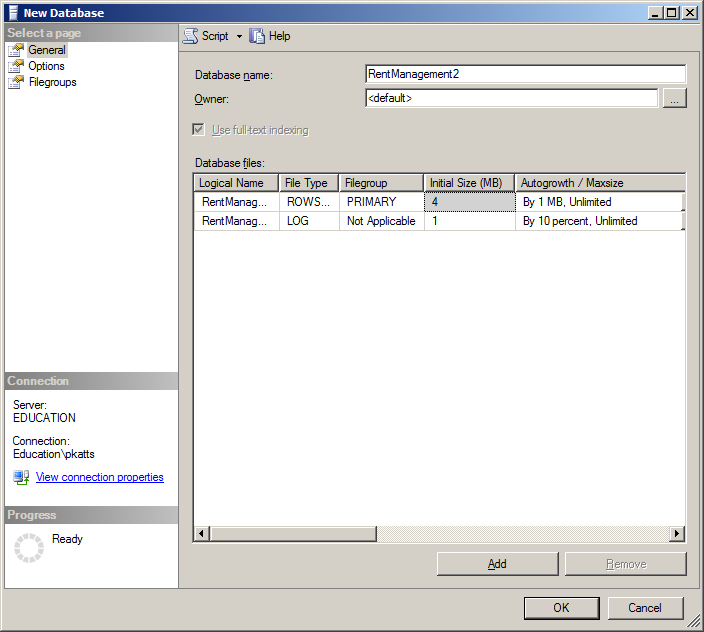
![]() Practical Learning: Introducing Relational Databases
Practical Learning: Introducing Relational Databases
USE master;
GO
CREATE DATABASE RentManagement1;
GO
USE RentManagement1;
GO
CREATE TABLE Employees
(
	EmployeeNumber NVARCHAR(10)  NOT NULL,
	FirstName      NVARCHAR(20),
	LastName       NVARCHAR(20)  NOT NULL,
	Title	       NVARCHAR(50)
);
GO
CREATE TABLE Apartments
(
	UnitNumber 	    SMALLINT NOT NULL,
	Bedrooms 	    TINYINT	 NOT NULL,
	Bathrooms 	    TINYINT	 NOT NULL,
	MonthlyRate	    DECIMAL  NOT NULL,
	SecurityDeposit	DECIMAL  NOT NULL,
	OccupancyStatus NVARCHAR(25) not null
);
GO
CREATE TABLE RentContracts
(
	ContractNumber   INT	       NOT NULL,
	EmployeeNumber   NVARCHAR(10)  NOT NULL,
	RegistrationDate DATE	       NOT NULL,
	FirstName	     NVARCHAR(20),
	LastName	     NVARCHAR(20),
	MaritalStatus	 NVARCHAR(30),
	NumberOfChildren TINYINT,
	UnitNumber	     SMALLINT	   NOT NULL,
	RentStartDate	 DATE
);
GO
CREATE TABLE Payments
(
	ReceiptNumber  INT	     NOT NULL,
	EmployeeNumber NVARCHAR(10)	     NOT NULL,
	ContractNumber INT	     NOT NULL,
	PaymentDate    DATE,
	Amount	       DECIMAL       NOT NULL,
	Notes	       NVARCHAR(MAX) NOT NULL
);
GO
A Primary Key for a Relational Database
When creating a table in a database, you must make sure it holds unique records. As we saw in our introduction to databases, and as we have done in various previous sections, to indicate the column that holds unique records, you can mark it as a "key", also referred to as the primary key.
In a relational database, which is the case for most of the databases you will be creating, each table should have a primary key. As an example, a primary key on an Employees table can be the column that holds employee numbers because each employee should (must) have a unique employee number (a table can use one or more columns to represent the primary key).
Once you have decided that a table will have a primary key, you must indicate the type of values (data) that the column will have. If you are building a table that can use a known and obvious column as unique, an example would be the employee number of an employee, you can set its data type as a string (CHAR(), VARCHAR(), NCHAR(), or NVARCHAR()) and make it a primary key. In some cases, you cannot decide on a particular field that would hold unique information. In this case, you can/should create a special column and make it the primary key. Such a column can/should have an identity column or use a sequence.
Introduction to Creating a Primary Key
To visually create a primary key, open the table in design view. Right-click the column that will be used as the primary key and click Set Primary Key.
To create a primary key using SQL, on the right side of the column definition, you can type PRIMARY KEY. Here is an example:
CREATE TABLE Employees
(
    EmployeeNumber NCHAR(5) PRIMARY KEY,
    FirstName NVARCHAR(20),
    LastName NVARCHAR(20) NOT NULL
);
You can add other options we know already such as UNIQUE or NOT NULL. Here is an example:
CREATE TABLE Employees
(
    EmployeeNumber NCHAR(5) PRIMARY KEY NOT NULL,
    FirstName NVARCHAR(20),
    LastName NVARCHAR(20) NOT NULL
);
In the SQL, you can give a specific name to a primary key. To do this, you can first create the column. Then, somewhere before the closing parenthesis of the table, specify the primary key column using the following formula:
CONSTRAINT primary-key-name PRIMARY KEY(column-name)
In this formula, the CONSTRAINT keyword and the PRIMARY KEY (case-insensitive) expression are required. In the primary-key-name placeholder, enter the name you want to give to the primary key. In the parentheses of the PRIMARY KEY expression, enter the name of the column that will be used as the primary key. Here is an example:
CREATE TABLE Apartments
(
    UnitNumber	SMALLINT UNIQUE NOT NULL,
	MonthlyRate	DECIMAL	 NOT NULL,
    CONSTRAINT PrimKeyApartments PRIMARY KEY(UnitNumber)
);
By convention or tradition, the name of the primary key starts with PK_ followed by the name of the table. Here is an example:
CREATE TABLE Contracts
(
    ContractNumber	 INT UNIQUE NOT NULL,
    TenantFirstName NVARCHAR(20),
    TenantLastName NVARCHAR(20) NOT NULL,
    CONSTRAINT PK_Contracts PRIMARY KEY(ContractNumber)
);
![]() Practical Learning: Creating Primary Keys
Practical Learning: Creating Primary Keys
CREATE TABLE Employees
(
	EmployeeNumber NVARCHAR(10)  NOT NULL,
	FirstName      NVARCHAR(20),
	LastName       NVARCHAR(20)  NOT NULL,
	Title	       NVARCHAR(50),
	CONSTRAINT PK_Employees PRIMARY KEY(EmployeeNumber)
);
GO
CREATE TABLE Apartments
(
	UnitNumber	SMALLINT         NOT NULL,
	Bedrooms	TINYINT	         NOT NULL,
	Bathrooms	TINYINT	         NOT NULL,
	MonthlyRate	DECIMAL	         NOT NULL,
	SecurityDeposit	DECIMAL	     NOT NULL,
	OccupancyStatus NVARCHAR(25) not null,
	CONSTRAINT PK_Apartments PRIMARY KEY(UnitNumber)
);
GO
CREATE TABLE RentContracts
(
	ContractNumber     INT           NOT NULL,
	EmployeeNumber     NVARCHAR(10)	 NOT NULL,
	RegistrationDate   DATE		     NOT NULL,
	FirstName	       NVARCHAR(20),
	LastName	       NVARCHAR(20),
	MaritalStatus	   NVARCHAR(30),
	NumberOfChildren   TINYINT,
	UnitNumber	       SMALLINT	 NOT NULL,
	RentStartDate	   DATE,
	CONSTRAINT PK_Contracts PRIMARY KEY(ContractNumber)
);
GO
CREATE TABLE Payments
(
	ReceiptNumber  INT           NOT NULL,
	EmployeeNumber NVARCHAR(10)  NOT NULL,
	ContractNumber INT	         NOT NULL,
	PaymentDate    DATE,
	Amount	       DECIMAL	     NOT NULL,
	Notes	       NVARCHAR(MAX) NOT NULL,
	CONSTRAINT PK_Payments PRIMARY KEY(ReceiptNumber)
);
GO
A Foreign Key
Introduction
To make the information flow from one table to another, you must create a relationship between them. To make it possible for a table B to receive data from a table A, table B must have a column that represents the records of table A. This column acts as an "ambassador" or a link. The column in table B allows both tables to communicate. For this reason, the column in table B is called a foreign key.
A foreign key is a column on a table whose data is coming from another table. The table that contains a primary key and that holds the information that another table would use is called the primary table or the parent table. The table that will receive the information from the other table is called the foreign table or the child table.
Creating a Foreign Key
The basic formula to create a foreign key in the SQL is:
FOREIGN KEY REFERENCES parent-table-name(foreign-key-column)
The FOREIGN KEY expression and the REFERENCES keyword are required. In the parent-table-name placeholder, enter the name of the primary table that holds the information that will be accessed in the current table. In the parentheses of parent-table-name, enter the name of the primary column of the parent table. Here is an example:
CREATE TABLE Employees
(
	EmployeeNumber NCHAR(5) PRIMARY KEY NOT NULL,
	FirstName      NVARCHAR(20),
	LastName       NVARCHAR(20) NOT NULL,
	Title	       NCHAR(50)
);
GO
CREATE TABLE Contracts
(
	ContractNumber	INT UNIQUE NOT NULL,
	EmployeeNumber	NCHAR(5) FOREIGN KEY REFERENCES Employees(EmployeeNumber),
	TenantFirstName	NVARCHAR(20),
	TenantLastName	NVARCHAR(20),
	CONSTRAINT PK_Contracts  PRIMARY KEY(ContractNumber)
);
GO
The Foreign Key Constraint
Based on the above technique, notice that the foreign key does not have an object name as we saw for the primary key. If you don't specify a name for the foreign key, the SQL interpreter would automatically create a default name for the foreign key. Otherwise, to create a name, after creating the column, enter the CONSTRAINT keyword followed by the desired name and continue the rest as we saw above. Her is an example:
CREATE TABLE Employees
(
    EmployeeNumber NCHAR(5) PRIMARY KEY NOT NULL,
    FirstName      NVARCHAR(20),
    LastName       NVARCHAR(20) NOT NULL,
	Title	       NCHAR(50)
);
GO
CREATE TABLE Apartments
(
	UnitNumber	SMALLINT UNIQUE NOT NULL,
	MonthlyRate	DECIMAL	        NOT NULL,
	CONSTRAINT PK_Apartments PRIMARY KEY(UnitNumber)
);
GO
CREATE TABLE Contracts
(
	ContractNumber	INT UNIQUE NOT NULL,
	EmployeeNumber	NCHAR(5) NOT NULL FOREIGN KEY REFERENCES Employees(EmployeeNumber),
	TenantFirstName	NVARCHAR(20),
	TenantLastName	NVARCHAR(20),
	UnitNumber		SMALLINT CONSTRAINT FKApartments FOREIGN KEY REFERENCES Apartments(UnitNumber),
	RentStartDate   DATE,
	CONSTRAINT PK_Contracts PRIMARY KEY(ContractNumber),
    GenderID int NULL
);
GO
You can also create a foreign key as its own constraint, which is another technique to name a foreign key. To assign a desired name to a foreign key, you must create it as a constraint. To do this, after defining the column that holds the foreign key before the end of defining the table, create a constraint using the following formula:
CONSTRAINT name FOREIGN KEY(foreign-key) REFERENCES parent-table(foreign-key)
Here is an example:
CREATE TABLE Genders
(
    GenderID int NOT NULL,
    Gender NVARCHAR(20) NOT NULL,
    CONSTRAINT PK_Genders PRIMARY KEY(GenderID)
);
GO
CREATE TABLE Persons
(
    EmployeeNumber NCHAR(5) PRIMARY KEY NOT NULL,
    FirstName NVARCHAR(20),
    LastName NVARCHAR(20) NOT NULL,
    GenderID int,
    Comments NVARCHAR(max),
    CONSTRAINT FK_Genders FOREIGN KEY(GenderID) REFERENCES Genders(GenderID)
);
Tables Maintenance for Data Relationships
Deletion Maintenance
If you decide to delete a table, first check if it is involved in a relationship. If a table is a child, you can easily delete it using any of the techniques we know already. If a table is a parent, you will receive an error. Consider the following two tables
CREATE TABLE Genders
(
    GenderID int not null PRIMARY KEY,
    Gender NVARCHAR(20)
);
GO
CREATE TABLE Persons
(
    PersonID int PRIMARY KEY NOT NULL,
    FirstName NVARCHAR(20),
    LastName NVARCHAR(20) NOT NULL,
    GenderID int FOREIGN KEY REFERENCES Genders(GenderID)
);
GO

INSERT INTO Genders
VALUES(1, N'Make'), (2, N'Female'), (3, N'Unknown');
GO
INSERT INTO Persons(PersonID, FirstName, LastName, GenderID)
VALUES(1, N'Peter', N'Mukoko', 1), (2, N'Ann', N'Nsang', 2);
GO
If you try to delete the Genders table, which is a parent to the Persons, table, you would receive an error. To avoid this problem (this error), you can first delete the child table.
Adding a Primary Key to an Existing Table
After creating a table or when using a table created by someone else, you may find out that it lacks a primary key. You can add it, of course following some rules. You have two options.
Imagine you have the following table:
CREATE TABLE Employees
(
    FirstName NVARCHAR(20),
    LastName NVARCHAR(20),
    DepartmentCode NCHAR(6)
);
You can add the PRIMARY KEY expresion after defining the new column. Here is an example:
ALTER TABLE Employees
    ADD EmployeeNumber int not null PRIMARY KEY;
As an alternative, you can add a column, and then use the CONSTRAINT formula to define the primary key. Here is an example:
ALTER TABLE Employees
    ADD EmployeeNumber int not null
    CONSTRAINT PK_Employees PRIMARY KEY(EmployeeNumber);
Adding a Foreign Key to an Existing Table
Just as you can add a primary key to an already created table, you can also add a new column that is a foreign key. Consider the following table named Persons:
CREATE TABLE Genders
(
    GenderID int not null PRIMARY KEY,
    Gender NVARCHAR(20)
);

CREATE TABLE Persons
(
    PersonID int PRIMARY KEY NOT NULL,
    FirstName NVARCHAR(20),
    LastName NVARCHAR(20) NOT NULL
);
The formula to add a foreign key to an existing table is:
ALTER TABLE TableName
ADD NewColumnName DataType Options
    FOREIGN KEY REFERENCES ParentTableName(ColumnNameOfOtherTable);
Here is an example of adding a foreign key to the above Persons table:
ALTER TABLE Persons
ADD GenderID int NULL FOREIGN KEY REFERENCES Genders(GenderID);
![]() Practical Learning: Creating Foreign Keys
Practical Learning: Creating Foreign Keys
USE master;
GO
CREATE DATABASE RentManagement1;
GO
USE RentManagement1;
GO

CREATE TABLE Employees
(
	EmployeeNumber NCHAR(5)      NOT NULL,
	FirstName      NVARCHAR(20),
	LastName       NVARCHAR(20)  NOT NULL,
	Title	       NCHAR(50),
	CONSTRAINT PK_Employees PRIMARY KEY(EmployeeNumber)
);
GO
CREATE TABLE Apartments
(
	UnitNumber	SMALLINT         NOT NULL,
	Bedrooms	TINYINT	         NOT NULL,
	Bathrooms	TINYINT	         NOT NULL,
	MonthlyRate	DECIMAL	         NOT NULL,
	SecurityDeposit	DECIMAL	     NOT NULL,
	OccupancyStatus NVARCHAR(25) not null,
	CONSTRAINT PK_Apartments PRIMARY KEY(UnitNumber)
);
GO
CREATE TABLE RentContracts
(
	ContractNumber	 INT        NOT NULL,
	EmployeeNumber	 NCHAR(5)	NOT NULL,
	ContractDate	 DATE		NOT NULL,
	FirstName		 NVARCHAR(20),
	LastName		 NVARCHAR(20),
	MaritalStatus    NVARCHAR(30),
	NumberOfChildren TINYINT,
	UnitNumber		 SMALLINT	NOT NULL,
	RentStartDate	 DATE,
	CONSTRAINT FK_Registrars FOREIGN KEY(EmployeeNumber) REFERENCES Employees(EmployeeNumber),
	CONSTRAINT FK_Apartments FOREIGN KEY(UnitNumber)     REFERENCES Apartments(UnitNumber),
	CONSTRAINT PK_Contracts  PRIMARY KEY(ContractNumber)
);
GO
CREATE TABLE Payments
(
	ReceiptNumber  INT           NOT NULL,
	EmployeeNumber NCHAR(5)      NOT NULL,
	ContractNumber INT	         NOT NULL,
	PaymentDate    DATE,
	Amount	       DECIMAL	     NOT NULL,
	Notes	       NVARCHAR(MAX) NOT NULL,
	CONSTRAINT FK_ProcessedBy FOREIGN KEY(EmployeeNumber) REFERENCES Employees(EmployeeNumber),
	CONSTRAINT FK_Contracts   FOREIGN KEY(ContractNumber) REFERENCES RentContracts(ContractNumber),
	CONSTRAINT PK_Payments    PRIMARY KEY(ReceiptNumber)
);
GO
CREATE SCHEMA Management;
GO
CREATE SCHEMA HumanResources;
GO

CREATE TABLE Employees
(
	EmployeeNumber NCHAR(5)      NOT NULL,
	FirstName      NVARCHAR(20),
	LastName       NVARCHAR(20)  NOT NULL,
	Title	       NCHAR(50),
	CONSTRAINT PK_Employees PRIMARY KEY(EmployeeNumber)
);
GO
CREATE TABLE Management.Apartments
(
	UnitNumber	SMALLINT         NOT NULL,
	Bedrooms	TINYINT	         NOT NULL,
	Bathrooms	TINYINT	         NOT NULL,
	MonthlyRate	DECIMAL	         NOT NULL,
	SecurityDeposit	DECIMAL	     NOT NULL,
	OccupancyStatus NVARCHAR(25),
	CONSTRAINT PK_Apartments PRIMARY KEY(UnitNumber)
);
GO
CREATE TABLE Management.RentContracts
(
	ContractNumber	 INT        NOT NULL,
	EmployeeNumber	 NCHAR(5)	NOT NULL,
	ContractDate	 DATE		NOT NULL,
	FirstName		 NVARCHAR(20),
	LastName		 NVARCHAR(20),
	MaritalStatus    NVARCHAR(30),
	NumberOfChildren TINYINT,
	UnitNumber		 SMALLINT	NOT NULL,
	RentStartDate	 DATE,
	CONSTRAINT FK_Registrars FOREIGN KEY(EmployeeNumber) REFERENCES Employees(EmployeeNumber),
	CONSTRAINT FK_Apartments FOREIGN KEY(UnitNumber)     REFERENCES Apartments(UnitNumber),
	CONSTRAINT PK_Contracts  PRIMARY KEY(ContractNumber)
);
GO
CREATE TABLE Management.Payments
(
	ReceiptNumber  INT           NOT NULL,
	EmployeeNumber NCHAR(5)      NOT NULL,
	ContractNumber INT	         NOT NULL,
	PaymentDate    DATE,
	Amount	       DECIMAL	     NOT NULL,
	Notes	       NVARCHAR(MAX) NOT NULL,
	CONSTRAINT PK_Payments    PRIMARY KEY(ReceiptNumber),
	CONSTRAINT FK_ProcessedBy FOREIGN KEY(EmployeeNumber) REFERENCES Employees(EmployeeNumber),
	CONSTRAINT FK_Contracts   FOREIGN KEY(ContractNumber) REFERENCES RentContracts(ContractNumber)
);
GO
CREATE SCHEMA Management;
GO
CREATE SCHEMA HumanResources;
GO
CREATE TABLE HumanResources.Employees
(
	EmployeeID     INT IDENTITY(1, 1),
	EmployeeNumber NCHAR(5) UNIQUE NOT NULL,
	FirstName      NVARCHAR(20),
	LastName       NVARCHAR(20)  NOT NULL,
	Title	       NCHAR(50),
	CONSTRAINT PK_Employees PRIMARY KEY(EmployeeID)
);
GO
CREATE TABLE Management.Apartments
(
	ApartmentID     INT IDENTITY(1, 1),
	UnitNumber	    NVARCHAR(10) UNIQUE NOT NULL,
	Bedrooms	    TINYINT	     NOT NULL,
	Bathrooms	    TINYINT	     NOT NULL,
	MonthlyRate	    INT          NOT NULL,
	SecurityDeposit	INT	     NOT NULL,
	OccupancyStatus NVARCHAR(25),
	CONSTRAINT PK_Apartments PRIMARY KEY(ApartmentID)
);
GO
CREATE TABLE Management.RentContracts
(
	RentContractID   INT IDENTITY(1, 1),
	ContractNumber	 INT UNIQUE NOT NULL,
	EmployeeID       INT	NOT NULL,
	ContractDate	 DATE		NOT NULL,
	FirstName		 NVARCHAR(20),
	LastName		 NVARCHAR(20),
	MaritalStatus    NVARCHAR(30),
	NumberOfChildren TINYINT,
	ApartmentID      INT,
	RentStartDate	 DATE,
	CONSTRAINT FK_Registrars FOREIGN KEY(EmployeeID) REFERENCES HumanResources.Employees(EmployeeID),
	CONSTRAINT FK_Apartments FOREIGN KEY(ApartmentID) REFERENCES Management.Apartments(ApartmentID),
	CONSTRAINT PK_Contracts  PRIMARY KEY(RentContractID)
);
GO
CREATE TABLE Management.Payments
(
	PaymentID      INT IDENTITY(1, 1),
	ReceiptNumber  INT UNIQUE NOT NULL,
	EmployeeID     INT      NOT NULL,
	RentContractID INT	     NOT NULL,
	PaymentDate    DATE,
	Amount	       DECIMAL	     NOT NULL,
	Notes	       NVARCHAR(MAX) NOT NULL
	CONSTRAINT PK_Payments    PRIMARY KEY(PaymentID),
	CONSTRAINT FK_ProcessedBy FOREIGN KEY(EmployeeID) REFERENCES HumanResources.Employees(EmployeeID),
	CONSTRAINT FK_Contracts   FOREIGN KEY(RentContractID) REFERENCES Management.RentContracts(RentContractID)
);
GO
In the Object Explorer of Microsoft SQL Server Management, right-click inside the Query window and click Execute (don't execute the code in the Server Explorer of Microsoft Visual Studio)
Records Relationships and Referential Integrity
Introduction
Data relationships allow records from one object to be available to other objects. When a relationship has been established between two tables, one of the concerns is to plan what would happen if a record from a parent table is edited (updated) or deleted. Referential integrity is the ability to take appropriate actions when tables or records involved in a relationship are affected.
Remember how to create foreign keys. Here is an example:
USE master;
GO
CREATE DATABASE QuatroGas;
GO
USE QuatroGas;
GO
CREATE TABLE GasMeters
(
	MeterNumber	NVARCHAR(10) UNIQUE,
	Make		NVARCHAR(40),
	Model		NVARCHAR(20),
	MeterSize	NVARCHAR(20) NOT NULL,
	DateLastUpdate  DATE,
	CounterValue	INT      NOT NULL,
	CONSTRAINT PK_GasMeters PRIMARY KEY(MeterNumber)
);
GO
CREATE TABLE Customers
(
	AccountNumber NVARCHAR(20) UNIQUE,
	MeterNumber	  NVARCHAR(10) NOT NULL,
	FirstName	  NVARCHAR(20),
	LastName	  NVARCHAR(20),
	[Address]	  NVARCHAR(100),
	City		  NVARCHAR(40),
	County		  NVARCHAR(40),
	[State]		  NVARCHAR(5),
	ZIPCode		  NVARCHAR(10),
	AccountStatus NVARCHAR(25)  NOT NULL,
	CONSTRAINT FK_GasMeters FOREIGN KEY(MeterNumber) REFERENCES GasMeters(MeterNumber),
	CONSTRAINT PK_Customers PRIMARY KEY(AccountNumber)
);
GO
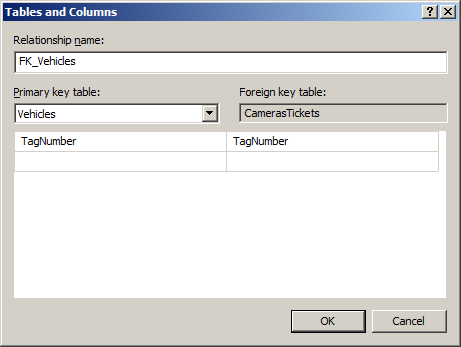
In Microsoft SQL Server Management Studio, to visually manage referential integrity, you can use the Foreign Key Relationships dialog box. To access it, first open the child table in the design view. Then:
Any of these actions would display the Foreign Key Relationships dialog box. If you had not yet created a foreign key on the table that was displaying, the dialog box would appear empty.
Enforcing Referential Integrity
When a relationship has been established between two tables, you can ask the database engine to observe some rules between the tables on one hand and among the records on the other hand. Of course, before setting these rules, you must have created the relationship. Here is an example we saw already:
Once this is done, in the Foreign Key Relationships dialog box, expand INSERT And UPDATE Specification. Two combo boxes would appear: Delete Rule and Update Rule
These two combo boxes have the same four options:
The options can be set either visually or programmatically. Remember how to create a foreign key with code. Here is an example:
CREATE TABLE Persons
(
    PersonID int PRIMARY KEY NOT NULL,
    FirstName nvarchar(20),
    LastName nvarchar(20) NOT NULL,
    GenderID int FK_Genders FOREIGN KEY REFERENCES Genders(GenderID)
);
GO
Record Update and Data Integrity
When a relationship has been established between two tables, you can give instructions to the database engine to take some actions towards the tables on one hand and among the records on the other hand. To specify what action to take on the foreign key when a record of the primary key table changes, add an ON UPDATE expression to the foreign key constraint. You would start it as follows:
CREATE TABLE Customers
(
	AccountNumber	NVARCHAR(20) UNIQUE,
	MeterNumber	NVARCHAR(10) NOT NULL,
	. . .
	CONSTRAINT FK_GasMeters FOREIGN KEY(MeterNumber) REFERENCES GasMeters(MeterNumber)
		ON UPDATE . . .,
	CONSTRAINT PK_Customers PRIMARY KEY(AccountNumber)
)
After the ON UPDATE expression, you must specify what action to take. You have various options.
Issuing an Error when Updating a Primary Key
If there is an issue related to changes in records of a parent table as the records relate to foreign keys, the default option is to take no special action but present an error from the database engine to the user. To indicate this, when creating the foreign key, add an ON UPDATE NO ACTION expression to it. Here is an example:
DROP TABLE Persons;
GO
DROP TABLE Genders;
GO
CREATE TABLE Genders
(
    GenderID int not null,
    Gender nvarchar(20),
    CONSTRAINT PK_Genders PRIMARY KEY(GenderID)
);
GO
INSERT INTO Genders
VALUES(1, N'Male'), (2, N'Female'), (3, N'Unknown');
GO
CREATE TABLE Persons
(
    PersonID int PRIMARY KEY NOT NULL,
    FirstName nvarchar(20),
    LastName nvarchar(20) NOT NULL,
    GenderID int FOREIGN KEY REFERENCES Genders(GenderID)
	ON UPDATE NO ACTION
);
GO
INSERT INTO Persons(PersonID, FirstName, LastName, GenderID)
VALUES(1, N'James', N'Palau', 1),
      (2, N'Ann', N'Nsang', 2),
      (3, N'Marc', N'Ulrich', 1),
      (4, N'Arjuh', N'Namdy', 3),
      (5, N'Aisha', N'Diabate', 2);
GO
Here is an attempt to update a parent record:
Record Deletion for Data Integrity
To address issues related to a record being deleted on a primary key, add an ON DELETE expression to the foreign key. You would start it as follows:
CREATE TABLE Customers
(
	AccountNumber	NVARCHAR(20) UNIQUE,
	MeterNumber	NVARCHAR(10) NOT NULL,
	AccountStatus	NVARCHAR(25)  NOT NULL,
	CONSTRAINT FK_GasMeters FOREIGN KEY(MeterNumber) REFERENCES GasMeters(MeterNumber)
		ON DELETE . . .,
	CONSTRAINT PK_Customers PRIMARY KEY(AccountNumber)
);
GO
To present an error from the database engine, add NO ACTION. Here is an example:
USE master;
GO
CREATE DATABASE QuatroGas;
GO
USE QuatroGas;
GO
CREATE TABLE GasMeters
(
MeterNumber NVARCHAR(10) UNIQUE,
Make NVARCHAR(40),
Model NVARCHAR(20),
CONSTRAINT PK_GasMeters PRIMARY KEY(MeterNumber)
);
GO
CREATE TABLE Customers
(
AccountNumber NVARCHAR(20) UNIQUE,
MeterNumber NVARCHAR(10) NOT NULL,
AccountStatus NVARCHAR(25) NOT NULL,
CONSTRAINT FK_GasMeters FOREIGN KEY(MeterNumber) REFERENCES GasMeters(MeterNumber)
ON DELETE NO ACTION,
CONSTRAINT PK_Customers PRIMARY KEY(AccountNumber)
);
GO
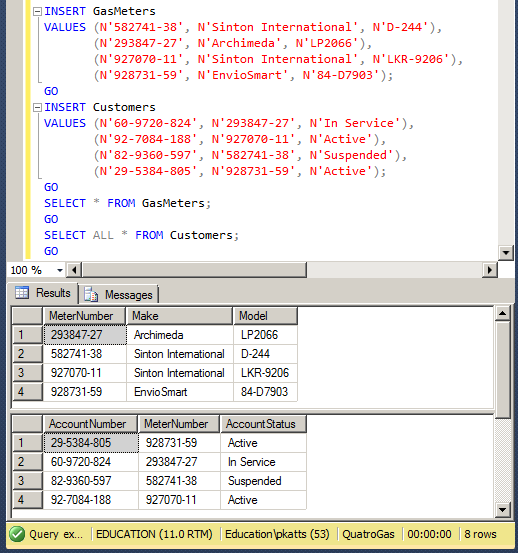
INSERT GasMeters
VALUES (N'582741-38', N'Sinton International', N'D-244'),
(N'293847-27', N'Archimeda', N'LP2066'),
(N'927070-11', N'Sinton International', N'LKR-9206'),
(N'928731-59', N'EnvioSmart', N'84-D7903');
GO
INSERT Customers
VALUES (N'60-9720-824', N'293847-27', N'In Service'),
(N'92-7084-188', N'927070-11', N'Active'),
(N'82-9360-597', N'582741-38', N'Suspended'),
(N'29-5384-805', N'928731-59', N'Active');
GO
SELECT * FROM GasMeters;
GO
SELECT ALL * FROM Customers;
GO
Here is an example of showing all records of the tables:
Now, if you try to delete one of the records of the GasMeters table, if there is a Customers account that is using that record, you would receive an error. Here is an example:
DELETE GasMeters
WHERE MeterNumber = N'927070-11';
This would produce:
Msg 547, Level 16, State 0, Line 44
The DELETE statement conflicted with the REFERENCE constraint "FK_GasMeters". The conflict occurred in database "QuatroGas", table "dbo.Customers", column 'MeterNumber'.
The statement has been terminated.
In the same way, if you had set the update to No Action, if you try updating a parent record and if the change would impact a child record, the database engine would present an error.
Options on Referential Integrity
Combining Actions
When configuring referential integrity on a foreign key constraint, you can decide to apply only the deletion side with an ON DELETE NO ACTION expression or only the update side with the ON UPDATE NO ACTION option. If you want to apply both options, you can combine them. This can be done as follows:
CREATE TABLE Customers
(
	AccountNumber	NVARCHAR(20) UNIQUE,
	MeterNumber	NVARCHAR(10) NOT NULL,
	AccountStatus	NVARCHAR(25)  NOT NULL,
	CONSTRAINT FK_GasMeters FOREIGN KEY(MeterNumber)
		REFERENCES GasMeters(MeterNumber)
		ON DELETE NO ACTION
		ON UPDATE NO ACTION
);
GO
These expressions can come in any order of your choice. Here are examples:
CREATE TABLE Management.Payments
(
	ReceiptNumber  INT UNIQUE NOT NULL,
	EmployeeNumber NCHAR(5)      NOT NULL,
	ContractNumber INT	     NOT NULL,
	PaymentDate    DATE,
	Amount	       DECIMAL	     NOT NULL,
	Notes	       NVARCHAR(MAX) NOT NULL,
	CONSTRAINT FK_ProcessedBy FOREIGN KEY(EmployeeNumber) REFERENCES HumanResources.Employees(EmployeeNumber)
		ON UPDATE NO ACTION
		ON DELETE NO ACTION,
	CONSTRAINT FK_Contracts   FOREIGN KEY(ContractNumber) REFERENCES Management.RentContracts(ContractNumber)
		ON DELETE NO ACTION
        ON UPDATE NO ACTION,
	CONSTRAINT PK_Payments    PRIMARY KEY(ReceiptNumber)
);
GO
Cascading On Update/Delete
When a record of a parent table changes (is edited or is updated), if you want, one option is to ask the database engine to find every record of the child table that is using that record and to change it. Such an instruction is referred to as cascading the records when an update occurs. For example, if you are using the Delete Rule, if a record is deleted in the parent table and if some records in the child table use the value in the parent table, those records in the child table get deleted.
To visually apply the cascade option, if you are working visually, in the Foreign Key Relationships dialog box, click the combo box of either Delete Rule or Update Rule and select Cascade. To cascade the records programmatically, add CASCADE after ON DELETE or ON UPDATE. Here is an example:
DROP TABLE Persons;
GO
DROP TABLE Genders;
GO
CREATE TABLE Genders
(
    GenderID int not null,
    Gender nvarchar(20),
    CONSTRAINT PK_Genders PRIMARY KEY(GenderID)
);
GO
INSERT INTO Genders
VALUES(1, N'Male'), (2, N'Female'), (3, N'Unknown');
GO
CREATE TABLE Persons
(
    PersonID int PRIMARY KEY NOT NULL,
    FirstName nvarchar(20),
    LastName nvarchar(20) NOT NULL,
    GenderID int FOREIGN KEY REFERENCES Genders(GenderID)
	ON DELETE CASCADE
);
GO
INSERT INTO Persons(PersonID, FirstName, LastName, GenderID)
VALUES(1, N'James', N'Palau', 1),
      (2, N'Ann', N'Nsang', 2),
      (3, N'Marc', N'Ulrich', 1),
      (4, N'Arjuh', N'Namdy', 3),
      (5, N'Aisha', N'Diabate', 2);
GO
Here is an example of deleting a record from a parent table:
DELETE FROM Genders
WHERE GenderID = 2;
GO
SELECT ALL * FROM Persons;
GO
Notice that the records in the child table that were getting their values from the parent table have also been deleted.
If you apply the cascade option to the Update Rule, when a record of the parent table is changed, the child records receive the change.
Instead of displaying a nasty error or even deleting records on cascade when something happens to a record of a parent table, probably a better option is to reset to NULL every record of the child table if that record is related to the parent table. To do this visually, in the Delete Rule or the Update Rule, select Set Null. To do this programmatically, after ON DELETE or ON UPDATE, add SET NULL. Here is an example:
DROP TABLE Persons;
GO
DROP TABLE Genders;
GO
CREATE TABLE Genders
(
    GenderID int not null,
    Gender nvarchar(20),
    CONSTRAINT PK_Genders PRIMARY KEY(GenderID)
);
GO
INSERT INTO Genders
VALUES(1, N'Male'), (2, N'Female'), (3, N'Unknown');
GO
CREATE TABLE Persons
(
    PersonID int PRIMARY KEY NOT NULL,
    FirstName nvarchar(20),
    LastName nvarchar(20) NOT NULL,
    GenderID int FOREIGN KEY REFERENCES Genders(GenderID)
	ON DELETE SET NULL
);
GO
INSERT INTO Persons(PersonID, FirstName, LastName, GenderID)
VALUES(1, N'James', N'Palau', 1),
      (2, N'Ann', N'Nsang', 2),
      (3, N'Marc', N'Ulrich', 1),
      (4, N'Arjuh', N'Namdy', 3),
      (5, N'Aisha', N'Diabate', 2);
GO
SELECT ALL * FROM Persons;
GO
Here is an example of showing all records of the table:
Here is an example of deleting a record from a parent table:
DELETE FROM Genders
WHERE GenderID = 2;
GO

The update follows the same logic: If a record of the parent table is updated, any record in the child table and that gets its value from the parent table would have its value set to NULL.
Applying the Default Value On Delete or On Update
If a column of a parent table has a default value, when a record of that column is affected by some action, you can ask the database engine to apply the default value to the related records of the child table. To do this programmatically, use ON DELETE SET DEFAULT or ON UPDATE SET DEFAULT. Here is an example:
DROP TABLE Persons;
GO
DROP TABLE Genders;
GO
CREATE TABLE Genders
(
    GenderID int not null,
    Gender nvarchar(20),
    CONSTRAINT PK_Genders PRIMARY KEY(GenderID)
);
GO
INSERT INTO Genders
VALUES(1, N'Male'), (2, N'Female'), (3, N'Unknown');
GO

CREATE TABLE Persons
(
    PersonID int PRIMARY KEY NOT NULL,
    FirstName nvarchar(20),
    LastName nvarchar(20) NOT NULL,
    GenderID int default 3
    CONSTRAINT FK_Genders FOREIGN KEY REFERENCES Genders(GenderID)
	ON DELETE SET DEFAULT
);
GO
INSERT INTO Persons(PersonID, FirstName, LastName, GenderID)
VALUES(1, N'James', N'Palau', 1),
      (2, N'Ann', N'Nsang', 2),
      (3, N'Marc', N'Ulrich', 1),
      (4, N'Arjuh', N'Namdy', NULL),
      (5, N'Aisha', N'Diabate', 2);
GO
Here is an example of showing the records of the table:
Here is an example of delete a record from the parent table and showing the records of the child table:
![]() Practical Learning: Introducing Maintenance of Data Relationships
Practical Learning: Introducing Maintenance of Data Relationships
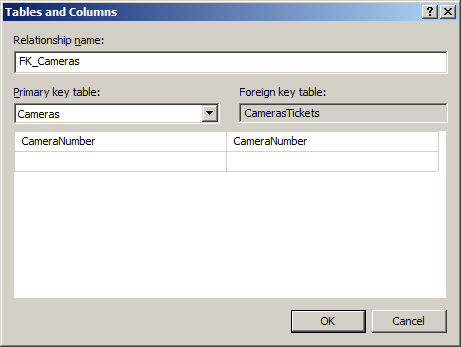
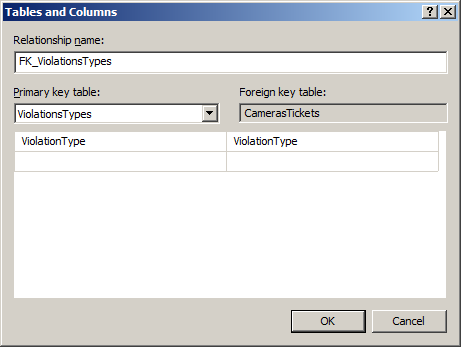
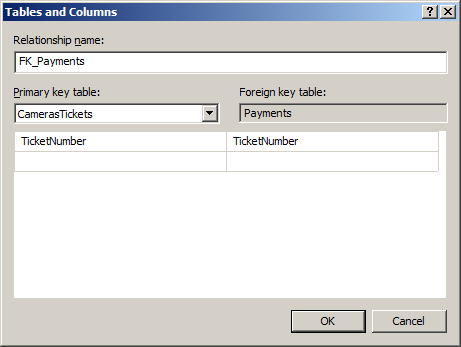
USE master;
GO
CREATE DATABASE TrafficTicketSystem;
GO
USE TrafficTicketSystem;
GO
CREATE SEQUENCE TicketsNumbers
AS INT
START WITH 100001
INCREMENT BY 1;
GO
CREATE TABLE Drivers
(
	[DrvLicNumber] NVARCHAR(20) NOT NULL,
	[FirstName]	   NVARCHAR(25),
	[LastName]	   NVARCHAR(25),
	[Address]	   NVARCHAR(100),
	[City]		   NVARCHAR(50),
	[County]	   NVARCHAR(50),
	[State]		   NVARCHAR(5),
	CONSTRAINT	   PK_Drivers PRIMARY KEY([DrvLicNumber])
);
GO
CREATE TABLE Cameras
(
	[CameraNumber] NVARCHAR(20) NOT NULL,
	[Make]		   NVARCHAR(40),
	[Model]		   NVARCHAR(40),
	[Location]	   NVARCHAR(120),
	CONSTRAINT	   PK_Cameras PRIMARY KEY([CameraNumber])
);
GO
CREATE TABLE ViolationsTypes
(
	[ViolationType] NVARCHAR(30) NOT NULL,
	[Description]	NVARCHAR(MAX),
	CONSTRAINT	   PK_ViolationsTypes PRIMARY KEY([ViolationType])
);
GO
CREATE TABLE Vehicles
(
	[TagNumber]	   NVARCHAR(20) NOT NULL,
	[DrvLicNumber] NVARCHAR(20) NOT NULL,
	[Make]		   NVARCHAR(40),
	[Model]		   NVARCHAR(40),
	[Year]		   DECIMAL,
	[Color]		   NVARCHAR(32),
	CONSTRAINT	   PK_Vehicles PRIMARY KEY([TagNumber])
);
GO
CREATE TABLE CamerasTickets
(
	[TicketNumber]	 INT UNIQUE NOT NULL,
	[CameraNumber]	 NVARCHAR(20) NOT NULL,
	[TagNumber]		 NVARCHAR(20) NOT NULL,
	[ViolationType]	 NVARCHAR(30) NOT NULL,
	[ViolationDate]	 DATE,
	[ViolationTime]	 TIME,
	[PhotoAvailable] BIT,
	[VideoAvailable] BIT,
	[PaymentAmount]  DECIMAL(8, 2),
	[PaymentDate]	 DATE,
	CONSTRAINT	     PK_CamerasTickets PRIMARY KEY([TicketNumber])
);
GO
CREATE TABLE Payments
(
	[ReceiptNumber] INT IDENTITY(1, 1) NOT NULL,
	[TicketNumber]	INT NOT NULL,
	[PaymentDate]	 DATE,
	[PaymentAmount]  DECIMAL(8, 2),
	CONSTRAINT	     PK_Payments PRIMARY KEY([ReceiptNumber])
);
GO
INSERT ViolationsTypes
VALUES(N'Red Light', N'A vehicle must completely stop when the light is red. If the red light appears at an intersection where the drivers wants to make a right turn, the vehicle must first completely stop before proceeding.'),
	  (N'Stop Sign', N'A driver is required to come to a complete stop at the Stop sign, even there is no other vehicle on the other street(s).'),
	  (N'Speed', N'Drivers are required to drive under posted speed limit.');
GO
Maintenance of Data Relationships
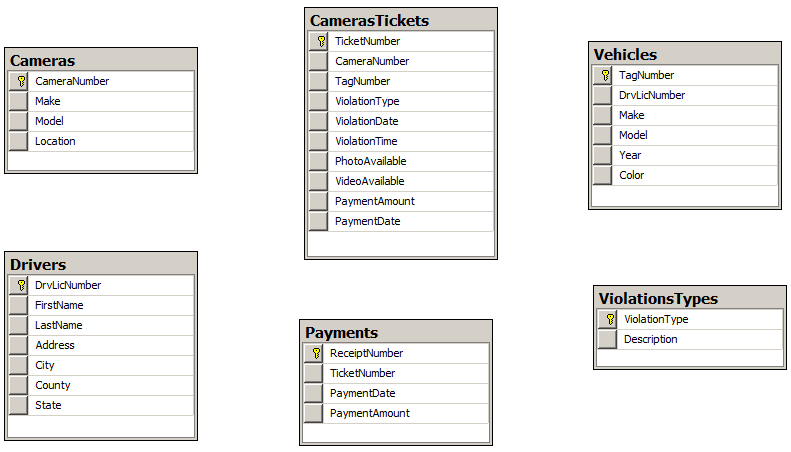
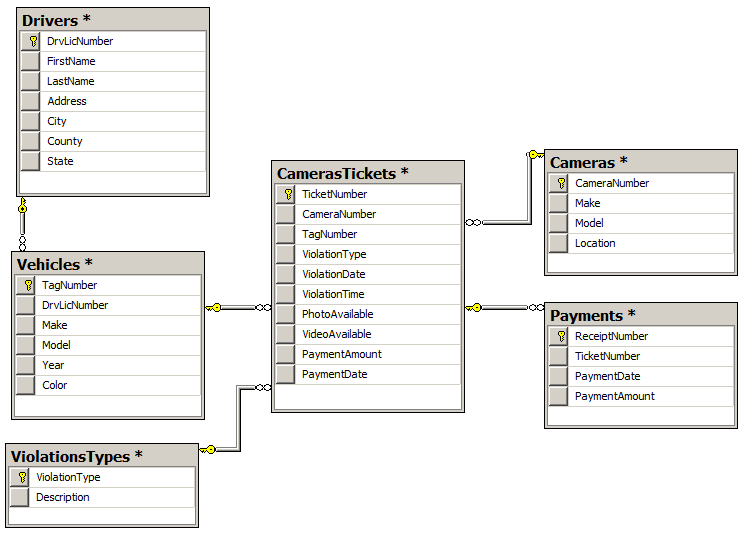
A Diagram for Data Relationships
One of the aspects of a data relationship is to indicate how data flows from one object (table) to another. To help you visualize this, Microsoft SQL Server allows you to create a special window named diagram. It allows you to visually illustrate the movement of data from one table to another.
To create a diagram:
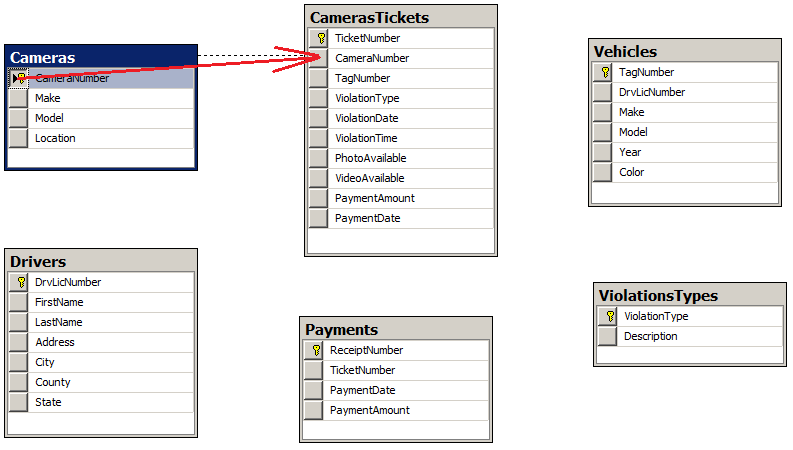
![]() Practical Learning: Creating a Relationships Diagram
Practical Learning: Creating a Relationships Diagram
Check Constraints
Introduction
When performing data entry, in some columns, even after indicating the types of values you expect the user to provide for a certain column, you may want to restrict a range of values that are allowed. In the same way, you can create a rule that must be respected on a combination of columns before the record can be created. For example, you can ask the database engine to check that at least one of two columns received a value. For example, on a table that holds information about customers, you can ask the database engine to check that, for each record, either the phone number or the email address of the customer is entered.
The ability to verify that one or more rules are respected on a table is called a check constraint. A check constraint is a Boolean operation performed by the SQL interpreter. The interpreter examines a value that has just been provided for a column. If the value is appropriate:
If the value is not appropriate:
You create a check constraint at the time you are creating a table.
Visually Creating a Check Constraint
To create a check constraint, when creating a table, right-click anywhere in (even outside) the table and click Check Constraints... This would open the Check Constraints dialog box. From that window, you can click Add. Because a constraint is an object, you must provide a name for it. The most important piece of information that a check constraint should hold is the mechanism it would use to check its values. This is provided as an expression. Therefore, to create a constraint, you can click Expression and click its ellipsis button. This would open the Check Constraint Expression dialog box.
To create the expression, first type the name of the column on which the constraint will apply, followed by parentheses. In the parentheses, use the arithmetic and/or SQL operators we studied already. Here is an example that will check that a new value specified for the Student Number is greater than 1000:
After creating the expression, you can click OK. If the expression is invalid, you would receive an error and given the opportunity to correct it.
You can create as many check constraints as you judge necessary for your table:
After creating the check constraints, you can click OK.
Programmatically Creating a Check Constraint
To create a check constraint in SQL, first create the column on which the constraint will apply. Before the closing parenthesis of the table definition, use the following formula:
CONSTRAINT name CHECK (expression)
The CONSTRAINT and the CHECK keywords are required. As an object, make sure you provide a name for it. Inside the parentheses that follow the CHECK operator, enter the expression that will be applied. Here is an example that will make sure that the hourly salary specified for an employee is greater than 12.50:
CREATE TABLE Employees
(
	[Employee Number] nchar(7),
	[Full Name] varchar(80),
	[Hourly Salary] smallmoney,
	CONSTRAINT CK_HourlySalary CHECK ([Hourly Salary] > 12.50)
);
It is important to understand that a check constraint it neither an expression nor a function. A check constraint contains an expression and may contain a function as part of its definition.
After creating the constraint(s) for a table, in the Object Explorer of Microsoft SQL Server Management Studio, inside the table's node, there is a node named Constraints and, if you expand it, you would see the name of the constraint.
With the constraint(s) in place, during data entry, if the user (or your code) provides an invalid value, an error would display. Instead of an expression that uses only the regular operators, you can use a function to assist in the checking process. You can create and use your own function or you can use one of the built-in Transact-SQL functions.
![]() Practical Learning: Ending the Lesson
Practical Learning: Ending the Lesson
|
|
||
| Previous | Copyright © 2001-2021, FunctionX | Next |
|
|
||