Transact-SQL Views

Transact-SQL Views
Fundamentals of Views
Introduction
Consider a table created and filled up with records as follows:
CREATE TABLE Employees
(
	EmployeeNumber nchar(6) not null primary key,
    FirstName nvarchar(20),
    MiddleName nvarchar(20),
    LastName nvarchar(20),
    HourlySalary smallmoney,
    Status nvarchar(40)
);
GO
INSERT INTO Employees
VALUES(N'862804', N'Christopher', NULL, N'Larsen', 14.50, NULL),
	  (N'293747', N'Henry', N'Donald', N'Jonathan', 12.85, N'Full Time'),
      (N'385807', N'Lance', N'James', N'Seagal', 16.95, N'Full Time'),
      (N'927405', N'Paula', N'Roberta', N'Ortez', NULL, N'Full Time'),
      (N'790875', N'Paul', NULL, N'Swanson', 10.90, NULL),
      (N'384096', N'Kristopher', N'Jude', N'Michaels', 12.85, N'Part Time'),
      (N'385968', N'Jennifer', NULL, N'Sanders', 15.00, N'Part Time'),
      (N'380696', N'David', N'Peter', N'Monahan', 13.05, N'Full Time');
GO
When studying data analysis, we saw that a query was a technique of isolating a series of columns and/or records of a table. Although this is usually done for the purpose of data analysis, it can also be done to create a new list of items for any particular reason. Most of the time, a query is created temporarily, such as during data analysis while using a table, a form, or a web page. After using such a temporary list, it is then dismissed. Many database applications, including Microsoft SQL Server, allow you to create a query and be able to save it for later use, or even to use it as if it were its own table. This is the idea behind a view.
![]() Practical
Learning: Introducing Views
Practical
Learning: Introducing Views
body {
    background-color: #FFF;
}

.bold        { font-weight:      600;       }
.blue        { color:            #286090;   }
.maroon      { color:            #800000;   }
.small       { width:            20px;      }
.top-padding { padding-top:      0.50em;    }
.containment { margin:           auto;
               width:            400px;     }
.containment1{ margin:           auto;
               width:            500px;     }
.heading     { color:            white;
               background-color: steelblue; }
.common-font { font-family: Georgia, Garamond, 'Times New Roman', serif; }using System.Web.Optimization;
namespace WattsALoan1
{
public class BundleConfig
{
// For more information on bundling, visit https://go.microsoft.com/fwlink/?LinkId=301862
public static void RegisterBundles(BundleCollection bundles)
{
bundles.Add(new ScriptBundle("~/bundles/jquery").Include(
"~/Scripts/jquery-{version}.js"));
bundles.Add(new ScriptBundle("~/bundles/jqueryval").Include(
"~/Scripts/jquery.validate*"));
// Use the development version of Modernizr to develop with and learn from. Then, when you're
// ready for production, use the build tool at https://modernizr.com to pick only the tests you need.
bundles.Add(new ScriptBundle("~/bundles/modernizr").Include(
"~/Scripts/modernizr-*"));
bundles.Add(new ScriptBundle("~/bundles/bootstrap").Include(
"~/Scripts/bootstrap.js"));
bundles.Add(new StyleBundle("~/Content/css").Include(
"~/Content/bootstrap.css",
"~/Content/site.css",
"~/Content/WattsALoan.css"));
}
}
}USE master; GO CREATE DATABASE WattsALoan; GO USE WattsALoan1; GO
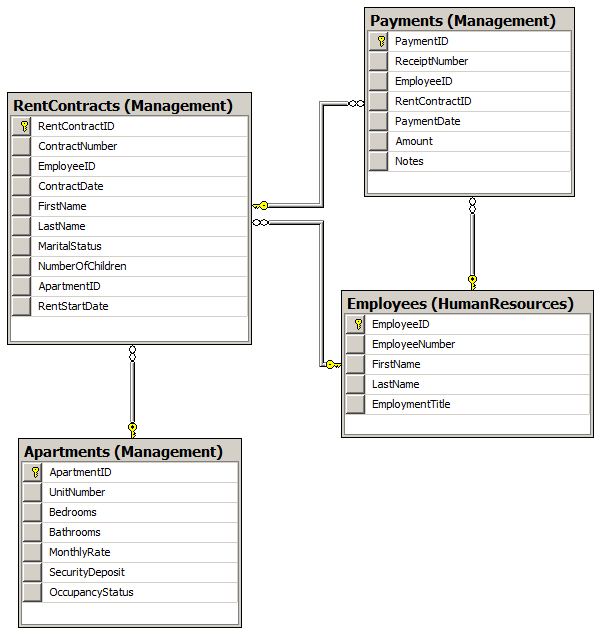
CREATE SCHEMA HumanResources;
GO
CREATE SCHEMA Management;
GO

CREATE TABLE HumanResources.Employees
(
	EmployeeID	    INT IDENTITY(1, 1),
	EmployeeNumber  NVARCHAR(10) UNIQUE,
	FirstName	    NVARCHAR(20),
	LastName        NVARCHAR(20),
	EmploymentTitle NVARCHAR(50),
	CONSTRAINT PK_Employees PRIMARY KEY(EmployeeID)
);
GO
CREATE TABLE Management.LoanContracts
(
	LoanContractID	  INT IDENTITY(1, 1),
	LoanNumber        INT UNIQUE NOT NULL,
	DateAllocated	  DATE,
	EmployeeID	      INT,
	CustomerFirstName NVARCHAR(20),
	CustomerLastName  NVARCHAR(20),
	LoanType		  NVARCHAR(20) DEFAULT N'Personal Loan',
	LoanAmount		  DECIMAL(8, 2),
	InterestRate	  DECIMAL(8, 2),
	[Periods]	      SMALLINT,
	MonthlyPayment	  DECIMAL(8, 2),
	FutureValue	      DECIMAL(8, 2),
	InterestAmount	  DECIMAL(8, 2),
	PaymentStartDate  DATE,
	CONSTRAINT FK_LoanProcessors FOREIGN KEY(EmployeeID) REFERENCES HumanResources.Employees(EmployeeID),
	CONSTRAINT PK_LoansContracts PRIMARY KEY(LoanContractID)
);
GO
CREATE TABLE Management.Payments
(
	PaymentID	   INT IDENTITY(1, 1),
	ReceiptNumber  INTEGER,
	PaymentDate	   DATE,
	EmployeeID     INT,
	LoanContractID INT,
	PaymentAmount  DECIMAL(8, 2),
	Balance		   DECIMAL(8, 2),
	CONSTRAINT FK_PaymentsReceivers FOREIGN KEY(EmployeeID) REFERENCES HumanResources.Employees(EmployeeID),
	CONSTRAINT FK_LoansPayments FOREIGN KEY(LoanContractID) REFERENCES Management.LoanContracts(LoanContractID),
	CONSTRAINT PK_Payments PRIMARY KEY(PaymentID)
);
GO
CREATE VIEW Management.LoansContracts
WITH SCHEMABINDING
AS
	SELECT LoanNumber,
		   DateAllocated,
		   EmployeeNumber + N': ' + FirstName + N' ' + LastName AS [Processed By],
		   CustomerFirstName + N' ' + CustomerLastName AS Customer,
		   LoanType,
		   LoanAmount,
		   InterestRate,
		   [Periods],
		   MonthlyPayment,
		   FutureValue,
		   InterestAmount,
		   PaymentStartDate
	FROM Management.LoanContracts INNER JOIN HumanResources.Employees
	ON Management.LoanContracts.EmployeeID LIKE HumanResources.Employees.EmployeeID;
GO
CREATE VIEW Management.LoanPayment
WITH SCHEMABINDING
AS
	SELECT ReceiptNumber,
		   EmployeeID,
		   LoanContractID,
		   PaymentDate,
		   PaymentAmount,
		   Balance
	FROM   Management.Payments;
GO

CREATE VIEW Management.PaymentsSummary
AS
	SELECT LoanNumber,
		   HumanResources.Employees.EmployeeNumber + N': ' + HumanResources.Employees.FirstName + N' ' + HumanResources.Employees.LastName AS [Received By],
		   PaymentDate,
		   Customer = CustomerFirstName + N' ' + CustomerLastName,
		   LoanType,
		   LoanAmount,
		   PaymentAmount,
		   Balance
	FROM Management.Payments
		INNER JOIN HumanResources.Employees ON Payments.EmployeeID LIKE HumanResources.Employees.EmployeeID
		INNER JOIN Management.LoanContracts ON Management.LoanContracts.LoanContractID LIKE Management.Payments.LoanContractID;
GO
<?xml version="1.0" encoding="utf-8"?>
<!--
  For more information on how to configure your ASP.NET application, please visit
  https://go.microsoft.com/fwlink/?LinkId=301880
  -->
<configuration>
  <appSettings>
    <add key="webpages:Version" value="3.0.0.0"/>
    <add key="webpages:Enabled" value="false"/>
    <add key="ClientValidationEnabled" value="true"/>
    <add key="UnobtrusiveJavaScriptEnabled" value="true"/>
  </appSettings>
  <system.web>
    <compilation debug="true" targetFramework="4.6.1"/>
    <httpRuntime targetFramework="4.6.1"/>
    <httpModules>
      <add name="ApplicationInsightsWebTracking" type="Microsoft.ApplicationInsights.Web.ApplicationInsightsHttpModule, Microsoft.AI.Web"/>
    </httpModules>
  </system.web>
  <connectionStrings>
    <add name="csWattsALoan"
         connectionString="Data Source=(local); Database='WattsALoan2'; Integrated Security=True;MultipleActiveResultSets=True"
         providerName="System.Data.SqlClient" />
  </connectionStrings>

  . . . No Change
</configuration><?xml version="1.0" encoding="utf-8"?>
<!--
For more information on how to configure your ASP.NET application, please visit
https://go.microsoft.com/fwlink/?LinkId=301880
-->
<configuration>
<appSettings>
<add key="webpages:Version" value="3.0.0.0"/>
<add key="webpages:Enabled" value="false"/>
<add key="ClientValidationEnabled" value="true"/>
<add key="UnobtrusiveJavaScriptEnabled" value="true"/>
</appSettings>
<system.web>
<compilation debug="true" targetFramework="4.6.1"/>
<httpRuntime targetFramework="4.6.1"/>
<httpModules>
<add name="ApplicationInsightsWebTracking" type="Microsoft.ApplicationInsights.Web.ApplicationInsightsHttpModule, Microsoft.AI.Web"/>
</httpModules>
</system.web>
<connectionStrings>
<add name="csWattsALoan"
connectionString="Data Source=(LocalDb)\MSSQLLocalDB;AttachDbFilename=|DataDirectory|\WattsALoan2.mdf;Initial Catalog=WattsALoan2;Integrated Security=True"
providerName="System.Data.SqlClient" />
</connectionStrings>
. . . No Change
</configuration>using System.ComponentModel.DataAnnotations;
namespace WattsALoan.Models
{
public class Employee
{
[Display(Name = "Employee ID")]
public int EmployeeID { get; set; }
[Display(Name = "Employee #")]
public string EmployeeNumber { get; set; }
[Display(Name = "First Name")]
public string FirstName { get; set; }
[Display(Name = "Last Name")]
public string LastName { get; set; }
[Display(Name = "Employment Title")]
public string EmploymentTitle { get; set; }
public string Identification
{
get
{
return EmployeeNumber + " - " + FirstName + " " + LastName + " (" + EmploymentTitle + ")";
}
}
}
}using System.Net;
using System.Data;
using System.Web.Mvc;
using WattsALoan1.Models;
using System.Data.SqlClient;
using System.Collections.Generic;
namespace WattsALoan1.Controllers
{
public class EmployeesController : Controller
{
public List<Employee> GetEmployees()
{
List<Employee> employees = new List<Employee>();
using (SqlConnection scWattsALoan = new SqlConnection(System.
Configuration.
ConfigurationManager.
ConnectionStrings["csWattsALoan"].
ConnectionString))
{
SqlCommand cmdEmployees = new SqlCommand("SELECT EmployeeID, EmployeeNumber, " +
" FirstName, LastName, EmploymentTitle " +
"FROM Employees;",
scWattsALoan);
scWattsALoan.Open();
cmdEmployees.ExecuteNonQuery();
SqlDataAdapter sdaEmployees = new SqlDataAdapter(cmdEmployees);
DataSet dsEmployees = new DataSet("employees");
sdaEmployees.Fill(dsEmployees);
Employee staff = null;
for (int i = 0; i < dsEmployees.Tables[0].Rows.Count; i++)
{
DataRow drEmployee = dsEmployees.Tables[0].Rows[i];
staff = new Employee()
{
EmployeeID = int.Parse(drEmployee[0].ToString()),
EmployeeNumber = drEmployee[1].ToString(),
FirstName = drEmployee[2].ToString(),
LastName = drEmployee[3].ToString(),
EmploymentTitle = drEmployee[4].ToString()
};
employees.Add(staff);
}
}
return employees;
}
// GET: Employees
public ActionResult Index()
{
return View(GetEmployees());
}
// GET: Employees/Details/5
public ActionResult Details(int id)
{
Employee employee = null;
if (id == 0)
{
return new HttpStatusCodeResult(HttpStatusCode.BadRequest);
}
foreach (var staff in GetEmployees())
{
if (staff.EmployeeID == id)
{
employee = staff;
break;
}
}
if (employee == null)
{
return HttpNotFound();
}
return View(employee);
}
// GET: Employees/Create
public ActionResult Create()
{
return View();
}
// POST: Employees/Create
[HttpPost]
public ActionResult Create(FormCollection collection)
{
try
{
// TODO: Add insert logic here
using (SqlConnection scRentManagement = new SqlConnection(System.Configuration.
ConfigurationManager.
ConnectionStrings["csWattsALoan"].
ConnectionString))
{
SqlCommand cmdEmployees = new SqlCommand("INSERT INTO Employees(EmployeeNumber, FirstName, LastName, EmploymentTitle) " +
"VALUES(N'" + collection["EmployeeNumber"] + "', " +
" N'" + collection["FirstName"] + "', " +
" N'" + collection["LastName"] + "', " +
" N'" + collection["EmploymentTitle"] + "');",
scRentManagement);
scRentManagement.Open();
cmdEmployees.ExecuteNonQuery();
}
return RedirectToAction("Index");
}
catch
{
return View();
}
}
// GET: Employees/Edit/5
public ActionResult Edit(int id)
{
if (id == 0)
{
return new HttpStatusCodeResult(HttpStatusCode.BadRequest);
}
Employee employee = null;
foreach (var staff in GetEmployees())
{
if (staff.EmployeeID == id)
{
employee = staff;
break;
}
}
return employee == null ? HttpNotFound() : (ActionResult)View(employee);
}
// POST: Employees/Edit/5
[HttpPost]
public ActionResult Edit(int id, FormCollection collection)
{
try
{
// TODO: Add update logic here
using (SqlConnection scRentManagement = new SqlConnection(System.Configuration.
ConfigurationManager.
ConnectionStrings["csWattsALoan"].
ConnectionString))
{
SqlCommand cmdEmployees = new SqlCommand("UPDATE Employees " +
"SET EmployeeNumber = N'" + collection["EmployeeNumber"] + "', " +
" FirstName = N'" + collection["FirstName"] + "', " +
" LastName = N'" + collection["LastName"] + "', " +
" EmploymentTitle = N'" + collection["EmploymentTitle"] + "' " +
"WHERE EmployeeID = " + id + ";",
scRentManagement);
scRentManagement.Open();
cmdEmployees.ExecuteNonQuery();
}
return RedirectToAction("Index");
}
catch
{
return View();
}
}
// GET: Employees/Delete/5
public ActionResult Delete(int id)
{
if (id == 0)
{
return new HttpStatusCodeResult(HttpStatusCode.BadRequest);
}
Employee employee = null;
foreach (var staff in GetEmployees())
{
if (staff.EmployeeID == id)
{
employee = staff;
break;
}
}
return employee == null ? HttpNotFound() : (ActionResult)View(employee);
}
// POST: Employees/Delete/5
[HttpPost]
public ActionResult Delete(int id, FormCollection collection)
{
try
{
// TODO: Add delete logic here
using (SqlConnection scRentManagement = new SqlConnection(System.Configuration.
ConfigurationManager.
ConnectionStrings["csWattsALoan"].
ConnectionString))
{
SqlCommand cmdEmployees = new SqlCommand("DELETE FROM Employees " +
"WHERE EmployeeID = " + id + ";",
scRentManagement);
scRentManagement.Open();
cmdEmployees.ExecuteNonQuery();
}
return RedirectToAction("Index");
}
catch
{
return View();
}
}
}
}@model IEnumerable<WattsALoan1.Models.Employee>
@{
ViewBag.Title = "Employees";
}
<h2 class="bold maroon common-font text-center">Employees</h2>
<hr />
<table class="table table-hover common-font">
<tr>
<th class="text-center">@Html.DisplayNameFor(model => model.EmployeeID)</th>
<th>@Html.DisplayNameFor(model => model.EmployeeNumber)</th>
<th>@Html.DisplayNameFor(model => model.FirstName)</th>
<th>@Html.DisplayNameFor(model => model.LastName)</th>
<th>@Html.DisplayNameFor(model => model.EmploymentTitle)</th>
<th>@Html.ActionLink("Hire New Employee", "Create")</th>
</tr>
@foreach (var item in Model)
{
<tr>
<td class="text-center">@Html.DisplayFor(modelItem => item.EmployeeID)</td>
<td>@Html.DisplayFor(modelItem => item.EmployeeNumber)</td>
<td>@Html.DisplayFor(modelItem => item.FirstName)</td>
<td>@Html.DisplayFor(modelItem => item.LastName)</td>
<td>@Html.DisplayFor(modelItem => item.EmploymentTitle)</td>
<td>
@Html.ActionLink("Edit", "Edit", new { id = item.EmployeeID }) |
@Html.ActionLink("Details", "Details", new { id = item.EmployeeID }) |
@Html.ActionLink("Delete", "Delete", new { id = item.EmployeeID })
</td>
</tr>
}
</table>@model WattsALoan1.Models.Employee
@{
ViewBag.Title = "Employee Details";
}
<h2 class="bold text-center common-font maroon">Employee Details</h2>
<hr />
<div class="containment">
<dl class="dl-horizontal common-font">
<dt>@Html.DisplayNameFor(model => model.EmployeeID)</dt>
<dd>@Html.DisplayFor(model => model.EmployeeID)</dd>
<dt>@Html.DisplayNameFor(model => model.EmployeeNumber)</dt>
<dd>@Html.DisplayFor(model => model.EmployeeNumber)</dd>
<dt>@Html.DisplayNameFor(model => model.FirstName)</dt>
<dd>@Html.DisplayFor(model => model.FirstName)</dd>
<dt>@Html.DisplayNameFor(model => model.LastName)</dt>
<dd>@Html.DisplayFor(model => model.LastName)</dd>
<dt>@Html.DisplayNameFor(model => model.EmploymentTitle)</dt>
<dd>@Html.DisplayFor(model => model.EmploymentTitle)</dd>
</dl>
</div>
<p class="text-center">
@Html.ActionLink("Edit/Update Employee Record", "Edit", new { id = Model.EmployeeID }) ::
@Html.ActionLink("Employees", "Index")
</p>@model WattsALoan1.Models.Employee
@{
ViewBag.Title = "Create Employee";
}
<h2 class="bold maroon common-font text-center">Employment Application</h2>
<hr />
@using (Html.BeginForm())
{
<div class="form-horizontal common-font">
<div class="form-group">
@Html.LabelFor(model => model.EmployeeNumber, htmlAttributes: new { @class = "control-label col-md-5 blue" })
<div class="col-md-7">
@Html.EditorFor(model => model.EmployeeNumber, new { htmlAttributes = new { @class = "form-control" } })
</div>
</div>
<div class="form-group">
@Html.LabelFor(model => model.FirstName, htmlAttributes: new { @class = "control-label col-md-5 blue" })
<div class="col-md-7">
@Html.EditorFor(model => model.FirstName, new { htmlAttributes = new { @class = "form-control" } })
</div>
</div>
<div class="form-group">
@Html.LabelFor(model => model.LastName, htmlAttributes: new { @class = "control-label col-md-5 blue" })
<div class="col-md-7">
@Html.EditorFor(model => model.LastName, new { htmlAttributes = new { @class = "form-control" } })
</div>
</div>
<div class="form-group">
@Html.LabelFor(model => model.EmployeeNumber, htmlAttributes: new { @class = "control-label col-md-5 blue" })
<div class="col-md-7">
@Html.EditorFor(model => model.EmploymentTitle, new { htmlAttributes = new { @class = "form-control" } })
</div>
</div>
<div class="form-group">
<label class="control-label col-md-6">@Html.ActionLink("Employees", "Index")</label>
<div class="col-md-6">
<input type="submit" value="Hire this Employee" class="btn btn-primary" />
</div>
</div>
</div>
}@model WattsALoan1.Models.Employee
@{
ViewBag.Title = "Edit/Update Employee Information";
}
<h2 class=" bold maroon common-font text-center">Edit/Update Employee Information</h2>
<hr />
@using (Html.BeginForm())
{
<div class="form-horizontal common-font">
<div class="form-group">
@Html.LabelFor(model => model.EmployeeNumber, htmlAttributes: new { @class = "control-label col-md-5" })
<div class="col-md-7">
@Html.EditorFor(model => model.EmployeeNumber, new { htmlAttributes = new { @class = "form-control" } })
</div>
</div>
<div class="form-group">
@Html.LabelFor(model => model.FirstName, htmlAttributes: new { @class = "control-label col-md-5" })
<div class="col-md-7">
@Html.EditorFor(model => model.FirstName, new { htmlAttributes = new { @class = "form-control" } })
</div>
</div>
<div class="form-group">
@Html.LabelFor(model => model.LastName, htmlAttributes: new { @class = "control-label col-md-5" })
<div class="col-md-7">
@Html.EditorFor(model => model.LastName, new { htmlAttributes = new { @class = "form-control" } })
</div>
</div>
<div class="form-group">
@Html.LabelFor(model => model.EmploymentTitle, htmlAttributes: new { @class = "control-label col-md-5" })
<div class="col-md-7">
@Html.EditorFor(model => model.EmploymentTitle, new { htmlAttributes = new { @class = "form-control" } })
</div>
</div>
<div class="form-group">
<label class="control-label col-md-5">@Html.ActionLink("Employees", "Index")</label>
<div class="col-md-7">
<input type="submit" value="Update Employee Record" class="btn btn-primary" />
</div>
</div>
</div>
}@model WattsALoan1.Models.Employee
@{
ViewBag.Title = "Deleting Employee Record";
}
<h2 class="bold common-font text-center maroon">Deleting Employee Record</h2>
<hr />
<h3 class="common-font maroon text-center">Are you sure you want to delete this employee's record?</h3>
<div class="containment">
<dl class="dl-horizontal common-font">
<dt>@Html.DisplayNameFor(model => model.EmployeeID)</dt>
<dd>@Html.DisplayFor(model => model.EmployeeID)</dd>
<dt>@Html.DisplayNameFor(model => model.EmployeeNumber)</dt>
<dd>@Html.DisplayFor(model => model.EmployeeNumber)</dd>
<dt>@Html.DisplayNameFor(model => model.FirstName)</dt>
<dd>@Html.DisplayFor(model => model.FirstName)</dd>
<dt>@Html.DisplayNameFor(model => model.LastName)</dt>
<dd>@Html.DisplayFor(model => model.LastName)</dd>
<dt>@Html.DisplayNameFor(model => model.EmploymentTitle)</dt>
<dd>@Html.DisplayFor(model => model.EmploymentTitle)</dd>
</dl>
@using (Html.BeginForm())
{
@Html.AntiForgeryToken()
<div class="form-actions no-color">
@Html.ActionLink("Employees", "Index") ::
<input type="submit" value="Delete Employee Record" class="btn btn-primary" />
</div>
}
</div>using System;
using System.ComponentModel.DataAnnotations;
namespace WattsALoan1.Models
{
public class LoanContract
{
[Display(Name = "Loan Contract ID")]
public int LoanContractID { get; set; }
[Display(Name = "Loan #")]
public int LoanNumber { get; set; }
[DataType(DataType.Date)]
[Display(Name = "Date Allocated")]
public DateTime DateAllocated { get; set; }
[Display(Name = "Employee ID")]
public int EmployeeID { get; set; }
[Display(Name = "First Name")]
public string CustomerFirstName { get; set; }
[Display(Name = "Last Name")]
public string CustomerLastName { get; set; }
[Display(Name = "Loan Type")]
public string LoanType { get; set; } // => "Personal Loan";
[Display(Name = "Loan Amount")]
public decimal LoanAmount { get; set; }
[Display(Name = "Interest Rate")]
public decimal InterestRate { get; set; }
public int Periods { get; set; }
[Display(Name = "Monthly Payment")]
public decimal MonthlyPayment { get; set; }
[Display(Name = "Future Value")]
public decimal FutureValue { get; set; }
[Display(Name = "Interest Amount")]
public decimal InterestAmount { get; set; }
[DataType(DataType.Date)]
[Display(Name = "Payment Start Date")]
public DateTime PaymentStartDate { get; set; }
}
}using System;
using System.Data;
using System.Web.Mvc;
using WattsALoan1.Models;
using System.Data.SqlClient;
using System.Collections.Generic;
namespace WattsALoan1.Controllers
{
public class LoansContractsController : Controller
{
public List<LoanContract> GetLoanContracts()
{
List<LoanContract> contracts = new List<LoanContract>();
using (SqlConnection scWattsALoan = new SqlConnection(System.Configuration.
ConfigurationManager.
ConnectionStrings["csWattsALoan"].
ConnectionString))
{
SqlCommand cmdLoanContracts = new SqlCommand("SELECT LoanContractID, LoanNumber, DateAllocated, EmployeeID, " +
" CustomerFirstName, CustomerLastName, LoanType, " +
" LoanAmount, InterestRate, Periods, MonthlyPayment, " +
" FutureValue, InterestAmount, PaymentStartDate " +
"FROM LoanContracts;",
scWattsALoan);
scWattsALoan.Open();
cmdLoanContracts.ExecuteNonQuery();
SqlDataAdapter sdaLoanContracts = new SqlDataAdapter(cmdLoanContracts);
DataSet dsLoanContracts = new DataSet("loans-contracts");
sdaLoanContracts.Fill(dsLoanContracts);
LoanContract contract = null;
for (int i = 0; i < dsLoanContracts.Tables[0].Rows.Count; i++)
{
DataRow drLoanContract = dsLoanContracts.Tables[0].Rows[i];
contract = new LoanContract()
{
LoanContractID = int.Parse(drLoanContract[0].ToString()),
LoanNumber = int.Parse(drLoanContract[1].ToString()),
DateAllocated = DateTime.Parse(drLoanContract[2].ToString()),
EmployeeID = int.Parse(drLoanContract[3].ToString()),
CustomerFirstName = drLoanContract[4].ToString(),
CustomerLastName = drLoanContract[5].ToString(),
LoanType = drLoanContract[6].ToString(),
LoanAmount = decimal.Parse(drLoanContract[7].ToString()),
InterestRate = decimal.Parse(drLoanContract[8].ToString()),
Periods = int.Parse(drLoanContract[9].ToString()),
MonthlyPayment = decimal.Parse(drLoanContract[10].ToString()),
FutureValue = decimal.Parse(drLoanContract[11].ToString()),
InterestAmount = decimal.Parse(drLoanContract[12].ToString()),
PaymentStartDate = DateTime.Parse(drLoanContract[13].ToString())
};
contracts.Add(contract);
}
}
return contracts;
}
// GET: LoansContracts
public ActionResult Index()
{
return View(GetLoanContracts());
}
// GET: LoansContracts/Details/5
public ActionResult Details(int id)
{
return View();
}
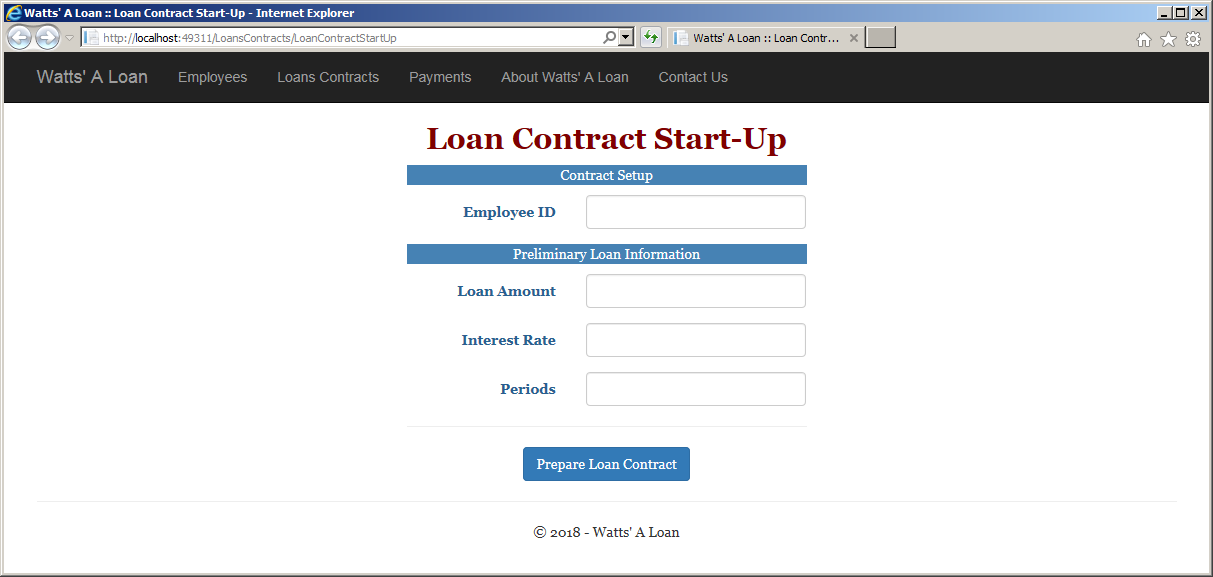
// GET: LoansContracts/LoanContractStartUp
public ActionResult LoanContractStartUp()
{
return View();
}
// GET: LoansContracts/LoanContractPreparation
public ActionResult LoanContractPreparation(string EmployeeID, string LoanAmount, string InterestRate, string Periods,
FormCollection collection)
{
//int loanNbr = 100000;
Random rndNumber = new Random();
ViewBag.LoanNumber = rndNumber.Next(100001, 999999).ToString();
// Create a list of loans types for a combo box
List<SelectListItem> loanTypes = new List<SelectListItem>();
loanTypes.Add(new SelectListItem() { Text = "Personal Loan", Value = "Personal Loan" });
loanTypes.Add(new SelectListItem() { Text = "Car Financing", Value = "Car Financing" });
loanTypes.Add(new SelectListItem() { Text = "Boat Financing", Value = "Boat Financing" });
loanTypes.Add(new SelectListItem() { Text = "Furniture Purchase", Value = "Furniture Purchase" });
loanTypes.Add(new SelectListItem() { Text = "Musical Instrument", Value = "Musical Instrument" });
// Store the list in a View Bag so it can be access by a combo box
ViewBag.LoanType = loanTypes;
if(!string.IsNullOrEmpty(EmployeeID))
{
EmployeesController ec = new EmployeesController();
using (SqlConnection scWattsALoan = new SqlConnection(System.Configuration.
ConfigurationManager.
ConnectionStrings["csWattsALoan"].
ConnectionString))
{
foreach (var staff in ec.GetEmployees())
{
if (staff.EmployeeID == int.Parse(EmployeeID))
{
ViewBag.EmployeeDetails = staff.EmployeeNumber + " - " +
staff.FirstName + " " + staff.LastName +
" (" + staff.EmploymentTitle + ")";
break;
}
}
}
}
int periods = 0;
decimal principal = 0, interestRate = 0;
if (!string.IsNullOrEmpty(LoanAmount))
{
principal = decimal.Parse(LoanAmount);
}
if (!string.IsNullOrEmpty(InterestRate))
{
interestRate = decimal.Parse(InterestRate) / 100;
}
if (!string.IsNullOrEmpty(Periods))
{
periods = int.Parse(Periods);
}
decimal interestAmount = principal * interestRate * periods / 12;
decimal futureValue = principal + interestAmount;
decimal monthlyPayment = futureValue / periods;
ViewBag.FutureValue = futureValue.ToString("F");
ViewBag.InterestAmount = interestAmount.ToString("F");
ViewBag.MonthlyPayment = monthlyPayment.ToString("F");
return View();
}
// GET: LoansContracts/Create
public ActionResult Create()
{
return View();
}
// POST: LoansContracts/Create
[HttpPost]
public ActionResult Create(string LoanNumber, string EmployeeID,
string InterestRate, string Periods, string FutureValue,
string MonthlyPayment, string InterestAmount,
FormCollection collection)
{
try
{
// TODO: Add insert logic here
if(!string.IsNullOrEmpty(EmployeeID))
{
using (SqlConnection scWattsALoan = new SqlConnection(System.Configuration.
ConfigurationManager.
ConnectionStrings["csWattsALoan"].
ConnectionString))
{
SqlCommand cmdLoanAllocation =
new SqlCommand("INSERT LoanContracts(LoanNumber, DateAllocated, EmployeeID, " +
" CustomerFirstName, CustomerLastName, LoanType, " +
" LoanAmount, InterestRate, Periods, MonthlyPayment, " +
" FutureValue, InterestAmount, PaymentStartDate) " +
"VALUES(" + int.Parse(LoanNumber) + ", N'" + collection["DateAllocated"] +
"', " + int.Parse(collection["EmployeeID"]) + ", N'" +
collection["CustomerFirstName"] + "', N'" + collection["CustomerLastName"] +
"', N'" + collection["LoanType"] + "', " + decimal.Parse(collection["LoanAmount"]) +
", " + decimal.Parse(collection["InterestRate"]) + ", " +
int.Parse(collection["Periods"]) + ", " + decimal.Parse(MonthlyPayment) +
", " + decimal.Parse(FutureValue) + ", " + decimal.Parse(InterestAmount) +
", N'" + collection["PaymentStartDate"] + "');");
cmdLoanAllocation.Connection = scWattsALoan;
scWattsALoan.Open();
cmdLoanAllocation.ExecuteNonQuery();
}
}
return RedirectToAction("Index");
}
catch
{
return View();
}
}
. . . No Change
}
}@model IEnumerable<WattsALoan1.Models.LoanContract>
@{
ViewBag.Title = "Loans Contracts";
}
<h2 class="bold maroon common-font text-center">Loan Contracts</h2>
<table class="table table-hover common-font">
<tr>
<th class="text-center">@Html.DisplayNameFor(model => model.LoanContractID)</th>
<th class="text-center">@Html.DisplayNameFor(model => model.LoanNumber)</th>
<th>@Html.DisplayNameFor(model => model.DateAllocated)</th>
<th class="text-center">@Html.DisplayNameFor(model => model.EmployeeID)</th>
<th>@Html.DisplayNameFor(model => model.CustomerFirstName)</th>
<th>@Html.DisplayNameFor(model => model.CustomerLastName)</th>
<th>@Html.DisplayNameFor(model => model.LoanType)</th>
<th>@Html.DisplayNameFor(model => model.LoanAmount)</th>
<th>@Html.DisplayNameFor(model => model.InterestRate)</th>
<th>@Html.DisplayNameFor(model => model.Periods)</th>
<th>@Html.DisplayNameFor(model => model.MonthlyPayment)</th>
<th>@Html.DisplayNameFor(model => model.FutureValue)</th>
<th>@Html.DisplayNameFor(model => model.InterestAmount)</th>
<th>@Html.DisplayNameFor(model => model.PaymentStartDate)</th>
<th>@Html.ActionLink("New Loan Contract", "LoanContractStartUp")</th>
</tr>
@foreach (var item in Model)
{
<tr>
<td class="text-center">@Html.DisplayFor(modelItem => item.LoanContractID)</td>
<td class="text-center">@Html.DisplayFor(modelItem => item.LoanNumber)</td>
<td class="text-center">@Html.DisplayFor(modelItem => item.DateAllocated)</td>
<td class="text-center">@Html.DisplayFor(modelItem => item.EmployeeID)</td>
<td>@Html.DisplayFor(modelItem => item.CustomerFirstName)</td>
<td>@Html.DisplayFor(modelItem => item.CustomerLastName)</td>
<td>@Html.DisplayFor(modelItem => item.LoanType)</td>
<td class="text-center">@Html.DisplayFor(modelItem => item.LoanAmount)</td>
<td class="text-center">@Html.DisplayFor(modelItem => item.InterestRate)</td>
<td class="text-center">@Html.DisplayFor(modelItem => item.Periods)</td>
<td class="text-center">@Html.DisplayFor(modelItem => item.MonthlyPayment)</td>
<td class="text-center">@Html.DisplayFor(modelItem => item.FutureValue)</td>
<td class="text-center">@Html.DisplayFor(modelItem => item.InterestAmount)</td>
<td class="text-center">@Html.DisplayFor(modelItem => item.PaymentStartDate)</td>
<td>
@Html.ActionLink("Edit", "Edit", new { id = item.LoanContractID }) |
@Html.ActionLink("Details", "Details", new { id = item.LoanContractID }) |
@Html.ActionLink("Delete", "Delete", new { id = item.LoanContractID })
</td>
</tr>
}
</table>@model WattsALoan1.Models.LoanContract
@{
ViewBag.Title = "Loan Contract Preparation";
}
<h2 class="text-center common-font maroon bold">Loan Contract Preparation</h2>
@using (Html.BeginForm("Create", "LoansContracts", FormMethod.Post))
{
<div class="containment1">
<div class="form-horizontal common-font">
<div class="heading"><p class="text-center">Contract Setup</p></div>
<div class="form-group">
@Html.LabelFor(model => model.EmployeeID, htmlAttributes: new { @class = "control-label col-md-3 blue" })
<div class="col-md-2">
@Html.EditorFor(model => model.EmployeeID, new { htmlAttributes = new { @class = "form-control" } })
</div>
<div class="col-md-6">@ViewBag.EmployeeDetails</div>
</div>
<div class="form-group">
@Html.LabelFor(model => model.DateAllocated, htmlAttributes: new { @class = "control-label col-md-5 blue" })
<div class="col-md-7">
@Html.EditorFor(model => model.DateAllocated, new { htmlAttributes = new { @class = "form-control" } })
</div>
</div>
<div class="form-group">
@Html.LabelFor(model => model.LoanNumber, htmlAttributes: new { @class = "control-label col-md-5 blue" })
<div class="col-md-7">
@Html.TextBox("LoanNumber", ViewBag.LoanNumber as string, htmlAttributes: new { @class = "form-control" })
</div>
</div>
<div class="heading text-center"><p class="text-center">Customer Information</p></div>
<div class="form-group">
@Html.LabelFor(model => model.CustomerFirstName, htmlAttributes: new { @class = "control-label col-md-5 blue" })
<div class="col-md-7">
@Html.EditorFor(model => model.CustomerFirstName, new { htmlAttributes = new { @class = "form-control" } })
</div>
</div>
<div class="form-group">
@Html.LabelFor(model => model.CustomerLastName, htmlAttributes: new { @class = "control-label col-md-5 blue" })
<div class="col-md-7">
@Html.EditorFor(model => model.CustomerLastName, new { htmlAttributes = new { @class = "form-control" } })
</div>
</div>
<div class="heading text-center"><p class="text-center">Loan Details</p></div>
<div class="form-group">
@Html.LabelFor(model => model.LoanType, htmlAttributes: new { @class = "control-label col-md-5 blue" })
<div class="col-md-7">
@Html.DropDownList("LoanType", ViewBag.LoansTypes as SelectList,
htmlAttributes: new { @class = "form-control col-md-5 blue" })
</div>
</div>
<div class="form-group">
@Html.LabelFor(model => model.LoanAmount, htmlAttributes: new { @class = "control-label col-md-5 blue" })
<div class="col-md-7">
@Html.EditorFor(model => model.LoanAmount, new { htmlAttributes = new { @class = "form-control" } })
</div>
</div>
<div class="form-group">
@Html.LabelFor(model => model.InterestRate, htmlAttributes: new { @class = "control-label col-md-5 blue" })
<div class="col-md-7">
@Html.EditorFor(model => model.InterestRate, new { htmlAttributes = new { @class = "form-control" } })
</div>
</div>
<div class="form-group">
@Html.LabelFor(model => model.Periods, htmlAttributes: new { @class = "control-label col-md-5 blue" })
<div class="col-md-7">
@Html.EditorFor(model => model.Periods, new { htmlAttributes = new { @class = "form-control" } })
</div>
</div>
<div class="form-group">
@Html.LabelFor(model => model.FutureValue, htmlAttributes: new { @class = "control-label col-md-5 blue" })
<div class="col-md-7">
@Html.TextBox("FutureValue", @ViewBag.FutureValue as string, htmlAttributes: new { @class = "form-control" })
</div>
</div>
<div class="form-group">
@Html.LabelFor(model => model.InterestAmount, htmlAttributes: new { @class = "control-label col-md-5 blue" })
<div class="col-md-7">
@Html.TextBox("InterestAmount", @ViewBag.InterestAmount as string, htmlAttributes: new { @class = "form-control" })
</div>
</div>
<div class="form-group">
@Html.LabelFor(model => model.MonthlyPayment, htmlAttributes: new { @class = "control-label col-md-5 blue" })
<div class="col-md-7">
@Html.TextBox("MonthlyPayment", @ViewBag.MonthlyPayment as string, htmlAttributes: new { @class = "form-control" })
</div>
</div>
<div class="form-group">
@Html.LabelFor(model => model.PaymentStartDate, htmlAttributes: new { @class = "control-label col-md-5 blue" })
<div class="col-md-7">
@Html.EditorFor(model => model.PaymentStartDate, new { htmlAttributes = new { @class = "form-control" } })
</div>
</div>
</div>
</div>
<hr />
<p class="text-center"><input type="submit" value="Save Loan Contract" class="btn btn-primary" /></p>
}@model WattsALoan1.Models.LoanContract
@{
ViewBag.Title = "Loan Contract Start-Up";
}
<h2 class="bold maroon common-font text-center">Loan Contract Start-Up</h2>
@using (Html.BeginForm("LoanContractPreparation", "LoansContracts", FormMethod.Post))
{
<div class="containment">
<div class="form-horizontal common-font">
<div class="heading"><p class="text-center">Contract Setup</p></div>
<div class="form-group">
@Html.LabelFor(model => model.EmployeeID, htmlAttributes: new { @class = "control-label col-md-5 blue" })
<div class="col-md-7">
@Html.EditorFor(model => model.EmployeeID, new { htmlAttributes = new { @class = "form-control" } })
</div>
</div>
<div class="heading"><p class="text-center">Preliminary Loan Information</p></div>
<div class="form-group">
@Html.LabelFor(model => model.LoanAmount, htmlAttributes: new { @class = "control-label col-md-5 blue" })
<div class="col-md-7">
@Html.EditorFor(model => model.LoanAmount, new { htmlAttributes = new { @class = "form-control" } })
</div>
</div>
<div class="form-group">
@Html.LabelFor(model => model.InterestRate, htmlAttributes: new { @class = "control-label col-md-5 blue" })
<div class="col-md-7">
@Html.EditorFor(model => model.InterestRate, new { htmlAttributes = new { @class = "form-control" } })
</div>
</div>
<div class="form-group">
@Html.LabelFor(model => model.Periods, htmlAttributes: new { @class = "control-label col-md-5 blue" })
<div class="col-md-7">
@Html.EditorFor(model => model.Periods, new { htmlAttributes = new { @class = "form-control" } })
</div>
</div>
<hr />
<p class="text-center">
<input type="submit" value="Review Loan Contract"
name="btnReviewLoanContract" class="btn btn-primary" />
</p>
</div>
</div>
}<!DOCTYPE html>
<html>
<head>
<meta charset="utf-8" />
<meta name="viewport" content="width=device-width, initial-scale=1.0">
<title>Watts' A Loan :: @ViewBag.Title</title>
@Styles.Render("~/Content/css")
@Scripts.Render("~/bundles/modernizr")
</head>
<body>
<div class="navbar navbar-inverse navbar-fixed-top">
<div class="container">
<div class="navbar-header">
<button type="button" class="navbar-toggle" data-toggle="collapse" data-target=".navbar-collapse">
<span class="icon-bar"></span>
<span class="icon-bar"></span>
<span class="icon-bar"></span>
</button>
@Html.ActionLink("Watts' A Loan", "Index", "Home", new { area = "" }, new { @class = "navbar-brand" })
</div>
<div class="navbar-collapse collapse">
<ul class="nav navbar-nav">
<li>@Html.ActionLink("Employees", "Index", "Employees")</li>
<li>@Html.ActionLink("Loans Contracts", "Index", "LoansContracts")</li>
<li>@Html.ActionLink("Payments", "Index", "Payments")</li>
<li>@Html.ActionLink("About Watts' A Loan", "About", "Home")</li>
<li>@Html.ActionLink("Contact Us", "Contact", "Home")</li>
</ul>
</div>
</div>
</div>
<div class="container body-content">
@RenderBody()
<hr />
<footer>
<p class="text-center">© @DateTime.Now.Year - Watts' A Loan</p>
</footer>
</div>
@Scripts.Render("~/bundles/jquery")
@Scripts.Render("~/bundles/bootstrap")
@RenderSection("scripts", required: false)
</body>
</html>
| Employee # | First Name | Last Name | Employment Title |
| 293-747 | Catherine | Watts | Owner - General Manager |
| 836-486 | Thomas | Felton | Accounts Representative |
| 492-947 | Caroline | Wernick | Assistant Manager |
| 240-750 | Catherine | Donato | Accounts Representative |
| 804-685 | Melissa | Browns | Customer Accounts Representative |
| 429-374 | Denise | Leighton | Accounts Manager |
INSERT Employees
VALUES(N'293-747', N'Catherine', N'Watts',    N'Owner'),
      (N'836-486', N'Thomas',    N'Felton',   N'Accounts Representative'),
      (N'492-947', N'Caroline',  N'Wernick',  N'Assistant Manager'),
      (N'240-750', N'Catherine', N'Donato',   N'Accounts Representative'),
      (N'804-685', N'Melissa',   N'Browns',   N'Customer Accounts Representative'),
      (N'429-374', N'Denise',    N'Leighton', N'Accounts Manager');
GO

Processed By:  6
Loan Amount:   2500
Interest Rate: 14.65
Periods:       36
Allocation Date:    01/18/2018
First Name:         Joanne
Last Name:          Kennan
Payment Start Date: 02/01/2018
| Processed By | Loan Amount | Interest Rate | Periods | Allocation Date | First Name | Last Name | Type of Loan | Payment Start Date |
| 3 | 16500 | 12.25 | 60 | 01/22/2018 | Stephanie | Haller | Boat Financing | 03/01/2018 |
| 6 | 2258.75 | 16.15 | 36 | 03/12/18 | Annette | Vargas | Furniture Purchase | 01-May-2018 |
| 2 | 22748 | 10.25 | 60 | 12-Mar-18 | Gérard | Maloney | Car Financing | 05-01-2018 |

Definition
A view is a query (a list of columns or a series of records retrieved) from one or more existing tables, or as a combination of one or more views and one or more tables, that is saved so it can be used one or more times. This means that, unlike a regular query, a query is a database object that has a name and is saved in the database. Before creating a view, you must first decide where its columns and records would come from. The easiest view is one whose columns and records come from one table.
Fundamentals of Creating a View
To create a view, you can use a Query window in Microsoft SQL Server or in Microsoft Visual Studio, or you can write C# code. To visually create a view in Microsoft SQL Server Management Studio, in the Object Explorer, expand the desired database. Right-click its Views node and click New View... This would open a new View window:
You will then make some selection and/or type the necessary code. Once you are ready, click the Update button.
The Name of a View
Like every object in Microsoft SQL Server, a view must have a name:
If you are visually creating a view in the Microsoft SQL Server Managment Studio, either close its window or click the Save button on the toolbar. You will be presented with a Choose Name dialog box. Accept or change the suggested name. When you are ready, click OK.
After saving a view, it becomes part of the Views node of its database: a node would be created for it and its name would appear in the Views node of its database.
Creating a View in SQL
The primary formula to programmatically create a view in SQL is:
CREATE VIEW [schema].view-name
AS
SELECT statement
The creation of a view starts with the CREATE VIEW expression followed by an optional schema and the name of the new view. If you don't specify a schema, the default dbo will be used. After the name of the view, use the AS keyword to indicate that you are ready to define the view.
Because a view is primarily a SQL statement, it is defined using a SELECT statement, using the same rules we studied for data analysis. Here is an example of a view:
CREATE VIEW Identifications
AS
SELECT EmployeeNumber, FirstName, LastName
FROM Employees
To make your code indicate that this is a view and not a regular query, you can indent the SELECT statement.
After creating the SQL statement that defines the view, you must execute it. If using a Query window in Microsoft SQL Server Management Studio, you can press F5 or click the Execute button.
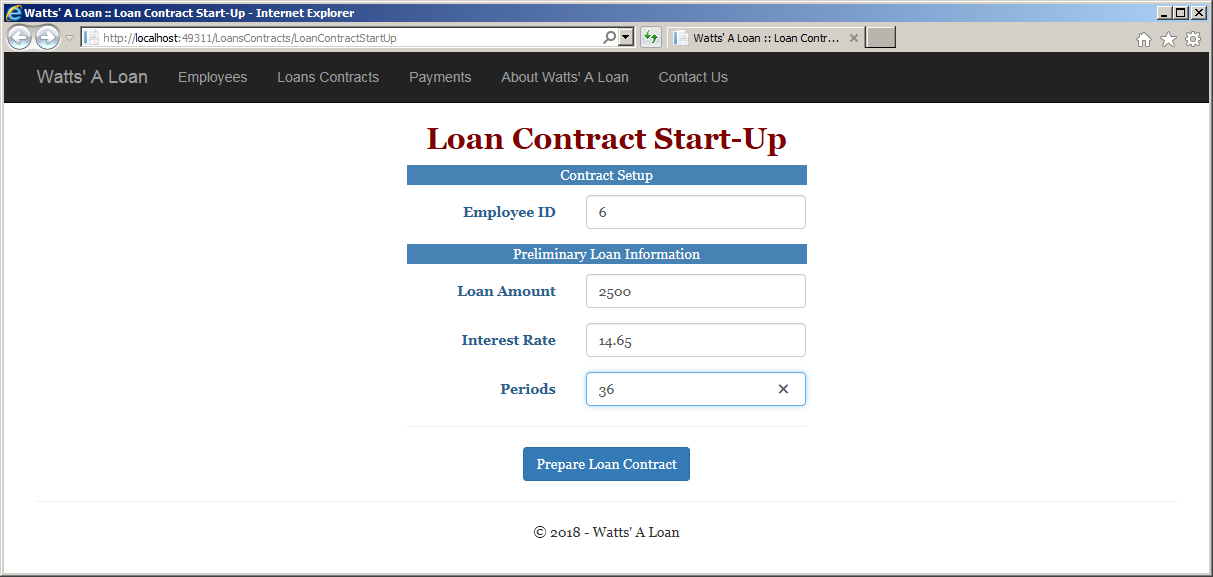
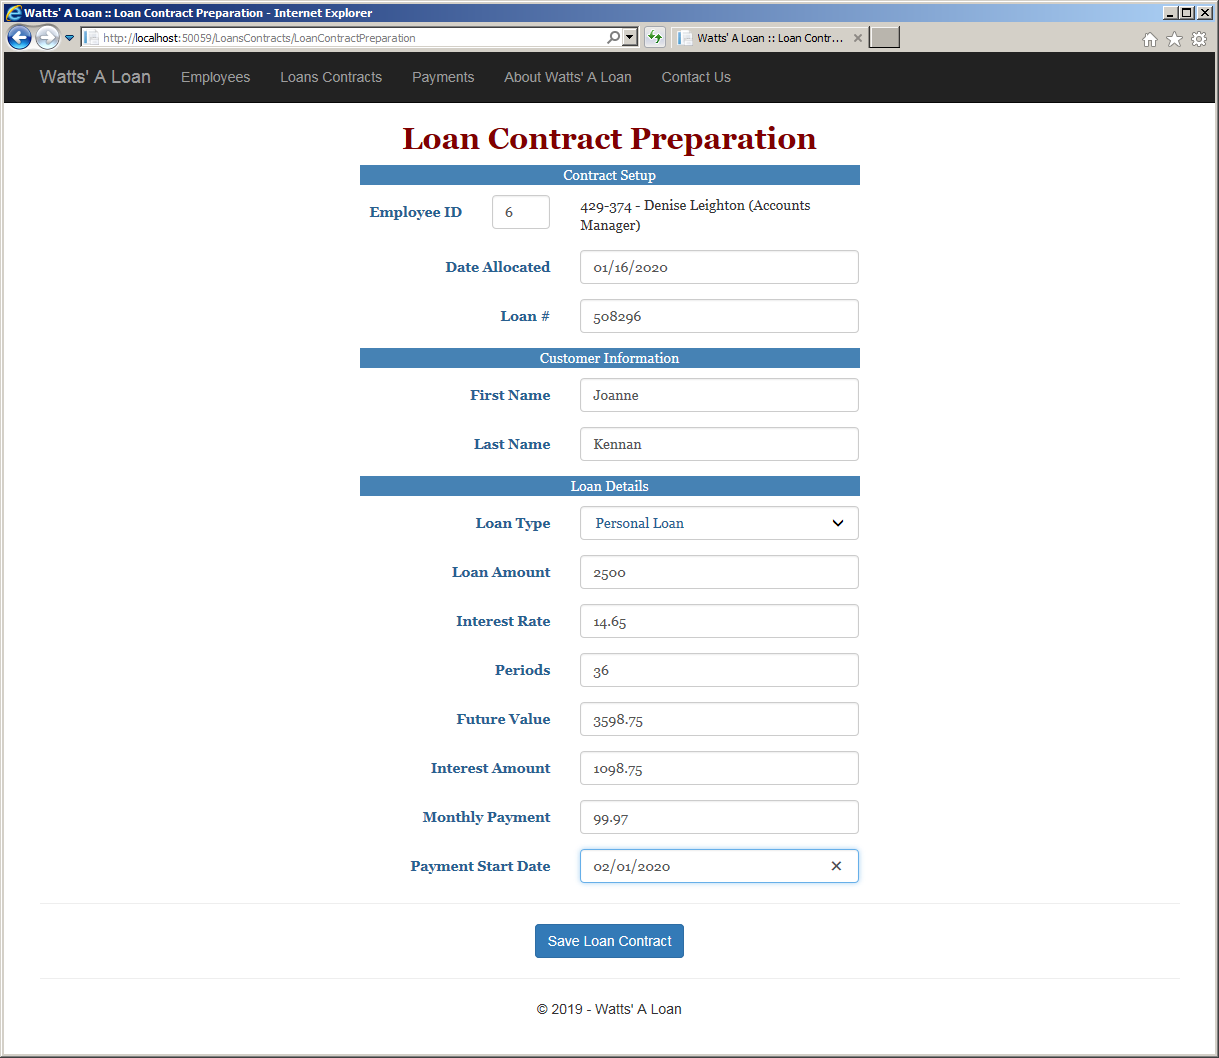
![]() Practical
Learning: Creating a View
Practical
Learning: Creating a View
USE WattsALoan1;
GO
CREATE VIEW Clients
AS
    SELECT LoanNumber,
           LoanType,
           CustomerFirstName,
           CustomerLastName,
           LoanAmount,
           MonthlyPayment,
           PaymentStartDate
    FROM   LoanContracts;
GOExecuting a View
After creating a view, it shares many of the characteristics of a table. For example, a view has its own columns although the columns are actually tied to the table(s) that hold(s) the original data. As done for a table, you can access the columns of a view using a SELECT statement. This means that you can access one, a few, or all of the columns. Here is an example that accesses all columns of a view:
SELECT * FROM Personnel.Identifications
![]() Practical Learning: Executing a View
Practical Learning: Executing a View
using System;
using System.Data;
using System.Web.Mvc;
using WattsALoan1.Models;
using System.Data.SqlClient;
using System.Collections.Generic;

namespace WattsALoan1.Controllers
{
    public class LoansContractsController : Controller
    {

        . . . No Change

        // GET: LoansContracts/ReviewCustomersAccounts
        public ActionResult ReviewCustomersAccounts()
        {
            return View();
        }
    }
}@{
ViewBag.Title = "Summary of Customers Accounts";
}
<h2 class="bold maroon common-font text-center">Summary of Customers Accounts</h2>
<div align="center">
@using (System.Data.SqlClient.SqlConnection scWattsALoan = new System.Data.SqlClient.SqlConnection(System.Configuration.
ConfigurationManager.
ConnectionStrings["csWattsALoan"].
ConnectionString))
{
System.Data.SqlClient.SqlCommand cmdCustomers =
new System.Data.SqlClient.SqlCommand("SELECT LoanNumber, LoanType, CustomerFirstName, CustomerLastName, " +
" LoanAmount, MonthlyPayment, PaymentStartDate " +
"FROM Clients;");
cmdCustomers.Connection = scWattsALoan;
scWattsALoan.Open();
System.Data.SqlClient.SqlDataAdapter sdaCustomers = new System.Data.SqlClient.SqlDataAdapter(cmdCustomers);
System.Data.DataSet dsCustomers = new System.Data.DataSet("clients");
sdaCustomers.Fill(dsCustomers);
if (dsCustomers.Tables[0].Rows.Count > 0)
{
<table class="table table-hover common-font">
<tr>
<td class="bold text-center">Loan #</td>
<td class="bold">Loan Type</td>
<td class="bold">Customer Name</td>
<td class="bold">Amount of Loan</td>
<td class="bold">Payment</td>
<td class="bold text-center">Start Date</td>
</tr>
@foreach (System.Data.DataRow drCustomer in dsCustomers.Tables[0].Rows)
{
<tr>
<td class="text-center">@drCustomer["LoanNumber"].ToString()</td>
<td>@drCustomer["LoanType"].ToString()</td>
<td>@drCustomer["CustomerFirstName"].ToString() @drCustomer["CustomerLastName"].ToString()</td>
<td>@drCustomer["LoanAmount"].ToString()</td>
<td>@drCustomer["MonthlyPayment"].ToString()/Month</td>
<td class="text-center">@DateTime.Parse(drCustomer["PaymentStartDate"].ToString()).ToShortDateString()</td>
</tr>
}
</table>
}
}
</div>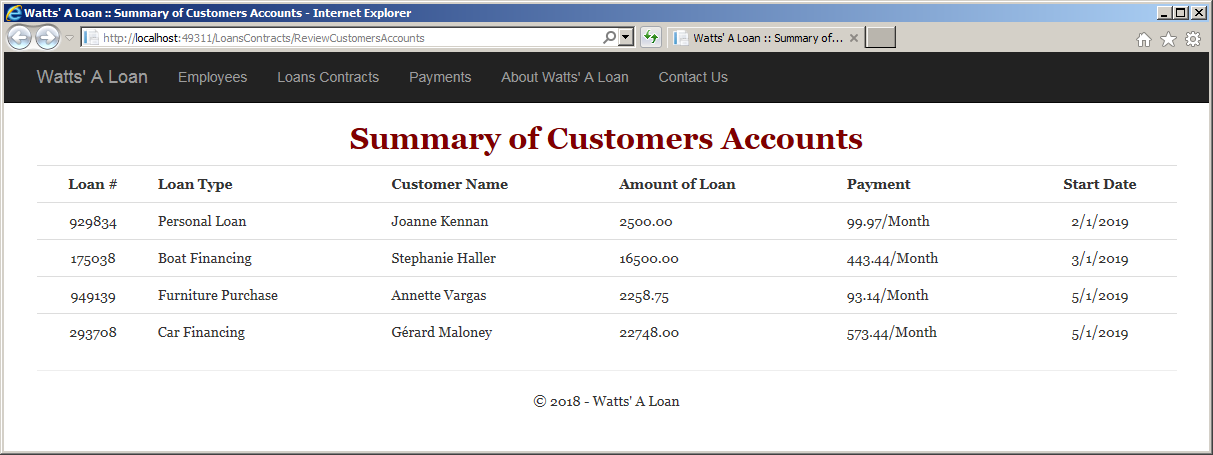
using System;
using System.ComponentModel.DataAnnotations;

namespace WattsALoan1.Models
{
    public class Payment
    {
        [Display(Name = "Payment ID")]
        public int      PaymentID      { get; set; }
        [Display(Name = "Receipt #")]
        public int      ReceiptNumber  { get; set; }
        [DataType(DataType.Date)]
        [Display(Name = "Payment Date")]
        public DateTime PaymentDate    { get; set; }
        [Display(Name = "Employee ID")]
        public int      EmployeeID     { get; set; }
        [Display(Name = "Loan Contract ID")]
        public int      LoanContractID { get; set; }
        [Display(Name = "Payment Amount")]
        public decimal  PaymentAmount  { get; set; }
        public decimal  Balance        { get; set; }
    }
}using System;
using System.Data;
using System.Web.Mvc;
using WattsALoan1.Models;
using System.Data.SqlClient;
using System.Collections.Generic;
namespace WattsALoan1.Controllers
{
public class PaymentsController : Controller
{
private List<Payment> payments = new List<Payment>();
public List<Payment> GetPayments()
{
using (SqlConnection scWattsALoan = new SqlConnection(System.Configuration.
ConfigurationManager.
ConnectionStrings["csWattsALoan"].
ConnectionString))
{
SqlCommand cmdPayments = new SqlCommand("SELECT PaymentID, ReceiptNumber, " +
" PaymentDate, EmployeeID, " +
" LoanContractID, PaymentAmount, Balance " +
"FROM Payments;",
scWattsALoan);
scWattsALoan.Open();
cmdPayments.ExecuteNonQuery();
SqlDataAdapter sdaPayments = new SqlDataAdapter(cmdPayments);
DataSet dsPayments = new DataSet("payments");
sdaPayments.Fill(dsPayments);
for (int i = 0; i < dsPayments.Tables[0].Rows.Count; i++)
{
DataRow drPayment = dsPayments.Tables[0].Rows[i];
payments.Add(new Payment() {
PaymentID = int.Parse(drPayment[0].ToString()),
ReceiptNumber = int.Parse(drPayment[1].ToString()),
PaymentDate = DateTime.Parse(drPayment[2].ToString()),
EmployeeID = int.Parse(drPayment[3].ToString()),
LoanContractID = int.Parse(drPayment[4].ToString()),
PaymentAmount = decimal.Parse(drPayment[5].ToString()),
Balance = decimal.Parse(drPayment[6].ToString())
});
}
}
return payments;
}
// GET: Payments
public ActionResult Index()
{
return View(GetPayments());
}
. . . No Change
}
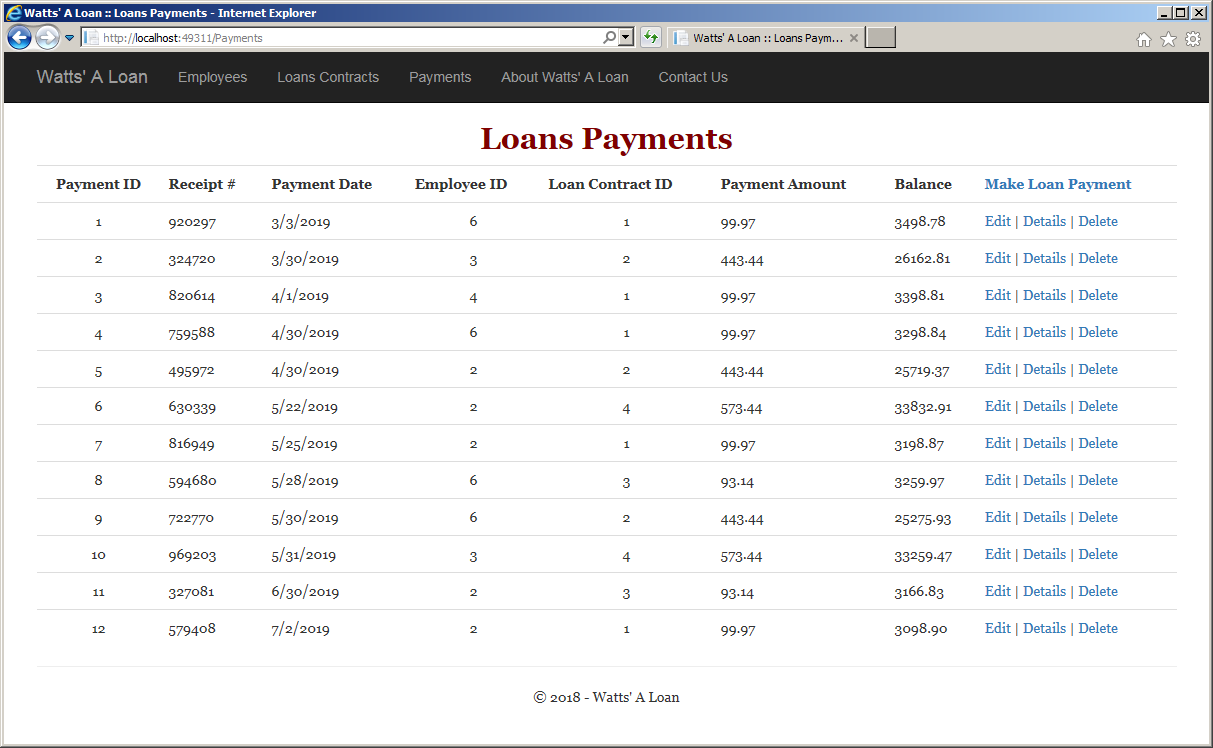
}@model IEnumerable<WattsALoan1.Models.Payment>
@{
ViewBag.Title = "Loans Payments";
}
<h2 class="bold maroon common-font text-center">Loans Payments</h2>
<table class="table table-hover common-font">
<tr>
<th class="text-center">@Html.DisplayNameFor(model => model.PaymentID)</th>
<th>@Html.DisplayNameFor(model => model.ReceiptNumber)</th>
<th>@Html.DisplayNameFor(model => model.PaymentDate)</th>
<th>@Html.DisplayNameFor(model => model.EmployeeID)</th>
<th>@Html.DisplayNameFor(model => model.LoanContractID)</th>
<th>@Html.DisplayNameFor(model => model.PaymentAmount)</th>
<th>@Html.DisplayNameFor(model => model.Balance)</th>
<th>@Html.ActionLink("Make Loan Payment", "PaymentStartUp")</th>
</tr>
@foreach (var item in Model)
{
<tr>
<td class="text-center">@Html.DisplayFor(modelItem => item.PaymentID)</td>
<td>@Html.DisplayFor(modelItem => item.ReceiptNumber)</td>
<td>@Html.DisplayFor(modelItem => item.PaymentDate)</td>
<td class="text-center">@Html.DisplayFor(modelItem => item.EmployeeID)</td>
<td class="text-center">@Html.DisplayFor(modelItem => item.LoanContractID)</td>
<td>@Html.DisplayFor(modelItem => item.PaymentAmount)</td>
<td>@Html.DisplayFor(modelItem => item.Balance)</td>
<td>
@Html.ActionLink("Edit", "Edit", new { id = item.PaymentID }) |
@Html.ActionLink("Details", "Details", new { id = item.PaymentID }) |
@Html.ActionLink("Delete", "Delete", new { id = item.PaymentID })
</td>
</tr>
}
</table>New and Existing Records on Views
Data Entry Using a View
As seen so far, a view is a selected list of records from a table. As you may suspect, the easiest view is one created from one table as we saw already. Here is an example:
CREATE VIEW Identifications
AS
	SELECT EmployeeNumber, FirstName, LastName
    FROM Personnel.Employees
On such a view that is based on one table, you can perform data entry, using the view, rather than the table. To do this, follow the same rules we reviewed for table data entry. Here is an example:
SELECT * FROM Employees;
GO

INSERT INTO Identifications
VALUES(N'885274', N'Sharon', N'Schultz');
GO
If you perform data entry using a view, the data you provide would be entered on the table from which the view is based. This means that the table would be updated automatically. Based on this feature, you can create a view purposely intended to update a table so that, in the view, you would include only the columns that need to be updated.
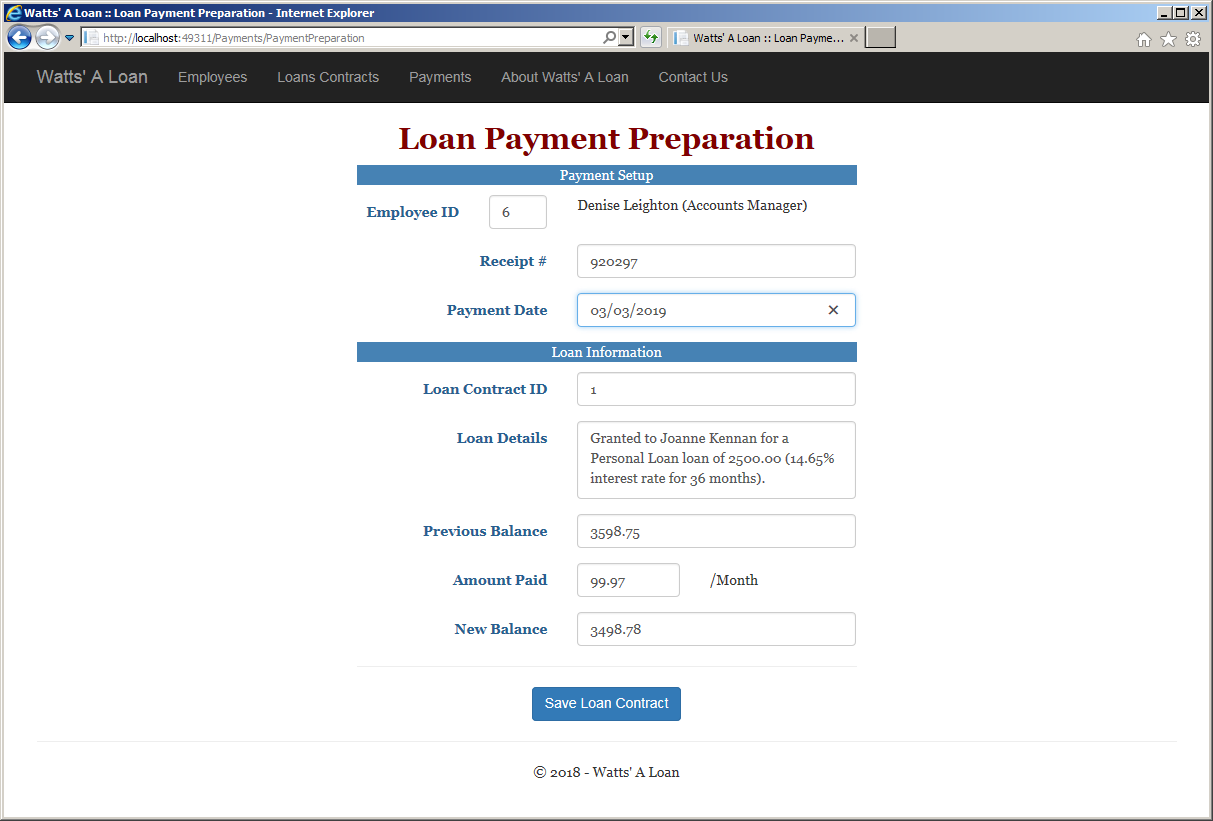
![]() Practical Learning: Performing Data Entry Using a View
Practical Learning: Performing Data Entry Using a View
USE WattsALoan1;
GO
CREATE VIEW LoanPayment
AS
	SELECT ReceiptNumber,
		   EmployeeID,
		   LoanContractID,
		   PaymentDate,
		   PaymentAmount,
		   Balance
	FROM   Payments;
GO
using System;
using System.Data;
using System.Web.Mvc;
using WattsALoan1.Models;
using System.Data.SqlClient;
using System.Collections.Generic;

namespace WattsALoan1.Controllers
{
    public class PaymentsController : Controller
    {
        private List<Payment> payments = new List<Payment>();

        public List<Payment> GetPayments()
        {
            using (SqlConnection scWattsALoan = new SqlConnection(System.Configuration.
                                                                         ConfigurationManager.
                                                                         ConnectionStrings["csWattsALoan"].
                                                                         ConnectionString))
            {
                SqlCommand cmdPayments = new SqlCommand("SELECT PaymentID, ReceiptNumber, " +
                                                         "      PaymentDate, EmployeeID, " +
                                                         "      LoanContractID, PaymentAmount, Balance " +
                                                         "FROM  Payments;",
                                                         scWattsALoan);

                scWattsALoan.Open();
                cmdPayments.ExecuteNonQuery();

                SqlDataAdapter sdaPayments = new SqlDataAdapter(cmdPayments);
                DataSet dsPayments = new DataSet("payments");

                sdaPayments.Fill(dsPayments);

                for (int i = 0; i < dsPayments.Tables[0].Rows.Count; i++)
                {
                    DataRow drPayment = dsPayments.Tables[0].Rows[i];

                    payments.Add(new Payment() {
                        PaymentID      =      int.Parse(drPayment[0].ToString()),
                        ReceiptNumber  =      int.Parse(drPayment[1].ToString()),
                        PaymentDate    = DateTime.Parse(drPayment[2].ToString()),
                        EmployeeID     =      int.Parse(drPayment[3].ToString()),
                        LoanContractID =      int.Parse(drPayment[4].ToString()),
                        PaymentAmount  =  decimal.Parse(drPayment[5].ToString()),
                        Balance        =  decimal.Parse(drPayment[6].ToString())
                    });
                }
            }

            return payments;
        }

        // GET: Payments
        public ActionResult Index()
        {
            return View(GetPayments());
        }

        // GET: Payments/Details/5
        public ActionResult Details(int id)
        {
            return View();
        }

        // GET: LoansContracts/PaymentStartUp
        public ActionResult PaymentStartUp()
        {
            return View();
        }

        // GET: LoansContracts/LoanContractPreparation
        public ActionResult PaymentPreparation(string EmployeeID, string LoanContractID)
        {
            decimal paymentAmount   = 0;
            decimal previousBalance = 0;
            Random  rndNumber = new Random();

            ViewBag.ReceiptNumber = rndNumber.Next(100001, 999999);

            using (SqlConnection scWattsALoan = new SqlConnection(System.Configuration.
                                                                         ConfigurationManager.
                                                                         ConnectionStrings["csWattsALoan"].
                                                                         ConnectionString))
            {
                // Locate the employee based on the employee number that was entered
                SqlCommand cmdEmployees = new SqlCommand("SELECT FirstName, LastName, EmploymentTitle " +
                                                         "FROM   Employees " +
                                                         "WHERE  EmployeeID = " + EmployeeID + ";")
                {
                    Connection = scWattsALoan
                };

                scWattsALoan.Open();

                // Store the employee in a data set.
                SqlDataAdapter sdaEmployees = new SqlDataAdapter(cmdEmployees);
                DataSet dsEmployees = new DataSet("employees");

                sdaEmployees.Fill(dsEmployees);

                // If there is an employee record for the employee number that was provided, ...
                if (dsEmployees.Tables[0].Rows.Count > 0)
                {
                    // ... create a string using that employee information and store that string in a view bag.
                    ViewBag.EmployeeDetails = dsEmployees.Tables[0].Rows[0][0].ToString() + " " + dsEmployees.Tables[0].Rows[0][1].ToString() + " (" + dsEmployees.Tables[0].Rows[0][2].ToString() + ")";
                }
                else
                {
                    // If there is no employee for the employee number that was provided, don't sweat.
                    return RedirectToAction("LoanContractStartUp");
                }
            }

            // Open a contract based on the loan number that was provided
            using (SqlConnection scWattsALoan = new SqlConnection(System.Configuration.
                                                                         ConfigurationManager.
                                                                         ConnectionStrings["csWattsALoan"].
                                                                         ConnectionString))
            {
                SqlCommand cmdContracts = new SqlCommand("SELECT CustomerFirstName, CustomerLastName, " +
                                                         "       LoanType, LoanAmount, " +
                                                         "       InterestRate, Periods, MonthlyPayment, " +
                                                         "       EmployeeID, FutureValue, " +
                                                         "       InterestAmount, PaymentStartDate " +
                                                         "FROM   LoanContracts " +
                                                         "WHERE  LoanContractID = " + LoanContractID + ";");
                    cmdContracts.Connection = scWattsALoan;

                    scWattsALoan.Open();

                    SqlDataAdapter sdaContracts = new SqlDataAdapter(cmdContracts);
                    DataSet dsContracts = new DataSet("loans-contracts");

                    sdaContracts.Fill(dsContracts);

                    // If the loan number exists, ...
                    if (dsContracts.Tables[0].Rows.Count > 0)
                    {
                        // Prepare some information that will be displayed on a form
                        ViewBag.LoanDetails = "Granted to " + dsContracts.Tables[0].Rows[0]["CustomerFirstName"].ToString() + " " +
                                              dsContracts.Tables[0].Rows[0]["CustomerLastName"].ToString() + " for a " +
                                              dsContracts.Tables[0].Rows[0]["LoanType"].ToString() + " loan of " +
                                              dsContracts.Tables[0].Rows[0]["LoanAmount"].ToString() + " (" +
                                              dsContracts.Tables[0].Rows[0]["InterestRate"].ToString() + "% interest rate for " +
                                              dsContracts.Tables[0].Rows[0]["Periods"].ToString() + " months).";
                        paymentAmount = decimal.Parse(dsContracts.Tables[0].Rows[0]["MonthlyPayment"].ToString());
                        /* We need the future value of the loan.
                         * It could be used as the previous balance if no payment has even been made on the loan. */
                        previousBalance = decimal.Parse(dsContracts.Tables[0].Rows[0]["FutureValue"].ToString());
                    }
                }

                // Open the list of payments if it contains some records
                using (SqlConnection scWattsALoan = new SqlConnection(System.Configuration.
                                                                             ConfigurationManager.
                                                                             ConnectionStrings["csWattsALoan"].
                                                                             ConnectionString))
                {
                // Get the list of payments that use the provided loan number
                SqlCommand cmdContracts = new SqlCommand("SELECT Balance " +
                                                         "FROM Payments " +
                                                         "WHERE LoanContractID = " + LoanContractID)
                {
                    Connection = scWattsALoan
                };

                scWattsALoan.Open();

                // Store the list of payments in a data set
                SqlDataAdapter sdaPayments = new SqlDataAdapter(cmdContracts);
                DataSet dsPayments = new DataSet("payments");

                sdaPayments.Fill(dsPayments);

                // If there is at least one payment made for the provided loan number, ...
                if (dsPayments.Tables[0].Rows.Count > 0)
                {
                    // ... scan the list of record from begining to end
                    for (int i = 0; i < dsPayments.Tables[0].Rows.Count; i++)
                    {
                        // The goal is to get the last balance that was set for the loan
                        previousBalance = decimal.Parse(dsPayments.Tables[0].Rows[i]["Balance"].ToString());
                    }
                }

                /* If no payment was ever made for the loan, then the previous balance is the future value.
                 * If there was at least one payment made for the loan, then a balance had been set.
                 * That balance will be used as the previous balance. */

                // Calculate the ne balance by monthly payment from the previous balance
                // Prepare the values to be sent to a form
                ViewBag.Balance         = previousBalance - paymentAmount;
                ViewBag.PaymentAmount   = paymentAmount;
                ViewBag.PreviousBalance = previousBalance;
            }

            return View();
        }

        // GET: Payments/Create
        public ActionResult Create()
        {
            return View();
        }

        // POST: Payments/Create
        [HttpPost]
        public ActionResult Create(FormCollection collection)
        {
            try
            {
                // TODO: Add insert logic here
                if (!string.IsNullOrEmpty(collection["EmployeeID"]))
                {
                    using (SqlConnection scWattsALoan = new SqlConnection(System.Configuration.
                                                                                 ConfigurationManager.
                                                                                 ConnectionStrings["csWattsALoan"].
                                                                                 ConnectionString))
                    {
                        SqlCommand cmdLoanPayment =
                            new SqlCommand("INSERT LoanPayment " +
                                           "VALUES(" + collection["ReceiptNumber"] + ", " + collection["EmployeeID"] +
                                           ", " + collection["LoanContractID"] + ", N'" + collection["PaymentDate"] +
                                           "', " + collection["PaymentAmount"] + ", " + collection["Balance"] + ");");

                        cmdLoanPayment.Connection = scWattsALoan;

                        scWattsALoan.Open();

                        cmdLoanPayment.ExecuteNonQuery();
                    }
                }

                return RedirectToAction("Index");
            }
            catch
            {
                return View();
            }
        }

        . . . No Change
    }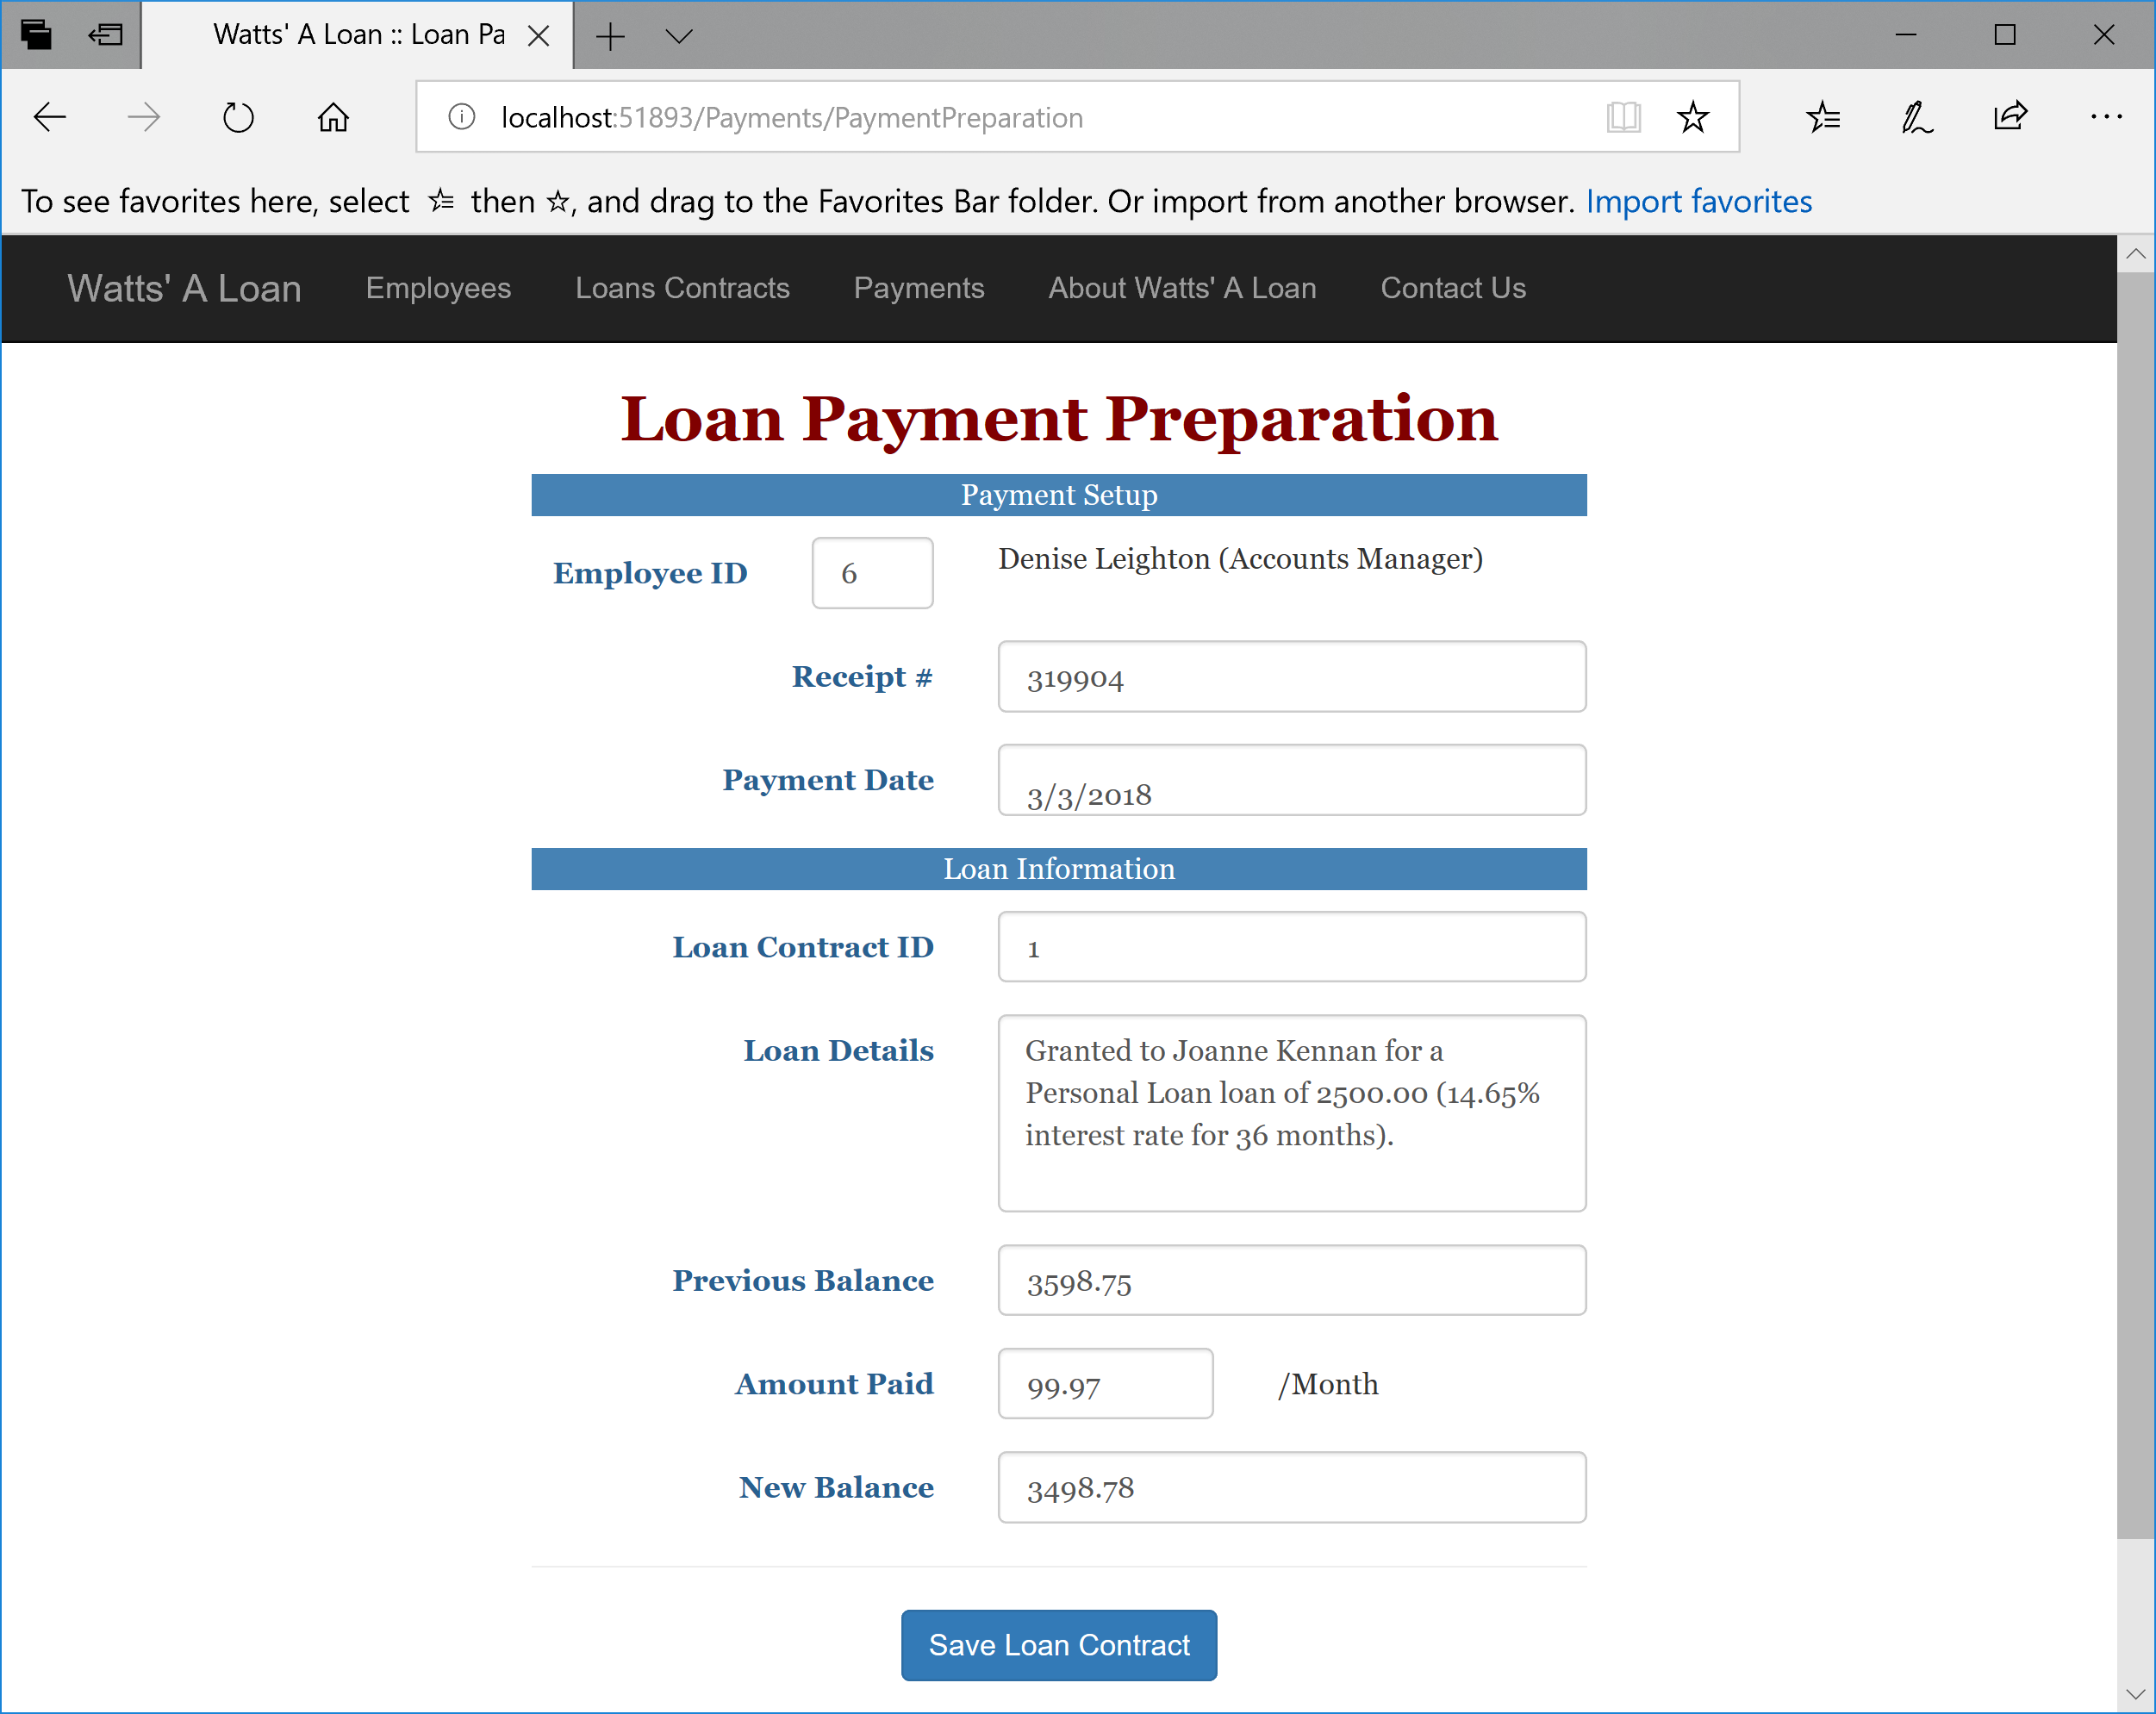
}@model WattsALoan1.Models.Payment
@{
ViewBag.Title = "Loan Payment Preparation";
}
<h2 class="bold maroon common-font text-center">Loan Payment Preparation</h2>
@using (Html.BeginForm("Create", "Payments", FormMethod.Post))
{
<div class="containment1">
<div class="form-horizontal common-font">
<div class="heading"><p class="text-center">Payment Setup</p></div>
<div class="form-group">
@Html.LabelFor(model => model.EmployeeID, htmlAttributes: new { @class = "control-label col-md-3 blue" })
<div class="col-md-2">
@Html.EditorFor(model => model.EmployeeID, new { htmlAttributes = new { @class = "form-control" } })
</div>
<div class="col-md-6">@ViewBag.EmployeeDetails</div>
</div>
<div class="form-group">
<label class="control-label col-md-5 blue">Receipt #</label>
<div class="col-md-7">
@Html.TextBox("ReceiptNumber", ViewBag.ReceiptNumber as string, htmlAttributes: new { @class = "form-control" })
</div>
</div>
<div class="form-group">
@Html.LabelFor(model => model.PaymentDate, htmlAttributes: new { @class = "control-label col-md-5 blue" })
<div class="col-md-7">
@Html.EditorFor(model => model.PaymentDate, new { htmlAttributes = new { @class = "form-control" } })
</div>
</div>
<div class="heading"><p class="text-center">Loan Information</p></div>
<div class="form-group">
<label class="control-label col-md-5 blue">Loan Contract ID</label>
<div class="col-md-7">
@Html.TextBox("LoanContractID", ViewBag.LoanContractID as string, htmlAttributes: new { @class = "form-control" })
</div>
</div>
<div class="form-group">
<label class="control-label col-md-5 blue">Loan Details</label>
<div class="col-md-7">
@Html.TextArea("LoanDetails", ViewBag.LoanDetails as string, htmlAttributes: new { @class = "form-control", cols = 60, rows = 4 })
</div>
</div>
<div class="form-group">
<label class="control-label col-md-5 blue">Previous Balance</label>
<div class="col-md-7">
@Html.TextBox("PreviousBalance", ViewBag.PreviousBalance as string, htmlAttributes: new { @class = "form-control" })
</div>
</div>
<div class="form-group">
<label class="control-label col-md-5 blue">Amount Paid</label>
<div class="col-md-3">
@Html.TextBox("PaymentAmount", ViewBag.PaymentAmount as string, htmlAttributes: new { @class = "form-control" })
</div>
<div class="col-md-3">
<div class="top-padding">/Month</div>
</div>
</div>
<div class="form-group">
<label class="control-label col-md-5 blue">New Balance</label>
<div class="col-md-7">
@Html.TextBox("Balance", ViewBag.Balance as string, htmlAttributes: new { @class = "form-control", cols = 60, rows = 4 })
</div>
</div>
<hr />
</div>
<p class="text-center"><input type="submit" value="Save Loan Contract" class="btn btn-primary" /></p>
</div>
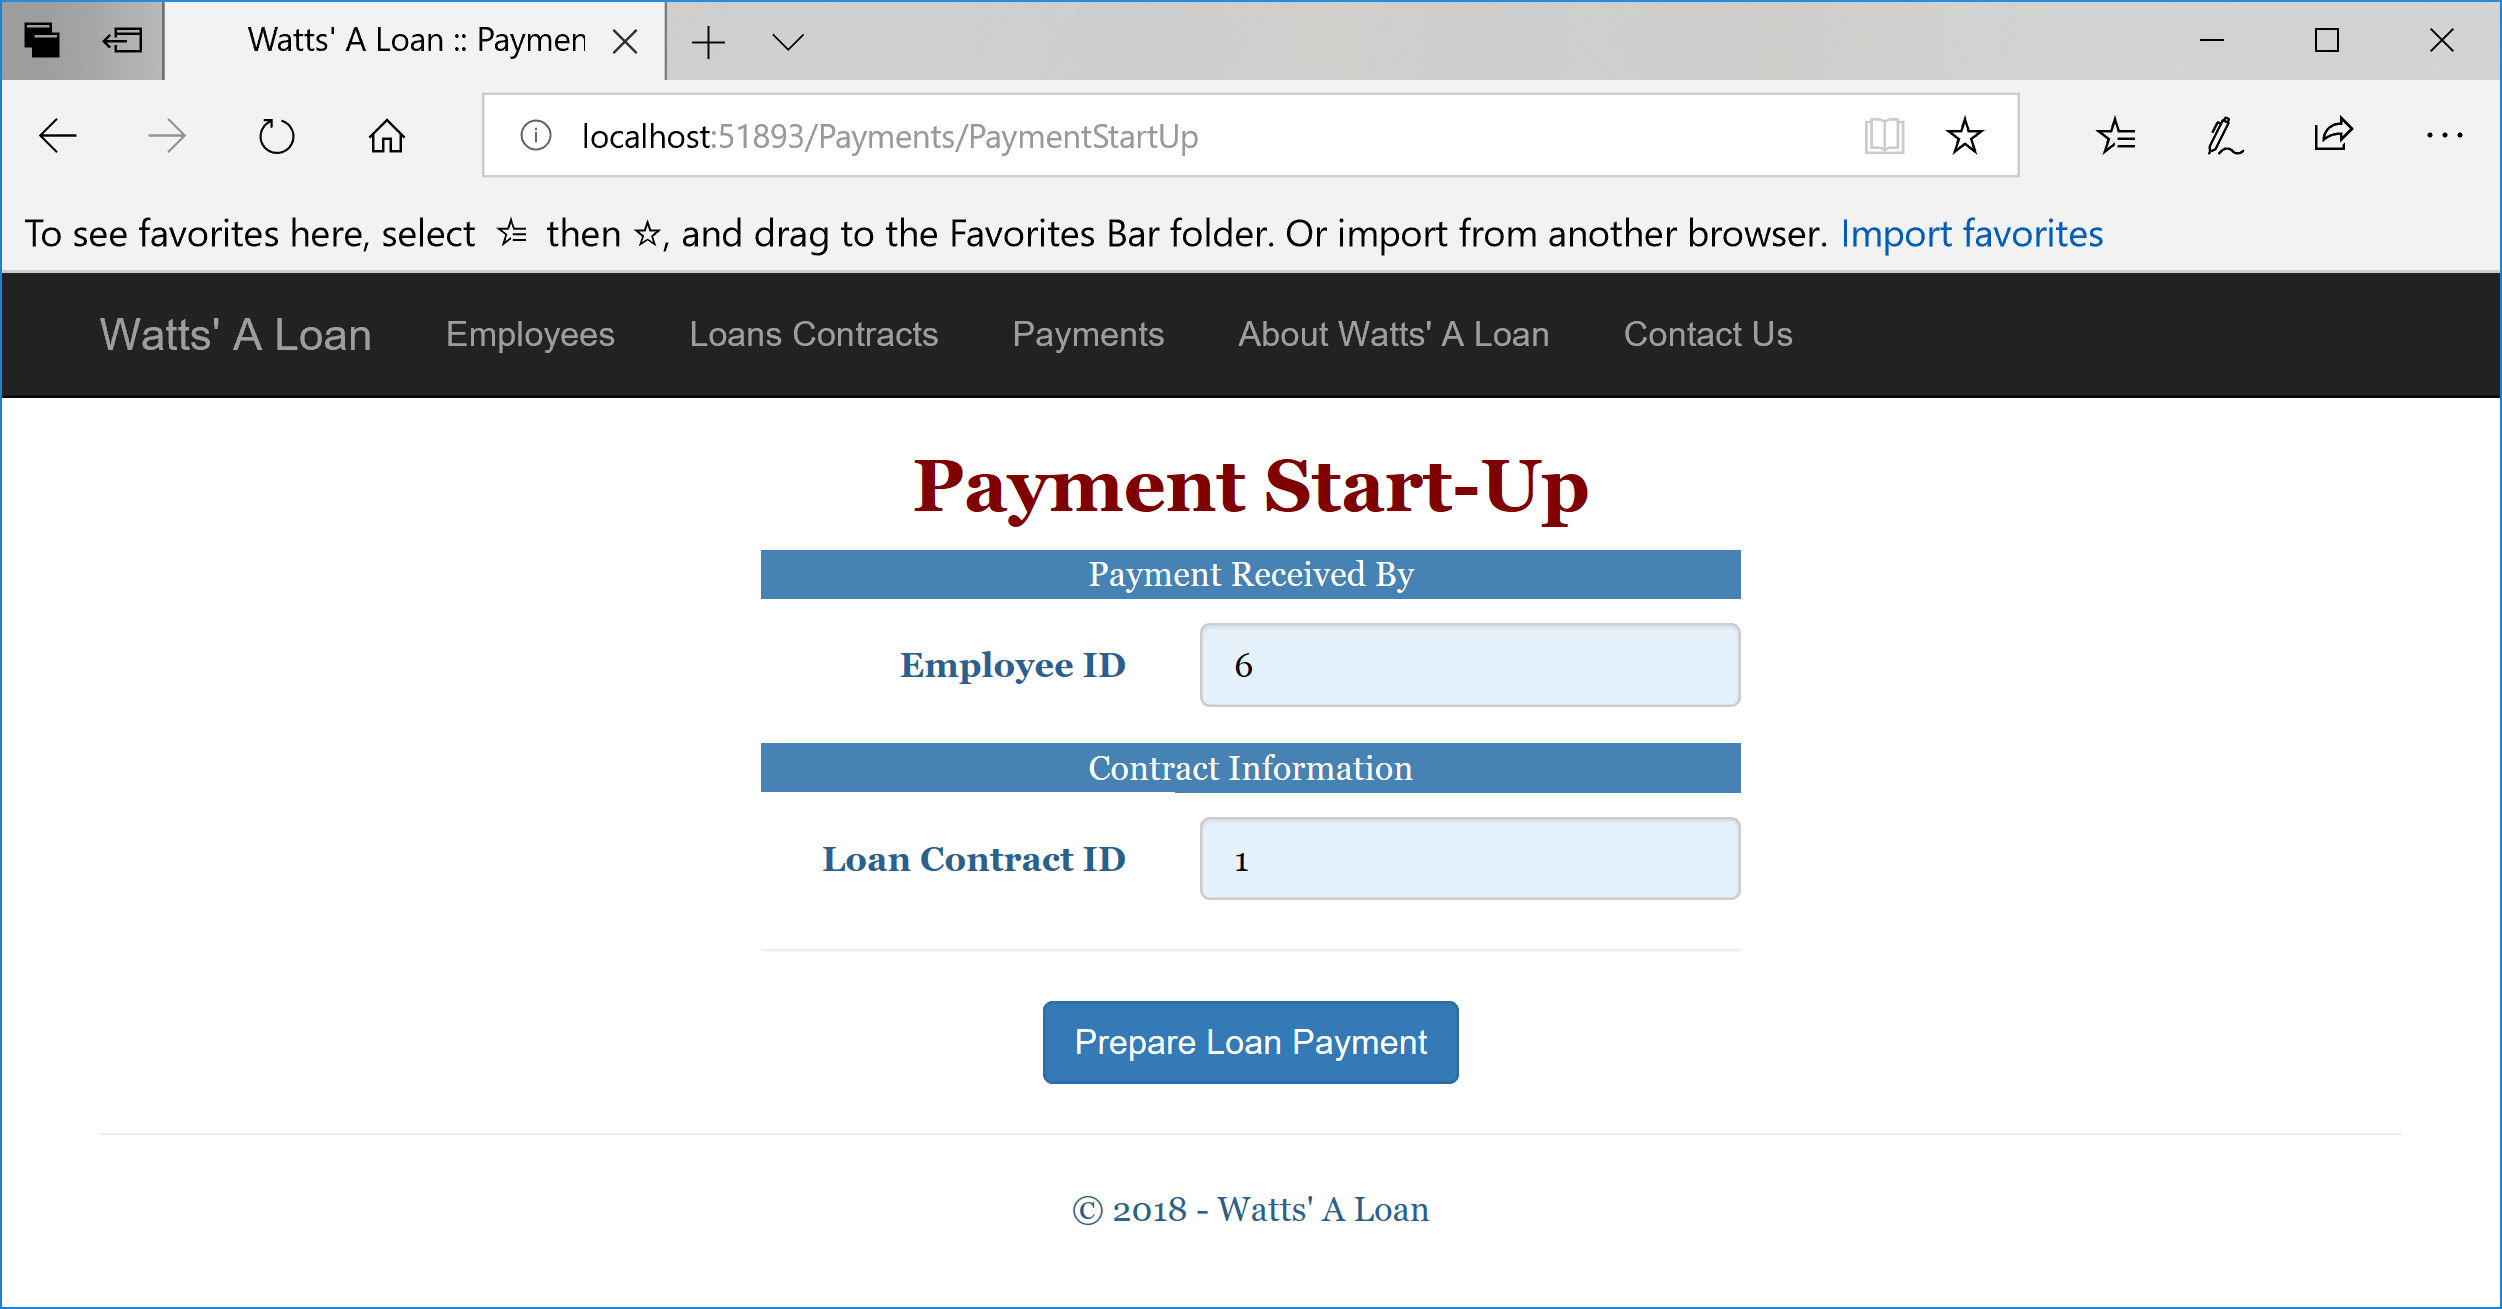
}@model WattsALoan1.Models.Payment
@{
ViewBag.Title = "Payment Start-Up";
}
<h2 class="bold maroon common-font text-center">Payment Start-Up</h2>
@using (Html.BeginForm("PaymentPreparation", "Payments", FormMethod.Post))
{
<div class="containment">
<div class="form-horizontal common-font">
<div class="heading"><p class="text-center">Payment Received By</p></div>
<div class="form-group">
@Html.LabelFor(model => model.EmployeeID, htmlAttributes: new { @class = "control-label col-md-5 blue" })
<div class="col-md-7">
@Html.EditorFor(model => model.EmployeeID, new { htmlAttributes = new { @class = "form-control" } })
</div>
</div>
<div class="heading"><p class="text-center">Contract Information</p></div>
<div class="form-group">
@Html.LabelFor(model => model.LoanContractID, htmlAttributes: new { @class = "control-label col-md-5 blue" })
<div class="col-md-7">
@Html.EditorFor(model => model.LoanContractID, new { htmlAttributes = new { @class = "form-control" } })
</div>
</div>
</div>
<hr />
<p class="text-center">
<input type="submit" value="Prepare Loan Payment"
name="btnPrepareLoanPayment" class="btn btn-primary" />
</p>
</div>
}
Employee ID: 6
Loan Contract ID: 1
| Employee ID | Loa Contract ID | Payment Date |
| 3 | 2 | 03/30/2018 |
| 4 | 1 | 04/01/18 |
| 6 | 1 | 04-30-2018 |
| 2 | 2 | 04-30-2018 |
| 2 | 4 | 05-22-2018 |
| 2 | 1 | 25-May-2018 |
| 6 | 3 | 05/28/2018 |
| 6 | 2 | 30-May-2018 |
| 3 | 4 | 31-May-18 |
| 2 | 3 | 30-Jun-2018 |
| 2 | 1 | 02-Jul-18 |
Updating Records Using a View
Just as done for data entry, you can create a view whose main role is to provide a means of changing one or a few values of a record of a table. To start, you must create a view that lists the necessary columns. Once the view exists, when creating the UPDATE statement, instead of a table, use the columns in the view.
Options on Creating a View
A Condition in a View
Because a view is created as a query, its statement can contain any of the clauses we have used so far. For example, its statement can contain a condition. Here is an example:
CREATE TABLE Customers
(
	AccountNumber	NVARCHAR(20) UNIQUE,
	CustomerName	NVARCHAR(40),
	Category		NVARCHAR(20),
	[Address]		NVARCHAR(100),
	City			NVARCHAR(40),
	[State]			NVARCHAR(5)  NOT NULL,
	ZIPCode			NVARCHAR(10),
	AccountStatus	NVARCHAR(25)  NOT NULL
);
GO
INSERT Customers
VALUES(N'2040-9488-928', N'Hutchinson Industries', N'Business', N'927 Casa Diego Ave Suite 412', N'Chambersburg', N'PA', N'17201', N'Active'),
	  (N'7358-3960-400', N'Nicholas Arango', N'Residential', N'10384 Uribe Rd', N'Chambersburg', N'PA', N'17202', N'Active'),
	  (N'5349-4094-750', N'Constanza Worldwide', N'Business', N'3947 Galegos Str', N'Bedford', N'PA', N'15522', N'Suspended');
GO

CREATE VIEW CorporateAccounts
AS
	SELECT [AccountNumber], [CustomerName], [City], [State], [AccountStatus]
	FROM   Customers
	WHERE  Category = N'Business';
GO
Of course, the condition can be a conjunction, a disjunction, or a combination of those.
Views and Relationships
Data relationships are created among the tables of a database. You can create a view that involves many tables. When creating the SELECT statement, you can include the names of the desired columns from the tables. You can then use a WHERE condition to match the common colum of the tables. Here is an example from a query we previously used:
CREATE TABLE Departments
(
    DeptCode varchar(7),
    DepartmentName varchar(50)
);
GO
CREATE TABLE Employees
(
    EmployeeNumber varchar(10),
    FirstName varchar(24),
    LastName varchar(24),
    DeptCode varchar(7),
);
GO
INSERT INTO Departments
VALUES(N'HMNRS', N'Human Resources'),
      (N'ITECH', N'Information Technology'),
      (N'RESDV', N'Research and Development');
GO
INSERT INTO Employees
VALUES(N'937-497', N'Frank', N'Salomons', N'ITECH'),
      (N'284-957', N'Chrissie', N'Siegel', NULL),
      (N'204-805', N'Violet', N'Calhoun', N'HMNRS'),
      (N'927-394', N'James', N'Waller', N'RESDV'),
      (N'294-793', N'John', N'Harding', N'HMNRS'),
      (N'920-794', N'Joan', N'Thomason', NULL),
      (N'395-004', N'Alexander', N'Lamm', N'HMNRS'),
      (N'305-804', N'Anna', N'Danielson', NULL);
GO

CREATE VIEW StaffMembers
AS
	SELECT EmployeeNumber,
	       FirstName,
		   LastName,
	       DepartmentName
	FROM Employees, Departments
	WHERE Employees.DeptCode = Departments.DeptCode;
GO

SELECT ALL * FROM StaffMembers;
GO
Views and Joins
Like a regular query, the SELECT statenent of a view can include joins. Probably the best feature of views is their ability to include joins because this sets them apart from tables and regular queries: A table cannot have a join and a regular query cannot be saved as an object.
To include a join in a view that involves more than one table, formulate the join as a you do for a regular query. Here is an example:
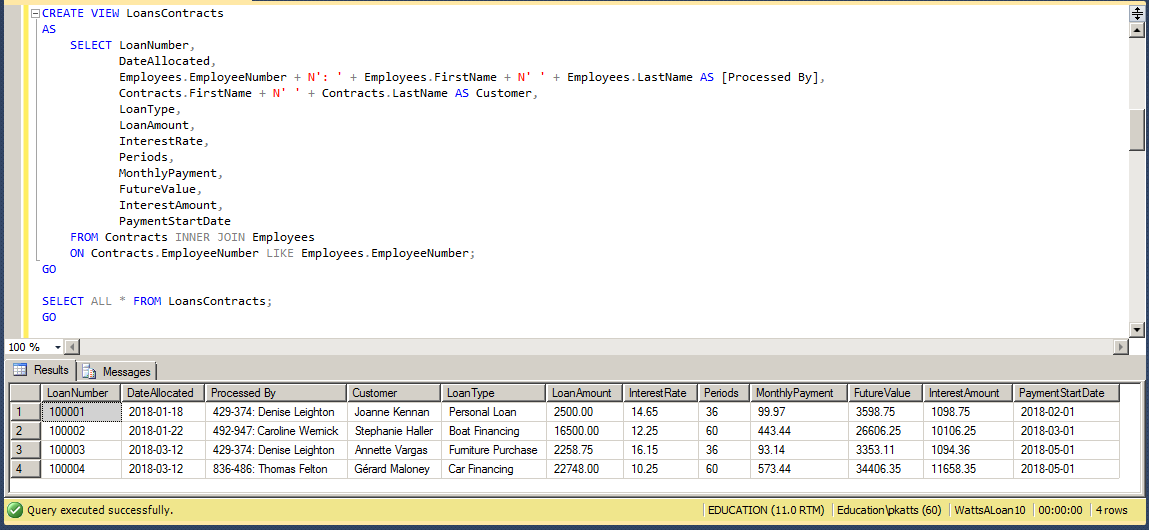
CREATE VIEW LoansContracts
AS
	SELECT LoanNumber,
		   DateAllocated,
		   Employees.EmployeeNumber + N': ' + Employees.FirstName + N' ' + Employees.LastName AS [Processed By],
		   Contracts.FirstName + N' ' + Contracts.LastName AS Customer,
		   LoanType,
		   LoanAmount,
		   InterestRate,
		   Periods,
		   MonthlyPayment,
		   FutureValue,
		   InterestAmount,
		   PaymentStartDate
	FROM Contracts INNER JOIN Employees
	ON Contracts.EmployeeNumber LIKE Employees.EmployeeNumber;
GO

SELECT ALL * FROM LoansContracts;
GO
This would produce:
In the same way, a view can involve many tables. Here is an example:
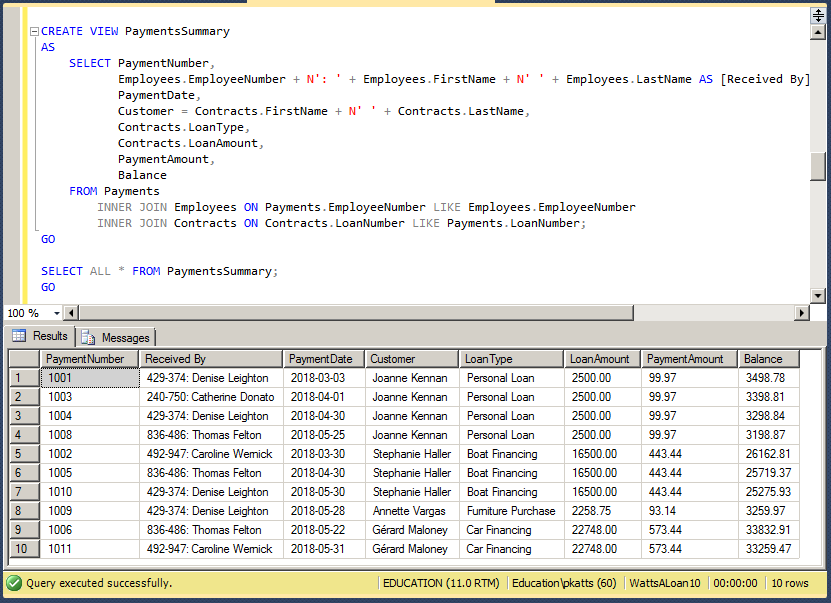
CREATE VIEW PaymentsSummary
AS
	SELECT PaymentNumber,
		   Employees.EmployeeNumber + N': ' + Employees.FirstName + N' ' + Employees.LastName AS [Received By],
		   PaymentDate,
		   Customer = Contracts.FirstName + N' ' + Contracts.LastName,
		   Contracts.LoanType,
		   Contracts.LoanAmount,
		   PaymentAmount,
		   Balance
	FROM Payments
		INNER JOIN Employees ON Payments.EmployeeNumber LIKE Employees.EmployeeNumber
		INNER JOIN Contracts ON Contracts.LoanNumber LIKE Payments.LoanNumber;
GO

SELECT ALL * FROM PaymentsSummary;
GO
This would produce:
Views and Schemas
Introduction
When creating a view, you have the option of specifying its schema. In reality, like every object in the database, a view must be owned by a schema. You have many options. By default, when you create a view, if you don't specify a schema, it would be owned by dbo.
Instead of using dbo, you can use a schema of your choice and apply it to the view. If you had already created a schema in your database, you can use it or create a new schema.
Binding a View to its Parent
When you have created a view, you know that the records it shows are tied to its parent table, the table that holds the original data. Consider the following example:
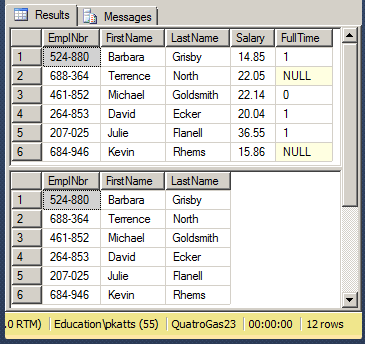
CREATE SCHEMA Personnel;
GO
CREATE TABLE Personnel.Employees
(
	EmplNbr nchar(10),
    FirstName nvarchar(20),
    LastName nvarchar(20),
    Salary money,
    FullTime bit
);
GO
INSERT INTO Personnel.Employees
VALUES(N'524-880', N'Barbara', N'Grisby', 14.85, 1),
      (N'688-364', N'Terrence', N'North', 22.05, NULL),
      (N'461-852', N'Michael', N'Goldsmith', 22.14, 0),
      (N'264-853', N'David', N'Ecker', 20.04, 1),
      (N'207-025', N'Julie', N'Flanell', 36.55, 1),
      (N'684-946', N'Kevin', N'Rhems', 15.86, NULL);
GO

CREATE VIEW Personnel.Identifications
AS
	SELECT EmplNbr, FirstName, LastName
    FROM Personnel.Employees;
GO

SELECT * FROM Personnel.Employees;
GO
SELECT * FROM Personnel.Identifications;
GO
This would produce:
For one reason or another, you may have to make modifications on the parent table. For example, you may want to change the data type and/or the name of a column but without touching the view(s) that depend(s) on that table. Consider the following example that renames a column on a table:
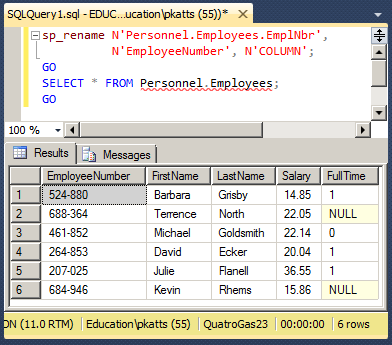
sp_rename N'Personnel.Employees.EmplNbr', N'EmployeeNumber', N'COLUMN'
This code would execute successfully and the column would be renamed. After renaming the column, you can use it in a SELECT statement of the table. Here is an example:
SELECT * FROM Personnel.Employees
Since the view would still be using the previous definition of the table, in this case the previous name of the column, if the user tries executing the view, the database engine would produce an error. Here is an example:
SELECT * FROM Personnel.Identifications
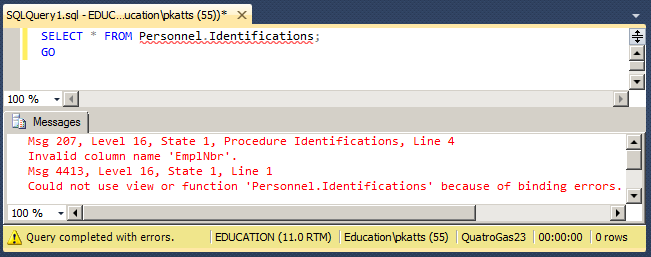
The solution is to prevent any changes on a parent table if that change would affect the view(s) that depend(s) on that table. To set this, if you are creating the view with code, before the AS keyword, add the WITH SCHEMABINDING flag. The formula to follow is:
CREATE VIEW [SchemaName.]ViewName
WITH SCHEMABINDING
AS
SELECT statement
Here is an example:
CREATE VIEW Personnel.EmploymentStatus
WITH SCHEMABINDING
AS
    SELECT FirstName, LastName, FullTime
    FROM Personnel.Employees;
You can then execute the view when necessary. Here is an example:
SELECT * FROM Personnel.EmploymentStatus;
Now, imagine you want to change something on the parent table. For this example, try to change the data type of the FullTime column:
ALTER TABLE Personnel.Employees
ALTER COLUMN FullTime int;
If you try executing the code, you would receive an error. This means that the database engine will not allow you to change something on the table if that change will make the dependent view(s) to stop working; but you can change anything on the parent table as long as no dependent view would be affected.
View Maintenance
Encrypting a View
When creating a view, if you want, you can encrypt its entry in the database engine. The formula to follow to do this is:
CREATE VIEW [SchemaName.]ViewName
WITH ENCRYPTION
AS
SELECT statement
Hee is an example:
CREATE VIEW Personnel.EmployeesIdentifications
WITH ENCRYPTION
AS
SELECT EmployeeNumber, FirstName, LastName
FROM Personnel.Employees;
GO
Renaming a View
After creating and executing a view, you can change its name with little worries with regards to its functionality. To programmatically rename a view, use the following formula:
sp_rename current-view-name, new-nName;
If the view uses a schema other than dbo, you must include it in the current-view-name. Here is an example:
sp_rename N'StaffMembers', N'EmployeesNames'
Modifying a View
After a view has been created, either by you or someone else, you may find out that it has an unnecessary column, it needs a missing column, it includes unnecessary records, or some records are missing. Fortunately, you can change the structure or the code of a view. This is referred to as altering a view.
To visually modify a view, in the Object Explorer of SQL Server Management Studio, right-click the intended view and click Modify. The basic formula to programmatically modify a view is:
ALTER VIEW [schema.]view-name
AS
SELECT statement
You start the alteration with the ALTER VIEW expression followed by the optional schema and the name of the view. Continue with the AS keyword and the desired code of the view. For example, you can create a SELECT statement that includes a modification of the existing code or a completely new statement. Here is an example:
ALTER VIEW Personnel.Identifications
AS
	SELECT EmployeeNumber, FirstName, MiddleName, LastName
    FROM Personnel.Employees
Deleting a View
Instead of modifying a view, if you find it altogether useless, you can remove it from its database. You have various options. To visually delete a view, in the Object Explorer of Microsoft SQL Server Management Studio or in the Server Explorer in Microsoft Visual Studio, under the Views node of the database, right-click the view and click Delete. A message box would display, asking you whether you are sure you want to delete the view. You can decide to continue or change your mind.
The formula to programmatically delete a view in SQL is:
DROP VIEW [schema.]view-name
On the right side of the DROP VIEW expression, enter the name of the undesired view and execute the statement. You will not be warned before the interpreter deletes the view. Here is an example:
DROP VIEW Personnel.Identifications
![]() Practical Learning: Creating a View-Based Project
Practical Learning: Creating a View-Based Project
body {
    background-color: #FFF;
}

.bold        { font-weight:      600;       }
.blue        { color:            #286090;   }
.maroon      { color:            #800000;   }
.small       { width:            20px;      }
.top-padding { padding-top:      0.50em;    }
.containment { margin:           auto;
               width:            400px;     }
.containment1{ margin:           auto;
               width:            500px;     }
.heading     { color:            white;
               background-color: steelblue; }
.common-font { font-family: Georgia, Garamond, 'Times New Roman', serif; }using System.Web.Optimization;
namespace WattsALoan2
{
public class BundleConfig
{
// For more information on bundling, visit https://go.microsoft.com/fwlink/?LinkId=301862
public static void RegisterBundles(BundleCollection bundles)
{
bundles.Add(new ScriptBundle("~/bundles/jquery").Include(
"~/Scripts/jquery-{version}.js"));
bundles.Add(new ScriptBundle("~/bundles/jqueryval").Include(
"~/Scripts/jquery.validate*"));
// Use the development version of Modernizr to develop with and learn from. Then, when you're
// ready for production, use the build tool at https://modernizr.com to pick only the tests you need.
bundles.Add(new ScriptBundle("~/bundles/modernizr").Include(
"~/Scripts/modernizr-*"));
bundles.Add(new ScriptBundle("~/bundles/bootstrap").Include(
"~/Scripts/bootstrap.js"));
bundles.Add(new StyleBundle("~/Content/css").Include(
"~/Content/bootstrap.css",
"~/Content/site.css",
"~/Content/WattsALoan.css"));
}
}
}USE master; GO CREATE DATABASE WattsALoan2; GO USE WattsALoan1; GO
CREATE TABLE Employees
(
	EmployeeID	    INT IDENTITY(1, 1),
	EmployeeNumber  NCHAR(7) UNIQUE,
	FirstName	    NVARCHAR(20),
	LastName        NVARCHAR(20),
	EmploymentTitle NVARCHAR(50),
	CONSTRAINT PK_Employees PRIMARY KEY(EmployeeID)
);
GO
CREATE TABLE LoanContracts
(
	LoanContractID	  INT IDENTITY(1, 1),
	LoanNumber        INT UNIQUE NOT NULL,
	DateAllocated	  DATE,
	EmployeeID	      INT,
	CustomerFirstName NVARCHAR(20),
	CustomerLastName  NVARCHAR(20),
	LoanType		  NVARCHAR(20) DEFAULT N'Personal Loan',
	LoanAmount		  DECIMAL(8, 2),
	InterestRate	  DECIMAL(8, 2),
	[Periods]	      SMALLINT,
	MonthlyPayment	  DECIMAL(8, 2),
	FutureValue	      DECIMAL(8, 2),
	InterestAmount	  DECIMAL(8, 2),
	PaymentStartDate  DATE,
	CONSTRAINT FK_LoanProcessors FOREIGN KEY(EmployeeID) REFERENCES Employees(EmployeeID),
	CONSTRAINT PK_LoansContracts PRIMARY KEY(LoanContractID)
);
GO
CREATE TABLE Payments
(
	PaymentID	   INT IDENTITY(1, 1),
	ReceiptNumber  INTEGER,
	PaymentDate	   DATE,
	EmployeeID     INT,
	LoanContractID INT,
	PaymentAmount  DECIMAL(8, 2),
	Balance		   DECIMAL(8, 2),
	CONSTRAINT FK_PaymentsReceivers FOREIGN KEY(EmployeeID) REFERENCES Employees(EmployeeID),
	CONSTRAINT FK_LoansPayments FOREIGN KEY(LoanContractID) REFERENCES LoanContracts(LoanContractID),
	CONSTRAINT PK_Payments PRIMARY KEY(PaymentID)
);
GO
<?xml version="1.0" encoding="utf-8"?>
<!--
  For more information on how to configure your ASP.NET application, please visit
  https://go.microsoft.com/fwlink/?LinkId=301880
  -->
<configuration>
  <appSettings>
    <add key="webpages:Version" value="3.0.0.0"/>
    <add key="webpages:Enabled" value="false"/>
    <add key="ClientValidationEnabled" value="true"/>
    <add key="UnobtrusiveJavaScriptEnabled" value="true"/>
  </appSettings>
  <system.web>
    <compilation debug="true" targetFramework="4.6.1"/>
    <httpRuntime targetFramework="4.6.1"/>
    <httpModules>
      <add name="ApplicationInsightsWebTracking" type="Microsoft.ApplicationInsights.Web.ApplicationInsightsHttpModule, Microsoft.AI.Web"/>
    </httpModules>
  </system.web>
  <connectionStrings>
    <add name="csWattsALoan"
         connectionString="Data Source=(local); Database='WattsALoan1'; Integrated Security=True;MultipleActiveResultSets=True"
         providerName="System.Data.SqlClient" />
  </connectionStrings>

  . . . No Change
</configuration><?xml version="1.0" encoding="utf-8"?>
<!--
For more information on how to configure your ASP.NET application, please visit
https://go.microsoft.com/fwlink/?LinkId=301880
-->
<configuration>
<appSettings>
<add key="webpages:Version" value="3.0.0.0"/>
<add key="webpages:Enabled" value="false"/>
<add key="ClientValidationEnabled" value="true"/>
<add key="UnobtrusiveJavaScriptEnabled" value="true"/>
</appSettings>
<system.web>
<compilation debug="true" targetFramework="4.6.1"/>
<httpRuntime targetFramework="4.6.1"/>
<httpModules>
<add name="ApplicationInsightsWebTracking" type="Microsoft.ApplicationInsights.Web.ApplicationInsightsHttpModule, Microsoft.AI.Web"/>
</httpModules>
</system.web>
<connectionStrings>
<add name="csWattsALoan"
connectionString="Data Source=(LocalDb)\MSSQLLocalDB;AttachDbFilename=|DataDirectory|\WattsALoan1.mdf;Initial Catalog=WattsALoan1;Integrated Security=True"
providerName="System.Data.SqlClient" />
</connectionStrings>
. . . No Change
</configuration>CREATE SCHEMA HumanResources; GO CREATE SCHEMA Management; GO CREATE TABLE HumanResources.Employees ( EmployeeID INT IDENTITY(1, 1), EmployeeNumber NVARCHAR(10) UNIQUE, FirstName NVARCHAR(20), LastName NVARCHAR(20), EmploymentTitle NVARCHAR(50), CONSTRAINT PK_Employees PRIMARY KEY(EmployeeID) ); GO CREATE TABLE Management.LoanContracts ( LoanContractID INT IDENTITY(1, 1), LoanNumber INT UNIQUE NOT NULL, DateAllocated DATE, EmployeeID INT, CustomerFirstName NVARCHAR(20), CustomerLastName NVARCHAR(20), LoanType NVARCHAR(20) DEFAULT N'Personal Loan', LoanAmount DECIMAL(8, 2), InterestRate DECIMAL(8, 2), [Periods] SMALLINT, MonthlyPayment DECIMAL(8, 2), FutureValue DECIMAL(8, 2), InterestAmount DECIMAL(8, 2), PaymentStartDate DATE, CONSTRAINT FK_LoanProcessors FOREIGN KEY(EmployeeID) REFERENCES HumanResources.Employees(EmployeeID), CONSTRAINT PK_LoansContracts PRIMARY KEY(LoanContractID) ); GO CREATE TABLE Management.Payments ( PaymentID INT IDENTITY(1, 1), ReceiptNumber INTEGER, PaymentDate DATE, EmployeeID INT, LoanContractID INT, PaymentAmount DECIMAL(8, 2), Balance DECIMAL(8, 2), CONSTRAINT FK_PaymentsReceivers FOREIGN KEY(EmployeeID) REFERENCES HumanResources.Employees(EmployeeID), CONSTRAINT FK_LoansPayments FOREIGN KEY(LoanContractID) REFERENCES Management.LoanContracts(LoanContractID), CONSTRAINT PK_Payments PRIMARY KEY(PaymentID) ); GO CREATE VIEW Management.LoansContracts WITH SCHEMABINDING AS SELECT LoanNumber, DateAllocated, HumanResources.Employees.EmployeeNumber + N': ' + HumanResources.Employees.FirstName + N' ' + HumanResources.Employees.LastName AS [Processed By], Management.LoanContracts.CustomerFirstName + N' ' + Management.LoanContracts.CustomerLastName AS Customer, LoanType, LoanAmount, InterestRate, [Periods], MonthlyPayment, FutureValue, InterestAmount, PaymentStartDate FROM Management.LoanContracts INNER JOIN HumanResources.Employees ON Management.LoanContracts.EmployeeID LIKE HumanResources.Employees.EmployeeID; GO CREATE VIEW Management.LoanPayment WITH SCHEMABINDING AS SELECT ReceiptNumber, EmployeeID, LoanContractID, PaymentDate, PaymentAmount, Balance FROM Management.Payments; GO CREATE VIEW Management.PaymentsSummary AS SELECT ReceiptNumber, HumanResources.Employees.EmployeeNumber + N': ' + HumanResources.Employees.FirstName + N' ' + HumanResources.Employees.LastName AS [Received By], PaymentDate, Customer = Management.LoanContracts.CustomerFirstName + N' ' + Management.LoanContracts.CustomerLastName, Management.LoanContracts.LoanType, Management.LoanContracts.LoanAmount, PaymentAmount, Balance FROM Management.Payments INNER JOIN HumanResources.Employees ON Management.Payments.EmployeeID LIKE HumanResources.Employees.EmployeeID INNER JOIN Management.LoanContracts ON Management.LoanContracts.LoanContractID LIKE Management.Payments.LoanContractID; GO
|
|
||
| Previous | Copyright © 2001-2021, FunctionX | Home |
|
|
||