Topics on Collections

Topics on Collections
Built-In Indexers
Introduction
To assist you with a faster means of using indexers in your code, some of the classes in the .NET Framework are equipped with indexed properties. The most fundamental of these classes is the String. It allows you to access each of its characters as an array.
| This is another version of a web project for a fictitious company that makes and sells office chairs. Each chair has a weight and a price per unit. A customer can order a certain number of chairs, which results in a calculated sub-total (the number of chairs multiplied by the price of a chair). When a customer places an order, a discount is based on the sub-total amount of the order. The shipping and handling of a customer order is based on the total weight of the chairs ordered. |
![]() Practical Learning: Introducing Collection Topics
Practical Learning: Introducing Collection Topics
 |
||
 |
 |
 |
body {
    background-color: #FFFFFF;
}
.bottom-bar         { left:                       0;
                      right:                      0;
                      bottom:                     0;
                      margin-bottom:              0;
                      position:                   fixed;
                      background-color:           #033e65;
                      border-top:                 6px solid #e0a43a; }
.top-banner         { margin:                     auto;
                      min-width:                  800px;
                      max-width:                  1150px;
                      height:                     15.50em;
                      border-bottom-left-radius:  30px;
                      border-bottom-right-radius: 30px;
                      border-bottom:              30px;
                      background-color:           #033e65;
                      border-left:                2px solid #efebeb;
                      border-right:               2px solid #efebeb;
                      background-image:           url(../Images/bg1.png) }
.top-table          { margin-top:                 0px;
                      margin-left:                50px;
                      width:                      800px;             }
.copyright          { color:                      aliceblue;
                      text-align:                 center;            }
.col-md-3 > h4      { color:                      #e0eaf2;
                      margin-left:                40px;              }
.col-md-3 > h4 > ul { list-style-type:            none;              }
.bottom-row         { margin:                     auto;
                      min-width:                  800px;
                      max-width:                  1150px;            }
.navbar-fixed-top   { height:                     12.50em;
                      background-color:           #033e65;
                      border-bottom:              3px solid #000000; }
.jumbotron          { padding-top:                180px;
                      padding-bottom:             10px;
                      background-color:           #FFF;              }
.jumbotron h1       { color:                      #0a2dd5;           }
.lead               { color:                      #071b96;           }
.col-head           { font-weight:                600;
                      font-size:                  18px;
color: #800000; } @{
ViewBag.Title = "Welcome to Chair Executives";
}
<div class="jumbotron">
<p class="lead">
At Chair Executives, we design, create, manufacture, and care for
comfortable chairs for home offices, schools, small businesses, enterprises,
and government environments. Through rigorous research and tests, we
understand what various users look for in a chair. We certainly
know and have what it takes to fulfill your long seating needs.
</p>
</div>
<table style="width: 100%">
<tr>
<td colspan="2" style="width: 33%"><P class="col-head">Attentive Seating</P></td>
<td colspan="2" style="width: 33%"><P class="col-head">Spirit of Monarchy</P></td>
<td colspan="2" style="width: 100%"><P class="col-head">Confidence n' Management</P></td>
</tr>
<tr>
<td><img src="~/Images/chair1a.png" /></td>
<td>
<p>This introductory chair's primary goal is to serve short-seating
periods (such as job interviews or classroom teachers) environments
not concerned with rough use.</p>
</td>
<td><img src="~/Images/chair1b.png" alt="Business Chairs" /></td>
<td>
<p>This is our intermediate chair aimed at business offices, enterprises,
and the government. This category of chairs provide warmth comfort for long use.
</p>
</td>
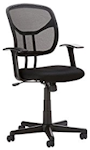
<td><img src="~/Images/chair1c.png" alt="Business Chairs" /></td>
<td>
<p>Our top executive chair provides the ultimate comfort. Its goal is
to assist business managers and supervisors who must spend long
hours seating and making important decisions.</p>
</td>
</tr>
</table>
<!DOCTYPE html>
<html>
<head>
<meta charset="utf-8" />
<meta name="viewport" content="width=device-width, initial-scale=1.0">
<title>@ViewBag.Title - Chair Executives</title>
@Styles.Render("~/Content/css")
@Scripts.Render("~/bundles/modernizr")
<link rel="stylesheet" type="text/css" href="~/Content/ChairExecs.css" />
</head>
<body>
<div class="navbar-fixed-top">
<div class="top-banner">
<table class="top-table">
<tr>
<td> </td>
<td> </td>
<td> </td>
<td rowspan="7"></td>
</tr>
<tr>
<td> </td>
<td> </td>
<td> </td>
</tr>
<tr>
<td> </td>
<td> </td>
<td> </td>
</tr>
<tr>
<td> </td>
<td> </td>
<td> </td>
</tr>
<tr>
<td>@Html.ActionLink("Home", "Index", "Home")</td>
<td>@Html.ActionLink("Our Brand", "OurBrand", "Home")</td>
<td>@Html.ActionLink("School Deals", "SchoolDeals", "Home")</td>
</tr>
<tr>
<td>@Html.ActionLink("About Us", "About", "Home")</td>
<td>@Html.ActionLink("Our Materials", "LearnMore", "Home")</td>
<td>@Html.ActionLink("Small Business Deals", "SmallBusinessDeals", "Home")</td>
</tr>
<tr>
<td>@Html.ActionLink("Contact Us", "Contact", "Home")</td>
<td>@Html.ActionLink("Our Designs", "CurrentSales", "Home")</td>
<td>@Html.ActionLink("Enterprise Deals", "EnterpriseDeals", "Home")</td>
</tr>
<tr>
<td>@Html.ActionLink("Customer Service", "CustomerService", "Home")</td>
<td>@Html.ActionLink("Our Customers", "Customers", "Home")</td>
<td>@Html.ActionLink("Government Deals", "GovernmentDeals", "Home")</td>
</tr>
</table>
</div>
</div>
<div class="container body-content">
@RenderBody()
<hr />
<footer class="bottom-bar">
<div class="bottom-row">
<div class="col-md-3">
<h4>Departments</h4>
<ul>
<li>@Html.ActionLink("Shop by Category", "Category", "Shop")</li>
<li>@Html.ActionLink("Shop by Brand", "Brand", "Shop")</li>
<li>@Html.ActionLink("Shop by Material", "Material", "Shop")</li>
<li>@Html.ActionLink("Shop by Environment", "Environment", "Shop")</li>
</ul>
</div>
<div class="col-md-3">
<h4>Accounts</h4>
<ul>
<li>@Html.ActionLink("Login", "Personal", "Home")</li>
<li>@Html.ActionLink("Register/Create Account", "School", "Home")</li>
<li>@Html.ActionLink("Club Membership", "Membership", "Home")</li>
<li>@Html.ActionLink("Privacy Issues", "Index", "Home")</li>
</ul>
</div>
<div class="col-md-3">
<h4>Solutions</h4>
<ul>
<li>@Html.ActionLink("Classic", "Index", "Home")</li>
<li>@Html.ActionLink("Exotic", "About", "Home")</li>
<li>@Html.ActionLink("Essentials", "Contact", "Home")</li>
<li>@Html.ActionLink("Ergonomic Economy", "Index", "Home")</li>
</ul>
</div>
<div class="col-md-3">
<h4>Relations</h4>
<ul>
<li>@Html.ActionLink("Public relations", "Index", "Home")</li>
<li>@Html.ActionLink("Press Releases", "About", "Home")</li>
<li>@Html.ActionLink("Legislations/Regulations", "Contact", "Home")</li>
<li>@Html.ActionLink("Newsletter Subscription", "Index", "Home")</li>
</ul>
</div>
<hr />
<p class="copyright">© @DateTime.Now.Year - Chair Executives</p>
</div>
</footer>
</div>
@Scripts.Render("~/bundles/jquery")
@Scripts.Render("~/bundles/bootstrap")
@RenderSection("scripts", required: false)
</body>
</html>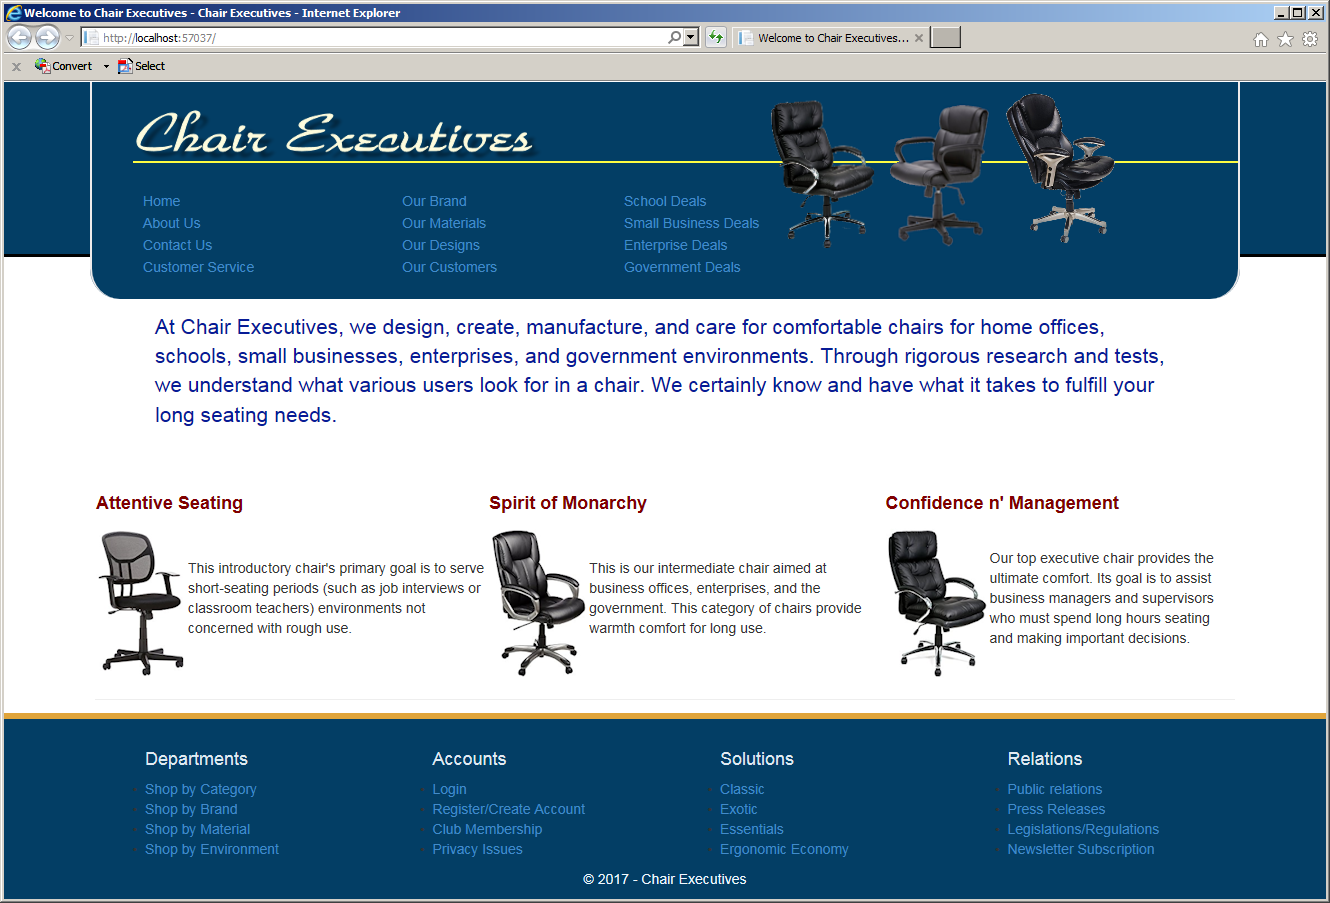
using System.Web.Mvc;

namespace ChairExecs4.Controllers
{
    public class BusinessController : Controller
    {
        // GET: Business
        public ActionResult Index()
        {
            return View();
        }

        // GET: Business/StartCustomerOrder
        public ActionResult StartCustomerOrder()
        {
            return View();
        }
    }
}
Introduction to Requesting a Value
We alreaddy know that the webserver (IIS) has its own libraries. One of the classes on that library is named HttpRequest. That class allows you to read values that a browser carries.
To support HTTP requests, ASP.NET provides a class named HttpRequestBase. The HttpRequestBase class is an ASP.NET adapation of the HttpRequest class. Both classes practically behave the same.
A Requested Value in a Controller
A controller can receive a value as an HTTP request from a browser. The controller may need to appropriately analyse and convert that value before processing it. To support this operation, the Controller class is equipped with a property named Request:
public HttpRequestBase Request { get; }
To let you get the value of a request, the HttpRequest class is equipped with a property named QueryString. Therefore, to get the value of a control, pass its name to the square brackets of this property. As an alternative, you can omit the QueryString property. In this case, to get the value of the request, type Request[]. In the square brackets, provide the value as a string.
The controller can receive a request through a parameter to an action.
![]() Practical Learning: Requesting Values in a Controller
Practical Learning: Requesting Values in a Controller
using System.Web.Mvc;

namespace ChairExecs4.Controllers
{
    public class BusinessController : Controller
    {
        // GET: Business
        public ActionResult Index()
        {
            return View();
        }

        // GET: Business/StartCustomerOrder
        public ActionResult StartCustomerOrder()
        {
            return View();
        }

        public ActionResult PrepareCustomerOrder(string Type1Name, string Type1UnitWeight, string Type1UnitPrice, string Type1Quantity,
                                                 string Type2Name, string Type2UnitWeight, string Type2UnitPrice, string Type2Quantity,
                                                 string Type3Name, string Type3UnitWeight, string Type3UnitPrice, string Type3Quantity)
        {
            int iType1Weight = int.Parse(Request["Type1UnitWeight"]);
            int iType1Quantity = int.Parse(Request["Type1Quantity"]);
            double dType1UnitPrice = double.Parse(Request["Type1UnitPrice"]);

            int iType2Weight = int.Parse(Request["Type2UnitWeight"]);
            int iType2Quantity = int.Parse(Request["Type2Quantity"]);
            double dType2UnitPrice = double.Parse(Request["Type2UnitPrice"]);

            int iType3Weight = int.Parse(Request["Type3UnitWeight"]);
            int iType3Quantity = int.Parse(Request["Type3Quantity"]);
            double dType3UnitPrice = double.Parse(Request["Type3UnitPrice"]);

            return View();
        }
    }
}@{
ViewBag.Title = "New Customer Order";
}
<div align="center">
<h2 style="margin-top: 6.5em">New Customer Order</h2>
@using (Html.BeginForm("PrepareCustomerOrder", "Business", FormMethod.Post))
{
<table>
<tr>
<td style="width: 120px"><b>Item Name</b></td>
<td><b>Weight</b></td>
<td><b>Unit Price</b></td>
<td><b>Quantity</b></td>
</tr>
<tr>
<td>@Html.TextBox("Type1Name", "Demeanor")</td>
<td>@Html.TextBox("Type1UnitWeight", "16", new { style = "width: 55px" }) Lbs</td>
<td>@Html.TextBox("Type1UnitPrice", "64.95", new { style = "width: 75px" })</td>
<td>@Html.TextBox("Type1Quantity", "0", new { style = "width: 55px" })</td>
</tr>
<tr>
<td>@Html.TextBox("Type2Name", "Scholar")</td>
<td>@Html.TextBox("Type2UnitWeight", "32", new { style = "width: 55px" }) Lbs</td>
<td>@Html.TextBox("Type2UnitPrice", "104.45", new { style = "width: 75px" })</td>
<td>@Html.TextBox("Type2Quantity", "0", new { style = "width: 55px" })</td>
</tr>
<tr>
<td>@Html.TextBox("Type3Name", "Executive")</td>
<td>@Html.TextBox("Type3UnitWeight", "36", new { style = "width: 55px" }) Lbs</td>
<td>@Html.TextBox("Type3UnitPrice", "154.55", new { style = "width: 75px" })</td>
<td>@Html.TextBox("Type3Quantity", "0", new { style = "width: 55px" })</td>
</tr>
</table>
<hr />
<p style="text-align: center; width: 500px">
<input type="submit" name="btnPrepareCustomerOrder"
value="Prepare Customer Order" style="width: 300px" />
</p>
}
</div>Requesting a Value in a View
When you create a form in a webpage and add some controls to it, you subsequently create a dictionary-based collection where, as we learned already about this type of list, each item is represented as key=value. Each key is the target that will receive the value of the control. Such a key can be a variable, another control, or any left-hand operand. A value can come from a control. The value is provided as an indexer.
To give you access to the collection of controls of a form, the WebPageRenderingBase class (an ancestor of webpages) is equipped with a property named Request. This property is of type HttpRequestBase:
public virtual HttpRequestBase Request { get; }
To get the value of a control from a form, you can apply the QueryString property of the HttpRequest class. Therefore, to get the value of a control, pass its name to the square brackets of this property. You can then assign that value to a string or a variable. Here is an example:
@{
    ViewBag.Title = "Employment Application";

    string strEmployeeName = string.Empty;

    if (IsPost)
    {
        strEmployeeName = Request.QueryString["txtEmployeeName"];
    }
}

<h2>Employment Application</h2>

@using (Html.BeginForm())
{
    <p>Employee Name: @Html.TextBox("txtEmployeeName")</p>
}
Instead of going through the QueryString property, you can apply the square brackets directly to the Request property.
Viewing Data
Generating Data from a Controller
The ViewBag object allows you to transfer one value at a time from a controller to a view. As an alternative, to give you the ability to transfer a value as a key/value pair, the ControllerBase class is equipped with a property named ViewData. This property is based on a dictionary-based collection class named ViewDataDictionary:
public ViewDataDictionary ViewData { get; set; }
To use a ViewData object, you never have to declare a ViewDataDictionary variable. Instead, the object is already a member of the controller or the view.
The ViewData property follows the logic of an item of a dictionary-based collection. To use this property, in the method associated with the view where you will access the value, type ViewData followed by square brackets. Inside the brackets, pass a one-word name of your choice, as a string. Then assign the desired value. You can use the same technique to create as many values as you want.
![]() Practical Learning: Generating Data from a Controller
Practical Learning: Generating Data from a Controller
using System;
using System.Collections.Generic;
using System.Linq;
using System.Web;
using System.Web.Mvc;

namespace ChairExecs4.Controllers
{
    public class BusinessController : Controller
    {
        // GET: Business
        public ActionResult Index()
        {
            return View();
        }

        // GET: Business/StartCustomerOrder
        public ActionResult StartCustomerOrder()
        {
            return View();
        }

        public ActionResult PrepareCustomerOrder(string Type1Name, string Type1UnitWeight, string Type1UnitPrice, string Type1Quantity,
                                                 string Type2Name, string Type2UnitWeight, string Type2UnitPrice, string Type2Quantity,
                                                 string Type3Name, string Type3UnitWeight, string Type3UnitPrice, string Type3Quantity)
        {
            int iType1Weight = int.Parse(Request["Type1UnitWeight"]);
            int iType1Quantity = int.Parse(Request["Type1Quantity"]);
            double dType1UnitPrice = double.Parse(Request["Type1UnitPrice"]);

            int iType2Weight = int.Parse(Request["Type2UnitWeight"]);
            int iType2Quantity = int.Parse(Request["Type2Quantity"]);
            double dType2UnitPrice = double.Parse(Request["Type2UnitPrice"]);

            int iType3Weight = int.Parse(Request["Type3UnitWeight"]);
            int iType3Quantity = int.Parse(Request["Type3Quantity"]);
            double dType3UnitPrice = double.Parse(Request["Type3UnitPrice"]);

            int type1TotalWeight = 0, type2TotalWeight = 0, type3TotalWeight = 0;

            if (iType1Quantity == 0)
                type1TotalWeight = 0;
            else
                type1TotalWeight = iType1Weight * iType1Quantity;

            if (iType2Quantity == 0)
                type2TotalWeight = 0;
            else
                type2TotalWeight = iType2Weight * iType2Quantity;

            if (iType3Quantity == 0)
                type3TotalWeight = 0;
            else
                type3TotalWeight = iType3Weight * iType3Quantity;

            ViewData["Type1Quantity"] = Type1Quantity;
            ViewData["Type2Quantity"] = Type2Quantity;
            ViewData["Type3Quantity"] = Type3Quantity;
            ViewData["Type1SubTotal"] = dType1UnitPrice * iType1Quantity;
            ViewData["Type2SubTotal"] = dType2UnitPrice * iType2Quantity;
            ViewData["Type3SubTotal"] = dType3UnitPrice * iType3Quantity;
            ViewData["Type1TotalWeight"] = type1TotalWeight;
            ViewData["Type2TotalWeight"] = type2TotalWeight;
            ViewData["Type3TotalWeight"] = type3TotalWeight;
            ViewData["TotalWeight"] = iType1Weight + iType2Weight + iType3Weight;

            return View();
        }
    }
}
Viewing Data in a View
After creating a ViewData value or object, to access it, in the view associated with the method, type ViewData and its square brackets. In the square brackets, pass the name you had used.
![]() Practical Learning: Viewing Data in a View
Practical Learning: Viewing Data in a View
@{
ViewBag.Title = "Prepare Customer Order";
}
@{
double discountRate = 0.00, shipping = 0.00;
double subTotal1 = double.Parse(ViewData["Type1SubTotal"].ToString());
double subTotal2 = double.Parse(ViewData["Type2SubTotal"].ToString());
double subTotal3 = double.Parse(ViewData["Type3SubTotal"].ToString());
double totalWeight = double.Parse(ViewData["TotalWeight"].ToString());
double subTotal = subTotal1 + subTotal2 + subTotal3;
if (subTotal >= 800)
{
discountRate = 20; // %
}
else if (subTotal >= 600)
{
discountRate = 15; // %
}
else if (subTotal >= 300)
{
discountRate = 10; // %
}
else
{
discountRate = 0; // %
}
if (totalWeight >= 200)
{
shipping = 42.50;
}
else if (totalWeight >= 150)
{
shipping = 36.25;
}
else if (totalWeight >= 100)
{
shipping = 24.48;
}
else if (totalWeight >= 50)
{
shipping = 18.65;
}
else
{
shipping = 12.25;
}
double discountAmount = subTotal * discountRate / 100;
double orderTotal = subTotal - discountAmount + shipping;
}
<div align="center">
<h2 style="margin-top: 6.5em">Prepare Customer Order</h2>
@using (Html.BeginForm())
{
<table style="width: 540px;">
<tr>
<td style="width: 350px; font-size: 14px; border-bottom: 2px double black; font-weight: bold; text-align: center">Item Definition</td>
<td style="border-bottom: 2px double black; font-size: 14px; font-weight: bold">Sale Description</td>
</tr>
</table>
<table>
<tr>
<td style="width: 120px"><b>Item Name</b></td>
<td><b>Weight</b></td>
<td><b>Unit Price</b></td>
<td><b>Quantity</b></td>
<td><b>Weight</b></td>
<td><b>Sub-Total</b></td>
</tr>
<tr>
<td>@Html.TextBox("Type1Name", @"Type1Name")</td>
<td>@Html.TextBox("Type1UnitWeight", @"Type1UnitWeight", new { style = "width: 55px" }) Lbs</td>
<td>@Html.TextBox("Type1UnitPrice", @"Type1UnitPrice", new { style = "width: 75px" })</td>
<td>@Html.TextBox("Type1Quantity", @ViewData["Type1Quantity"], new { style = "width: 55px" })</td>
<td>@Html.TextBox("Type1TotalWeight", @ViewData["Type1TotalWeight"], new { style = "width: 55px" }) Lbs</td>
<td>@Html.TextBox("Type1SubTotal", @subTotal1.ToString("F"), new { style = "width: 75px" })</td>
</tr>
<tr>
<td>@Html.TextBox("Type2Name", @"Type2Name")</td>
<td>@Html.TextBox("Type2UnitWeight", @"Type2UnitWeight", new { style = "width: 55px" }) Lbs</td>
<td>@Html.TextBox("Type2UnitPrice", @"Type2UnitPrice", new { style = "width: 75px" })</td>
<td>@Html.TextBox("Type2Quantity", @ViewData["Type2Quantity"], new { style = "width: 55px" })</td>
<td>@Html.TextBox("Type2TotalWeight", @ViewData["Type2TotalWeight"], new { style = "width: 55px" }) Lbs</td>
<td>@Html.TextBox("Type2SubTotal", @subTotal2.ToString("F"), new { style = "width: 75px" })</td>
</tr>
<tr>
<td>@Html.TextBox("Type3Name", @"Type3Name")</td>
<td>@Html.TextBox("Type3UnitWeight", @"Type3UnitWeight", new { style = "width: 55px" }) Lbs</td>
<td>@Html.TextBox("Type3UnitPrice", @"Type3UnitPrice", new { style = "width: 75px" })</td>
<td>@Html.TextBox("Type3Quantity", @ViewData["Type3Quantity"], new { style = "width: 55px" })</td>
<td>@Html.TextBox("Type3TotalWeight", @ViewData["Type3TotalWeight"], new { style = "width: 55px" }) Lbs</td>
<td>@Html.TextBox("Type3SubTotal", @subTotal3.ToString("F"), new { style = "width: 75px" })</td>
</tr>
</table>
<hr />
<table>
<tr>
<td style="width: 160px">Total Weight:</td>
<td>@Html.TextBox("TotalWeight", @totalWeight, new { style = "width: 75px" }) Lbs</td>
<td style="width: 80px"> </td>
<td>Sub-Total:</td>
<td>@Html.TextBox("SubTotal", @subTotal.ToString("F"), new { style = "width: 75px" })</td>
</tr>
<tr>
<td>Discount Rate:</td>
<td>@Html.TextBox("DiscountRate", @discountRate.ToString("F"), new { style = "width: 75px" })%</td>
<td> </td>
<td>Discount Amount:</td>
<td>@Html.TextBox("DiscountAmount", @discountAmount.ToString("F"), new { style = "width: 75px" })</td>
</tr>
<tr>
<td>Shipping & Handling:</td>
<td>@Html.TextBox("ShippingAndHandling", @shipping.ToString("F"), new { style = "width: 75px" })</td>
<td> </td>
<td>Order Total:</td>
<td>@Html.TextBox("OrderTotal", @orderTotal.ToString("F"), new { style = "width: 75px" })</td>
</tr>
</table>
<hr />
<p style="text-align: center; width: 500px">
<input type="submit" name="btnSaveCustomerOrder"
value="Save Customer Order" style="width: 300px" />
</p>
}
</div>

Viewing a Bag
We already know that the ViewBag is an anonymous object that can be used to send values or objects from a controller action to its related view. Besides regular values or strings, you can transfer a list (or collection) from a controller to a view using a ViewBag object. To do this, apply a property to ViewBag and assign the collection variable to it. To make it possible to send a value to a view (a webpage), the ControllerBase class (the parent of the Controller class) is equipped with a property named ViewBag:
public object ViewBag { get; }
ViewBag is an anonymous object, actually a dynamic type of object. This means that it can be anything. To start the anonymous object, in the method (the action) of a webpage in the controller class, type ViewBag, add a period to it, and add any name of a property you want. You can then assign any value to that property. Once a property of a ViewBag object holds a value, you can get that value from the view associated with that method. We have seen numerous examples of how this is done.
Introduction to List-Based Controls
Introduction to the List Box
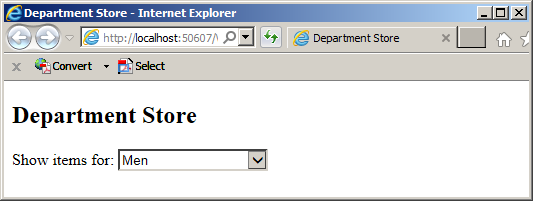
A list box and a combo box are used to display a list of items, such as strings, in a webpage. Each item displays on its own line within the control. To create a list box or a combo box in HTML, use the SELECT tag. Inside that tag, to create each item, use an OPTION tag. Here is an example:
<!DOCTYPE html>
<html>
<head>
<title>Department Store</title>
</head>
<body>
<h2>Department Store</h2>
<form name="frmDepartmentStore" method="post">
<p>Show items for:
<select name="Selection" style="width: 150px">
<option value="0"> </option>
<option value="1">Men</option>
<option value="2">Women</option>
<option value="3">Boys</option>
<option value="4">Girls</option>
<option value="5">Toddlers</option>
</select></p>
</form>
</body>
</html>
This would produce:
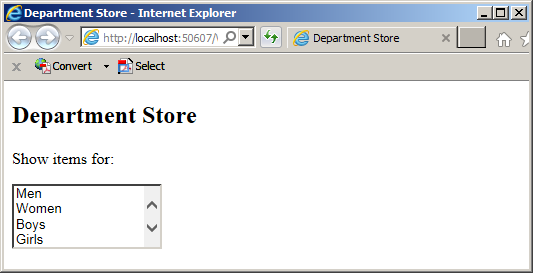
To create a list box, add the MULTIPLE attribute to the SELECT tag Here is an example:
<!DOCTYPE html>
<html>
<head>
<title>Department Store</title>
</head>
<body>
<h2>Department Store</h2>

<form name="frmDepartmentStore" method="post">
    <p>Show items for:</p>
    <select name="Selection" multiple style="width: 150px">
    <option value="1">Men</option>
    <option value="2">Women</option>
    <option value="3">Boys</option>
    <option value="4">Girls</option>
    <option value="5">Toddlers</option>
</select>
</form>
</body>
</html>
This would produce:
The Selected Item of a List Box or Combo Box
To select an item in a list box, a visitor can click the desired item. To select an item in a combo box, the user can click the down-pointing arrow of the control and select an item from the list. To support the selection of items from a list box or a combo box in ASP.NET MVC, the System.Web.Mvc namespace provides a class named SelectListItem:
public class SelectListItem
To support the text of an item, the SelectListItem class is equipped with a read-write property named Text
public string Text { get; set; }
To support the value of an item, the SelectListItem class is equipped with a property named Value
public string Value { get; set; }
To support the item selected in a list box or a combo box, the SelectListItem class is equipped with a property named Selected
public string Selected { get; set; }
Selecting Items from a List Box
In a combo box, the user can select only one item. One of the options of a list box is that a user can select more than one item by clicking, holding Ctrl or Shift, and clicking the other option(s). To support the list of items of a list box in ASP.NET MVC, the System.Web.Mvc namespace provides a class named MultiSelectList. It implements the IEnumerable<> and the IEnumerable interfaces:
public class MultiSelectList : IEnumerable<SelectListItem>, IEnumerable
A Single Selection
To let you create a list-based control where only one item can be selected at a time, the System.Web.Mvc namespace provides a class named SelectList that is derived from MultiSelectList
public class SelectList : MultiSelectList
Adding Items to a List/Combo Box
Using the Members of an Enumeration
As mentioned previously (Lesson 14 on enumerations), you can use the members of an enumeration to fill a combo box or a list box. Of course, you must have or decide what enumeration to use. You can use any one of the .NET Framework built-in enumerations or you can create your own. To apply the enumeration, call the method used to create the control and use the select list argument.
![]() Practical Learning: Using the Members of an Enumeration in a Combo Box
Practical Learning: Using the Members of an Enumeration in a Combo Box
namespace ChairExecs4.Models
{
    public enum Basic
    {
        Station,
        Essential,
        Instructor
    }
}
@{
    ViewBag.Title = "New Customer Order";
}

<h2>New Customer Order</h2>

<div align="center">
    <h2 style="margin-top: 6.5em">New Customer Order</h2>

    @using (Html.BeginForm("PrepareCustomerOrder", "Business", FormMethod.Post))
    {
        <table>
            <tr>
                <td style="width: 120px"><b>Item Name</b></td>
                <td><b>Weight</b></td>
                <td><b>Unit Price</b></td>
                <td><b>Quantity</b></td>
            </tr>
            <tr>
                <td>@Html.DropDownList("Type1Name",
                                       new SelectList(Enum.GetValues(typeof(ChairExecs4.Models.Basic))),
                                       new { style = "width: 160px" })</td>
                <td>@Html.TextBox("Type1UnitWeight", "16", new { style = "width: 55px" }) Lbs</td>
                <td>@Html.TextBox("Type1UnitPrice", "64.95", new { style = "width: 75px" })</td>
                <td>@Html.TextBox("Type1Quantity", "0", new { style = "width: 55px" })</td>
            </tr>
            <tr>
                <td>@Html.TextBox("Type2Name", "Scholar")</td>
                <td>@Html.TextBox("Type2UnitWeight", "32", new { style = "width: 55px" }) Lbs</td>
                <td>@Html.TextBox("Type2UnitPrice", "104.45", new { style = "width: 75px" })</td>
                <td>@Html.TextBox("Type2Quantity", "0", new { style = "width: 55px" })</td>
            </tr>
            <tr>
                <td>@Html.TextBox("Type3Name", "Executive")</td>
                <td>@Html.TextBox("Type3UnitWeight", "36", new { style = "width: 55px" }) Lbs</td>
                <td>@Html.TextBox("Type3UnitPrice", "154.55", new { style = "width: 75px" })</td>
                <td>@Html.TextBox("Type3Quantity", "0", new { style = "width: 55px" })</td>
            </tr>
        </table>

        <hr />

        <p style="text-align: center; width: 500px">
            <input type="submit" name="btnPrepareCustomerOrder"
                   value="Prepare Customer Order" style="width: 300px" />
        </p>
    }
</div>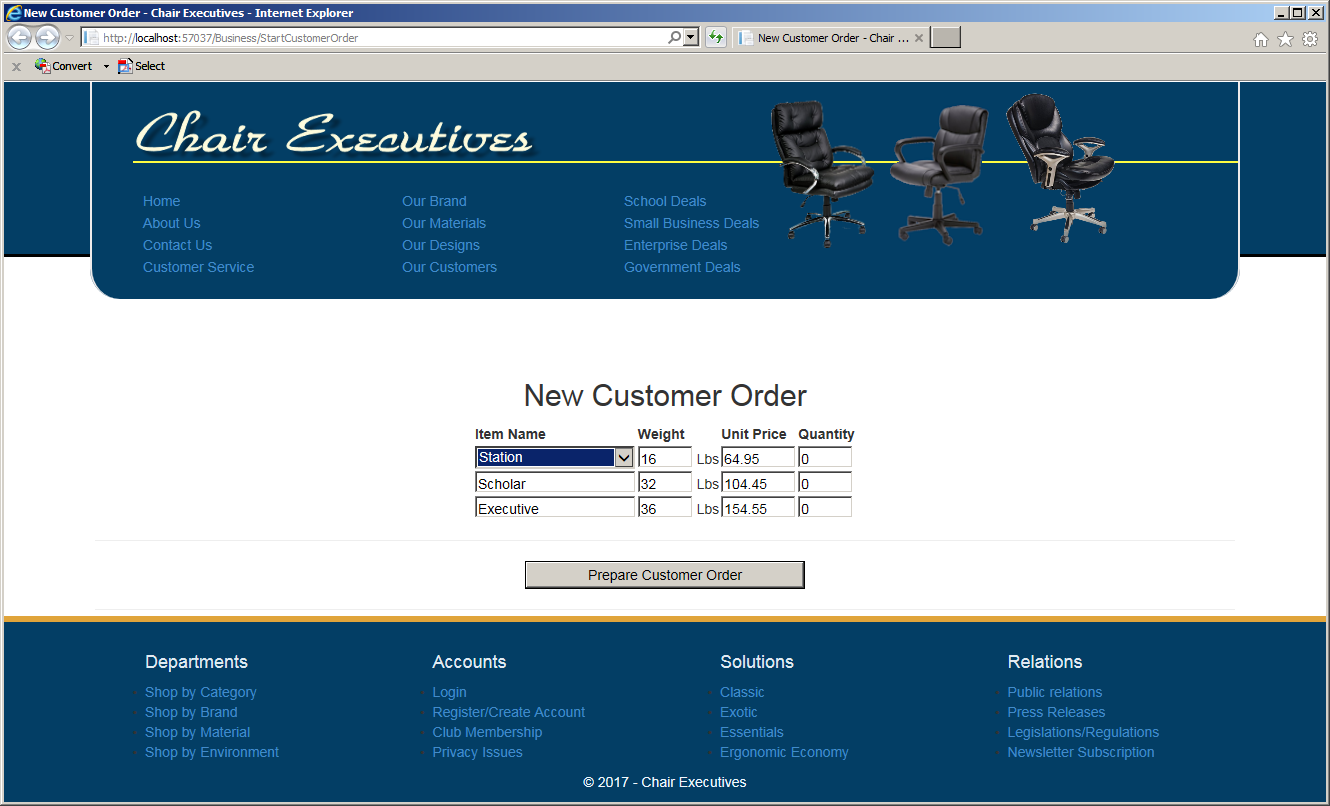
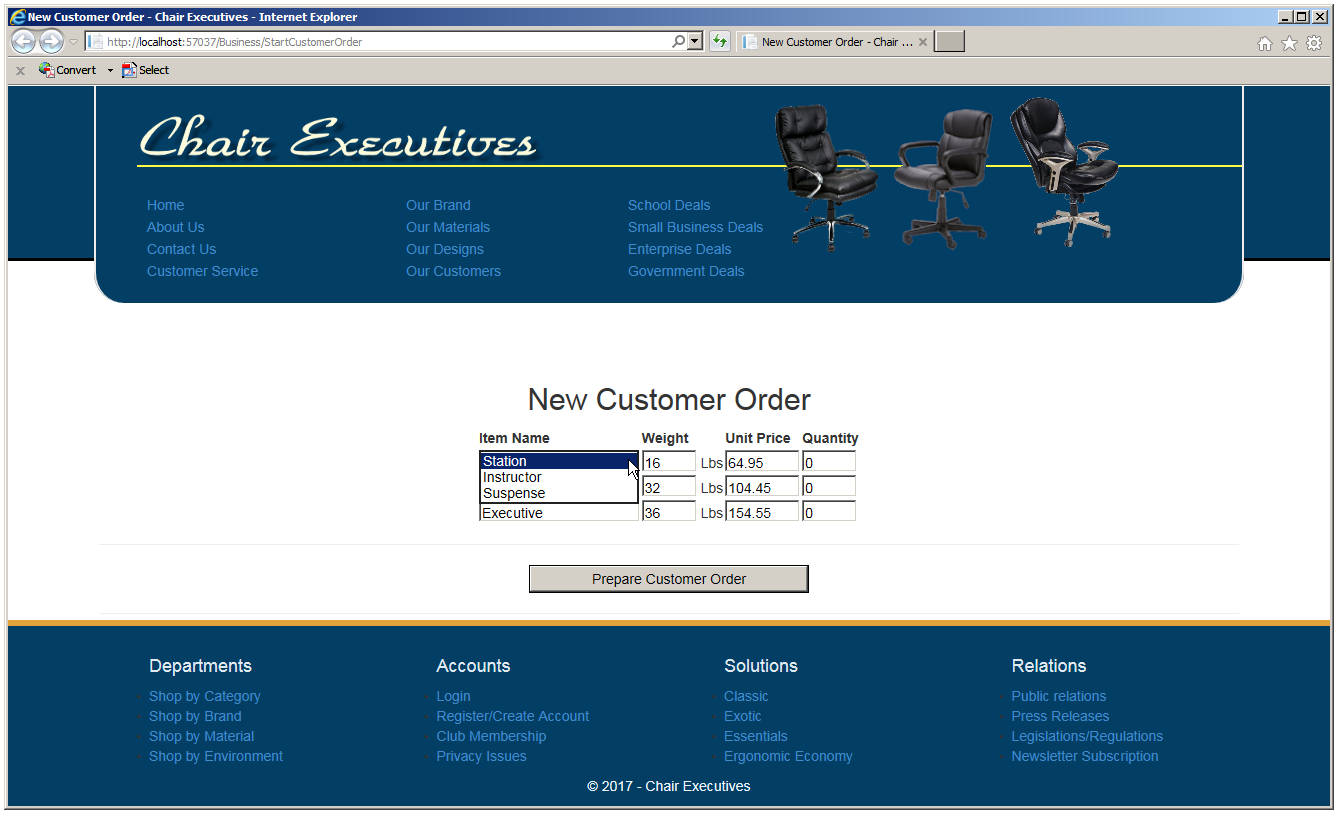
Introduction to Using an Enumerable List
Remember that the MultiSelectList class implements both the IEnumerable<> and the IEnumerable interfaces. This means you can create a list using a class that implements those interfaces and use the items of that list for the list box or combo box.
![]() Practical Learning: Applying an Enumerable List to a Combo Box
Practical Learning: Applying an Enumerable List to a Combo Box
@{
    ViewBag.Title = "New Customer Order";
}

<h2>New Customer Order</h2>

<div align="center">
    <h2 style="margin-top: 6.5em">New Customer Order</h2>

    @using (Html.BeginForm("PrepareCustomerOrder", "Business", FormMethod.Post))
    {
        var Type2Name = new List<SelectListItem>();

        Type2Name.Add(new SelectListItem { Value = "Scholar", Text = "Scholar" });
        Type2Name.Add(new SelectListItem { Value = "Conviction", Text = "Conviction" });

        <table>
            <tr>
                <td style="width: 120px"><b>Item Name</b></td>
                <td><b>Weight</b></td>
                <td><b>Unit Price</b></td>
                <td><b>Quantity</b></td>
            </tr>
            <tr>
                <td>@Html.DropDownList("Type1Name",
                                       new SelectList(Enum.GetValues(typeof(ChairExecs4.Models.Basic))),
                                       new { style = "width: 160px" })</td>
                <td>@Html.TextBox("Type1UnitWeight", "16", new { style = "width: 55px" }) Lbs</td>
                <td>@Html.TextBox("Type1UnitPrice", "64.95", new { style = "width: 75px" })</td>
                <td>@Html.TextBox("Type1Quantity", "0", new { style = "width: 55px" })</td>
            </tr>
            <tr>
                <td>@Html.DropDownList("Type2Name", Type2Name, new { style = "width: 160px" })</td>
                <td>@Html.TextBox("Type2UnitWeight", "32", new { style = "width: 55px" }) Lbs</td>
                <td>@Html.TextBox("Type2UnitPrice", "104.45", new { style = "width: 75px" })</td>
                <td>@Html.TextBox("Type2Quantity", "0", new { style = "width: 55px" })</td>
            </tr>
            <tr>
                <td>@Html.TextBox("Type3Name", "Executive")</td>
                <td>@Html.TextBox("Type3UnitWeight", "36", new { style = "width: 55px" }) Lbs</td>
                <td>@Html.TextBox("Type3UnitPrice", "154.55", new { style = "width: 75px" })</td>
                <td>@Html.TextBox("Type3Quantity", "0", new { style = "width: 55px" })</td>
            </tr>
        </table>

        <hr />

        <p style="text-align: center; width: 500px">
            <input type="submit" name="btnPrepareCustomerOrder"
                   value="Prepare Customer Order" style="width: 300px" />
        </p>
    }
</div>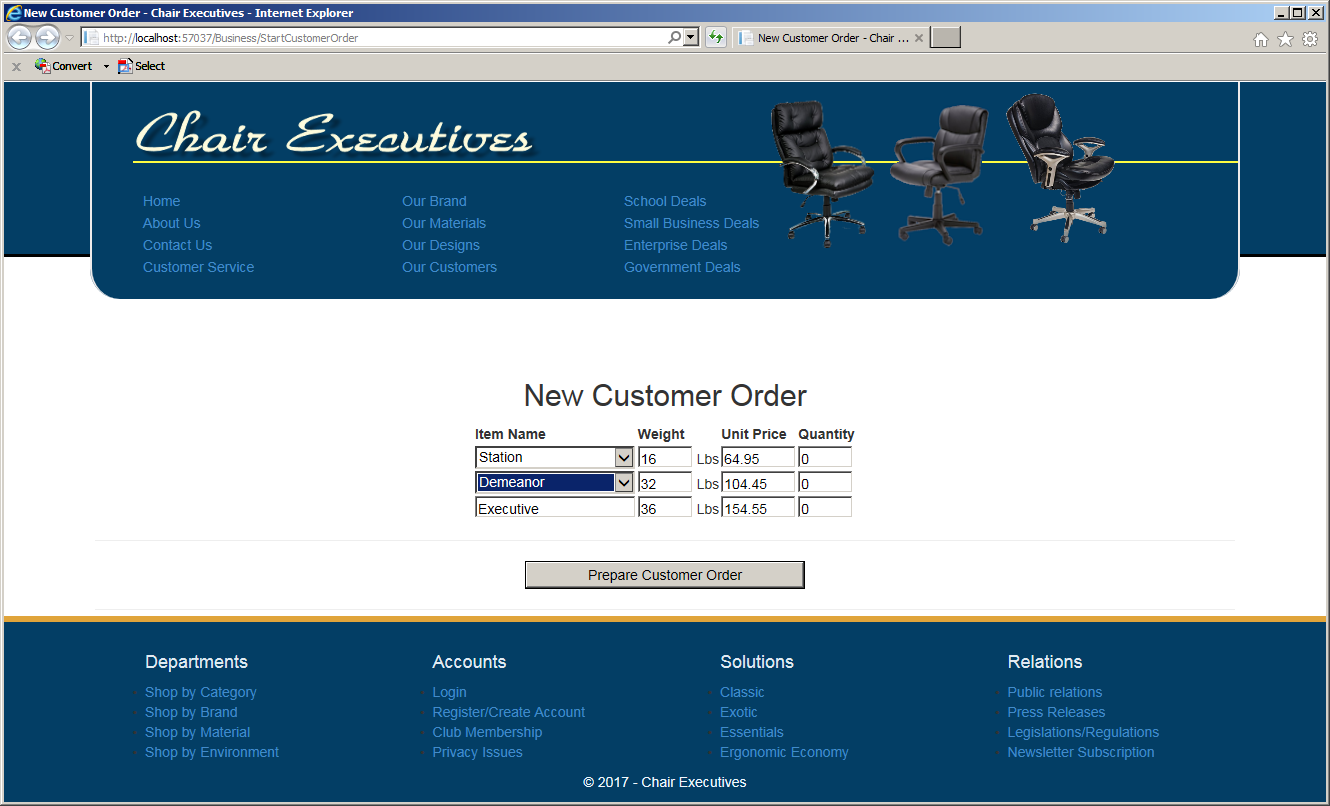
Using a View Bag
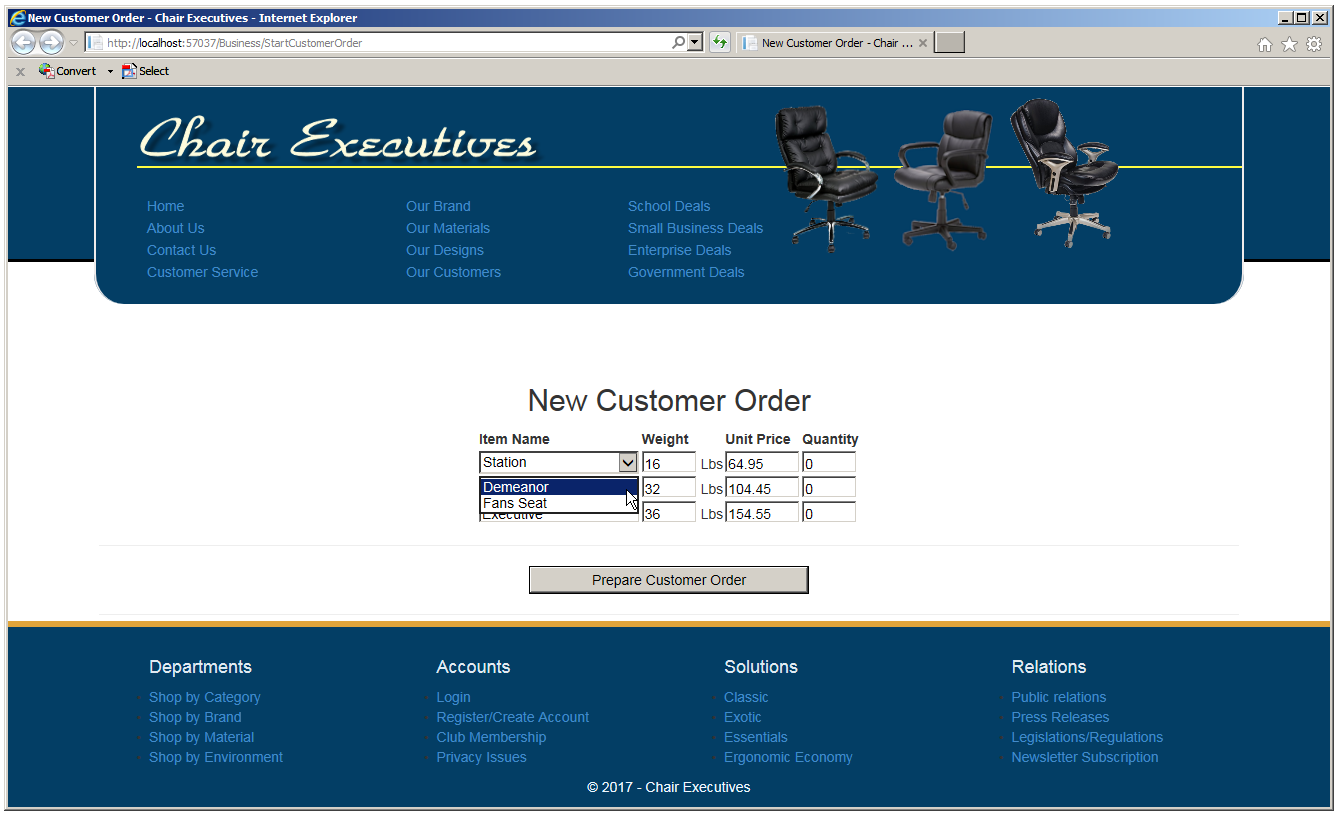
When creating the action method of a form, you can created a list of items (usually a list of strings) that you want to use in a list box or a combo box. After creating the list, assign it to a ViewData indexer. Pass the name of the control (or the name you will use for the control). In the form, simply use the same name for the control.
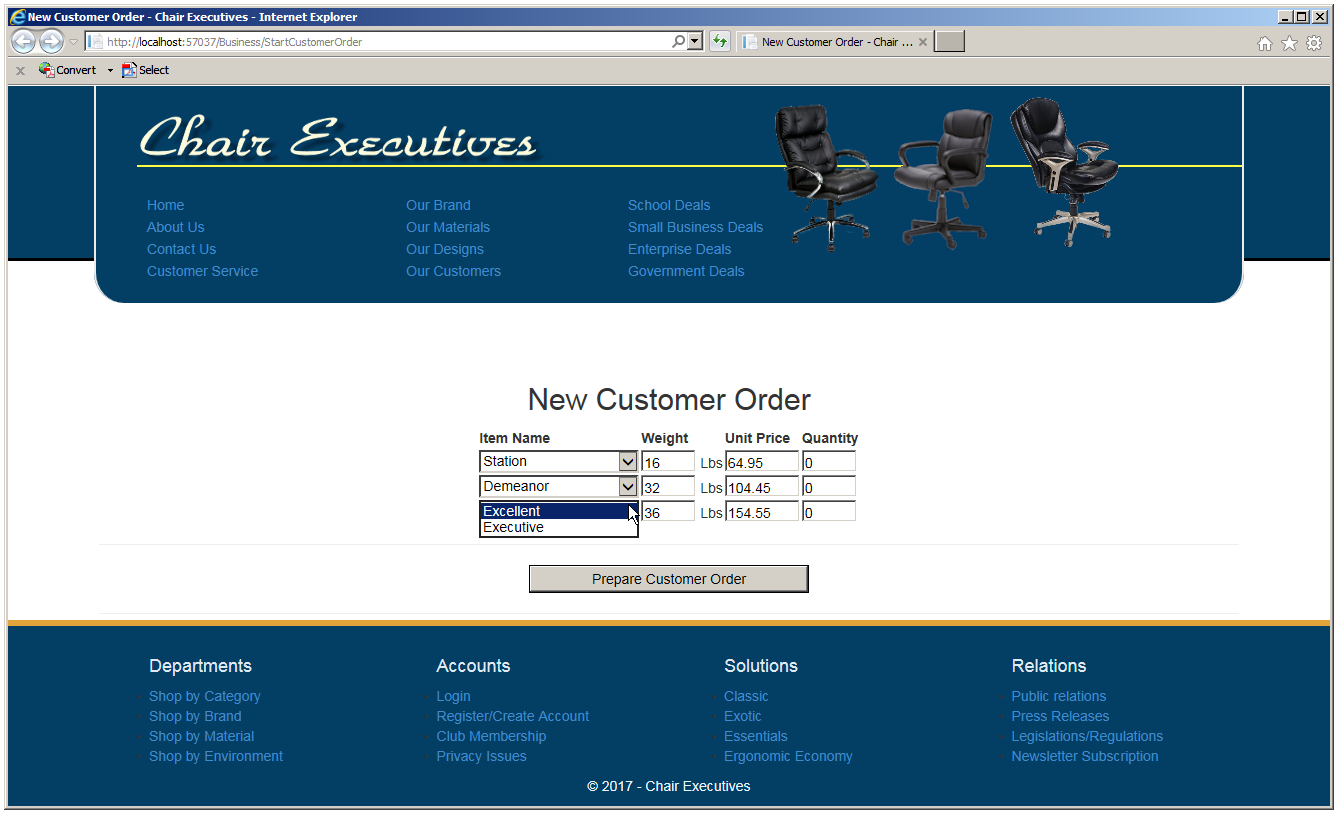
![]() Practical Learning: Using a View Bag for a Combo Box
Practical Learning: Using a View Bag for a Combo Box
using System;
using System.Collections.Generic;
using System.Linq;
using System.Web;
using System.Web.Mvc;

namespace ChairExecs4.Controllers
{
    public class BusinessController : Controller
    {
        // GET: Business
        public ActionResult Index()
        {
            return View();
        }

        // GET: Business/StartCustomerOrder
        public ActionResult StartCustomerOrder()
        {
            List<SelectListItem> execs = new List<SelectListItem>();

            execs.Add(new SelectListItem() { Text = "Excellent", Value = "1" });
            execs.Add(new SelectListItem() { Text = "Executive", Value = "2" });

            ViewData["Type3Name"] = execs;

            return View();
        }

        public ActionResult PrepareCustomerOrder(string Type1Name, string Type1UnitWeight, string Type1UnitPrice, string Type1Quantity,
                                                 string Type2Name, string Type2UnitWeight, string Type2UnitPrice, string Type2Quantity,
                                                 string Type3Name, string Type3UnitWeight, string Type3UnitPrice, string Type3Quantity)
        {
            int iType1Weight = int.Parse(Request["Type1UnitWeight"]);
            int iType1Quantity = int.Parse(Request["Type1Quantity"]);
            double dType1UnitPrice = double.Parse(Request["Type1UnitPrice"]);

            int iType2Weight = int.Parse(Request["Type2UnitWeight"]);
            int iType2Quantity = int.Parse(Request["Type2Quantity"]);
            double dType2UnitPrice = double.Parse(Request["Type2UnitPrice"]);

            int iType3Weight = int.Parse(Request["Type3UnitWeight"]);
            int iType3Quantity = int.Parse(Request["Type3Quantity"]);
            double dType3UnitPrice = double.Parse(Request["Type3UnitPrice"]);

            int type1TotalWeight = 0, type2TotalWeight = 0, type3TotalWeight = 0;

            if (iType1Quantity == 0)
                type1TotalWeight = 0;
            else
                type1TotalWeight = iType1Weight * iType1Quantity;

            if (iType2Quantity == 0)
                type2TotalWeight = 0;
            else
                type2TotalWeight = iType2Weight * iType2Quantity;

            if (iType3Quantity == 0)
                type3TotalWeight = 0;
            else
                type3TotalWeight = iType3Weight * iType3Quantity;

            ViewData["Type1Quantity"] = Type1Quantity;
            ViewData["Type2Quantity"] = Type2Quantity;
            ViewData["Type3Quantity"] = Type3Quantity;
            ViewData["Type1SubTotal"] = dType1UnitPrice * iType1Quantity;
            ViewData["Type2SubTotal"] = dType2UnitPrice * iType2Quantity;
            ViewData["Type3SubTotal"] = dType3UnitPrice * iType3Quantity;
            ViewData["Type1TotalWeight"] = type1TotalWeight;
            ViewData["Type2TotalWeight"] = type2TotalWeight;
            ViewData["Type3TotalWeight"] = type3TotalWeight;
            ViewData["TotalWeight"] = iType1Weight + iType2Weight + iType3Weight;

            return View();
        }
    }
}
@{
    ViewBag.Title = "New Customer Order";
}

<h2>New Customer Order</h2>

<div align="center">
    <h2 style="margin-top: 6.5em">New Customer Order</h2>

    @using (Html.BeginForm("PrepareCustomerOrder", "Business", FormMethod.Post))
    {
        var Type2Name = new List<SelectListItem>();

        Type2Name.Add(new SelectListItem { Value = "Scholar", Text = "Demeanor" });
        Type2Name.Add(new SelectListItem { Value = "Conviction", Text = "Fans Seat" });

        <table>
            <tr>
                <td style="width: 120px"><b>Item Name</b></td>
                <td><b>Weight</b></td>
                <td><b>Unit Price</b></td>
                <td><b>Quantity</b></td>
            </tr>
            <tr>
                <td>@Html.DropDownList("Type1Name",
                                       new SelectList(Enum.GetValues(typeof(ChairExecs4.Models.Basic))),
                                       new { style = "width: 160px" })</td>
                <td>@Html.TextBox("Type1UnitWeight", "16", new { style = "width: 55px" }) Lbs</td>
                <td>@Html.TextBox("Type1UnitPrice", "64.95", new { style = "width: 75px" })</td>
                <td>@Html.TextBox("Type1Quantity", "0", new { style = "width: 55px" })</td>
            </tr>
            <tr>
                <td>@Html.DropDownList("Type2Name", Type2Name, new { style = "width: 160px" })</td>
                <td>@Html.TextBox("Type2UnitWeight", "32", new { style = "width: 55px" }) Lbs</td>
                <td>@Html.TextBox("Type2UnitPrice", "104.45", new { style = "width: 75px" })</td>
                <td>@Html.TextBox("Type2Quantity", "0", new { style = "width: 55px" })</td>
            </tr>
            <tr>
                <td>
                    @Html.DropDownList("Type3Name", null, new { style = "width: 160px" })</td>
                <td>@Html.TextBox("Type3UnitWeight", "36", new { style = "width: 55px" }) Lbs</td>
                <td>@Html.TextBox("Type3UnitPrice", "154.55", new { style = "width: 75px" })</td>
                <td>@Html.TextBox("Type3Quantity", "0", new { style = "width: 55px" })</td>
            </tr>
        </table>

        <hr />

        <p style="text-align: center; width: 500px">
            <input type="submit" name="btnPrepareCustomerOrder"
                   value="Prepare Customer Order" style="width: 300px" /></p>
    }
</div>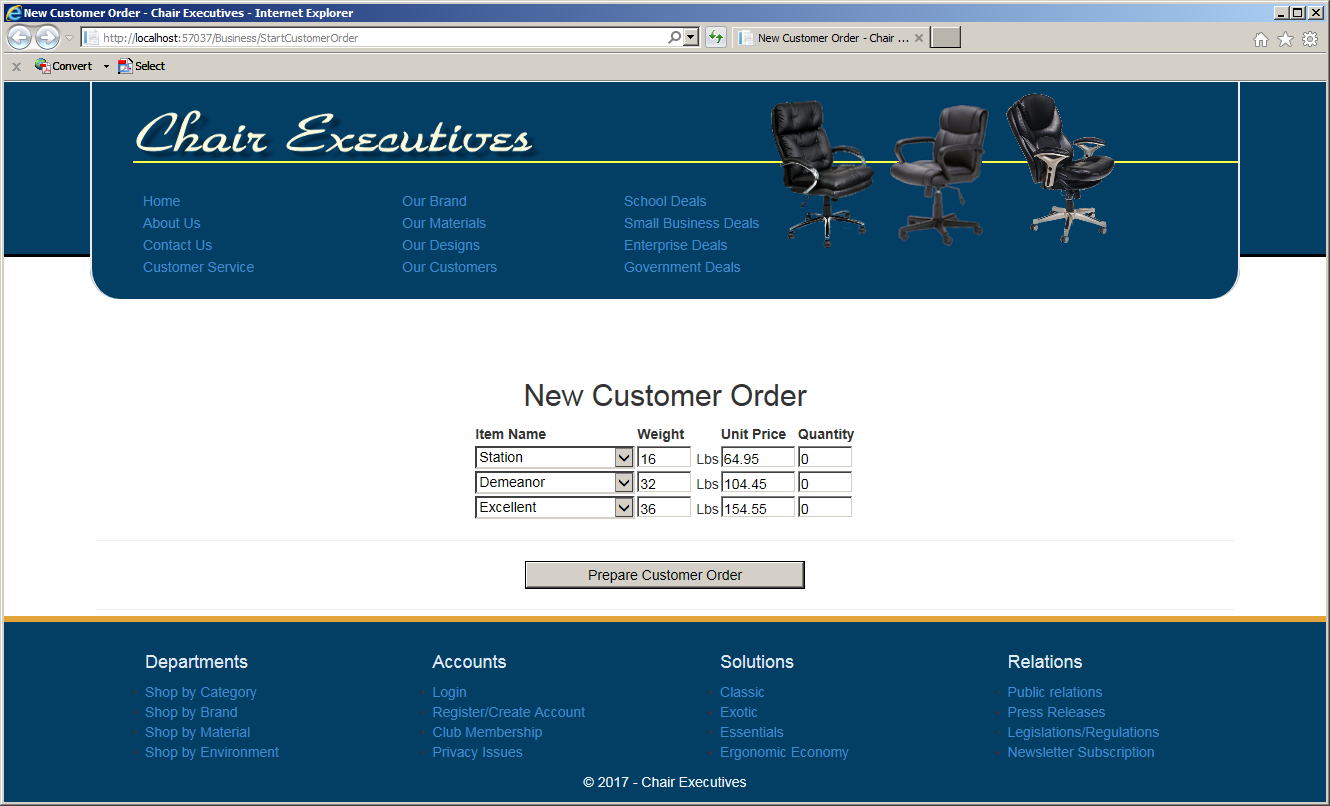
|
|
||
| Previous | Copyright © 2010-2021, FunctionX | Next |
|
|
||