Topics on Using the Constructors of a Class

Topics on Using the Constructors of a Class
Techniques of Creating and Using a Constructor
A Constructor with No Body
As mentioned for methods, if you are creating a small constructor that contains a single statement, you can replace the curly brackets with the => operator after the parentheses of the name of the constructor. This is followed by the necessary one-line statement.
![]() Practical Learning:
Introducing Constructors with No Bodies
Practical Learning:
Introducing Constructors with No Bodies
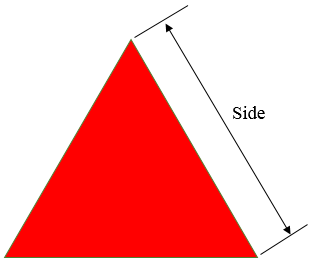
public class EquilateralTriangle
{
    private decimal s;
    const decimal NumberOfSides = 3;

    public EquilateralTriangle()
    {
        s = 0;
    }

    public EquilateralTriangle(decimal side)
    {
        s = side;
    }

    public decimal CalculatePerimeter()
    {
        decimal dResult = 0;

        dResult = s * NumberOfSides;

        return dResult;
    }
}<!DOCTYPE html>
<html>
<head>
<style>
.central {
margin: auto;
width: 325px;
}
</style>
<title>Geomtry - Equilateral Triangle</title>
</head>
<body>
<div class="central">
<h3 style="text-align: center">Geomtry - Equilateral Triangle</h3>
</div>
@{
decimal side = 0;
EquilateralTriangle et = new EquilateralTriangle();
if (IsPost)
{
side = Request["txtSide"].AsDecimal();
et = new EquilateralTriangle(side);
}
}
<div class="central">
<p><img src="~/Images/equilateral.png" alt="Geomtry - Equilateral Triangle" width="312" height="263" /></p>
<FORM NAME="frmEquilateralTriangle" METHOD="POST">
<table>
<tr>
<td>Side:</td>
<td><input type="text" name="txtSide" value="@side" /></td>
</tr>
<tr>
<td> </td>
<td style="text-align: center"><input type="submit" name="btnCalculate" value="Calculate" /></td>
</tr>
<tr>
<td>Perimeter:</td>
<td><input type="text" name="txtPerimeter" value="@et.CalculatePerimeter()" /></td>
</tr>
</table>
</FORM>
</div>
</body>
</html>. . . compilerOptions="/langversion:Default . . .


public class EquilateralTriangle
{
    private decimal s;
    const decimal NumberOfSides = 3;

    public EquilateralTriangle() => s = 0;
    public EquilateralTriangle(decimal side) => s = side;

    public decimal CalculatePerimeter()
    {
        decimal dResult = 0;

        dResult = s * NumberOfSides;

        return dResult;
    }
}
public class EquilateralTriangle
{
    private decimal s;
    const decimal NumberOfSides = 3;

    public EquilateralTriangle(decimal side = 0) => s = side;

    public decimal CalculatePerimeter() => s * NumberOfSides;
}When creating a field of a class, one of the decisions you must make is how the field would get its value(s). To create a field whose value can only be read outside the class, precede its data type, during declaration, with the readonly keyword.
If the value held by a read-only field is gotten from an expression, then the field must be initialized in the(a) construction with the desired expression. Because you can initialize a read-only field in a constructor, if you have different constructors, you can also have different values for a read-only field. Here are examples:
public class Circle
{
    private decimal r;

    private readonly decimal PI;

    public Circle()
    {
       	PI = 3.14;
    }

    public Circle(decimal rad)
    {
       	r = rad;
        PI = 3.14159M;
    }

    public decimal CalculateDiameter()
    {
       	return r * 2M;
    }

    public decimal CalculateArea()
    {
       return r * r * PI;
    }
}
We know that a constant variable must be initialized when it is created. Although a read-only variable seems to follow the same rule, it doesn't. Remember that you don't need to initialize a read-only variable when you declare it since you can do this in the(a) constructor of the class. Also, because a constructor can be overloaded, a read-only field can hold different values depending on the particular constructor that is accessed at a particular time, but the value of a constant variable cannot change: it is initialized once, in the class (or in a method) and it keeps that value throughout the class (or method).
![]() Practical Learning:
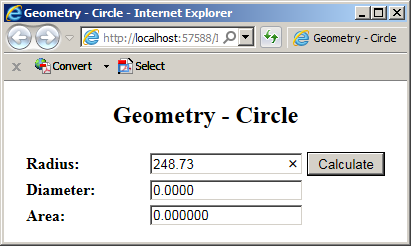
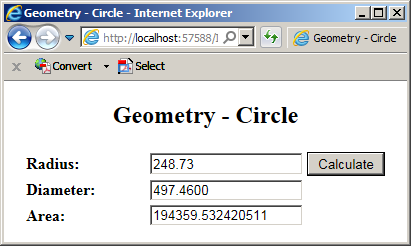
Creating and Using a Read-Only Field
Practical Learning:
Creating and Using a Read-Only Field
public class Circle
{
    public readonly decimal PI;

    public decimal Radius;

    public Circle()
    {
        Radius = 0.00M;
    }

    public decimal CalculateDiameter()
    {
        return Radius * 2.00M;
    }
}public class Circle
{
public readonly decimal PI = 3.14M;
public decimal Radius;
public Circle()
{
Radius = 0.00M;
}
public decimal CalculateDiameter()
{
return Radius * 2.00M;
}
public decimal CalculateArea()
{
return Radius * Radius * PI;
}
}<!DOCTYPE html>
<html>
<head>
<title>Geometry - Circle</title>
<style>
.container {
margin: auto;
width: 300px;
}
</style>
</head>
<body>
<div class="container">
<h2 style="text-align: center">Geometry - Circle</h2>
@{
Circle round = new Circle();
if (IsPost)
{
round.Radius = Request["txtRadius"].AsDecimal();
}
<form name="frmGeometry" method="post">
<table>
<tr>
<td style="width: 120px; font-weight: bold">Radius:</td>
<td><input type="text" name="txtRadius" value=@round.Radius /></td>
<td><input type="submit" name="txtSubmit" value=Calculate /></td>
</tr>
<tr>
<td style="font-weight: bold">Diameter:</td>
<td><input type="text" name="txtDiameter" value=@round.CalculateDiameter() /></td>
<td> </td>
</tr>
<tr>
<td style="font-weight: bold">Area:</td>
<td><input type="text" name="txtArea" value=@round.CalculateArea() /></td>
<td> </td>
</tr>
</table>
</form>
}
</div>
</body>
</html>

public class Circle
{
    public readonly decimal PI;

    public decimal Radius;

    public Circle()
    {
        PI = 3.14m;
        Radius = 0.00M;
    }

    public decimal CalculateDiameter()
    {
        return Radius * 2M;
    }

    public decimal CalculateArea()
    {
        return Radius * Radius * PI;
    }
}public class Circle
{
public readonly decimal PI;
public decimal Radius;
public Circle()
{
PI = 3.14m;
Radius = 0.00M;
}
public Circle(decimal rad)
{
Radius = rad;
PI = 3.14159M;
}
public decimal CalculateDiameter()
{
return Radius * 2M;
}
public decimal CalculateArea()
{
return Radius * Radius * PI;
}
}<!DOCTYPE html>
<html>
<head>
<style>
.container {
margin: auto;
width: 300px;
}
</style>
<title>Geometry - Circle</title>
</head>
<body>
<div class="container">
<h2 style="text-align: center">Geometry - Circle</h2>
@{
Circle round = new Circle();
if (IsPost)
{
decimal rad = Request["txtRadius"].AsDecimal();
round = new Circle(rad);
}
<form name="frmGeometry" method="post">
<table>
<tr>
<td style="width: 120px; font-weight: bold">Radius:</td>
<td><input type="text" name="txtRadius" value=@round.Radius /></td>
<td><input type="submit" name="txtSubmit" value=Calculate /></td>
</tr>
<tr>
<td style="font-weight: bold">Diameter:</td>
<td><input type="text" name="txtDiameter" value=@round.CalculateDiameter() /></td>
<td> </td>
</tr>
<tr>
<td style="font-weight: bold">Area:</td>
<td><input type="text" name="txtArea" value=@round.CalculateArea() /></td>
<td> </td>
</tr>
</table>
</form>
}
</div>
</body>
</html>
A Field of a Class Type
Just like a primitive type can be used to describe an object, a class can play that role too. To make this happen, create a member that uses a class as its type. You can use any class, including one you create yourself. Here is an example:
public class Rectangle
{
    public decimal Width;
    public decimal Height;
}

class Box
{
    Rectangle Face;
}
A Field with the Same Type and Name
A field of a class type can use the same name as the class. Here is an example:
class Employee
{

}

class TimeSheet
{
    private decimal timeWorked;
    private string filingStatus;

    public Employee Employee;
}
In this case, the compiler would know that the first name represents a type and the second name represents a field. In the methods of the class, when you use the name as variable, the compiler would know that you are accessing the field.
Of course, a class can also have members of any type. Here is an example:
public class Rectangle
{
    public decimal Width;
    public decimal Height;
}

public class Box
{
    public decimal Depth;
    public Rectangle Face;
}
If a member of a class A (for example, the above Box class) is of a class type B (for example, the above Rectangle class):
public class Rectangle
{
    public decimal Width;
    public decimal Height;
}

public class Box
{
    public decimal Depth;
    public Rectangle Face = new Rectangle();
}public class Rectangle
{
public decimal Width;
public decimal Height;
}
public class Box
{
public decimal Depth;
public Rectangle Face;
public void Initialize()
{
Face = new Rectangle();
}
}
If you use this technique, make sure you call that method before using the member. This can be done as follows:
public class Exercise
{
private void Describe()
{
Box rectangular = new Box();
rectangular.Initialize();
}
}
public class Rectangle
{
    public decimal Width;
    public decimal Height;
}

public class Box
{
    public decimal Depth;
    public Rectangle Face;

    public void Initialize()
    {
        Face = new Rectangle();
    }
}public class Exercise
{
private void Describe()
{
Box rectangular = new Box();
rectangular.Face = new Rectangle();
}
}
public class Rectangle
{
    public decimal Width;
    public decimal Height;
}
public class Box
{
    public decimal Depth;
    public Rectangle Face;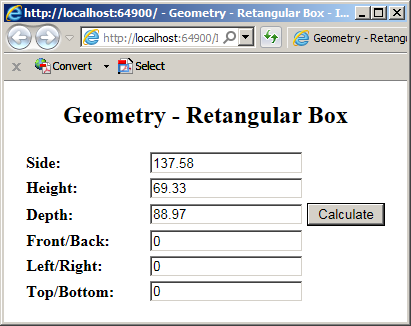
}![]() Practical Learning: Using a Field as a Class Type
Practical Learning: Using a Field as a Class Type
public class Rectangle
{
public decimal Width;
public decimal Height;
}public class Box
{
public decimal Depth;
public Rectangle Face;
}<!DOCTYPE html>
<html>
<head>
<title>Geometry - Retangular Box</title>
</head>
<body>
@{
decimal width = 0M;
decimal height = 0M;
decimal depth = 0M;
decimal frontBackPerimeter = 0M;
decimal leftRightPerimeter = 0M;
decimal topBottomPerimeter = 0M;
if (IsPost)
{
Box rectangular = new Box();
rectangular.Face = new Rectangle();
width = Request["txtWidth"].AsDecimal();
height = Request["txtHeight"].AsDecimal();
depth = Request["txtDepth"].AsDecimal();
rectangular.Face.Width = width;
rectangular.Face.Height = height;
rectangular.Depth = depth;
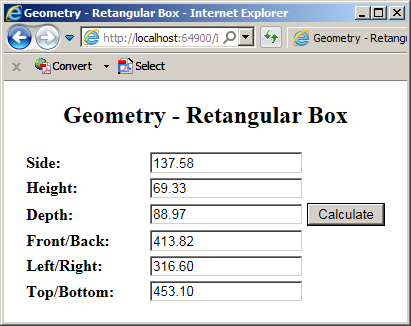
frontBackPerimeter = (rectangular.Face.Width + rectangular.Face.Height) * 2M;
leftRightPerimeter = (rectangular.Face.Height + rectangular.Depth) * 2M;
topBottomPerimeter = (rectangular.Face.Width + rectangular.Depth) * 2M;
}
}
<div align="center">
<h2>Geometry - Retangular Box</h2>
<form name="frmGeometry" method="post">
<table>
<tr>
<td style="width: 120px; font-weight: bold">Side:</td>
<td><input type="text" name="txtWidth" value="@width" /></td>
<td> </td>
</tr>
<tr>
<td style="width: 120px; font-weight: bold">Height:</td>
<td><input type="text" name="txtHeight" value="@height" /></td>
<td> </td>
</tr>
<tr>
<td style="font-weight: bold">Depth:</td>
<td><input type="text" name="txtDepth" value="@depth" /></td>
<td><input type="submit" name="txtSubmit" value=Calculate /></td>
</tr>
<tr>
<td style="font-weight: bold">Front/Back:</td>
<td><input type="text" name="txtFrontBack" value="@frontBackPerimeter" /></td>
<td> </td>
</tr>
<tr>
<td style="font-weight: bold">Left/Right:</td>
<td><input type="text" name="txtLeftRight" value="@leftRightPerimeter" /></td>
<td> </td>
</tr>
<tr>
<td style="font-weight: bold">Top/Bottom:</td>
<td><input type="text" name="txtTopBottom" value="@topBottomPerimeter" /></td>
<td> </td>
</tr>
</table>
</form>
</div>
</body>
</html>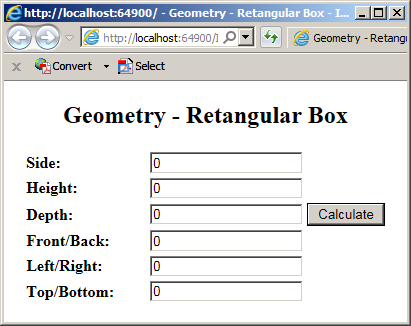
A Class Type as Parameter
An object of a class can be passed as argument. For example, a class type can be used as a parameter of a method of another class. When creating the method, simply provide the name of a class as type followed by a name for the parameter. You can use a class from the .NET Framework or your own class. As mentioned already, in the body of the method, you can ignore or use the parameter. When it comes to a class passed as parameter, its public and internal members are available to the method that uses it. When calling the method, you must provide an object created from the class.
Classes are always used as references. This means that, when using a class as parameter, it is implied to be passed by reference. If you want to reinforce this, you can type the ref keyword to the left of the parameter and when passing the argument.
Instead of one parameter, a method can use as many parameters as you want. The parameters can be of the same or different types, and you can use a combination of classes and primitive types.
Returning an Object
Introduction
A method can be made to produce an object. When creating the method, specify the name of the desired class before the name of the method. You can use your own class or use one of the many classes that come with the .NET Framework. In the body of the method, you can declare a variable of the class and initialize it. Before the closing bracket of the method, you must use the return keyword followed by the object and a semicolon. Here is an example:
public class Square
{
    private decimal s;

    public Square(decimal side)
    {
        s = side;
    }

    public decimal CalculatePerimeter()
    {
        return s * 4M;
    }

    public decimal CalculateArea()
    {
        return s * s;
    }
}

public class Plate
{
    private Square Create()
    {
        Square sqr = new Square(10M);

		. . . Blah Blah Blah

        return sqr;
    }
}
Calling a Method that Returns an Object
To call a method that returns an object, you can first declare a variable of the class's return type and later assign the method call to the variable. Here is an example:
public class Square
{
    private decimal s;

    public Square(decimal side)
    {
        s = side;
    }
}

public class Plate
{
    private Square Create()
    {
        Square sqr = new Square(10M);

    	. . . Blah Blah Blah

        return sqr;
    }

    private void Describe()
    {
        Square s = new Square(0m);

	    . . . Blah Blah Blah

        s = Create();
    }
}
Since the method internally initializes the object, you don't have to initialize the receiving variable. This means that you can directly assign the method call to the variable. Here is an example:
public class Square
{
    private decimal s;

    public Square(decimal side)
    {
        s = side;
    }

    public decimal CalculatePerimeter()
    {
        return s * 4M;
    }

    public decimal CalculateArea()
    {
        return s * s;
    }
}

public class Plate
{
    private Square Create()
    {
        Square sqr = new Square(10M);

	return sqr;
    }

    private void Describe()
    {
    	Square s = Create();
    }
}
Having Many Methods that Return the Same Type of Object
Imagine you have a method that returns an object. Here is an example:
public class Operation
{
    public decimal Number1;
    public decimal Number2;
    public string  Operator;

    public Operation(decimal nbr1, string oper, decimal nbr2)
    {
        Number1 = nbr1;
        Number2 = nbr2;
        Operator = oper;
    }
}

public class Algebra
{
    public decimal First;
    public decimal Second;
    public string  Performance;

    public Operation View()
    {
        Operation op = new Operation(First, Performance, Second);

        return op;
    }

    public Operation Add()
    {
        return View();
    }
}
You can also have another or more methods that perform the same type of operation and/or return the same type of object. You don't need to declare a variable to call the first method. Here are examples:
public class Operation
{
    public decimal Number1;
    public decimal Number2;
    public string  Operator;

    public Operation(decimal nbr1, string oper, decimal nbr2)
    {
        Number1 = nbr1;
        Number2 = nbr2;
        Operator = oper;
    }
}

public class Algebra
{
    public decimal First;
    public decimal Second;
    public string  Performance;

    public Operation View()
    {
        Operation op = new Operation(First, Performance, Second);

        return op;
    }

    public Operation Add()
    {
        return View();
    }

    public Operation Subtract()
    {
        return View();
    }

    public Operation Multiply()
    {
        return View();
    }
}
Returning an Object From a Class's Own Method
You can create a method that returns an instance of its own class. To start, on the left side of the method, enter the name of the class. Here is an example:
public class Employee
{
    public Employee Create()
    {
    }
}
There are various ways you can deal with the method. If you want to return a new value of the class, you can declare an instance of the class, initialize it, and then return it. Here is an example:
public class Employee
{
    public int EmplNbr;
    public string FName;
    public string LName;
    public decimal Salary;

    public Employee Create()
    {
    	Employee staff = new Employee();

        staff.EmplNbr = 947059;
	    staff.FName = "Paull";
       	staff.LName = "Motto";
        staff.Salary = 54925;

        return staff;
    }
}
Another technique consists of declaring an instance of the class and initialize its fields with those of the class. Here is an example:
public class Employee
{
    public int EmplNbr;
    public string FName;
    public string LName;
    public decimal Salary;

    public Employee Create()
    {
       	Employee staff = new Employee();

        staff.EmplNbr = EmplNbr;
    	staff.FName   = FName;
        staff.LName   = LName;
	    staff.Salary  = Salary;

       	return staff;
    }
}
Most of the time, this technique may not be very useful. As an alternative, you can pass some parameters to the method and then initialize the fields of the class with those parameters. After doing this, when calling the method, you can assign it to an object of the same class.
Using the Returned Object of a Method
Consider the following class created in a file named BillPreparation.cs:
// Eletricity Distribution Company
public class Meter
{
    public string MeterNumber { get; set; }
    public string Make { get; set; }
    public string Model { get; set; }


    public string Describe()
    {
        string strMMM = Make + " " + Model + " (" + MeterNumber + ")";

        return strMMM;
    }
}
Notice that this class contains a simple method that produces a string. Consider another class in the same project:
// Eletricity Distribution Company
public class Meter
{
    public string MeterNumber { get; set; }
    public string Make { get; set; }
    public string Model { get; set; }

    public string Describe()
    {
        return Make + " " + Model + " (" + MeterNumber + ")";
    }
}

public class CounterReading
{
    private Meter mtr;
    public int TotalUse { get; set; }

    public CounterReading()
    {
        mtr = new Meter();
    }

    public Meter Read()
    {
        return mtr;
    }
}
Notice that this new CounterReading class contains a method that returns an object of the type of the other class. Consider one more class as follows:
// Eletricity Distribution Company
public class Meter
{
    public string MeterNumber { get; set; }
    public string Make { get; set; }
    public string Model { get; set; }

    public string Describe()
    {
        return Make + " " + Model + " (" + MeterNumber + ")";
    }
}

public class CounterReading
{
    private Meter mtr;
    public int TotalUse { get; set; }

    public CounterReading()
    {
        mtr = new Meter();
    }

    public Meter Read()
    {
        return mtr;
    }
}

public class Calculations
{
    public CounterReading Useage;

    public Calculations()
    {
        Useage = new CounterReading();
    }

    public CounterReading Prepare()
    {
        return Useage;
    }
}
Once again, this new class contains a method that returns an object of a class. We saw that, to use the return object of a method, you can first declare a variable and then assign the method call to that variable. Here is an example:
// Eletricity Distribution Company
public class Meter
{
    public string MeterNumber { get; set; }
    public string Make { get; set; }
    public string Model { get; set; }

    public string Describe()
    {
        return Make + " " + Model + " (" + MeterNumber + ")";
    }
}

public class CounterReading
{
    private Meter mtr;

    public Meter Read()
    {
        return mtr;
    }
}

public class Calculations
{
    public CounterReading Useage;

    public Calculations()
    {
        Useage = new CounterReading();
    }

    public CounterReading Prepare()
    {
        return Useage;
    }
}

public class ElectriBill
{
    private Calculations values;

    public ElectriBill()
    {
        values = new Calculations();
    }

    public void Calculate()
    {
        CounterReading cr = new CounterReading();
        Calculations calc = new Calculations();

        cr = calc.Prepare();
    }
}
As seen in the previous section, this type of variable may be necesary and useful only if you are planning to call the method method more than once.
When you call a method that returns an object, the call holds an actual value of the class. As a result, you can call the method directly where the object is needed. If the class of that object contains a method that returns an object you need, you can call that other method directly after the parentheses of the previously mentioned method. Here are examples:
File: BillPreparation.cs
// Eletricity Distribution Company
public class Meter
{
    public string MeterNumber { get; set; }
    public string Make { get; set; }
    public string Model { get; set; }

    public string Describe()
    {
        return MeterNumber + " (" + Make + ", " + Model + ")";
    }
}

public class CounterReading
{
    private Meter mtr;
    public int TotalUse { get; set; }

    public CounterReading()
    {
        mtr = new Meter();

        mtr.Make = "Horriander";
        mtr.Model = "CXL 3600";
        mtr.MeterNumber = "M927084";
    }

    public Meter Read()
    {
        return mtr;
    }
}

public class Calculations
{
    public CounterReading Useage;
    const decimal CustomerCharge = 7.60m;
    const decimal DeliveryTaxRate = 6.20m;
    const decimal EnergyChargeRate = 6.2655m;
    const decimal GridResilienceChargeRate = 12m;
    const decimal EnvironmentSurchargeRate = 14.90m;

    public Calculations()
    {
        Useage = new CounterReading();

        Useage.TotalUse = 1497;
    }

    public decimal CalculateEnergyCharges()
    {
        return Useage.TotalUse * EnergyChargeRate / 100;
    }

    public decimal CalculateGridResilienceCharges()
    {
        return Useage.TotalUse * GridResilienceChargeRate / 100000;
    }

    public decimal CalculateDeliveryTaxes()
    {
        return Useage.TotalUse * DeliveryTaxRate / 10000;
    }

    public decimal CalculateEnvironmentalSurcharge()
    {
        return Useage.TotalUse * EnvironmentSurchargeRate / 100000;
    }

    public decimal EvaluateAmountDue()
    {
        return CustomerCharge + CalculateEnergyCharges() + CalculateGridResilienceCharges() + CalculateDeliveryTaxes() + CalculateEnvironmentalSurcharge();
    }

    public CounterReading Prepare()
    {
        return Useage;
    }
}

public class ElectriBill
{
    private Calculations values;

    public ElectriBill()
    {
        values = new Calculations();
    }

    public Calculations Calculate()
    {
        return values;
    }
}
File: Index.cshtml
<!DOCTYPE html>
<html>
<head>
<title>Electricity Distribution Company</title>
</head>
<body>
<h3>Electricity Distribution Company</h3>

@{
    ElectriBill eb = new ElectriBill();
    string strAmountDue = eb.Calculate().EvaluateAmountDue().ToString("F");

    <p>Meter Nbr: @eb.Calculate().Prepare().Read().Describe()</p>
    <p>Amount Due: @strAmountDue</p>
}
</body>
</html>
Of course, you can apply the same technique if the code is written inside a method of a class. Here is an example:
File: BillPreparation.cs
// Eletricity Distribution Company
public class Meter
{
    public string MeterNumber { get; set; }
    public string Make { get; set; }
    public string Model { get; set; }

    public string Describe() => MeterNumber + " (" + Make + ", " + Model + ")";
}

public class CounterReading
{
    private Meter mtr;
    public int TotalUse { get; set; }

    public CounterReading()
    {
        mtr = new Meter();

        mtr.Make = "Horriander";
        mtr.Model = "CXL 3600";
        mtr.MeterNumber = "M927084";
    }

    public Meter Read() => mtr;
}

public class Calculations
{
    public CounterReading Useage;
    const decimal CustomerCharge = 7.60m;
    const decimal DeliveryTaxRate = 6.20m;
    const decimal EnergyChargeRate = 6.2655m;
    const decimal GridResilienceChargeRate = 12m;
    const decimal EnvironmentSurchargeRate = 14.90m;

    public Calculations()
    {
        Useage = new CounterReading();

        Useage.TotalUse = 1497;
    }

    public decimal CalculateEnergyCharges()          => Useage.TotalUse * EnergyChargeRate / 100;
    public decimal CalculateGridResilienceCharges()  => Useage.TotalUse * GridResilienceChargeRate / 100000;
    public decimal CalculateDeliveryTaxes()          => Useage.TotalUse * DeliveryTaxRate / 10000;
    public decimal CalculateEnvironmentalSurcharge() => Useage.TotalUse * EnvironmentSurchargeRate / 100000;

    public decimal EvaluateAmountDue()
    {
        return CustomerCharge + CalculateEnergyCharges() + CalculateGridResilienceCharges() + CalculateDeliveryTaxes() + CalculateEnvironmentalSurcharge();
    }

    public CounterReading Prepare() => Useage;
}

public class ElectriBill
{
    private Calculations values;

    public ElectriBill()
    {
        values = new Calculations();
    }

    public Calculations Calculate()
    {
        return values;
    }

    public string Summarize()
    {
        string strSummary = values.Prepare().Read().Describe();

        return strSummary;
    }
}
File: Index.cshtml
<!DOCTYPE html>
<html>
<head>
<title>Electricity Distribution Company</title>
</head>
<body>
<h3>Electricity Distribution Company</h3>

@{
    ElectriBill eb = new ElectriBill();

    <p>Meter Nbr: @eb.Summarize()</p>
    <p>Amount Due: @eb.Calculate().EvaluateAmountDue().ToString("F")</p>
}
</body>
</html>
To make your code easier to read, you can put each method call on its own line. Here is an example:
// Eletricity Distribution Company
public class Meter
{
    public string MeterNumber { get; set; }
    public string Make { get; set; }
    public string Model { get; set; }

    public string Describe() => MeterNumber + " (" + Make + ", " + Model + ")";
}

public class CounterReading
{
    private Meter mtr;
    public int TotalUse { get; set; }

    public CounterReading()
    {
        mtr = new Meter();

        mtr.Make = "Horriander";
        mtr.Model = "CXL 3600";
        mtr.MeterNumber = "M927084";
    }

    public Meter Read() => mtr;
}

public class Calculations
{
    public CounterReading Useage;
    const decimal CustomerCharge = 7.60m;
    const decimal DeliveryTaxRate = 6.20m;
    const decimal EnergyChargeRate = 6.2655m;
    const decimal GridResilienceChargeRate = 12m;
    const decimal EnvironmentSurchargeRate = 14.90m;

    public Calculations()
    {
        Useage = new CounterReading();

        Useage.TotalUse = 1497;
    }

    public decimal CalculateEnergyCharges()          => Useage.TotalUse * EnergyChargeRate / 100;
    public decimal CalculateGridResilienceCharges()  => Useage.TotalUse * GridResilienceChargeRate / 100000;
    public decimal CalculateDeliveryTaxes()          => Useage.TotalUse * DeliveryTaxRate / 10000;
    public decimal CalculateEnvironmentalSurcharge() => Useage.TotalUse * EnvironmentSurchargeRate / 100000;

    public decimal EvaluateAmountDue()
    {
        return CustomerCharge + CalculateEnergyCharges() + CalculateGridResilienceCharges() + CalculateDeliveryTaxes() + CalculateEnvironmentalSurcharge();
    }

    public CounterReading Prepare() => Useage;
}

public class ElectriBill
{
    private Calculations values;

    public ElectriBill() => new Calculations();

    public Calculations Calculate() => values;

    public string Summarize()
    {
        string strSummary = values.Prepare()
                                  .Read()
                                  .Describe();

        return strSummary;
    }
}
Involving a Class in its Own Members
The Type of a Field as its Own Class
In a class, you can create a field that is the type of its own class. Here is an example:
public class Employee
{
    public int EmplNbr;
    public string FName;
    public string LName;
    public decimal Salary;

    Employee staff;
}
If you do this, the field can be accessed by any member of the same class. If you make the field public or internal, if you decide to use it outside the class, you can access the public and internal members of the class through that field.
Passing a Class to its Own Method
An instance of a class can be passed as an argument to one of its own methods. To do this, you primarily pass the argument as if it were any type. Here is an example:
public class HotelRoom
{
    public void Display(HotelRoom room)
    {
    }
}
In the body of the method, you can do whatever you want. You can, or you may not, use the parameter. Still, if you decide to use the parameter, know that all of the other members of the class are accessible through the parameter. One of the simplest ways you can use the parameter is the assign each of of its values to the equivalent member of the class. Here is an example:
public class HotelRoom
{
    private string RoomNumber;
    private int    Capacity;
    private string RoomType;
    private decimal BaseRate;

    public void Display(HotelRoom room)
    {
       	RoomNumber = room.RoomNumber;
	    Capacity = room.Capacity;
    	RoomType = room.RoomType;
        BaseRate = room.BaseRate;
    }
}
When calling the method, make sure you pass an instance of the class to it. You can first create and define an object of the class, then pass it.
A Class Type as a Parameter to its Own Constructor
Just like a class can be used as the type of a parameter in one of its own methods, a class type can be used as a parameter to one of its own constructors. This can be done as follows:
public class HotelRoom
{
    public HotelRoom(HotelRoom sample)
    {

    }
}
Instead of a formal method, you can use a constructor of the class to pass an instance of the same class. Then, in the constructor, use the argument as you see fit, knowing that all the members of the class are available.
Passing a Class in, and Returning an Object from, its Own Method
In a class, you can create a method that both uses a parameter that is of the type of its own class and returns an object that is the type of its own class. Here is an example:
public class Circle
{
    public Circle Create(Circle cir)
    {
    }
}
As mentioned already, in the body of the method, the parameter has access to all members of the class. Before exiting the method, make sure you return an object that is the type of the class. Here is an example:
public class Circle
{
    public Circle Create(Circle cir)
    {
       	Circle rounder = new Circle();

        return rounder;
    }
}
Using a Reference of a Class Without its Object
Introduction
So far, to create an object, we had to declare a variable of the desired class. A variable, or object, is necessary only if you are planning to use the object more than once. If you need a reference to the object only once (or just a few times), you don't need a variable. In this case, in the section of code where you want the reference, simply type the new keyword followed by the name of the class. Since you are calling a constructor of the class, you must add parentheses.
public class Triangle
{
    public decimal Width;
    public decimal Depth;

    public decimal CalculateArea() => Width * Depth / 2.00;
}

. . .

new Triangle();
Passing a Reference to a Method
Consider the following class:
public class Triangle
{
    public decimal Width;
    public decimal Depth;

    public Triangle(decimal w, decimal d)
    {
        Width = w;
        Depth = d;
    }

    public decimal CalculateArea() => Width * Depth / 2.00M;
}
In order to use an object, you usually first declare a variable of the class before calling the method that needs it. If you are not planning to use the object many times, you don't have to first declare a variable for it. You can pass the initialization directly to the method. Here is an example:
<!DOCTYPE html>
<html>
<head>
<title>Geometry - Triangle</title>
</head>
<body>
<div align="center">
<h2>Geometry - Triangle</h2>
@{
decimal width = 0.00M, height = 0.00M, area = 0.00M;
if (IsPost)
{
width = Request["txtWidth"].AsDecimal();
height = Request["txtWidth"].AsDecimal();
area = new Triangle(width, height).CalculateArea();
}
<form name="frmGeometry" method="post">
<table>
<tr>
<td style="width: 120px; font-weight: bold">Width:</td>
<td><input type="text" name="txtWidth" value="@width" /></td>
<td> </td>
</tr>
<tr>
<td style="font-weight: bold">Height:</td>
<td><input type="text" name="txtHeight" value="@height" /></td>
<td><input type="submit" name="txtSubmit" value=Calculate /></td>
</tr>
<tr>
<td style="font-weight: bold">Area:</td>
<td><input type="text" name="txtArea" value="@area" /></td>
<td> </td>
</tr>
</table>
</form>
}
</div>
</body>
</html>
Returning a Reference
As done for a value of a regular type, you can return an object value from a method of a class. To do this, you can first declare the method and specify the class as the return type. Here is an example:
public class Triangle
{
    public decimal Width;
    public decimal Depth;

    public Triangle(decimal w, decimal d)
    {
        Width = w;
        Depth = d;
    }

    public decimal CalculateArea() => Width * Depth / 2.00M;
}

public class Shape
{
    private Triangle Create()
    {
        decimal width = 2834.208M;
        decimal depth = 602.415M;

        return new Triangle(width, depth);
    }
}
![]() Practical Learning: Ending the Lesson
Practical Learning: Ending the Lesson
|
|
||
| Previous | Copyright © 2001-2019, FunctionX | Next |
|
|
||