Partially Rendering a Web Page

Partially Rendering a Web Page
Rendering the Body of a Web Page
Introduction
As seen in previous lessons, the general way to programmatically populate a webpage with contents from other pages is to call the RenderBody() method of the WebPageBase class. As we saw already, that method is usually used to indicate the area of the layout page that represents the common section to show the webpages that depend on that layout design. You can create various sections on a webpage and render them independently.
![]() Practical Learning: Introducing Partial Rendering
Practical Learning: Introducing Partial Rendering
body {
    background-color: #FFFFFF;
}

.bold    { font-weight: 600;   }
.small   { width:       90px;  }
.x-large { width: 300px; }using System.Web.Optimization;
namespace FourCornerRestaurant10
{
public class BundleConfig
{
// For more information on bundling, visit https://go.microsoft.com/fwlink/?LinkId=301862
public static void RegisterBundles(BundleCollection bundles)
{
bundles.Add(new ScriptBundle("~/bundles/jquery").Include(
"~/Scripts/jquery-{version}.js"));
bundles.Add(new ScriptBundle("~/bundles/jqueryval").Include(
"~/Scripts/jquery.validate*"));
// Use the development version of Modernizr to develop with and learn from. Then, when you're
// ready for production, use the build tool at https://modernizr.com to pick only the tests you need.
bundles.Add(new ScriptBundle("~/bundles/modernizr").Include(
"~/Scripts/modernizr-*"));
bundles.Add(new ScriptBundle("~/bundles/bootstrap").Include(
"~/Scripts/bootstrap.js",
"~/Scripts/respond.js"));
bundles.Add(new StyleBundle("~/Content/css").Include(
"~/Content/bootstrap.css",
"~/Content/site.css",
"~/Content/Restaurant.css"));
}
}
}using System;
namespace FourCornerRestaurant10.Models
{
[Serializable]
public class CustomerOrder
{
public int OrderNumber { get; set; }
public string OrderDescription { get; set; }
public string Price { get; set; }
public string OrderStatus { get; set; }
}
}Rendering a Web Page
For your Web project, you can create a webpage that would serve as a host to other webpages. In this case, you would embed those child webpages in the parent document. It is as if, instead of showing different views in various tabs of a browser, you can use a webpage that displays, in one view, the contents of various webpages. This is done by rendering the parent webpage.
To prepare a document for webpage rendering, create one or more webpages. You can create ASP.NET MVC views from action methods. You can also create regular razor pages in a folder of your choice. To let you embed the webpage, the WebPageBase class is equipped with a method named RenderPage. Its syntax is:
public override HelperResult RenderPage(string path,
										params Object[] data);
This method takes one required and one optional arguments. The required argument is the name or the path of the webpage whose content will display. In most cases, the method can be called with just that argument. If you want to transmit some data from one view to another, pass the second argument as a dictionary-based list.
![]() Practical Learning: Rendering Web Pages
Practical Learning: Rendering Web Pages
using System;
using System.Collections.Generic;
using System.IO;
using System.Runtime.Serialization.Formatters.Binary;
using System.Web.Mvc;

namespace FourCornerRestaurant1.Controllers
{
    public class HomeController : Controller
    {
        public ActionResult Index()
        {
            return View();
        }

        public ActionResult About()
        {
            ViewBag.Message = "Your application description page.";

            return View();
        }

        public ActionResult Contact()
        {
            ViewBag.Message = "Your contact page.";

            return View();
        }

        public ActionResult CustomersOrders()
        {
            return View();
        }

        public ActionResult CreateCustomerOrder()
        {
            return View();
        }

        public ActionResult SaveCustomerOrder(string OrderDescription, string Price)
        {
            int orderNumber = 100;
            string orderStatus = "Received";
            FileStream fsCustomersOrders = null;
            BinaryFormatter bfCustomersOrders = new BinaryFormatter();
            List<Models.CustomerOrder> customersOrders = new List<Models.CustomerOrder>();
            string strCustomersOrdersFile = Server.MapPath("~/App_Data/CustomerOrders.cos");

            if (!string.IsNullOrEmpty("OrderDescription"))
            {
                if (System.IO.File.Exists(strCustomersOrdersFile))
                {
                    using (fsCustomersOrders = new FileStream(strCustomersOrdersFile, FileMode.Open, FileAccess.Read, FileShare.Read))
                    {
                        customersOrders = (List<Models.CustomerOrder>)bfCustomersOrders.Deserialize(fsCustomersOrders);
                    }

                    foreach(Models.CustomerOrder co in customersOrders)
                    {
                        orderNumber = co.OrderNumber;
                    }
                }

                Models.CustomerOrder order = new Models.CustomerOrder()
                {
                    OrderNumber = orderNumber + 1,
                    OrderDescription = OrderDescription,
                    Price = Price,
                    OrderStatus = orderStatus
                };

                customersOrders.Add(order);

                using (fsCustomersOrders = new FileStream(strCustomersOrdersFile, FileMode.Create, FileAccess.Write, FileShare.Write))
                {
                    bfCustomersOrders.Serialize(fsCustomersOrders, customersOrders);
                }

                // If the list of CustomerOrderes has been created/updated and saved, take the user back to the form.
                return RedirectToAction("CreateCustomerOrder");
            }

            return View();
        }

        public ActionResult FindCustomerOrder()
        {
            return View();
        }

        public ActionResult UpdateCustomerOrder(string OrderNumber, string OrderDescription, string Price, string OrderStatus)
        {
            FileStream fsCustomersOrders = null;
            BinaryFormatter bfCustomersOrders = new BinaryFormatter();
            List<Models.CustomerOrder> customersOrders = new List<Models.CustomerOrder>();
            string strCustomersOrdersFile = Server.MapPath("~/App_Data/CustomerOrders.cos");

            if (!string.IsNullOrEmpty("OrderNumber"))
            {
                if (System.IO.File.Exists(strCustomersOrdersFile))
                {
                    using (fsCustomersOrders = new FileStream(strCustomersOrdersFile, FileMode.Open, FileAccess.Read, FileShare.Read))
                    {
                        customersOrders = (List<Models.CustomerOrder>)bfCustomersOrders.Deserialize(fsCustomersOrders);
                    }

                    foreach (Models.CustomerOrder co in customersOrders)
                    {
                        if (co.OrderNumber == int.Parse(OrderNumber))
                        {
                            ViewBag.OrderNumber = co.OrderNumber;
                            ViewBag.OrderDescription = co.OrderDescription;
                            ViewBag.Price = co.Price;
                            ViewBag.OrderStatus = co.OrderStatus;
                        }
                    }
                }
            }

            return View();
        }

        public ActionResult SaveUpdatedCustomerOrder(int OrderNumber, string OrderDescription, string Price, string OrderStatus)
        {
            FileStream fsCustomersOrders = null;
            BinaryFormatter bfCustomersOrders = new BinaryFormatter();
            List<Models.CustomerOrder> customersOrders = new List<Models.CustomerOrder>();
            string strCustomersOrdersFile = Server.MapPath("~/App_Data/CustomerOrders.cos");

            if (System.IO.File.Exists(strCustomersOrdersFile))
            {
                using (fsCustomersOrders = new FileStream(strCustomersOrdersFile, FileMode.Open, FileAccess.Read, FileShare.Read))
                {
                    customersOrders = (List<Models.CustomerOrder>)bfCustomersOrders.Deserialize(fsCustomersOrders);
                }

                foreach (Models.CustomerOrder co in customersOrders)
                {
                    if (co.OrderNumber == OrderNumber)
                    {
                        co.OrderDescription = OrderDescription;
                        co.Price = Price;
                        co.OrderStatus = OrderStatus;

                        break;
                    }
                }

                        using (fsCustomersOrders = new FileStream(strCustomersOrdersFile, FileMode.OpenOrCreate, FileAccess.ReadWrite, FileShare.ReadWrite))
                        {
                            bfCustomersOrders.Serialize(fsCustomersOrders, customersOrders);
                        }

                    return RedirectToAction("FindCustomerOrder");
            }

            return View();
        }

        public ActionResult CompletedCustomersOrders()
        {
            return View();
        }
    }
}
@{
    ViewBag.Title = "Create Customer Order";
}

<h2>Create Customer Order</h2>

@using (Html.BeginForm("SaveCustomerOrder", "Home", FormMethod.Post))
{
    <div class="row">
        <div class="col-md-12 bold">Food Item Name/Description:
        </div>
    </div>

    <div class="row form-group">
        <div class="col-md-3 small">
        </div>
        <div>@Html.TextBox("OrderDescription", "", htmlAttributes: new { @class = "form-control" })</div>
    </div>

    <div class="row form-group">
        <div class="col-md-3 small bold">
            <b>Price:</b>
        </div>
        <div class="col-md-9">@Html.TextBox("Price", "", htmlAttributes: new { @class = "form-control" })</div>
    </div>

    <p><input type="submit" value="Save Customer Order" class="btn btn-primary" /></p>
    <p>@Html.ActionLink("Monitor Customers Orders", "CustomersOrders")</p>
}@{
ViewBag.Title = "FindCustomerOrder";
}
<h2>Find Customer Order</h2>
@using (Html.BeginForm("UpdateCustomerOrder", "Home", FormMethod.Post))
{
<div class="row">
<div class="col-md-3 small bold">
<b>Order #:</b>
</div>
<div class="col-md-9 form-group">
@Html.TextBox("OrderNumber", "", htmlAttributes: new { @class = "form-control" })
<input type="submit" value="Find Customer Order" class="btn btn-primary" />
</div>
</div>
<p>@Html.ActionLink("Monitor Customers Orders", "CustomersOrders")</p>
}@{
ViewBag.Title = "Update Customer Order";
}
<h2>Update Customer Order</h2>
@using (Html.BeginForm("SaveUpdatedCustomerOrder", "Home", FormMethod.Post))
{
<div class="row form-group">
<div class="col-md-3 small bold">
<b>Order #:</b>
</div>
<div class="col-md-9">
@Html.TextBox("OrderNumber", @ViewBag.OrderNumber as string, htmlAttributes: new { @class = "form-control" })
</div>
</div>
<div class="row">
<div class="col-md-12 bold">
Food Item Name/Description:
</div>
</div>
<div class="row form-group">
<div class="col-md-3 small">
</div>
<div>@Html.TextBox("OrderDescription", @ViewBag.OrderDescription as string, htmlAttributes: new { @class = "form-control" })</div>
</div>
<div class="row form-group">
<div class="col-md-3 small bold">
<b>Price:</b>
</div>
<div class="col-md-9">@Html.TextBox("Price", @ViewBag.Price as string, htmlAttributes: new { @class = "form-control" })</div>
</div>
<div class="row form-group">
<div class="col-md-3 small bold">
<b>Order Status:</b>
</div>
<div class="col-md-9">
<div class="row">
<div class="col-md-4">Received @Html.RadioButton("OrderStatus", "Received")</div>
<div class="col-md-4">Processing @Html.RadioButton("OrderStatus", "Processing")</div>
<div class="col-md-4">Completed @Html.RadioButton("OrderStatus", "Completed")</div>
</div>
</div>
</div>
<p><input type="submit" value="Save Updated Customer Order" class="btn btn-primary" /></p>
<p>@Html.ActionLink("Monitor Customers Orders", "CustomersOrders")</p>
}@{
ViewBag.Title = "Completed Customers Orders";
}
<h2 class="text-center">Completed Customers Orders</h2>
@{
FileStream fsCustomersOrders = null;
System.Runtime.Serialization.Formatters.Binary.BinaryFormatter bfCustomersOrders = new System.Runtime.Serialization.Formatters.Binary.BinaryFormatter();
System.Collections.Generic.List<FourCornerRestaurant10.Models.CustomerOrder> customersOrders = new System.Collections.Generic.List<FourCornerRestaurant10.Models.CustomerOrder>();
System.Collections.Generic.List<FourCornerRestaurant10.Models.CustomerOrder> completedCustomersOrders = new System.Collections.Generic.List<FourCornerRestaurant10.Models.CustomerOrder>();
string strCustomersOrdersFile = Server.MapPath("~/App_Data/CustomerOrders.cos");
if (System.IO.File.Exists(strCustomersOrdersFile))
{
using (fsCustomersOrders = new FileStream(strCustomersOrdersFile, FileMode.Open, FileAccess.Read, FileShare.Read))
{
customersOrders = (System.Collections.Generic.List<FourCornerRestaurant10.Models.CustomerOrder>)bfCustomersOrders.Deserialize(fsCustomersOrders);
foreach (var co in customersOrders)
{
if (co.OrderStatus == "Completed")
{
completedCustomersOrders.Add(co);
}
}
}
}
}
<table class="table table-striped">
<tr>
<td><b>#</b></td>
<td><b>Description</b></td>
<td><b>Price</b></td>
<td><b>Status</b></td>
</tr>
@foreach (var co in completedCustomersOrders)
{
<tr>
<td>@co.OrderNumber</td>
<td>@co.OrderDescription</td>
<td>@co.Price</td>
<td>@co.OrderStatus</td>
</tr>
}
</table>@{
ViewBag.Title = "Customers Orders";
}
<h2 class="text-center">Customers Orders Management</h2>
<div class="row">
<div class="col-md-6">
@RenderPage("PendingCustomersOrders.cshtml")
</div>
<div class="col-md-6">
@RenderPage("CompletedCustomersOrders.cshtml")
</div>
</div>
<p class="text-center">@Html.ActionLink("New Customer Order", "CreateCustomerOrder") :: @Html.ActionLink("Update Customer Order", "FindCustomerOrder")</p>Food Item Name/Description: Chicken Chow Mein Price: 6.85
Food Item Name/Description: Kung Pao Chicken w/ Wong Tong Soup
Price: 14.75
Food Item Name/Description: Sweet and Soor Pork, Shrimp with Cashew Nut
Price: 26.35
Food Item Name/Description: Sweet and Sour Pork, Shrimp w/ Cashew Nuts
Price: 16.35
Order Status: Processing
Rendering a Section
Introduction
As we have seen already, you can use a central document, called a layout page that would display the contents of different views that depend in it. A layout page can have only one view. This is by design. After all, it doesn't make sense for a webpage to display its content more than once in the browser. As an alternative, in a central webpage like a layout view, you can create and reserve a special section that each webpage would use to display something particular. The section is created in the layout view and shared by all webpages that depend on that layout document, but each view must define what it wants to display in that section.
An HTML Section
There are two interchangeable steps to implement section rendering. You can first prepare the layout page, or you can do it last, or you can first prepare the view(s). To prepare a view for section rendering, in its document, create a section using the following formula
@section section-name {

}
The name is not included in quotes. Here is an example:
. . .

@section References {

}

. . .
You can create the section anywhere in the document. It is in the layout page that you will decide where to display the common section.
In the body delimited by curly brackets, you can include text and HTML code, with optional CSS formats. Here is an example:
. . .
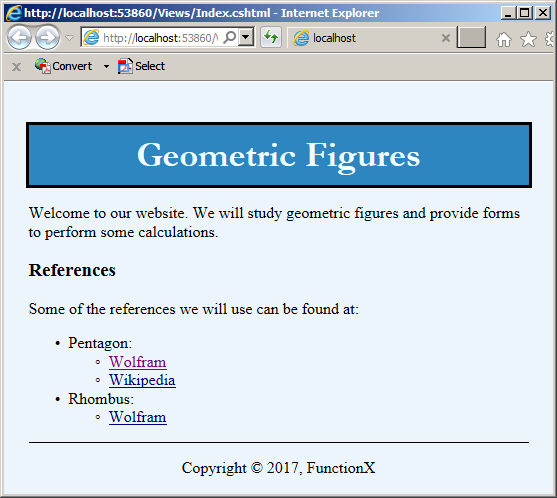
<p>Welcome to our website. We will study geometric figures and provide forms to perform some calculations.</p>
<section name="references">
<h3>References</h3>
<p>Some of the references we will use can be found at:</p>
<ul>
<li>Pentagon:
<ul>
<li><a href="http://mathworld.wolfram.com/Pentagon.html">Wolfram</a></li>
<li><a href="https://en.wikipedia.org/wiki/Pentagon">Wikipedia</a></li>
</ul>
</li>
<li>Rhombus:
<ul>
<li><a href="http://mathworld.wolfram.com/Rhombus.html">Wolfram</a></li>
</ul>
</li>
</ul>
</section>
. . .
In every view that will need to display something in the section, you can, should (must) create a section using the same name. Since you must create the section in each desired view, you can (must) also include the desired content for each view. Of course, this means that the contents will be different.
![]() Practical Learning: Creating HTML Sections
Practical Learning: Creating HTML Sections
@{
    ViewBag.Title = "Home Page";
}

@section Promotions{
    <p class="text-center">Four-Corner Restaurant, an internation cuisine with a sweet local touch...</p>
}

<div class="jumbotron">
    . . . No Change
</div>@{
ViewBag.Title = "Contact Us";
}
<h2>@ViewBag.Title.</h2>
<h3>@ViewBag.Message</h3>
<address>
<p class="bold"></p>Four-Corner Restaurant</p>
<p>10724 Robyn Rd, Paulding, OH 45879<br />
Phone #: 419-082-3518<br />
Fax #: 419-174-5093<br />
Website: http://www.fourcornerrestaurantoh.com<br />
Email: customers@fourcornerrestaurantoh.com</p>
</address>
@section Promotions{
<p class="text-center">For a more detailed and clearer experience, please place your order via our website.</p>
}
<address>
<strong>Customer Service:</strong> <a href="mailto:Support@fourcornerrestaurantoh.com">Support@fourcornerrestaurantoh.com</a><br />
<strong>Catering:</strong> <a href="mailto:catering@fourcornerrestaurantoh.com">catering@fourcornerrestaurantoh.com</a>
</address>@{
ViewBag.Title = "About Four-Corner Restaurant";
}
@section Promotions{
<p class="text-center">Our cuisine was featured as a reference by three local newspapers for the last five months.</p>
}
<h2>@ViewBag.Title.</h2>
<h3>@ViewBag.Message</h3>@{
ViewBag.Title = "Customers Orders";
}
<h2 class="text-center">Customers Orders Management</h2>
<div class="row">
<div class="col-md-6">
@RenderPage("PendingCustomersOrders.cshtml")
</div>
<div class="col-md-6">
@RenderPage("CompletedCustomersOrders.cshtml")
</div>
</div>
<p class="text-center">@Html.ActionLink("New Customer Order", "CreateCustomerOrder") :: @Html.ActionLink("Update Customer Order", "FindCustomerOrder")</p>
@section Promotions{
<p class="text-center">Today's Sale Special: Chicken Wings w/ Rice: 6 for the price of 3</p>
<p class="text-center">Four-Corner Restaurant, an international cuisine with a sweet local touch...</p>
}Rendering a Section in the Central Web Page
In a central document, such as a layout page, to let you create a section shared by its dependent views, the WebPageBase class provides an overloaded method named RenderSection. One of the versions of this method takes a string as argument. To indicate that you may use such a section, in your layout page, call this method and pass the name of the section you had created. Here is an example:
<!DOCTYPE html>
<html>
<head>
<title></title>
<link rel="stylesheet" type="text/css" href="~/Content/Site.css" />
</head>
<body>
<div class="tool-bar central">
<p id="main-title">Geometric Figures</p>
</div>
<div class="central">
@RenderBody()
</div>
<div>
@RenderSection("references")
</div>
<div class="bottom-side central">
<p>Copyright © 2017, FunctionX</p>
</div>
</body>
</html>
![]() Practical Learning: Rendering a Section in the Layout Page
Practical Learning: Rendering a Section in the Layout Page
<!DOCTYPE html>
<html>
<head>
<meta charset="utf-8" />
<meta name="viewport" content="width=device-width, initial-scale=1.0">
<title>Four-Corner Restaurant :: @ViewBag.Title</title>
@Styles.Render("~/Content/css")
@Scripts.Render("~/bundles/modernizr")
</head>
<body>
<div class="navbar navbar-inverse navbar-fixed-top">
<div class="container">
<div class="navbar-header">
<button type="button" class="navbar-toggle" data-toggle="collapse" data-target=".navbar-collapse">
<span class="icon-bar"></span>
<span class="icon-bar"></span>
<span class="icon-bar"></span>
</button>
@Html.ActionLink("Four-Corner Restaurant", "Index", "Home", new { area = "" }, new { @class = "navbar-brand" })
</div>
<div class="navbar-collapse collapse">
<ul class="nav navbar-nav">
<li>@Html.ActionLink("About Us", "About", "Home")</li>
<li>@Html.ActionLink("Contact Us", "Contact", "Home")</li>
<li>@Html.ActionLink("Customers Orders Monitoring", "CustomersOrders", "Home")</li>
</ul>
</div>
</div>
</div>
<div class="container body-content">
<div>
@RenderSection("Promotions")
</div>
<div>
@RenderBody()
</div>
<hr />
<footer>
<p class="text-center">© @DateTime.Now.Year - Four-Corner Restaurant</p>
</footer>
</div>
@Scripts.Render("~/bundles/jquery")
@Scripts.Render("~/bundles/bootstrap")
@RenderSection("scripts", required: false)
</body>
</html>Sectional Errors
Remember that you should (must) create a named section for each view that will use the reserved section. When a view is accessed, if it doesn't have the designated section, the browser would produce an error. Here is an example of such an error:
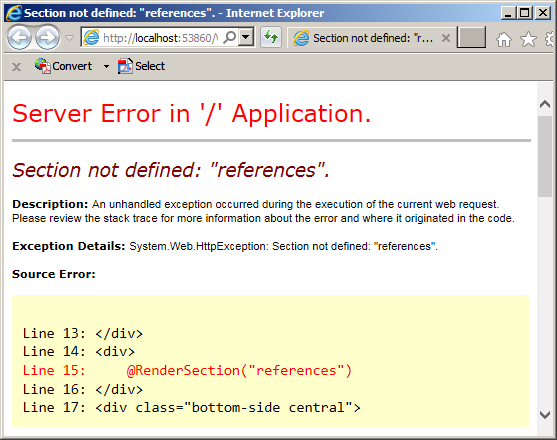
Of course, in your website, you can have webpages that don't have that section. To allow you to deal with the possibility of webpages that don't have the designated section, the WebPageBase class provides another version of the RenderSection method. This version uses a second argument that is Boolean. This argument specifies whether the section is required or not. Here is an example of calling it:
<!DOCTYPE html>
<html>
<head>
<title></title>
<link rel="stylesheet" type="text/css" href="~/Content/Site.css" />
</head>
<body>
<div class="tool-bar central">
<p id="main-title">Geometric Figures</p>
</div>
<div class="central">
@RenderBody()
</div>
@RenderSection("references", false)
<div class="bottom-side central">
<p>Copyright © 2017, FunctionX</p>
</div>
</body>
</html>
This would produce:
:
![]() Practical Learning: Ending the Lessons
Practical Learning: Ending the Lessons
|
|
||
| Previous | Copyright © 2017-2019, FunctionX | Home |
|
|
||