Introduction to Built-In JavaScript Objects

Introduction to Built-In JavaScript Objects
Introduction to DOM Interfaces
Overview
The Document Object Model, or DOM, is a library that contains the definitions of all of the objects used to create and populate a webpage. As is the case for the .NET Framework, the DOM is filled with interfaces and classes. The necessary classes used for webpages implement those interfaces. Unlike the .NET Framework where the names of interfaces start with I, the names of interfaces in the DOM usually start with an uppercase letter. The classes that implement those interfaces use the same name but are in lowercase.
To assist you in performing some of the most routine operations, the JavaScript language provides many ready-made objects that you can directly use in your code.
An HTML Element
As you may know already, a webpage is a text-based document that contains text-based tags the instruct the browser what to do with the document. The tags are created using standardized formats. To support the tags of a webpage, the DOM provides a class named Element. This class contains the common characteristics (properties) that describe all or most tags. The class also contains methods for the actions that a tag can take.
Introduction to the Document of a Web Page
Overview
As you are probably aware already, a webpage starts as normal text-based document in which you add the necessary HTML tags to create the desired content. To support the document as an object, the DOM provides an interface named Document. To give you access to the webpage, the DOM provides a class named document that implements the Document interface.
The Root of a Web Page
The most fundamental tag of a webpage is named HTML. It includes, and serves as the parent of, everything or every other tag on a webpage. Therefore, it is called the root element.
To give you access to the root element of a webpage, the Document interface is equipped with a property named documentElement:
var element = document.documentElement;
The Document.documentElement property holds a collection of all the elements or HTML tags of a webpage.
Writing to a Document
To allow you to programmatically write something to a webpage, the Document interface is equipped with a method named write. Its syntax is:
document.write(markup);
This method takes a string as argument. You can pass a regular string to the method. One of the strengths of the Document.write() method is thaat its argument can include HTML markup. It this case, the method would produce the word, paragraph, or section as it is meant to display as an HTML formatted item.
Locating an Element in a Web Page
Locating an Element by its Identifier
When creating a tag in a webpage, you can add an identifier to it. This is done by adding an ID attribute to the tag. Assign a name to the ID attribute. In the same way, you can add the ID attribute to as many tags as you want. The name of the ID attribute must be unique for each tag in the same webpage.
To let you access a tag based on its ID attribute, the Document interface is equipped with a method named getElementById. Its syntax is:
var element = document.getElementById(id);
This method produces an Element object.
Querying by Selection
The DOM provides a general way to locate an element in a webpage. This is done using a method named querySelector of the document class. The syntax of the document.querySelector() method is:
element = document.querySelector(selectors);
This method takes a string as argument. The content of that string depends on the category of item you are trying to access. One way to use this methos is to first add a CSS class to a tag. The doesn't have to exist in a style section or a CSS file. This means that you can add a CSS class to a tag and give it any value. Then, to access the tag based on the CSS class, pass the value of the class to the document.querySelector() method. The value you pass must be preceded by a period.
The Object Object
Introduction
The most fundamental class in JavaScript is named Object. This class encompasses practically everything on the webpage. To put it another way, everything you can see on a webpage, that is, every element that appears in the browser, is directly or indirectly an object of type Object.
The most fundamental way to use the Object class is to declare a variable of it.
The new Operator
To let you initialize an object, the JavaScript language (in fact all or most C-based languages, which includes C#) supports an operator named new, which we encountered already in C#. Therefore, to initialize an Object variable, use the new operator as we saw in C#. Here is an example:
<!DOCTYPE html>
<html>
<head>
<meta charset="utf-8" />
<title>Exercise</title>
</head>
<body>
<script type="text/javascript">
    var staff = new Object();
</script>
</body>
</html>
After declaring the variable, you can access the members of the class. The Object class is equipped with various properties and methods.
The Constructor of an Object
One of the most important characteristics of the Object class is that it can be used to create an object as an item of a class. To make this possible, the Object class is equipped with a default constructor that takes no argument. To create an object using the Object class, declare a variable using the var keyword. Initialize it using. The formula to follow is:
var variable-name = new Object();
After that, attach the desired properties as we have been doing so far. Here is an example:
<!DOCTYPE html>
<html>
<head>
    <title>ESCAPE - Bill Evaluation</title>
    <link rel="stylesheet" type="text/css" href="~/CableCompany.css" />
</head>
<body>
    <div class="container">
        <h1 class="centered">ESCAPE</h1>
        <h2 class="centered">Eastern Shore Cable and Production Entertainment</h2>
        <h3 class="centered">Bill Evaluation</h3>
    </div>

    <div class="container">
        <form name="BillEvaluation" method="post">
            <fieldset>
                <legend>Cable TV Services</legend>
                <div>
                    <label for="CableTVBasicFee">Cable TV Basic Fee:</label>
                    <input type="number" id="CableTVBasicFee" name="CableTVBasicFee" value="0.00" />
                </div>
                <div>
                    <label for="DVRService">DVR Service:</label>
                    <input type="number" id="DVRService" name="DVRService" value="0.00" />
                </div>
                <div>
                    <label for="SportPackage">Sport Package:</label>
                    <input type="number" id="SportsPackage" name="SportsPackage" value="0.00" />
                </div>
                <div>
                    <label for="SportPackage">Total Amount:</label>
                    <input type="number" id="totalAmount" name="totalAmount" value="0.00" />
                </div>
            </fieldset>
        </form>
    </div>

    <script>
        var bill = new Object();

        bill.basicFee = 32.70;
        bill.dvr = 10.45;
        bill.sports = 12.20;

        bill.total = function () {
            return this.basicFee + this.dvr + this.sports;
        }

        document.BillEvaluation.CableTVBasicFee.value = bill.basicFee;
        document.BillEvaluation.DVRService.value = bill.dvr;
        document.BillEvaluation.SportsPackage.value = bill.sports;
        document.BillEvaluation.totalAmount.value = bill.total();
    </script>

</body>
</html>
You can pass one or more parameters to the Object class. The parameter can be any type. In fact, you can pass the definition of an object to an object. The members are attached using the colon-based technique. Here is an example:
var bill = new Object({
    basicFee : 32.70,
    dvr : 10.45,
    sports : 12.20,

    total : function () {
        return this.basicFee + this.dvr + this.sports;
    }
});
To let you access the object that was defined in the parentheses, the Object class is equipped with a method named create. When calling it, pass the Object variable as argument. Assign the call to a new variable and access the members of the object by that new variable. Here is an example:
. . .

<script>
    var bill = new Object({
        basicFee : 32.70,
        dvr : 10.45,
        sports : 12.20,

        total : function () {
            return this.basicFee + this.dvr + this.sports;
        }
    });

    var pay = Object.create(bill);

    document.BillEvaluation.CableTVBasicFee.value = pay.basicFee;
    document.BillEvaluation.DVRService.value = pay.dvr;
    document.BillEvaluation.SportsPackage.value = pay.sports;
    document.BillEvaluation.totalAmount.value = pay.total();
</script>

</body>
</html>
Numbers
Introduction
JavaScript supports numbers in many ways. The primary way is through a class named Number. You can use this class to initiate a number. To do this, declare a variable and initialize it using the new operator. Pass the desired expression or number to the constructor of this class. Here are examples:
<script>
    function create(start, rent, plays) {
        var bill = {};

        bill.basicFee = start;
        bill.dvr = rent;
        bill.sports = plays;
        bill.fccFee = 1.05;
        bill.total = function () {
            return this.basicFee + this.dvr + this.sports + this.fccFee;
        };
        bill.calcTaxes = function (rate) {
            var taxes = this.total() * rate / 100;

            return taxes;
        }

        return bill;
    };

    var first = new Number(28.85);
    var recorder = new Number(8.95);
    ar play = new Number(12.95);
    var pay = create(first, recorder, play);
</script>
Converting a Number
Converting, or parsing, a number consists of analyzing it to make it possible to use it appropriately. The Number class provides its own mechanism to perform a conversion. To convert a number, use its constructor as a method. As mentioned already, it takes an object as argument. You can use that argument as a Boolean disjunction. The formula to follow is:
Number(expression || 0);
Pass an expression or a value to Number followed by || 0. If the expression or value is successfully converted to a number, this method returns that number. If the conversion fails, the || 0 expression indicates that the method should returns 0. You can then assign the method call to a variable:
variable = Number(expression || 0);
Formatting a Number
One of the most important features of the Number class is its ability to format a number so it can be displayed the way you want to the user. The class does this through various methods.
To let you format a number to an exponential, the Number class provides a method named toExponential. To let you format a number to a precision of your choice, the class provides a method named toPrecision. To allow you to format a number to a fixed precision, the Number class provides a method named toFixed. Its syntax is:
toFixed([digits])
This method takes one argument that is optional. The value of this argument is a number between 0 and 20. The value represents the number digits that would appear after the decimal point. If you don't pass this argument, the method would use 0. Otherwise, make sure you pass a value of your choice.
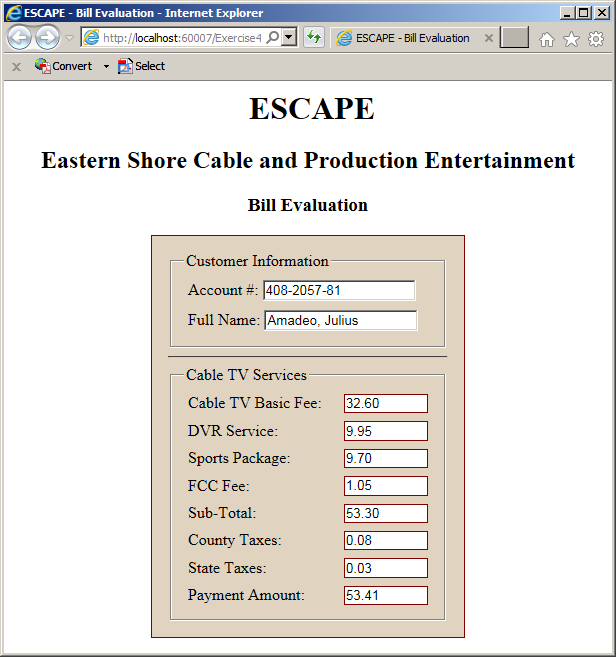
![]() Practical Learning: Formatting Numbers
Practical Learning: Formatting Numbers
<!DOCTYPE html>
<html>
<head>
<meta charset="utf-8" />
<title>ESCAPE - Bill Evaluation</title>
<script src="WaterBill.js"></script>
<script src="Customer.js"></script>
<link rel="stylesheet" type="text/css" href="CableCompany.css" />
</head>
<body>
<div class="container">
    <h1 class="centered">ESCAPE</h1>
    <h2 class="centered">Eastern Shore Cable and Production Entertainment</h2>
    <h3 class="centered">Bill Evaluation</h3>
</div>

<div class="container">
    <form name="BillEvaluation" method="post">
        <fieldset>
            <legend>Customer Information</legend>
            <div>
                <label for="accountNumber">Account #:</label>
                <input type="text" id="accountNumber" name="accountNumber" />
            </div>
            <div>
                <label for="customerName">Full Name:</label>
                <input type="text" id="customerName" name="customerName" />
            </div>
        </fieldset>
        <hr />
        <fieldset>
            <legend>Cable TV Services</legend>
            <div>
                <label for="CableTVBasicFee">Cable TV Basic Fee:</label>
                <input type="number" id="CableTVBasicFee" name="CableTVBasicFee" value="0.00" />
            </div>
            <div>
                <label for="DVRService">DVR Service:</label>
                <input type="number" id="DVRService" name="DVRService" value="0.00" />
            </div>
            <div>
                <label for="SportsPackage">Sports Package:</label>
                <input type="number" id="SportsPackage" name="SportsPackage" value="0.00" />
            </div>
            <div>
                <label for="fccFee">FCC Fee:</label>
                <input type="number" id="fccFee" name="fccFee" value="0.00" />
            </div>
            <div>
                <label for="subTotal">Sub-Total:</label>
                <input type="number" id="subTotal" name="subTotal" value="0.00" />
            </div>
            <div>
                <label for="countyTaxes">County Taxes:</label>
                <input type="number" id="countyTaxes" name="countyTaxes" value="0.00" />
            </div>
            <div>
                <label for="stateTaxes">State Taxes:</label>
                <input type="number" id="stateTaxes" name="stateTaxes" value="0.00" />
            </div>
            <div>
                <label for="paymentAmount">Payment Amount:</label>
                <input type="number" id="paymentAmount" name="paymentAmount" value="0.00" />
            </div>
        </fieldset>
    </form>
</div>

<script>
    var primary = new Number(32.60);
    var renting = new Number(9.95);
    var play = new Number(9.70);
    var pay = create(primary, renting, play);
    var client = new Customer('408-2057-81', 'Julius', 'Amadeo', '8725 Henrietta Road');

    var local = new Number(pay.calcTaxes(0.15));
    var state = new Number(pay.calcTaxes(0.05));

    document.BillEvaluation.CableTVBasicFee.value = pay.basicFee.toFixed(2);
    document.BillEvaluation.DVRService.value = pay.dvr.toFixed(2);
    document.BillEvaluation.SportsPackage.value = pay.sports.toFixed(2);
    document.BillEvaluation.fccFee.value = pay.fccFee.toFixed(2);
    document.BillEvaluation.subTotal.value = pay.subTotal().toFixed(2);
    document.BillEvaluation.countyTaxes.value = local.toFixed(2);
    document.BillEvaluation.stateTaxes.value = state.toFixed(2);
    document.BillEvaluation.paymentAmount.value = (pay.subTotal() + local + state).toFixed(2);
    document.BillEvaluation.accountNumber.value = client.AccountNumber;
    document.BillEvaluation.customerName.value = client.FullName();
</script>
</body>
</html>
The Window of a Web Page
Introduction
A webpage is an object displays in an application called a browser. A webpage is surrounded by borders. It has a title bar and may contain tabs. It presents a wide area that presents the content aimed at serving the visitor of a website.
To support the window in a browser, the DOM provides an interface named Window. To give you access to that window, a class named window implements that interface.
A Message Box
A message box is one of the types of windows you can display in a browser. To support it, the Window interface provides a method named alert. Its syntax is:
window.alert(message);
To access a property of an object in a webpage, type the name of the object, a period, and the desired property. Here are examples:
This method takes a string as an optional argument.
Loading the Window of a Web Page
When a browser is asked to display a webpage, the browser has to check and/or validate a few things. At one time, if everything is alright, the webpage displays, but just before displaying the webpage, the browser fires an event named load. To use this event, add an attribute named onload to the HTML tag to which you want to apply it.
If you want to do something on the webpage as soon as it displays, apply the onload event to the window object. Usually, you add this event as an attribute to the <BODY> tag of the webpage.
The Location of a Document
Introduction
The Internet is large network of connected computers. The most important aspect of the Internet is that the connected computers hold billions of documents that are of interest to Web visitors. To access one of those documents, a person must use an application such as a browser and provide the address of the document.
The place where the document is stored is called a location. To support the concept of document location, the DOM provides an interface named Location. To let you use that interface, the DOM provides an object named location that implements the Location interface.
To make it easy for you to deal with the location of a document, both the Window and the Document interfaces are equipped with a property named location. This means that when using either the window object or the document object, you can access the location object from them.
The URL of a Document
The most important piece of information about a document on the internet is address, that is, how and where to find the document. To support this aspect, the Location interface is equipped with a property named href:
string = object.href;
object.href = string;
This read-write property, on one hand, allows you to provide the address of a document you want to access. This is done by assigning a string as location to this property.
Data and Time Values in JavaScript
Introduction
To support date and time values, JavaScript provides an object named Date.
Create a Date
To create a date value, declare a variable of type Date. Initialize it with the new operator and this class. The constructor of this class can take three arguments as follows:
var variable = new Date(year, month, day);
The Current Date/Time
If you declare a variable and initialize it with new Date();, the variable automatically assumes the current date and time.
jQuery and JavaScript Built-In Objects
Introduction
Remember that jQuery is primarily just a JavaScript library. jQuery supports and recognized the objects used in JavaScript such as the window, the document. As a result, you can access the members of the window object directly in your jQuery code. For example, to display a message box, simply call the alert() function and pass the desired string to it.
The $ Namespace
To give you access to many functions you can directly use in your code, jQuery provides a special namespace named $. It works like a static class. This means that you don't declare a variable of it. To use one the multiple members of this namespace, type $. followed by the memember.
A jQuery Object
To support a way to create objects adapted for jQuery code, the library provides a special object created as $(). As you can see, the jQuery object appears as a function named $ or rather a constructor. This object takes two arguments. The first is required and the second is optional.
Selecting an HTML Element in jQuery
While JavaScript supports the ability to locate and select an element in a webpage, jQuery provides its own $() object. The primary formula to follow is:
$(...)
As mentioned in the previous section, the $() jQuery object takes some type of argument. In some cases, the parentheses will contain the whole code you want to use. In some other cases, you will add some necessary behavior after the parentheses.
To access a DOM object in jQuery, you can pass that object in the parentheses of $(). For example, to access a webpage document in jQuery, you can use $(document). To access the Window object of a browser in jQuery, you can use $(window).
An Object for an Element
As you should be aware by now, a webpage is created by using HTML tags. Each tag has a name and some tags have one or more attributes. To let you represent a tag as an object in jQuery, a tag can be passed by its name as a string in the parentheses of $(). For example, to use a paragraph as an object in jQuery, use $("p"). To use a link as an object in jQuery, use $("a"), and so on.
Introduction to DOM Events in jQuery
Overview
After specifying the object you want to access from a webpage, you can attach the event it to fire. jQuery supports the same events of JavaScript and the same names.
To attach a JavaScript (a DOM) event to a selected element, after the parentheses of $(...), type a period and on() in a formula as follows:
$(object).on(event-name, function-definition);
In the parentheses of $(), you will include an object. The on() method takes two arguments. The first is the DOM name of the event you want to use. The name is passed as a string. The second argument is the function that will carry the event, that is the job you want to do when the event fires. You can first define the function and then pass its name as the second argument to the on() method. As an alternative, you can define the function directly in the second argument placeholder.
Once the Document is Ready
As mentioned already, just before a webpage displays, the browser fires the onload event. To apply this event, you can use the following formula:
$(object).on("load", function-definition);
The object can be window. To let you catch the load event, jQuery provides a method named ready. To use it, apply it to $(...) to which you would pass a document object as in $(document).ready(). Pass a function to the ready() method. The formula to follow is:
$( document ).ready(function-definition);
As mentioned earlier, you can first define a function and then pass it as argument. The formula to follow is:
function doSomething(){
}

$( document ).ready(doSomething);
Otherwise, you can define the function directly in the parentheses of the ready() method. Either way, in the body of the function, create the behavior you want.
As a shortcut to the ready() event, jQuery allows you to omit the (document).ready section. As a result, simply include the function definiton in the parentheses of $().
Clicking an Element
One of the most regular operations performed on an object of a webpage is to click. This action causes the control to fire the click event. To apply this event, attach it to an element selected through $(). As you may know already, events are carried by functions. Like most events, the click() method takes one argument which is a function. You can first define a function and then pass its name as argument to click(), or you can define the function directly in the parentheses of click(). This would be done as follows:
$(document).ready(function () {
    $("something").click(function (event) {
    });
});
Primary Characteristics of an Element
The HTML Markup of a Selected Element
As we will in the next sections, one of the types of items you can select on a webpage is the name of an HTML tag. After making such a selection, to let you specify the text of the element, jQuery provides a method named html. To call this method, attach it to $("tag-name"). An example is $("p").html(). In the parentheses of the html() method, pass the text as string. Here is an example:
<!DOCTYPE html>
<html>
<head>
<meta charset="utf-8" />
<title>Quotes</title>
<script src="Scripts/jquery-1.10.2.js"></script>
</head>
<body>
<h1>Nixon Quotes</h1>

<p>Quotes</p>

<script>
    $(document).ready(function () {
        $("p").html("If you take no risks, you will suffer no defeats. But if you take no risks, you winn no victories.");
    });
</script>

</body>
</html>
One of the valuable features of the html() method is that it takes and recognizes both HTML attributes and CSS formatting if you include them appropriately in the argument of the method. Here is an example:
<!DOCTYPE html>
<html>
<head>
<meta charset="utf-8" />
<title>Quotes</title>
<script src="Scripts/jquery-1.10.2.js"></script>
</head>
<body>
<h1>Saying</h1>
<p>Quotes</p>
<script>
$(document).ready(function () {
$("p").html("When the President does it, that means that it's not illegal. - <b>Richard M. Nixon</b>");
$("h1").html("<span style='font-weight: bold; color: #800000'>President Nixon Quotes</span>");
});
</script>
</body>
</html>public
The Value of an Element
As you may know already, to represent the value of a web control, the DOM provides the val() method. After selecting an element, you can apply this method to it and pass the string you want to display. Here is an example:
<!DOCTYPE html>
<html>
<head>
<meta charset="utf-8" />
<title>Employee Record</title>
<script src="Scripts/jquery-1.10.2.js"></script>
</head>
<body>
<h1 class="empl-rec">Employee Record</h1>

<p>Full Name: <input type="text" /></p>

<script>
    $(document).ready(function () {
        $("input").val("Antoine Mayer");
    });
</script>

</body>
</html>
Selecting Elements
Introduction
As mentioned previously, to select an item from a webpage, you can pass some information about it to the jQuery object as we will see in the next sections. When you have passed that information, the interpreter would look for at least one item that matches the information. If there is no item with the information, the jQuery object would be empty and no error would be produced.
Selecting an HTML Tag
Every HTML has a name. To select it for your jQuery code, as we saw earlier, pass the name of the tag as string to the jQuery object $(...). Here is an example:
<!DOCTYPE html>
<html>
<head>
<meta charset="utf-8" />
<title>Exercise</title>
<script src="Scripts/jQuery-1.10.2.js"></script>
</head>
<body>
<form name="Exercise" method="post">
    <p><input type="button" id="btnSend" value="Send It" /></p>
</form>
<script type="text/javascript">
    $(document).ready(function () {
        $("input").click(function (event) {
            alert("Your time sheet has been submitted!");
        });
    });
</script>
</body>
</html>
Selecting an Element By its Identifier
As you may know already, to represent an HTML element, you can add an ID attribute to its start tag. Remember that, in a webpage, the identifiers must be unique. To select a tag by its identifier, pass the value of its identifier preceded with #. Here is an example:
<!DOCTYPE html>
<html>
<head>
<meta charset="utf-8" />
<title>Employee Record</title>
<script src="Scripts/jquery-1.10.2.js"></script>
</head>
<body>
<h1>Employee Record</h1>

<p><b>First Name:</b> <span id="fName"></span></p>
<p><b>Last Name:</b> <span id="lName"></span></p>

<script>
    $(document).ready(function () {
        $("#fName").html("Elisabeth");
        $("#lName").html("Meuer");
    });
</script>

</body>
</html>
Selecting Elements by their Style
You can select elements based on a CSS style they share. To do this, in the double-quote of the jQuery object, pass the value of the style preceded by a period. This would be done as follows:
<!DOCTYPE html>
<html>
<head>
<meta charset="utf-8" />
<title>Exercise</title>
<script src="Scripts/jquery-1.10.2.js"></script>
<style type="text/css">
.centered   { text-align:  center;  }
</style>
</head>
<body>

<script type="text/javascript">
    $(document).ready(function () {
        $(".centered"). . .;
    });
</script>
</body>
</html>
In this case, all elements that use the same style would be selected.
By the way, a style you use for selection doesn't have to have been created. This means that you can use a style that doesn't exist in a style section or a CSS document, as long as yu had applied it to the intended tag.
Selecting an Element or Some Elements by their Style
If you have many elements that use the same style, if you want to select only one of some of the elements, you need to way to include only the element(s) you want or to exclude the other(s). You have many options. If the concerned element(s) use (a) different HTML tag(s), in the double-quote of the jQuery object, pass the value of the style preceded by a period and the name of the HTML tag. Here are examples:
<!DOCTYPE html>
<html>
<head>
<meta charset="utf-8" />
<title>Exercise</title>
<script src="Scripts/jquery-1.10.2.js"></script>
<style type="text/css">
.centered   { text-align:  center;  }
.blue       { color:       #0058ff; }
.right      { text-align:  right;   }
</style>
</head>
<body>
<h1 id="topTitle" class="centered"></h1>
<h2 class="centered">Expectations</h2>

<p class="centered"></p>
<p class="right">What was not supposed to happen happened.</p>

<script type="text/javascript">
    $(document).ready(function () {
        $("h2.centered").mouseenter(function (event) {
            $("h1.centered").html("Diagnostic Classifications");
            $("p.centered").html("What was supposed to happen happened.");
        });
    });
</script>
</body>
</html>
Getting an Element by Position
If you have many elements with the same HTML tag name in a webpage and if you make a selection by their HTML tag names or a style they share, you will get an array (or a collection) of elements. To let you access the elements by their positions, the jQuery object is equipped with a method named get. This method takes as argument the index of the element you want to access.
Adding a Style
You apply a style to an element that already has a style. To support this, the jQuery object is equipped with a method named addClass. To use this method, attach it to a selected item. The method is overloaded with two versions. One of the versions takes the new style as a string argument. Here is an example:
<!DOCTYPE html>
<html>
<head>
<meta charset="utf-8" />
<title>Argument</title>
<script src="Scripts/jquery-1.10.2.js"></script>
<style type="text/css">
.phrase { font-size:   18px;
          font-family: Garamond, Georgia, 'Times New Roman', serif; }
.high   { color:       blue;
          text-align:  center; }
</style>
</head>
<body>
<p id="argument" class="phrase">Absence of evidence is not evidence of absence</p>

<script type="text/javascript">
    $(document).ready(function () {
        $("#argument").addClass("high");
    });
</script>
</body>
</html>
Combining Selections
Compounding Styles
To add more than one style, pass their names in the same argument but separate them with empty spaces.
The other version of the $().addClass() takes a function as argument.
A Variable for a jQuery Object
After selecting an element using the jQuery object, you can assign the selection to a locally declared variable. Here is an example:
<!DOCTYPE html>
<html>
<head>
<meta charset="utf-8" />
<title>Argument</title>
<script src="Scripts/jQuery-1.10.2.js"></script>
</head>
<body>
<h1 class="text-center">Argumentative Qualifications</h1>

<div id="discussion">

</div>

<script type="text/javascript">
    $(document).ready(function () {
        var paragraph = $("#discussion");
    });
</script>
</body>
</html>
this Object in jQuery
Introduction
As a JavaScript library, jQuery supports the this object with some adaptation to the library. To start, you can use the this object in any of the ways we reviewed for JavaScript. In your jQuery code, if you create a section for an element, to refer to the child elements of the selected item, you can use the $(this) object. This would be done as follows:
$(document).ready(function () {
    $("#discussion").mouseenter(function (event) {
        $(this)
    });
});
A Variable for this Object
If you create a section of code for an element, in that section, to store an object that represents the whole section, ddeclare a variable and assign the $(this) object to it. Here is an example:
$(document).ready(function () {
    $("#discussion").mouseenter(function (event) {
        var local = $(this);
    });
});
Selecting this Object
In jQuery, when you have selected an element, it may have one or more elements under it. Such elements are considered its children. Consider the following code:
<div id="discussion">
    <p id="argument">Absence of evidence is not evidence of absence</p>

    <ul>
        <li>Absence of Evidence</li>
        <li>Proof of Evidence</li>
    </ul>
</div>
In this case, div is the parent of ul and its li elements. If you make a selection on the div element and create a delimiting body for it, in that delimiting body, to indicate that you want to change something on all child elements, you can use the $(this) expression. You can then apply any of the jQuery features to that expression. Here are two examples:
<!DOCTYPE html>
<html>
<head>
<meta charset="utf-8" />
<title>Argument</title>
<script src="Scripts/jquery-1.10.2.js"></script>
<style type="text/css">
.arg-contents { margin:      auto;
                width:       500px;   }
.text-center  { text-align:  center;  }
.red          { color:       #ff0000; }
.black        { color:       #000000; }
</style>
</head>
<body>
<h1 class="text-center">Argumentative Qualifications</h1>

<div id="contents" class="arg-contents">
    <h2>Arguments</h2>

    <div id="discussion">
        <p id="argument">Absence of evidence is not evidence of absence</p>

        <ul>
            <li>Absence of Evidence</li>
            <li>Proof of Evidence</li>
        </ul>
    </div>
</div>

<script type="text/javascript">
    $(document).ready(function () {
        $("#discussion").mouseenter(function (event) {
            $(this).addClass("red");
        });
        $("#discussion").mouseleave(function (event) {
            $(this).addClass("black");
        });
    });
</script>
</body>
</html>
Performing Operations on a Selection
Introduction
The selection is the main way you create an object from an HTML element in jQuery. After making such a selection, you get a fully functional object on which you can perform various types of operations.
Prepending a Value or Object
To let you add a value or object before an element, the jQuery object is equipped with an overloaded method named prepend. One version of the prepend method takes one required and one optional arguments. Its syntax is:
preppend(content [, content]);
You can pass a single argument that is a string containing the value or the format to position before the selection that called this method.
Generally Appending a Value or Object to an Element
Appending an item consists of adding a value or an object at the end of an existing one. To support this operation, the jQuery object is equipped with an overloaded method named append. One of the versions of this method takes one required and one optional arguments. Its syntax is:
append(content [, content]);
The required argument can be a string that holds text to be added to the right side of the selected item that called the function. If you want to add more items, pass a second argument.
The other version of the append() nethod uses the following syntax:
append(function);
This version takes a function as argument. The function must return the string that will be added to the element that called the append() method.
Appending to a Matching Element
To let you work in reverse of the append() nethod, the jQuery object provides a method named appendTo. Its syntax is:
appendTo(target)
This method works with the same goal as the append() nethod method except that, while the append() nethod is called by the element that must be modified, the append() nethod is called by the string or format that must be applied to the element passed as argument. The appendTo() method takes a string as argument. The argument can contain the HTML tag name of an element, the identifier of an element, the style applied to an element, etc. In other words, the argument must specify a way to find one or more elements on the webpage. If such an element is found, the selected value or formatting that called it would be applied to the found element.
![]() Practical Learning: Ending the Lesson
Practical Learning: Ending the Lesson
|
|
||
| Previous | Copyright © 2017-2019, FunctionX | Next |
|
|
||