Home

Namespaces and Code Directives


Fundamentals of Namespaces


Introduction

When creating your classes, one of the most important rules you must observe is that two classes in the same program must not have the same name. For example, the following program will not compile:

struct CHouse
{
	int protect()
	{
		return 0;
	}
};
struct CCar
{
	int drive()
	{
		return 0;
	}
};
struct CHouse
{
	int showroof()
	{
		return 0;
	}
};

int main()
{
	return 0;
}

Notice that there are two classes named house in this program. If you have different people working on the same project, it would not be unusual to have two classes with the same name. The consequence is that, if these classes are used in the same program, the program would not compile.

A namespace is a technique of grouping some functions and/or classes to create an entity. This has the main goal of eliminating the probability of having two classes of the same name. For example, if different people work on the same project, each one can create his or her own classes but put them in only his or her namespace. This way, even if they happen to have a class each with the same name, there is no risk of having a name conflict.

To create a namespace, type namespace followed by a name. Like a class, a namespace must have a body delimited by an opening curly bracket "{" and ending with a closing curly bracket "}". Here is an example:

namespace family
{
}

For the rest of the ebook, we will start the name of a namespace with an uppercase letter.

In the body of the namespace, you can create the classes (and/or functions) as you want. Here is an example:

namespace Family
{
	struct CHouse
	{
		int protect()
		{
			return 0;
		}
	};
	struct CCar
	{
		int drive()
		{
			return 0;
		}
	};
}

Remember that the struct or class keyword of a class can be preceded with private or public to control its "visibility" outside of its assembly. Therefore, the above classes can be preceded with the public keyword as follows:

namespace Family
{
	public struct CHouse
	{
		int protect()
		{
			return 0;
		}
	};
	public struct CCar
	{
		int drive()
		{
			return 0;
		}
	};
}

In the same way, you can have as many namespaces as you want. Each namespace can have any valid content. Inside of a namespace, two classes must not have the same name. Inside of a program, two namespaces must not have the same name. Consider this:

namespace Family
{
	public struct CHouse
	{
		int protect()
		{
			return 0;
		}
	};
	public struct CCar
	{
		int drive()
		{
			return 0;
		}
	};
}

int main()
{
	return 0;
}

As done previously, you can create static methods as members of your classes. This is also valid even if a class is part of a namespace. Here is an example:

namespace Family
{
	public struct CHouse
	{
		static int protect()
		{
			return 0;
		}
	};
	public struct CCar
	{
		int drive()
		{
			return 0;
		}
	};
}

int main()
{
	return 0;
}

Before accessing a non-static method of a class, you must first create an object from it. Before the type of declaration we saw earlier, you must precede it with the name of the namespace followed by ::. Here is an example:

namespace City
{
	public struct CHouse
	{
		int showroof()
		{
			return 0;
		}
	};
}

int main()
{
	City::CHouse town;
	
	town.showroof();

	return 0;
}

As mentioned earlier, if a method is static, you don't have to create an object from it before using it. You can access it directly by typing the name of the namespace followed by ::, followed by the name of the class. Here is an example:

namespace Family
{
	public struct CHouse
	{
		static int protect()
		{
			return 0;
		}
	};
	public struct CCar
	{
		int drive()
		{
			return 0;
		}
	};
}

int main()
{
	Family::CHouse::protect();

	return 0;
}

Practical LearningPractical Learning: Including a Class in a Namespace

  1. Click the Property.h tab
  2. To include our CProperty class in a namespace, change the file as follows:
     
    namespace RealEstate
    {
    	public class CProperty
    	{
    		int ShowWelcome();
    	};
    }
  3. Click the Property.cpp tab and change the file as follows:
     
    #include "stdafx.h"
    #include "Property.h"
    
    namespace RealEstate
    {
    	int CProperty::ShowWelcome()
    	{
    		return 0;
    	}
    }
  4. Save all

using a Namespace

We saw that, to call an object or a method that is part of a namespace, you must "qualify" that method or object using the period operator. Instead of using this approach, if you already know the name of a namespace that exists or has been created in another file, you can use a special keyword to indicate that you are using a namespace that is defined somewhere. This is done with the using keyword. To do this, before accessing the namespace, type using followed by the name of the namespace. 

Here is an example:

namespace Family
{
	public struct CHouse
	{
		static int protect()
		{
			return 0;
		}
	};

	public struct CCar
	{
		int drive()
		{
			return 0;
		}
	};
}

int main()
{
	using namespace Family;
	
	Family::CHouse::protect();

	return 0;
}

With the using keyword, you can omit the name of the namespace when accessing a class that belongs to the namespace. Here is an example:

int main()
{
	using namespace Family;
	
	CHouse::protect();

	return 0;
}

Using Various Namespaces

Various namespaces can be part of the same file and the same application. You can create each namespace and specify its own members in its delimiting curly brackets. With various namespaces on the same file or application, you can have the same variables in different namespaces. Here is an example of two namespaces:

namespace Family
{
	public struct CHouse
	{
		static int protect()
		{
			return 0;
		}
	};
	public struct CCar
	{
		int drive()
		{
			return 0;
		}
	};
}
namespace City
{
	public struct CHouse
	{
		int showroof()
		{
			return 0;
		}
	}
}

To access the member of a namespace, use the :: operator appended to its name and call the desired member. Using the :: operator, you can perform any operation on any member of one namespace applied to a member of another namespace.

We saw earlier that the using namespace routine allows accessing the members of a namespace. After typing it, if the name of a variable appears under a using namespace, the compiler would need to reconcile or identify it; if the name of such a variable is not recognized as part of the namespace that is being accessed, the program would not compile. For example, here is an example that uses two using namespaces:

namespace Family
{
	public struct CHouse
	{
		static int protect()
		{
			return 0;
		}
	};

	public struct CCar
	{
		int drive()
		{
			return 0;
		}
	};
}
namespace City
{
	public struct CHouse
	{
		static int showroof()
		{
			return 0;
		}
	};
}

int main()
{
	using namespace City;
	using namespace Family;
	
	CHouse::protect();

	return 0;
}

The above program would not compile because the compiler does not understand what house is being referred to in house::protect(): is it the house class of the Family namespace or the house of the City namespace? You would then receive an ambiguous symbol error:

.\Exercise.cpp(35) : error C2872: 'house' : ambiguous symbol
        could be '.\Exercise.cpp(4) : Family::house'
        or '.\Exercise.cpp(22) : City::house'

If you want to use different namespaces with the using namespace routine, each namespace will have to control its scope. One solution would be to create a “physical” scope for each namespace. Here is an example:

namespace Family
{
	public struct CHouse
	{
		static int protect()
		{
			return 0;
		}
	};

	public struct CCar
	{
		int drive()
		{
			return 0;
		}
	};
}
namespace City
{
	public struct CHouse
	{
		static int showroof()
		{
			return 0;
		}
	};
}

int main()
{
	{
		using namespace Family;
		CHouse::protect();
	}

	using namespace City;
	CHouse::showroof();

	return 0;
}

Before creating a “physical” scope, we saw that the compiler is able to point out what problem occurred at compilation time. Fortunately, the compiler is able to explicitly designate what problem it encountered. In this case there is a conflict in name resolution: two namespaces have a member of the same name.

The solution, which is commonly used, is to qualify the variable that is causing the conflict. You can qualify only the second house call because the compiler will associate the first house call with the first using namespace. The safest way is to qualify both calls of the member, as follows:

namespace Family
{
	public struct CHouse
	{
		static int protect()
		{
			return 0;
		}
	};

	public struct CCar
	{
		int drive()
		{
			return 0;
		}
	};
}
namespace City
{
	public struct CHouse
	{
		static int showroof()
		{
			return 0;
		}
	};
}

int main()
{
	using namespace Family;
	using namespace City;

	Family::CHouse::protect();
	City::CHouse::showroof();

	return 0;
}

Nesting Namespaces

Nesting a namespace is the ability to include a namespace inside (as part of the body) of another namespace. To do this, create the intended namespace as a member of the parent namespace. The nested namespace should have its own name and its own body. Here is an example:

namespace Country
{
	namespace City
	{
		public struct CHouse
		{
			static int showroof()
			{
				return 0;
			}
		};
	}

	struct CCar
	{
	};
}

To access a member of a nested namespace, first call its parent, type the :: operator, type the name of the nested namespace, followed by the :: operator, then type the name of the variable you are trying to access. Here is an example:

namespace Country
{
	namespace City
	{
		public struct CHouse
		{
			static int showroof()
			{
				return 0;
			}
		};
	}

	struct car
	{
	};
}

int main()
{
	Country::City::CHouse::showroof();

	return 0;
}

Following the same logic, you can have as many namespaces and many nested namespaces in your application as you desire. If you nest a namespace, you can use as many :: operators to qualify each member of the nested namespace you want.

You can also use the using namespace routine by qualifying each member inside the using namespace that “needs” its parent:

namespace Country
{
	namespace City
	{
		public struct CHouse
		{
			static int showroof()
			{
				return 0;
			}
		};
	}

	public struct car
	{
	};
}

int main()
{
	using namespace Country::City;

	CHouse::showroof();

	return 0;
}

Otherwise, you can create a using namespace for each namespace and make sure that each one of them controls its scope. As long as you are using the :: operator to identify the member that is being accessed inside of a using namespace, you can call the member of any namespace in any scope, provided you qualify it.



Built-In Namespaces


The System Namespace

The Microsoft .NET Framework contains a namespace named System. This is the primary namespace of the classes used to create applications. This namespace contains a class named Console. This class represents the DOS window that is used to display the results of a console application:

DOS Window

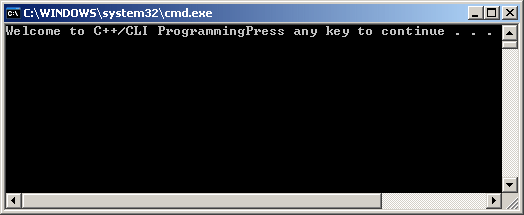
The Console class contains methods used to display information on the screen or to retrieve information from the user who types it in the DOS window. The method that is used to display text on the screen is called Write. To use the Write() method, inside of the parentheses, type the sentence between double-quotes. Here is an example:

int main()
{
	System::Console::Write("Welcome to C++/CLI Programming");

	return 0;
}

This would produce:

DOS Window

Besides the Write() method, the Console class also provides a method called WriteLine(). The difference is that, after displaying something on the screen, the Write() method keeps the caret on the same line but WriteLine() transfers the caret the next line.

The std Namespace

The C++ Standard provides a namespace called std. The std namespace includes a series of libraries that you will routinely and regularly use in your programs.

The following libraries are part of the std namespace:

algorithm iomanip list ostream streambuf
bitset ios locale queue string
complex iosfwd map set typeinfo
deque iostream memory sstream utility
exception istream new stack valarray
fstream iterator numeric stdexcept vector
functional limits      

Therefore, whenever you need to use a library that is part of the std namespace, instead of typing a library with its file extension, as in iostream.h, you can just type the name of the library as in iostream. Then, on the second line, type using namespace std;. As an example, instead of typing

#include <iostream.h>

You can type:

#include <iostream>
using namespace std;

Because this second technique is conform with the C++ Standard, we will use it whenever we need one of its libraries.

Like the System namespace, the std namespace provides its own means of displaying a value to the screen. In the std namespace, the class that takes care of this is called cout. To use it, type cout, followed by <<, followed by the value, and end it with a semi-colon. Here is an example:

#include <iostream>
using namespace std;

int main()
{
	cout << "Welcome to C++/CLI Programming";

	return 0;
}

As mentioned previously, you can use different namespaces in the same program. Based on this, you can use both the std and the System namespaces in your program. The compiler would know exactly where each is located. To access a class that is part of a certain namespace, you can call the namespace followed by the :: operator and access the class. Here are examples:

#include <iostream>

int main()
{
	std::cout << "Welcome to C++/CLI Programming. ";
	System::Console::WriteLine("C++/CLI is the new full-featured C++");

	return 0;
}

You can also type using namespace for each namespace that you will need in your program. The above program could be written as:

#include <iostream>
using namespace std;
using namespace System;

int main()
{
	std::cout << "Welcome to C++/CLI Programming. ";
	System::Console::WriteLine("C++/CLI is the new full-featured C++");

	return 0;
}

Remember that, when calling using namespace, you can omit qualifying a class by preceding it with the namespace:

#include <iostream>
using namespace std;
using namespace System;

int main()
{
	cout << "Welcome to C++/CLI Programming. ";
	Console::WriteLine("C++/CLI is the new full-featured C++");

	return 0;
}

C Routines

The C computer language is the parent of C++ and C++ is the parent of the C++/CLI language. To maintain backward compatibility, the operations performed in C were made available to C++ and most standards of C++ are available in C++/CLI. Based on this, you can transparently include C routines in your C++/CLI program.

The libraries of the C language available in C++ are:

cassert cios646 csetjmp cstdio ctime cctype
climits csignal cstdlib cwchar cerrno clocale
cstdarg cstring cwctype cfloat cmath cstddef

Like C++/CLI and C++, the C computer language has its own mechanisms to display a value on the screen. One of the functions used to do this is printf_s. To use it, add an opening and a closing parentheses to it. Inside of the parentheses, enter the value you want to display. Here is an example:

#include <iostream>
using namespace std;
using namespace System;

int main()
{
	cout << "Welcome to C++/CLI Programming. ";
	Console::WriteLine("C++/CLI is the new full-featured C++");
	printf_s("C++/CLI highlights the best of C++ and significantly modernizes it");

	return 0;
}

Of course, there are many other details and aspects concerning these built-in namespaces, libraries, and operations. We will review as many as possible in future lessons.

Primary Details of Program Structure


Preprocessors: #include

Include

The preprocessor is used to give a special instruction to the compiler. It is typically placed at the beginning of a line and it is followed by a word that would perform an action. The formula to use the preprocessor is:

#action What-To-Do

There are various actions you could ask the compiler to perform.

The #include is used to include an external file in the current file. The file to include is called a header file, a library, or another kind of file you want the compiler to consider before going any further. For example, to include one of the header files that shipped with Bcb, such as calendar.h, you can write

#include <calendar.h>

To include one of your header files when you will have created one, you can write

#include “Circle.h”
 

Preprocessors: #define

The #define, called a directive, is used to direct the compiler to create or perform a (small) action. This action is called a macro. For example, you can ask the compiler to use "Rio de Janeiro" whenever it sees RDJ. To do that you can write

#define RDJ "Rio de Janeiro"

If you use the word RDJ in your program, the compiler would replace it with the defined name. You can also use the #define directive to create words that would be replaced with numeric values. Here is an example:

#include <iostream>

using namespace std;
using namespace System;

#define RDJ "Rio de Janeiro"
#define Print(Sentence) Console::WriteLine(Sentence)

int main()
{   
	cout << "City: " << RDJ << "\n";
	Print("Welcome to the Wonderful World of C++/CLI.");

	return 0;
}

This would produce:

City: Rio de Janeiro
Welcome to the Wonderful World of C++/CLI.
Press any key to continue . . .

Pragma Directives


Introduction

A compiler of one particular programming environment has characteristics that distinguish it from other compilers. To customize its behavior, some instructions can tell it how to behavior and how to treat some code sections when it encounters them. One of the instructions used by a programming to direct a compiler is done using the #pragma preprocessor. It is used to give specific instructions to the compiler based on the particular compiler that is being used to create the program. This means the #pragma directive completely depends on the compiler you are using.

Open Once

When you create a file for your project as we saw in the previous lesson, when the compiler is building the project, you can instruct it to open a certain file only once, during the lifetime of the program. This has the role of reducing the overhead of over and over checking again if the file has already been opened. To give this instruction, you should start the file with

#pragma once

Under this line, you can then include the rest of the lines of code for the file.


Code Editor Region Delimiter

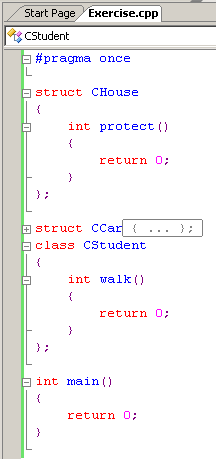
Microsoft Visual Studio provides a particularly wonderful editor that provides a good level of control over the code you write. The characteristics include color-coded words, intuitive indentation, delimitation of sections of code, etc. Consider the following contents of the Code Editor based on what we have reviewed so far:

The Code Editor

Notice that there are - buttons on the left side of some lines of code. These allow you to collapse a section of code if you think you don't need to see it. To do this, you can click the - button. If you click that - button, it changes into a + button. Here is an example:

The Code Colors

The + button allows you to expand a hidden code section. This behavior of creating + and - buttons is part of the Code Editor of Microsoft Visual Studio (yes, many other programming environments use that behavior also). To create these sections, the Code Editor follows some rules. For example, it looks for the start and end of such items as directives, namespaces, classes, functions, etc.

Besides, or instead of, the sections of code created by the Code Editor, if you want, you want, you can create your own sections. To do this, start the section with

#pragma region Whatever

and end it with

#pragma endregion Whatever

When and where you start, the #pragma region expression is required. On the right side of this expression, you can type anything you want on the line. To end the section, type #pragma endregion, followed by anything you want. Consider the following example:

#pragma once

struct CHouse
{
	int protect()
	{
		return 0;
	}
};

#pragma region These are classes used for Student Registration
struct CCar
{
	int drive()
	{
		return 0;
	}
};

class CStudent
{
	int walk()
	{
		return 0;
	}
};
#pragma endregion We can just stop it here

int main()
{
	return 0;
}

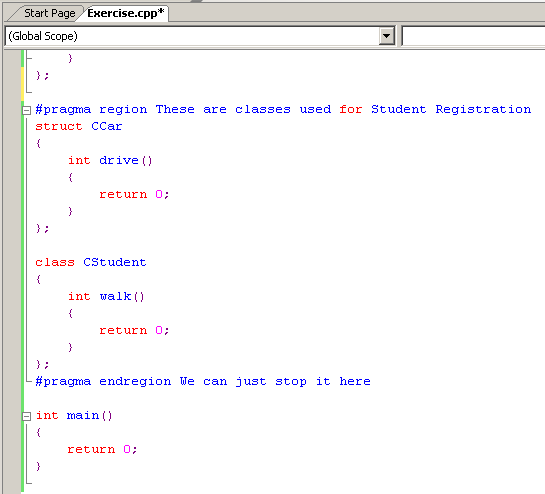
You don't have to type anything on the right side of #pragma endregion. After creating the region, the Code Editor would display a - button to the left side of #pragma region with a line from there to the left of #pragma endregion:

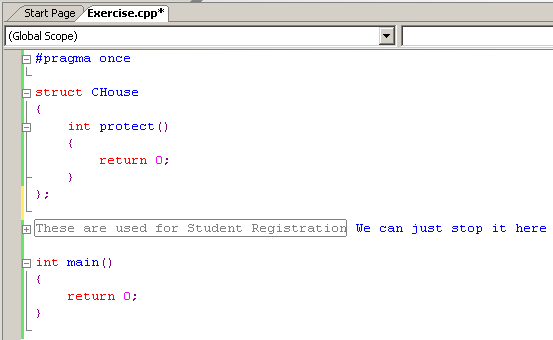
This then allows you to expand and collapse that section at will:

We mentioned that you didn't have to type anything on the right side of #pragma endregion and you could leave it empty. In our example, notice that there is a rectangle with gray lines around the string that follows #pragma region. This rectangle doesn't cover the string that follows #pragma endregion. This means that if you don't type anything on the right side of #pragma endregion, that section on the right side the #pragma region line would not show.


Previous Copyright © 2006-2016, FunctionX, Inc. Next