Assistance With Data Entry

Assistance With Data Entry
The Nullity of a Field
Introduction
During data entry, users of your database will face fields that expect data. Sometimes, for one reason or another, data will not be available for a particular field. An example would be an MI (middle initial) field: some people have a middle initial, some others either don't have it or would not (or cannot) provide it. This aspect can occur for any field of your table. Therefore, you should think of a way to deal with it.
A field is referred to as null when no data entry has been made to it:
|
A field is referred to as null if there is no way of determining the value of its content (in reality, the computer, that is, the operating system, has its own internal mechanism of verifying the value of a field) or its value is simply unknown. As you can imagine, it is not a good idea to have a null field in your table. As a database developer, it is your responsibility to always know with certainty the value held by each field of your table. A field is referred to as required if the user must provide a value for it before moving to another record. In other words, the field cannot be left empty during data entry. |
 |
We continue with our university database. To run its many services, the school has a managing team that consists of a president, deans, and other employees.
In this new version of the database, University3, we will create a table for employees. The table will be stored in the Academics schema.
![]() Practical Learning: Introducing Nullity
Practical Learning: Introducing Nullity
| Column Name | Data Type |
| EmployeeNumber | nvarchar(20) |
| FirstName | nvarchar(25) |
| MiddleName | nvarchar(25) |
| LastName | nvarchar(25) |
| EmailAddress | nvarchar(50) |
| Username | nvarchar(30) |
| Password | nvarchar(24) |
|
Visually Creating a NULL or NOT NULL Column |
To solve the problem of null and required fields, the SQL proposes two options: allow or not allow null values on a field. To make sure the user always fills out a certain field before moving to the next field, that is, to require the value, if you are visually creating the table:
|
|
| Column Name | Allow Nulls |
| EmployeeNumber | Unchecked |
| FirstName | Checked |
| MiddleName | Checked |
| LastName | Unchecked |
| EmailAddress | Checked |
| Username | Checked |
| Password | Checked |
If creating a table using SQL, to specify that it can allow null values, type NULL (remember that the SQL is not case-sensitive) on the right side of the column definition. To specify that the values of the column are required, on the right side, type NOT NULL. If you don't specify NULL or NOT NULL, the column will be created as NULL by default. Here are examples:
CREATE TABLE Persons
(
    FirstName nvarchar(20) NULL,
    LastName nvarchar(20) NOT NULL,
    Gender smallint
);
GO
If the table was already created and it holds some values (already), you cannot set the Allow Nulls option on columns that don't have values.
After specifying that a column would NOT allow NULL, if the user tries creating a record but omits to create a value for the column, an error would display. Here is an example:
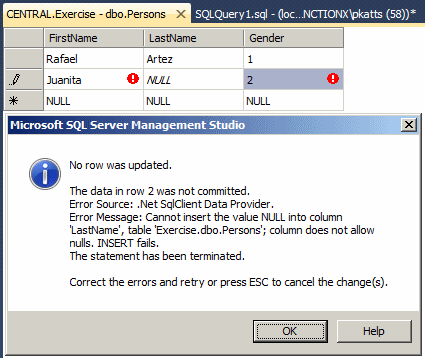
This error message box indicates that the user attempted to submit null for a column that requires a value. To cancel the action, you can press Esc.
|
Data Entry With a NULL Column |
If you specify that a column will allow null, during data entry, if you don't have a value for that column, you can leave its placeholder empty:
CREATE TABLE Persons
(
    FirstName nvarchar(20) NULL,
    LastName nvarchar(20) NOT NULL,
    Gender smallint
);
GO

INSERT Persons(FirstName, LastName) -- The Gender is left out
VALUES(N'Martin', N'Binam');
GO
INSERT Persons(LastName, Gender) -- The FirstName is left out
VALUES(N'Howley', 2);
GO
INSERT Persons(LastName) -- The FirstName and the Gender are left out
VALUES(N'Crouch');
GO
 |
When performing data entry, if the table has columns that allow nulls and whenever you don't have a value for a null column, you should provide a list of the columns as seen in the above examples. For the columns that are not included in the list, the database engine would automatically set their values to NULL. As an alternative, Transact-SQL allows you to keep the list of columns or to use any list of columns, including columns that allow null. Then, in the placeholder of a column, specify its value as NULL. Here are examples: |
INSERT Persons -- All columns are used
VALUES(N'Alex', N'Hough', NULL);
GO
INSERT Persons(LastName, Gender, FirstName) -- The Gender will be set to null
VALUES(N'Kousseusseu', NULL, N'Tchipseu');
GO
INSERT Persons -- All columns are used
VALUES(NULL, N'Beltram', NULL),
      (NULL, N'Ohari', 1),
      (N'Jamrah', N'Belhassen', NULL);
GO
|
The Default Value of a Column |
|
Introduction |
Sometimes most records under a certain column may hold the same value although just a few would be different. For example, if a school is using a database to register its students, all of them are more likely to be from the same state. In such a case, you can assist the user by automatically providing a value for that column. The user would then simply accept the value and change it only in the rare cases where the value happens to be different. To assist the user with this common value, you create what is referred to as a default value.
|
Visually Creating a Default Value |
You can create a default value of a column when creating a table. To specify the default value of a column, in the top section, click the column. In the bottom section, click Default Value or Binding, type the desired value.
When specifying the default value of a column, you must follow rules that depend on the column's data type:


To specify the default value in a SQL statement, when creating the column, after specifying the other pieces of information of the column, type DEFAULT followed by an empty space and followed by the desired value. Here are examples:
CREATE TABLE Employees
(
    FullName NVARCHAR(50),
    Address NVARCHAR(80),
    City NVARCHAR(40),
    State NVARCHAR(40) DEFAULT L'NSW',
    PostalCode NVARCHAR(4) DEFAULT L'2000',
    Country NVARCHAR(20) DEFAULT L'Australia'
);
GO
When performing data entry on the table, the user does not have to provide a value for a column that has a default. If the user does not provide the value, the default would be used when the record is saved.
|
|
If the user provides a value for a column that has a default value and then deletes the value, the default value rule would not apply anymore: The field would simply become empty. |
|
Forcing a Default Value During Data Entry |
During programmatic data entry, if you don't list a column that has a default value, its default value would be assigned to the column. On the other hand, if you add such a column in the list of an INSERT statement, you must provide a value or give an empty value. Fortunately, Transact-SQL makes it possible to force the default value for the column. To do this, in the placeholder of the value of the column, use the DEFAULT keyword. Here is an example:
USE Exercise;
GO
CREATE TABLE Employees
(
    EmployeeNumber int,
    FirstName nvarchar(20),
    LastName nvarchar(20),
    HourlySalary money default 12.50
);
GO

INSERT INTO Employees
VALUES(28404, N'Amadou', N'Sulleyman', 18.85),
      (82948, N'Frank', N'Arndt', DEFAULT),
      (27749, N'Marc', N'Engolo', 14.50);
GO
In this example, the second record would receive the default value, which is 12.50. In the same way, you can apply the default keyword for each column whose default value was indicated when the table was created.
|
Introduction |
One of the primary concerns of records is their uniqueness. In a database, you usually want to make sure that each record on a table can be uniquely identified. Microsoft SQL Server provides many means of taking care of this. These include the identity column, the primary key, and the indexes. We will review these issues in later lessons. Still, one way to do this is to apply a uniqueness rule on a column.
|
Visually Creating a Uniqueness Rule |
To visually specify that each value of a column must be unique, in the Table window, right-click the desired column and click Indexes/Keys...
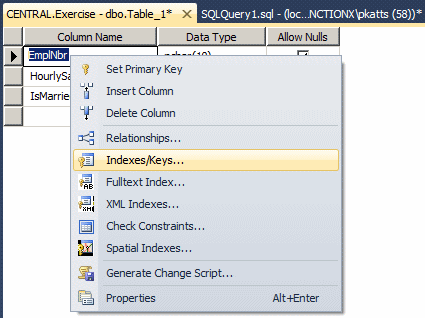
In the Indexes/Keys dialog box, click Add. On the right side, set the Is Unique field to Yes:
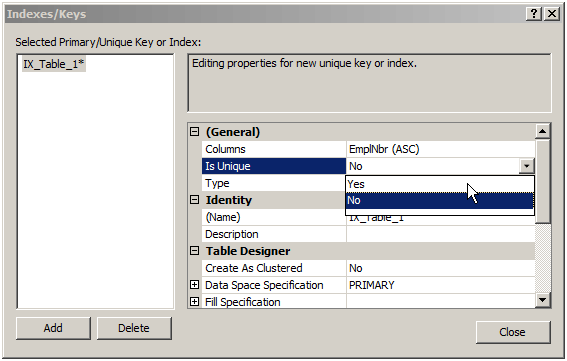
After doing this, click Close.
|
|
To assist you with creating a columns whose values will be distinguishable, Transact-SQL provides the UNIQUE keyword. To apply it on a column, after the data type, type UNIQUE. Here is an example:
USE Exercise;
GO
CREATE TABLE Students
(
    StudentNumber int UNIQUE,
    FirstName nvarchar(50),
    LastName nvarchar(50) NOT NULL
);
GO
When a column has been marked as unique, during data entry, the user must provide a unique value for each new record created. If an existing value is assigned to the column, this would produce an error:
USE Exercise;
GO
CREATE TABLE Students
(
    StudentNumber int UNIQUE,
    FirstName nvarchar(50),
    LastName nvarchar(50) NOT NULL
);
GO

INSERT INTO Students
VALUES(24880, N'John', N'Scheels'),
      (92846, N'Rénée', N'Almonds'),
      (47196, N'Peter', N'Sansen'),
      (92846, N'Daly', N'Camara'),
      (36904, N'Peter', N'Sansen');
GO
By the time the fourth record is entered, since it uses a student number that exists already, the database engine would produce an error:
Msg 2627, Level 14, State 1, Line 2
Violation of UNIQUE KEY constraint 'UQ__Students__DD81BF6C145C0A3F'.
Cannot insert duplicate key in object 'dbo.Students'.
The statement has been terminated.
Computed Columns
Introduction
There are various ways you can assist the user with data entry. For example, you can create an expression and apply it to a column so that the value of the column would come from other values. Such a column is called a computed column.
You can create the expression of a computed column when creating a table, whether in the Table window or using SQL.
|
Visually Creating a Computed Column |
To visually create an expression when creating a table, in the top section, specify the column's name (only the column name is needed). In the bottom section, expand the Computed Column Specification field and, in its (Formula) field, enter the desired expression. The expression can involve:
|
|
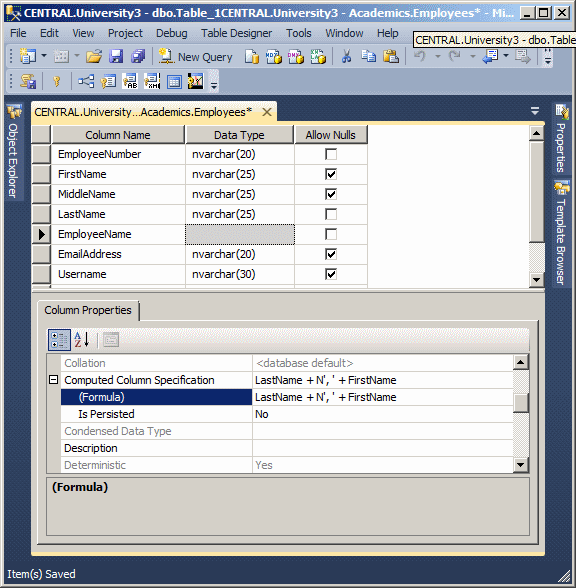
| EmployeeNumber | FirstName | MiddleName | LastName |
| 279227 | Donald | Henry | Leighton |
| 582007 | Alexander | Nolan | |
| 502494 | Anthony | Robert | Parrish |
| 702048 | Laurentine | Felicité | Avrilien |
| 927486 | Robert | John | Preston |
| 204850 | Simon | Lew | |
| 930248 | Jeannette | Veronica | Holms |
|
Creating an Expression Using SQL |
You can also create an expression in SQL code. To do this, in the placeholder of the column, enter the name of the column, followed by AS, and followed by the desired expression. Here is an example:
CREATE TABLE Circle
(
    CircleID int identity(1,1) NOT NULL,
    Radius decimal(8, 3) NOT NULL,
    Area AS Radius * Radius * PI()
);
GO
|
Using an Expression During Data Entry |
When performing data entry, you must not provide a value for a column that has an expression. The SQL interpreter would provide the value automatically. Here is an example of entering data for the above Circle table:
INSERT INTO Circle(Radius) VALUES(46.82);
GO
INSERT INTO Circle(Radius) VALUES(8.15);
GO
INSERT INTO Circle(Radius) VALUES(122.57);
GO
When you create a column that has an expression, the column doesn't have actual values. It is only a representative of values from other columns or constants. The column is referred to as a virtual column. Consider the following table:
CREATE TABLE Employees
(
    EmployeeNumber nchar(60),
    FirstName nvarchar(20),
    LastName nvarchar(20),
    HourlySalary money,
    TimeWorkedInAWeek decimal(6, 2),
    FullName AS FirstName + N' ' + LastName,
    WeeklySalary AS HourlySalary * TimeWorkedInAWeek
);
GO
The FullName only shows values that are from the FirstName and the LastName columns. This means that, unlike the FirstName and the LastName columns that have actual values, there is no real value in the FullName column. Transact-SQL allows you to actually store the value of the expression in the column. Storing the value in the column is referred to as persisting the value.
To ask the database engine to store the value of the expression (as an actual value), if you are visually creating the column, in the bottom section, under (Formula), set the Is Persisted field to Yes:
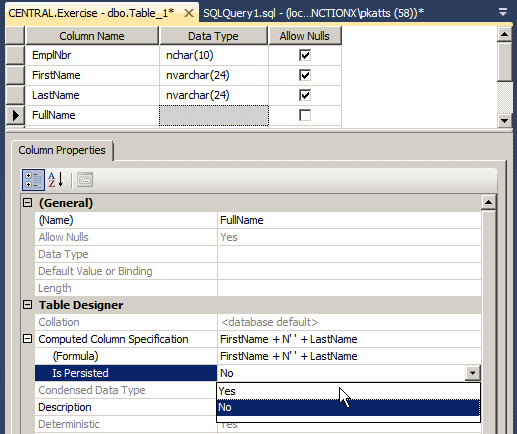
If you are creating the column using code, add a flag named PERSISTED at the end of the column definition. Here is an example:
CREATE TABLE Employees
(
    EmployeeNumber nchar(60),
    FirstName nvarchar(20),
    LastName nvarchar(20),
    HourlySalary money,
    TimeWorkedInAWeek decimal(6, 2),
    FullName AS LastName + N', ' + FirstName PERSISTED,
    WeeklySalary AS HourlySalary * TimeWorkedInAWeek
);
GO
Now, when you create a record, the result of the expression is saved in its own memory area. If you change the record, that is, if you change the value of (one of) the column(s) involved in the expression, the database engine would update the saved value of the expression.
|
Other Features of Records |
|
Is RowGuid |
This property allows you to specify that a column with the Identity property set to Yes is used as a ROWGUID column.
|
Collation |
Because different languages use different mechanisms in their alphabetic characters, this can affect the way some sort algorithms or queries are performed on data, you can ask the database to apply a certain language mechanism to the field by changing the Collation property. Otherwise, you should accept the default specified by the table.
To find out what language your server is currently using, in a Query Editor or from PowerShell, you can type:
SELECT @@LANGUAGE;
G
|
|
|
|
||
| Previous | Copyright © 2000-2022, FunctionX | Next |
|
|
||