Topics on Conjunctions and Disjunctions
Topics on Conjunctions and Disjunctions
BETWEEN a Starting and Ending Values
Introduction
If you have a logical range of values and you want to know if a certain value is contained in that range, you can add a BETWEEN operator.
![]() Practical Learning: Introducing BETWEEN Operations
Practical Learning: Introducing BETWEEN Operations
|
 |
|
Creating a BETWEEN Operation |
To visually create a BETWEEN expression, in the Criteria pane, click the box of the column on which the operation will be performed and type the expression. The statement is in the form:
BETWEEN Start AND End
In the SQL, the BETWEEN operator is used in a WHERE condition and combines with an AND conjunction. The basic formula to use a BETWEEN operator in SQL is:
WHERE Expression BETWEEN Start AND End
The Expression placeholder is usually the name of the column whose values you want to examine. Start is the starting value of the range to consider. End is the highest value to consider in the range. After this condition is executed, it produces the list of values between Start and End.
Consider the following records:
USE Exercise;
GO
CREATE TABLE Administration.Students
(
	StudentNumber int,
	FirstName nvarchar(20),
	LastName nvarchar(20),
	StudentName AS CONCAT(LastName, N', ', FirstName),
	Grade nvarchar(4)
);
GO
INSERT INTO Records.Students(StudentNumber, FirstName, LastName, Grade)
VALUES(960504, N'Paul', N'Yamo', N'D'),   (583115, N'Bertrand', N'Nguyen', N'B'),
      (284225, N'Alex', N'Alphey', N'D'), (429470, N'Lindsay', N'Womack', N'A'),
      (840051, N'Pamela', N'Nyat', N'B'), (928357, N'Ashley', N'Mann', N'F'),
      (275064, N'Jeanne', N'Ulm', N'A'),  (724857, N'Chrstine', N'Jeffers', N'C'),
      (929740, N'Richard', N'Fields', N'A'), (860402, N'Lois', N'Gibb', N'B');
GO
The values used in a BETWEEN operation must be of the same type and the SQL interpreter must be able to identify the range of values:
SELECT * FROM Administration.Students
WHERE Grade BETWEEN N'a' AND N'c';

SELECT StudentNumber [Student #],
       FirstName [First Name],
       Lastname [Last Name],
       Grade
FROM Administration.Students
WHERE LastName  BETWEEN N'Jeffers' AND N'Nyat';
GO
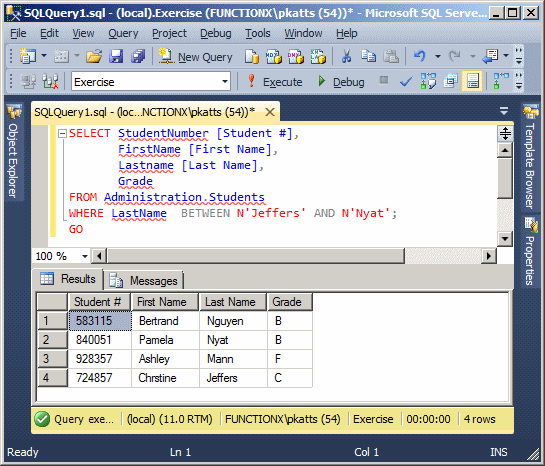
SELECT StudentNumber [Student #],
       FirstName [First Name],
       Lastname [Last Name],
       Grade,
       CASE Grade
	       WHEN N'A' THEN N'Pass'
	       WHEN N'B' THEN N'Pass'
	       WHEN N'C' THEN N'Pass'
	       WHEN N'D' THEN N'Pass'
	       WHEN N'F' THEN N'Fail'
       END [Pass/Fail Status]
FROM Administration.Students
WHERE StudentNumber  BETWEEN 20000 AND 500000;
GO

Of course, when creating a BETWEEN operation, you should be able to perform the operation on only similar values.
|
|

USE LambdaSquare1;
GO
SELECT "Unit #" = aparts.UnitNumber,
       Beds = aparts.Bedrooms,
       Baths = aparts.Bathrooms,
       [Monthly Rent] = aparts.Price,
       "Primary Deposit" = aparts.Deposit,
       (aparts.Price + aparts.Deposit) "Due Before Moving",
       CASE aparts.Available
	    WHEN 0 THEN N'No or Not Yet'
	    WHEN 1 THEN N'Yes'
       END "Available"
FROM Presentation.Units aparts
WHERE aparts.Price BETWEEN 1000 AND 1200
ORDER BY [Monthly Rent], "Primary Deposit";
GO

|
Negating a BETWEEN Operation |
To negate a BETWEEN operation, you can precede it with NOT. Here is an example:
SELECT * FROM Administration.Students
WHERE not Grade BETWEEN N'a' AND N'c';
This would produce:

To make the statement easier to read, you should include in parentheses the section after NOT. Here is an example:
SELECT * FROM Students
WHERE NOT (Grade BETWEEN N'a' AND N'c');
An alternative is to use the ranges outside the desired one, such as BETWEEN N'd' AND N'z'.
|
Combining BETWEEN Operations |
You can combine two or more BETWEEN operation to consider more than one range of values. If you want to combine two BETWEEN operation, you can use the following formula:
BETWEEN Start1 AND End1 OR Start2 AND End2
To make the statement easier to read, you should include each operation in parentheses:
BETWEEN (Start1 AND End1) OR (Start2 AND End2)
Each operation is evaluated individually. The first range is considered, followed by the second. Then the records resulting from each operation is combined to the other. Here is an example:
SELECT * FROM Students
WHERE (StudentNumber BETWEEN 100000 AND 300000)
      OR
      (StudentNumber BETWEEN 600000 AND 800000);
This would produce:

In the above statement, examine the ranges from a single column. You can create one BETWEEN operation from one column and another operation from another column, then combine them. Here is an example:
SELECT * FROM Students
WHERE (StudentNumber BETWEEN 400000 AND 400000)
      OR
      (Grade BETWEEN 'A' AND N'B');
This would produce:

|
Introduction |
Imagine you have a field that holds certain repeating values. Here is an example we used:
USE Exercise;
GO
DROP TABLE Employees;
GO
CREATE TABLE Employees([Empl #] nchar(10), [First Name] nvarchar(20),
	[Last Name] nvarchar(20), Salary money, [Full Time?] bit);
GO
INSERT INTO Employees
VALUES(N'29730', N'Philippe', N'Addy', 20.05, 1);
GO
INSERT INTO Employees([Empl #], [First Name], [Last Name], Salary)
VALUES(N'28084', N'Joan', N'Shepherd', 12.72);
GO
INSERT INTO Employees([Empl #], [First Name], [Last Name], Salary)
VALUES(N'79272', N'Joshua', N'Anderson', 18.26);
GO
INSERT INTO Employees
VALUES(N'22803', N'Gregory', N'Swanson', 15.95, 0);
GO
INSERT INTO Employees([Empl #], [Last Name], Salary, [Full Time?])
VALUES(N'28084', N'Shepherd', 12.72, 1),
      (N'39742', N'Anders', 8.88, 0);
GO
INSERT INTO Employees
VALUES(N'83084', N'Josephine', N'Anderson', 20.02, 1);
GO
INSERT INTO Employees([Empl #], [First Name], [Last Name], Salary)
VALUES(N'79272', N'James', N'Anders', 18.26),
      (N'27924', N'Gregory', N'Hope', 12.85),
      (N'39742', N'John', N'Anderson', 8.88);
GO
SELECT * FROM Employees;
GO
This would produce:
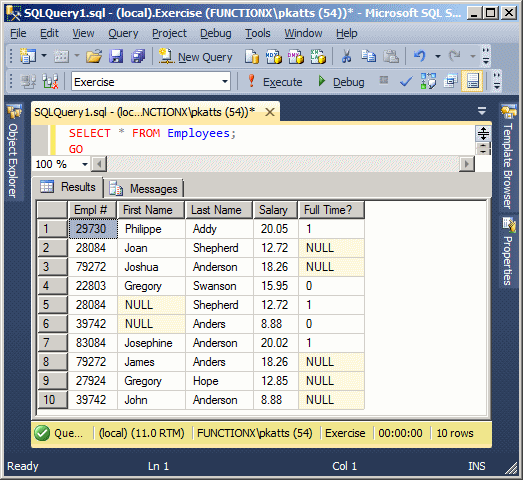
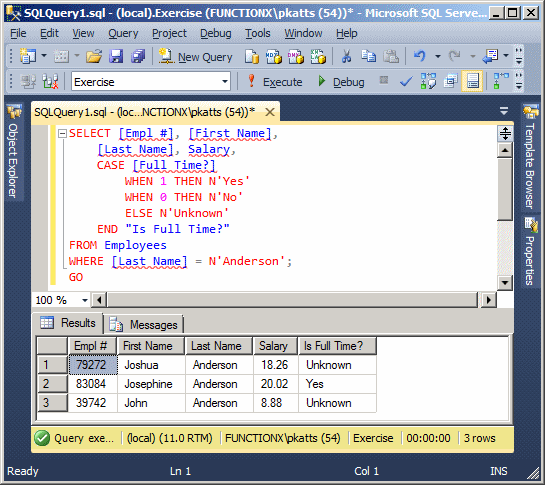
Notice that some names (such as Sheperd, Anders, and Anderson). We already know how to fnd records that share a certain value. For example, the following code gives us the list of employees whose last name is Anderson:
SELECT [Empl #], [First Name],
	[Last Name], Salary,
	CASE [Full Time?]
		WHEN 1 THEN N'Yes'
		WHEN 0 THEN N'No'
		ELSE N'Unknown'
	END "Is Full Time?"
FROM Employees
WHERE [Last Name] = N'Anderson';
GO
This would produce:
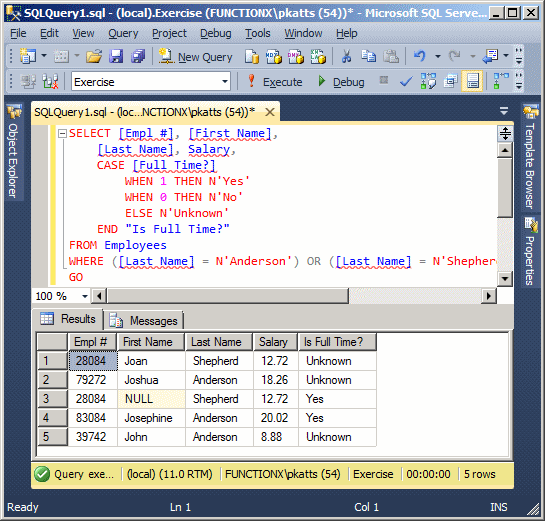
Imagine you want to add another value to your seach. We already know how to do that with an OR operator. Here is an example:
SELECT [Empl #], [First Name],
	[Last Name], Salary,
	CASE [Full Time?]
		WHEN 1 THEN N'Yes'
		WHEN 0 THEN N'No'
		ELSE N'Unknown'
	END "Is Full Time?"
FROM Employees
WHERE ([Last Name] = N'Anderson') OR ([Last Name] = N'Shepherd');
This would produce:
In the same way, you can add as many OR expressions as you see fit. As seen previously, you can create a logical disjunction that deals with either only one or more than one column. Here is an example that acts on two columns:
SELECT [Empl #], [First Name],
	[Last Name], Salary,
	CASE [Full Time?]
		WHEN 1 THEN N'Yes'
		WHEN 0 THEN N'No'
		ELSE N'Unknown'
	END "Is Full Time?"
FROM Employees
WHERE ([Last Name] = N'Anderson') OR ([Full Time?] IS NOT NULL);
This would produce:

If your logical disjunction involves only one column, the SQL provides an alternative operator named IN.
|
Creating an IN Operation |
The IN operation behaves like an OR applied to onw column but there are different ways you created each. You can create the expression visually or with code. First, the formula of an IN operation is:
IN(Expression1, Expression2, Expression_n)
You start with the IN keyword and add some parentheses to it. In the parentheses, put the list of values separated by commas.
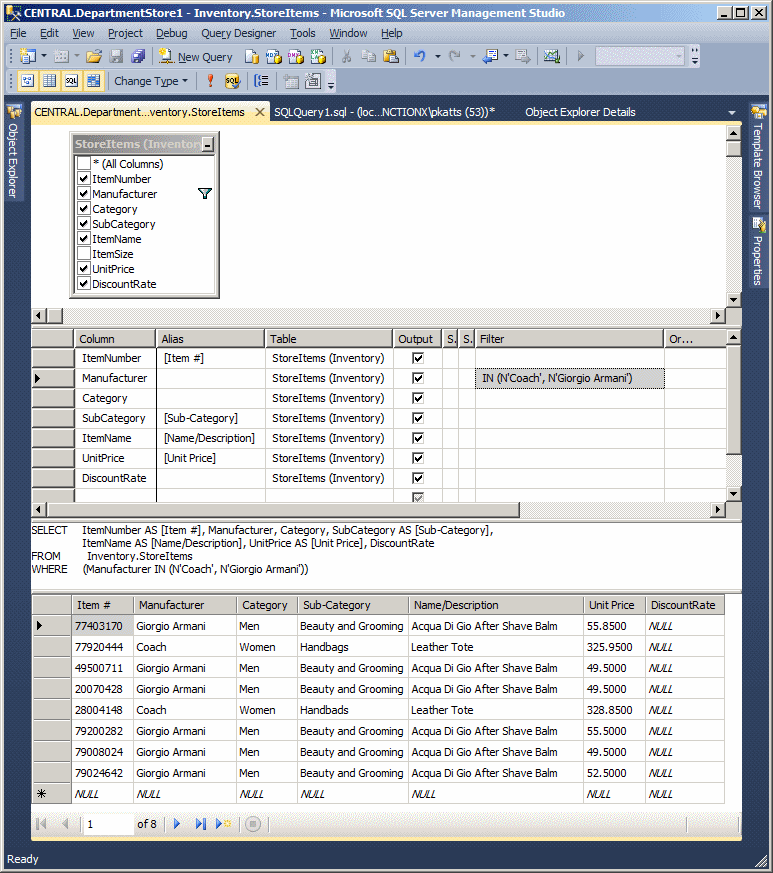
To visually create an IN operation, open the table in the Query Designer. In the Filter box that corresponds to the column, type the expression.
In the SQL, the IN operator is associated with a WHERE statement. The formula to follow is:
WHERE ColumnName IN(Expression1, Expression2, Expression_n)
Start with WHERE followed by the name of the column that holds the values to look for. In the parentheses of IN, add the desired values separated by commas. Each Expression can be one of the values of the ColumnName. This is equivalent to Expression1 OR Expression2 OR Expression_n, etc.
|
|
|
Negating an IN Operation |
As seen for the other operators, there are various ways you can negate an IN operator. Consider the following example:
SELECT [Empl #], [First Name],
	[Last Name], Salary,
	CASE [Full Time?]
		WHEN 1 THEN N'Yes'
		WHEN 0 THEN N'No'
		ELSE N'Unknown'
	END "Is Full Time?"
FROM Employees
WHERE [Last Name] IN (N'Anderson', N'Shepherd');

The easiest way is to precede the operation with NOT. One solution is to put NOT before the name of the column. Here is an example:
SELECT [Empl #], [First Name],
	[Last Name], Salary,
	CASE [Full Time?]
		WHEN 1 THEN N'Yes'
		WHEN 0 THEN N'No'
		ELSE N'Unknown'
	END "Is Full Time?"
FROM Employees
WHERE NOT [Last Name] IN (N'Anderson', N'Shepherd');

Another solution is to precede the IN keyword with NOT. This can be done as follows:
SELECT * FROM Employees
WHERE [Last Name] NOT IN (N'Anderson', N'Shepherd');
If the number of values in the column is short, to negate an IN operation, instead of the desired values, you can give the other values.
Introduction
When performing data entry, in some columns, even after indicating the types of values you expect the user to provide for a certain column, you may want to restrict a range of values that are allowed. In the same way, you can create a rule that must be respected on a combination of columns before the record can be created. For example, you can ask the database engine to check that at least one of two columns received a value. For example, on a table that holds information about customers, you can ask the database engine to check that, for each record, either the phone number or the email address of the customer is entered.
|
The ability to verify that one or more rules are respected on a table is called a check constraint. A check constraint is a Boolean operation performed by the SQL interpreter. The interpreter examines a value that has just been provided for a column. If the value is appropriate:
If the value is not appropriate:
You create a check constraint at the time you are creating a table. |
 |
|
Visually Creating a Check Constraint |
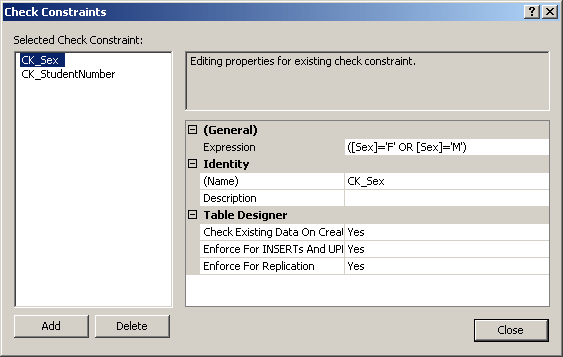
To create a check constraint, when creating a table, right-click anywhere in (even outside) the table and click Check Constraints... This would open the Check Constraints dialog box. From that window, you can click Add. Because a constraint is an object, you must provide a name for it. The most important piece of information that a check constraint should hold is the mechanism it would use to check its values. This is provided as an expression. Therefore, to create a constraint, you can click Expression and click its ellipsis button. This would open the Check Constraint Expression dialog box.
To create the expression, first type the name of the column on which the constraint will apply, followed by parentheses. In the parentheses, use the arithmetic and/or SQL operators we studied already. Here is an example that will check that a new value specified for the Student Number is greater than 1000:

After creating the expression, you can click OK. If the expression is invalid, you would receive an error and given the opportunity to correct it.
You can create as many check constraints as you judge necessary for your table:
After creating the check constraints, you can click OK.
To create a check constraint in SQL, first create the column on which the constraint will apply. Before the closing parenthesis of the table definition, use the following formula:
CONSTRAINT name CHECK (expression)
The CONSTRAINT and the CHECK keywords are required. As an object, make sure you provide a name for it. Inside the parentheses that follow the CHECK operator, enter the expression that will be applied. Here is an example that will make sure that the hourly salary specified for an employee is greater than 12.50:
CREATE TABLE Employees
(
	[Employee Number] nchar(7),
	[Full Name] varchar(80),
	[Hourly Salary] smallmoney,
	CONSTRAINT CK_HourlySalary CHECK ([Hourly Salary] > 12.50)
);
It is important to understand that a check constraint it neither an expression nor a function. A check constraint contains an expression and may contain a function as part of its definition.
After creating the constraint(s) for a table, in the Object Explorer of Microsoft SQL Server Management Studio, inside the table's node, there is a node named Constraints and, if you expand it, you would see the name of the constraint.
With the constraint(s) in place, during data entry, if the user (or your code) provides an invalid value, an error would display. Instead of an expression that uses only the regular operators, you can use a function to assist in the checking process. You can create and use your own function or you can use one of the built-in Transact-SQL functions.
|
Built-In Functions and Data Selection |
To refine your data analysis, you can use functions, whether functions you create yourself or Transact-SQL built-in functions. As always mentioned, the first candidates of functions you should use are the built-in functions.
To use a built-in function, in the placeholder of the column, type the name of the function, followed by its parentheses. If the function takes some parameters, remember to follow the rules to call a parameterized function. You can also include a function in any of the operators we have reviewed so far. You can also involve a built-in function in an expression.
|
User-Defined Functions and Data Selection |
If none of the built-in functions satisfies your needs, you can create your own and use it during data analysis. Obviously, you should first create the function. Here is an example of two functions created in the ROSH database:
USE ROSH;
GO

/* =============================================
   Author:      FunctionX
   Create date: Friday 6 April, 2007
   Description:	This function is used
                to get the full name of a student
   ============================================= */
CREATE FUNCTION Registration.GetFullName
(
	@FName nvarchar(20),
	@LName nvarchar(20)
)
RETURNS varchar(41)
AS
BEGIN
	RETURN @LName + ', N' + @FName;
END;
GO
/* =============================================
   Author:	FunctionX
   Create date: Saturday 7 April, 2007
   Description:	This function is used
                to display Yes or No
   ============================================= */
CREATE FUNCTION Registration.ShowYesOrNo
(
    @SingleParentHomeStatus bit
)
RETURNS nvarchar(3)
AS
BEGIN
    DECLARE @Result nvarchar(3);

    IF @SingleParentHomeStatus = 0
       SET @Result = N'No';
    ELSE
       SET @Result = N'Yes';

    RETURN @Result;
END;
GO
Once a function is ready, in the placeholder of your SQL statement, type the name of the schema, followed by a period, followed by the name of the function, its parentheses, and its paremeter(s), if any, inside of the parentheses. Here is an example:
SELECT StudentNumber [Student #],
       Registration.GetFullName(FirstName, LastName) AS [Student's Name],
       Gender,
       Registration.ShowYesOrNo(SingleParentHome) AS [Live's in a Single Parent Home?],
       ParentsNames AS [Parents' Names]
FROM   Registration.Students;
GO
This would produce:

|
|
|
|
||
| Previous | Copyright © 2008-2022, FunctionX, Inc. | Next |
|
|
||