Home

Introduction to Microsoft SQL Server


Microsoft SQL Server Setup


Introduction

Microsoft SQL Server is an application used to create computer databases for the Microsoft Windows family of server operating systems. It provides an environment used to generate databases that can be accessed from workstations, the web, or other media such as a personal digital assistant (PDA). Microsoft SQL Server is probably the most accessible and the most documented enterprise database environment right now. This also means that you can learn it a little quicker than most other database environments on the market.

On this site, we provide lessons and other topics on how to use Microsoft SQL Server. To limit the number of instructions given in the lessons and make them a little easier, this web site deals only with Microsoft SQL Server 2000, no other version (such as 6.5, 7, or Express), no MSDE (although you would be able to follow most lessons on this site with the MSDE, the problem is that it doesn't include an interface and some of its results in the Command Prompt are not "cute").

Getting Microsoft SQL Server

In order to follow the lessons on this site, you must have access to a computer in which Microsoft SQL Server is installed. To start, you must have a computer that runs an appropriate operating system. If you are just learning, which is assumed for all lessons on this site, you can use a Microsoft Windows >= XP Home Edition: that includes Windows XP Home Edition, Windows XP Professional, Windows 2000 Professional, or any version of Windows Server 2003. 
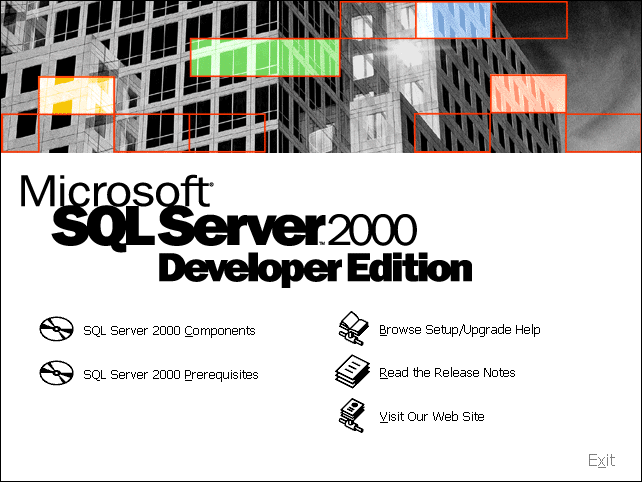
In this case, you must install Microsoft SQL Server 2000 Developer Edition.

To make it possible for you and other students to study databases and SQL, Microsoft made available a trial version of Microsoft SQL Server. This full version is available from the Microsoft web site. This is something beneficial because most companies would not give such a long trial version of an important software product: for 120 days, you should be able to learn as must as possible and be able to move on, such as finding a job or starting a business.

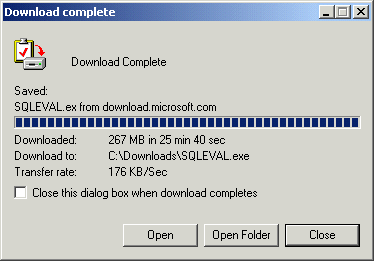
To get the trial edition of Microsoft SQL Server, go to the Microsoft web site, do a search on "trial software" (normally, there is usually a Trial Software link on the home page), and follow the links to locate the trial edition of Microsoft SQL Server. This is a (very) big product: 274062 KB. For all of the lessons of this site, we will use the developer edition of Microsoft SQL Server, which is the same you download from the Microsoft web site.

Once you get serious with MS SQL Server, you would use Microsoft SQL Server Enterprise Edition.

Installation Steps


Introduction

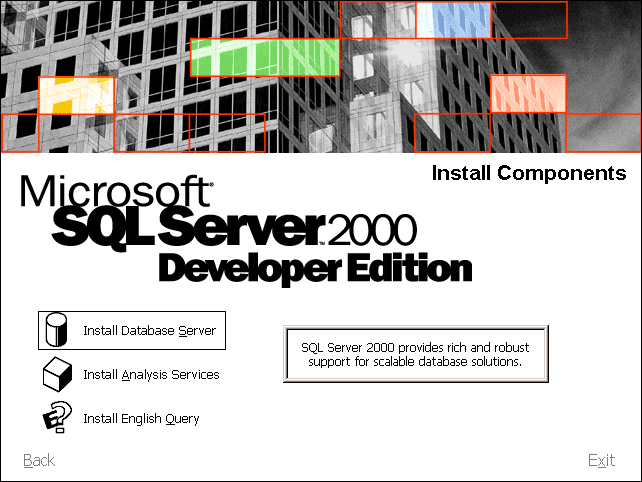
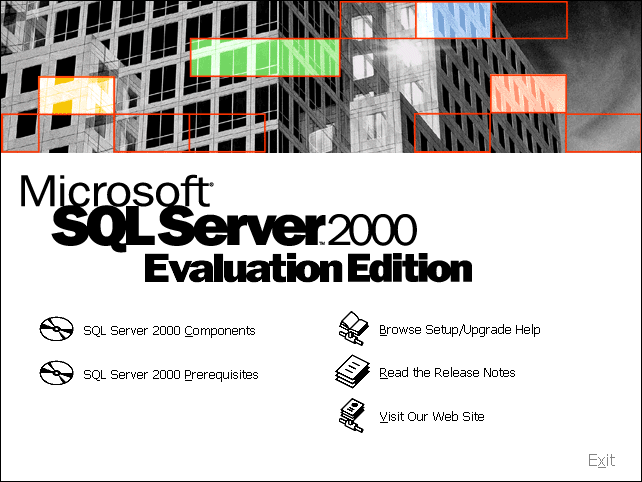
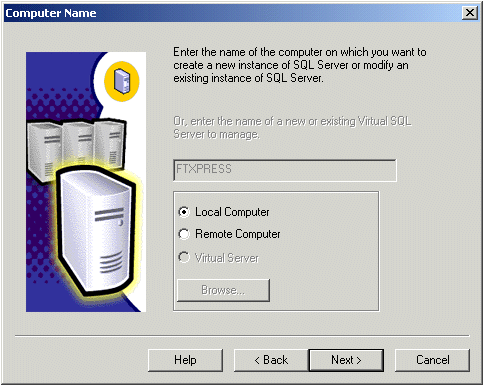
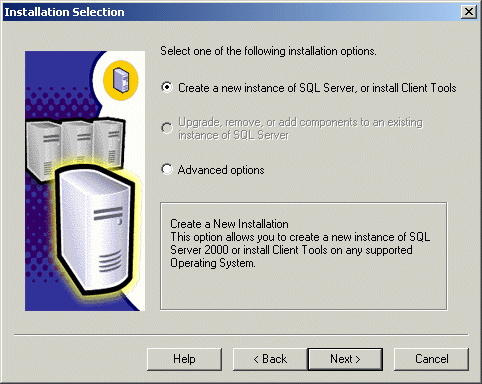
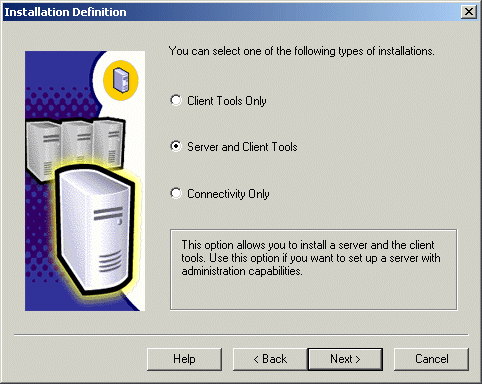
The installation of Microsoft SQL Server, like that of various modern products is fairly easy, whether you are using a CD called SQL Server Developer Edition, a DVD or a downloaded edition. If you have it on CD or DVD, you can put it in the drive and follow the instructions on the screen as we will review them.

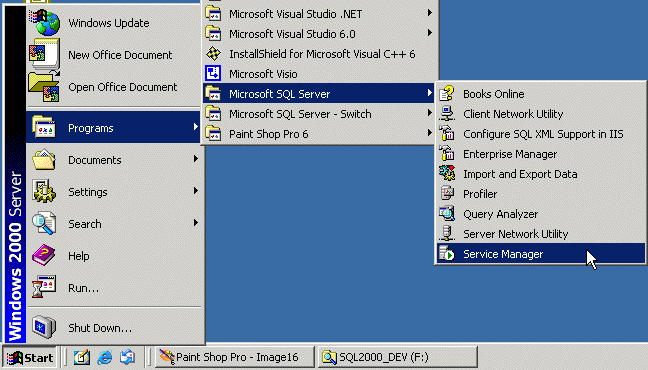
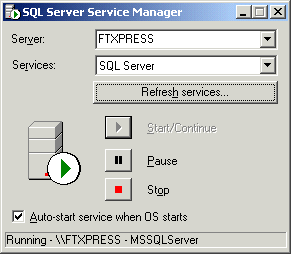
The following steps describe the installation on a Microsoft Windows 2000 Server by the Administrator account, a Windows XP Home Edition, a Windows XP Professional, or the downloaded edition on a Microsoft Windows 2000 Professional.

Practical LearningPractical Learning: Installing MS SQL Server

  1. Log on to your Windows 2000 Server or open Windows 2000/XP Professional
  2. Put the CD or DVD in the drive or download the trial edition of SQL Server
  3. If you are using the CD or DVD, a border-less window should come up (if it doesn't, open Windows explorer, access the drive that has the CD or DVD and double-click autorun):


    If you had downloaded the file, you may have the Download Complete dialog box


    In this case, click Open. A dialog box will indicate where the file would be installed:


    You can accept the default and click Finish. You may be asked whether you want to create the new folder that doesn't exist and you should click Yes. After a while, you should receive a message indicating success:


    Click OK
  4. If you are using the CD installation, click SQL Server 2000 Components or press Alt C:


    If you are using the downloadable edition, locate the folder where the files were installed. You should see an autorun icon. Double-click it:


    Click SQL Server Components and click Install Database Server
     
  5. On the first page of the Welcome wizard, click Next
  6. On the second page, choose the type of installation you are performing by clicking the appropriate radio button. The Remote Computer choice would lead you to select a computer or provide its path so you can install SQL Server on a computer that is not close to you. Otherwise, accept or select the Local Computer radio button:
     
  7. After selecting the desired type of installation and if necessary providing the information needed, click Next:
     
  8. The next dialog box allows you to select an installation option such as performing an installation live or scheduling that can be done without your eyewitness supervision (second radio button). For this installation, you should accept the default first radio button and click Next
  9. The next option allows you to type your name (the name you use here has nothing to do with authentication) and optionally your company. After doing this, click Next
     
  10. Read the Software License Agreement COMPLETELY and, if you agree, click Next. If you don't agree, click No and stop the whole thing. The next steps assume that you agreed with the small prints
  11. Next, enter the 25-digit CD-Key and click Next
  12. The next step provides other options for the installation type. The first radio button is mainly used if you are installing on a workstation that will be connecting to a server or to servers. The third option allows you to install only MDAC. You should accept or select the default second radio button:
     
  13. After making your selection, click Next.
    If possible, accept the Default check box selected on the wizard page.
    If you must enter an Instance Name, choose a convenient name and type. For our lessons, we will name it BUSY_INTEL
     
  14. Click Next
  15. The next steps will need some decisions from you. For example, you must now set the amount of installation you want to perform and the folder in which you want to store SQL Server. In most cases, you can accept the default Typical:


    Click Next
  16. The next step allows you to specify who is doing the installation. If you are an administrator, specify the account's password. If you have an account that can perform an installation on the server, enter its username, its password, and the domain it belongs to:
     
  17. Click Next
  18. On the next step, you can accept to exclusively use Windows Authentication with the first radio button. Otherwise, you can and should use this opportunity to allow different persons to log in to this SQL Server. In this case, you can select the second radio button and create a password for the SQL Server Authentication, which would create and setup the sa account:


    You should never use or allow a blank password, even if you are working alone. For one thing, this would be a bad habit you should not let get to you. For another thing, database security should be one of your biggest concerns and an employer or a job interviewer would be happy to know that you take security issues to your heart and you care. If that's the case, specify the type of authentication you will use. You should select
  19. Click Next
     
  20. Once Setup has enough information, on the last wizard page, simply click Next
  21. Once the installation is over, click Finish
 

SQL Server Startup

To use SQL Server, it must start as a service. You have two options. You can start it every time you want to use. You can also make it start whenever the computer comes up from booting.

Practical LearningPractical Learning: Starting and Stopping SQL Server

  1. To start SQL Server, on the Taskbar, click Start -> Programs -> Microsoft SQL Server -> Service Manager
     
  2. On the SQL Server Service Manager dialog box, click the Start/Continue button if necessary
     
  3. On the lower-right corner of the desktop, on the clock section of the Taskbar, the button of SQL Server appears with a green play button .
  4. Close the dialog box

Pratical LearningPractical Learning: Stopping SQL Server

  1. To stop the SQL Server service, double-click the SQL Server icon on the Taskbar system tray
     
  2. On the SQL Server Service Manager dialog box, click the Stop button
  3. You will receive a confirmation message box. Click Yes.

Practical LearningPractical Learning: Starting the SQL Server Service Automatically

  1. Display the Control Panel window and double-click Administrative Tools
  2. In the Administrative Tools window, double-click Services
     
  3. In the Services window, scroll to the middle of the right frame and click MSSQLSERVER
  4. On the toolbar, click the Start Service button
     
  5. Close the Services window


Home Copyright © 2005-2016, FunctionX Next