|
A table is an object that holds the information of a
database. Because a table is the central part of a
database, the information it holds must be meticulously organized. To better manage its information, data of a table is arranged
in a series of fields called cells, the same types of cells you would
encounter on a spreadsheet application such as Microsoft Excel, StarCalc, or Corel Quattro
Pro.
To use tables on a database, the table must belong to
a database. SQL Server installs a few databases on its own, and you can use
these databases to experiment with tables. Some of the tables we will use here already contain records.
Others will be populated as we move on. Once a table contains information, you can review it using either
Enterprise Manager or an external application.
The tables of a database display in the MMC in a
common folder of their parent database. To open a table, first locate the
database it belongs to. In the left frame of the MMC window, expand the
Database folder and expand the name of the database you want to use. Then
click the Tables node of the desired database.
In the right frame of the MMC window, if you
double-click a table, it would open the Table Properties. The Table
Properties shows the table as its columns are organized.
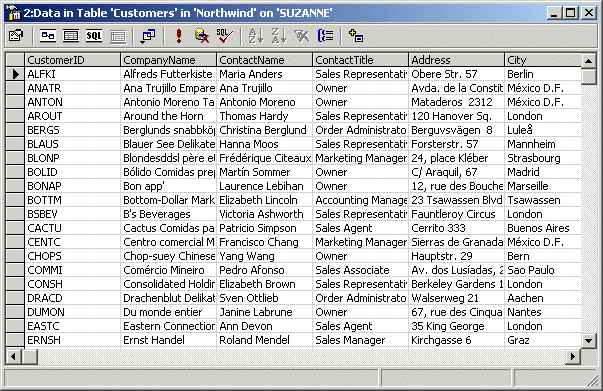
If you want to see information that a table holds, you
can right-click it, position your mouse on Open Table and click Return All
Rows.
To see the structural design of a table, you can
right-click it, and click Design Table.
|
|
Table Data Navigation in the Enterprise Manager |
|
|
Data Navigation consists of displaying and viewing
data. Because information of a database
is stored in tables, your primary means of viewing data consists of
opening a table in a view that displays its information.
In the Enterprise Manager, to view data, you open a table in the
view that displays the records. To do this, you can right-click the table
-> Open Table -> Return All Rows. If the table contains too much
information, you can specify the maximum number of records you want to
see. To do this you would select Return Top... This would present a dialog
box that allows you to type the desired number.
When a table displays its records, you navigate
through its fields using the mouse or the keyboard. With the mouse, to get
to any cell, you can just click it. To navigate through records using the
keyboard, you can press:
- The right arrow key to move to the right cell; if the caret is
already in the most right cell, it would be moved to the first cell of
the next record, up to the last empty cell of the first empty record
- The left arrow key to move to the previous cell; if the caret is in,
or reaches, the most left cell of the first record, nothing would
happen when you press the the left arrow key
- The down arrow key to move to the cell under the current one; if the
caret is already in the last cell of the current column, nothing would
happen
- The up arrow key to move to the cell just above the current one; if
the caret is already in the first cell of the current column, nothing
would happen
- The Page Down to move to the next group of cell that would
correspond to the next page; if the number of records is less than a
complete page, the caret would move to the last cell of the current
column
- The Page Up to move to the next group of cell that would correspond
to the next page; if the number of records is less than a complete
page, the caret would move to the first cell of the current column
|
|
 Practical
Learning: Navigating Through Records of a Table Practical
Learning: Navigating Through Records of a Table
|
|
- Start the Enterprise Manager (MMC) of Microsoft SQL Server.
Expand the Microsoft SQL Servers node. Expand the server node. Expand
the Databases folder.
- Expand Northwind (by clicking its + symbol)
- In the left frame, click Tables
- In the right-frame, right-click Customers, position the mouse on
Open Table and click Return All Row

- To navigate through records, press the right arrow key twice
- Press the down arrow key five times
- Press Ctrl + End to move to the last record
- Press Page Up
- Press Ctrl + Home
- After viewing the records, to close the table, click its
system Close button

|
|

