Data Analysis
|
|
Data Analysis |
|
Data analysis consists of visiting the values stored in the tables of a database, for any reason judged necessary. It can be performed to check the accuracy of a series of values, to apply new changes to one or more records, to look for the existence or state of a record, or else. Microsoft SQL Server itself is equipped with all the tools, including visual tools, needed to perform data analysis. If you want to perform data analysis in a Windows Forms Application, you must know what the SQL offers so you can apply the SQL as a language to your programming language and use these in your Windows controls. If you are working in the SQL Server Enterprise Manager,
before performing data analysis, you should first open the table in a view that
shows its records. To do this, after locating the desired table, you can
right-click it, position the mouse on Open Table, and click Return All Rows.
After displaying the table, to access the view that allows data
analysis, click the Show SQL Pane button To perform data analysis, you must write a SQL statement. After writing the statement, you must execute it. If you are
working with a table from the SQL Server Enterprise Manager, to execute the statement, you can click
the Run button If you are working in the SQL Query Analyzer, to execute a
statement, you can click the Execute Query button If you are working in a Windows Forms Application, to
perform data analysis, the .NET Framework provides the DataView class.
The DataView class is defined in the System::Data namespace of the
System.Data.dll library. To use a DataView object in your application,
you can declare a pointer to DataView using one of its three
constructors. The default constructor allows you to declare the variable without
giving its details. As an alternative to declaring a DataView variable,
Microsoft Visual Studio .NET provides the DataView button |
|
|
|
|
Data Selection |
|
In order to perform any type of data analysis, you must specify the table and the columns that would be involved. This is done using the same type of SELECT statement we introduced for the data adapter in the previous lesson. The fundamental formula of selecting columns of a table is: SELECT What FROM TableName Based on this formula, you use the TableName to specify the name of the table that holds the records you want to retrieve. The table must exist in the database you specified when establishing your connection. If you want to use the records of only one column, you can specify its name as the What placeholder of our formula. Here is an example:
If you want to use more than one column, separate them with commas. Here is an example:
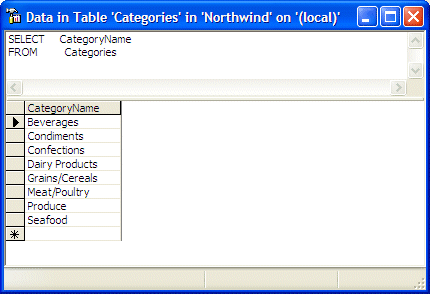
If you want to use all columns of the table, replace the What placeholder of our formula with *. Here is an example:
If you are working in a Windows Forms Application and plan to perform data analysis, after declaring a DataView variable, the first action you should take is to specify the table that holds the records you want to examine. If you have declared the DataView variable using its default constructor, to specify the table, you can assign the name of the database table to the Table property of the DataView object. Alternatively, you can specify the table when declaring the DataView class. To do this, you can use the following constructor:
As you can see, this constructor expects a pointer to a DataTable as argument. After declaring the DataView variable, the records stored in the table argument would accessible for operations performed using the DataView object. The name of the table can also be specified in the Table field of the Properties window for the DataView object.
If you create a table that includes an identity column and that column is the first (or the most left) column of the table, when the user performs data entry, the records are arranged in the incremental order of the numbers of that identity column. Here is an example:
If you want, you can allow the user to arrange the list of records based on another column. This other column would be used as reference. Rearrange the list of records is referred to as sorting and there are two options: ascending and descending. When a list is sorted in ascending order:
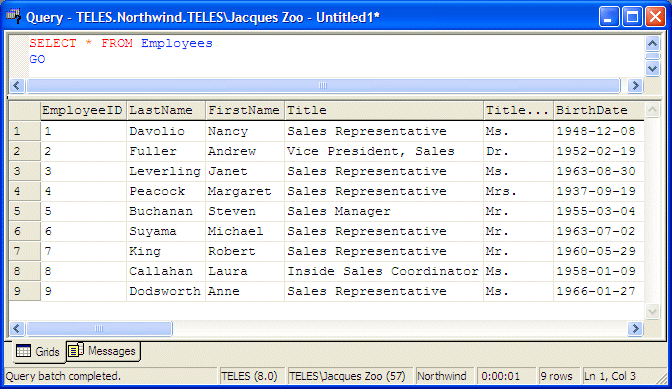
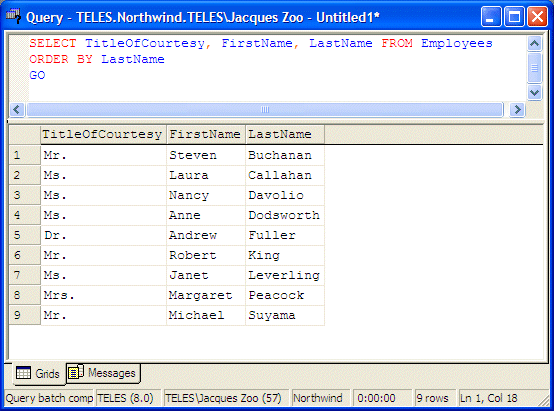
All of the techniques used to sort records on a table can also be applied to a query that displays in Datasheet View. To create more advanced queries, the SQL allows you to sort a field on a query and use this arrangement as part of the query. To sort a column in ascending order, you can include the ORDER BY clause in your statement. The formula used is: SELECT What FROM TableName ORDER BY ColumnName; The What and the TableName factors are the same as described earlier. The ColumnName placeholder allows you to specify the column used as reference. When this operation is performed, the values under the ColumnName column would be sorted in ascending order. The value or the other columns would be used to correspond to those of this column. Consider the following example:
Notice that the records under the LastName column are sorted in alphabetical order, and the other values in the other columns simply follow this order. If you use the * operator to include all fields, you can order the list based on any of the table's column. By default, records are ordered in ascending order. Nevertheless, the ascending order is controlled using the ASC keyword specified after the column used as basis. Here is an example:
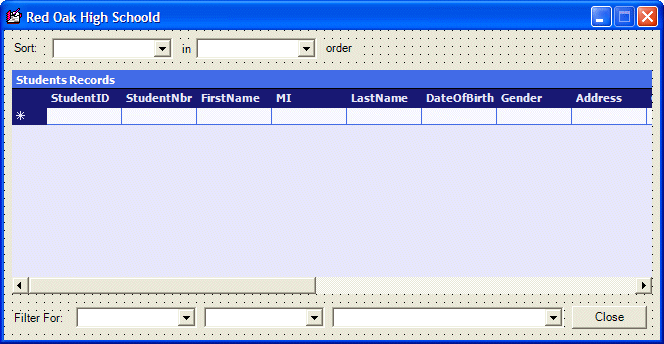
If you create a database application that contains a table and you want the users to be able to sort values of that table, probably the fastest means of supporting this operation is through the DataGrid control. Its columns are already configured to be sorted in ascending or descending order. If you are working in a Windows Forms Application and using a DataView object, to sort records, the DataView class is equipped with the Sort property that is of type String. To specify the sort order to apply to the records, assign a formatted string to this property.
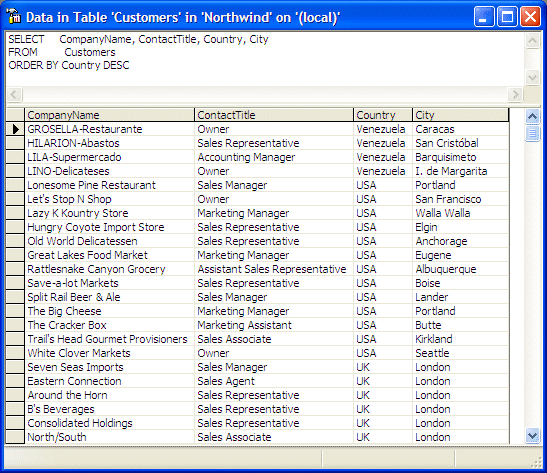
Instead of sorting a list in ascending order, you can rearrange its values in reverse order. This is referred to as descending order. The algorithms used are the same as for ascending, except that they are applied in reverse. If you want to sort records in descending order, use the DESC keyword after the name of the column, in place of ASC. The DESC keyword produces the opposite result to the ASC effect. Here is an example:
Once again, if you are working in a Windows Forms Application and using a DataView object, to sort records, assign an appropriately built string to the DataView::Sort property.
|
|
|
 |
||||||||||||||||||||||||||||||||
|
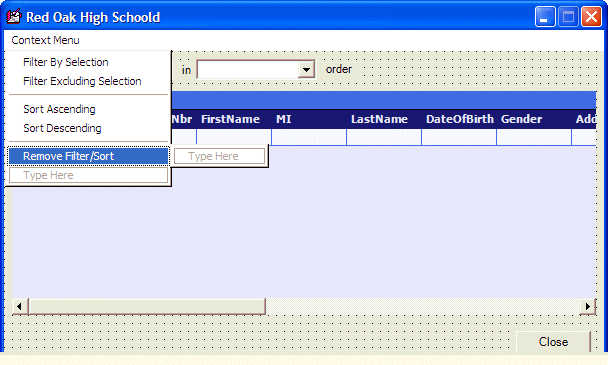
| Text | (Name) |
| Filter By Selection | mnuFiltBySel |
| Filter Excluding Selection | mnuFiltExclSel |
| - | |
| Sort Ascending | mnuSortAsc |
| Sort Descending | mnuSortDesc |
| - | |
| Remove Filter/Sort | mnuRemFiltSort |
private: /// <summary> /// Required designer variable. /// </summary> System::ComponentModel::Container * components; DataColumn *colSelected; |
System::Void Form1_Load(System::Object *  sender, System::EventArgs *  e)
{
	 DataTable *tblStudents = this->dsROSH1->Tables->Item[S"Students"];
	 DataColumnCollection *colStudents = tblStudents->Columns;

	 for(int i = 0; i < colStudents->Count; i++)
		 this->cboColumns->Items->Add(colStudents->Item[i]->ColumnName);

	 this->cboColumns->SelectedIndex = 0;
	 this->cboSortOrder->SelectedIndex = 0;

	 this->sqlDataAdapter1->Fill(this->dsROSH1);

	 colSelected = new DataColumn;
}
|
System::Void dataGrid1_MouseDown(System::Object *  sender,
				System::Windows::Forms::MouseEventArgs *  e)
{
	 DataGrid::HitTestInfo *hti = this->dataGrid1->HitTest(e->X, e->Y);
	 DataGridCell curCell;

	 curCell.RowNumber = hti->Row;
	 curCell.ColumnNumber = hti->Column;

	 this->dataGrid1->CurrentCell = curCell;

	 colSelected = this->dsROSH1->Tables->Item[S"Students"]->Columns->Item[hti->Column];
}
|
System::Void cboColumns_SelectedIndexChanged(System::Object *  sender, System::EventArgs *  e)
{
	 String *strAscDesc = S"ASC";

	 if( this->cboSortOrder->Text->Equals(S"Descending") )
		 strAscDesc = S"DESC";

	 this->dvwStudents->Sort = String::Concat(this->cboColumns->Text, S" ", strAscDesc);
}
|
System::Void cboSortOrder_SelectedIndexChanged(System::Object *  sender, System::EventArgs *  e)
{
	 String *strAscDesc = S"ASC";

	 if( this->cboColumns->SelectedIndex == -1 )
		 return;

	 if( this->cboSortOrder->Text->Equals(S"Descending") )
		 strAscDesc = S"DESC";

	 this->dvwStudents->Sort = String::Concat(this->cboColumns->Text, S" ", strAscDesc);
}
|
System::Void mnuSortAsc_Click(System::Object *  sender, System::EventArgs *  e)
{
	 this->dvwStudents->Sort = String::Concat(colSelected->ColumnName, S" ASC");
}
|
System::Void mnuSortDesc_Click(System::Object *  sender, System::EventArgs *  e)
{
	 this->dvwStudents->Sort = String::Concat(colSelected->ColumnName, S" DESC");
}
|
System::Void mnuRemFiltSort_Click(System::Object *  sender, System::EventArgs *  e)
{
	 this->dvwStudents->RowFilter = 0;
	 this->dvwStudents->Sort = String::Concat(S"StudentID", S" ASC");
}
|
System::Void btnClose_Click(System::Object *  sender, System::EventArgs *  e)
{
	 Close();
}
|
|
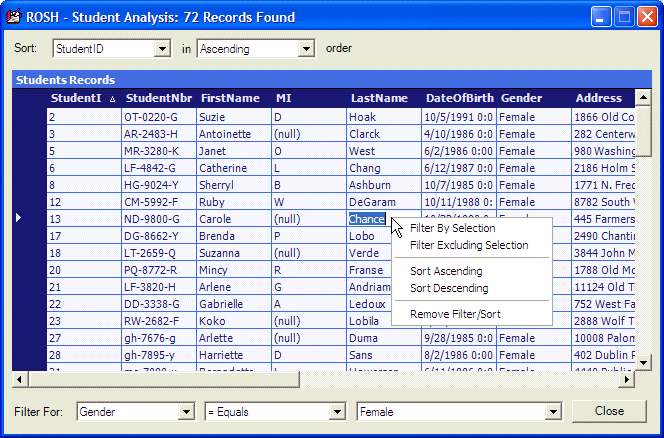
A Criterion for Data Analysis |
|
Introduction |
|
Besides selecting and sorting records, data analysis also consists of restricting the list of records to examine at one time. To do this, you would include a clause in your SQL statement to create a particular. The interpreter would select only records that abide by the rule of your choice. The rule used to restrict the list of available records is called a criterion. The plural is criteria but it can also be used in singular.
To set a criterion in your SQL statement, you use the WHERE keyword in the following formula: SELECT What FROM TableName WHERE Condition The What and the TableName factors follow the same rules we have applied so far. The Condition factor is used to specify the rule applied to restrict the list of records. A condition is formulated as a logical expression that produces a Boolean result. To create an expression, you use comparison operators supported by the SQL. You are already familiar with some of the operators. Some others are not used in C++ but may be familiar to Visual Basic or Pascal programmers.
A comparison operator is used to compare one value to another. Normally, from your knowledge of C++, you should already be familiar with all the routine comparisons performed on values and variables. Most operators used in SQL for comparison are the same as those used in C++ except the inequality <>. Based on this, you can perform your comparisons on column names and constant values. If you are using .NET Framework classes of the System::Data::SqlTypes namespace in your code, each one of its classes has an overloaded method that corresponds to each comparison operator we will review.
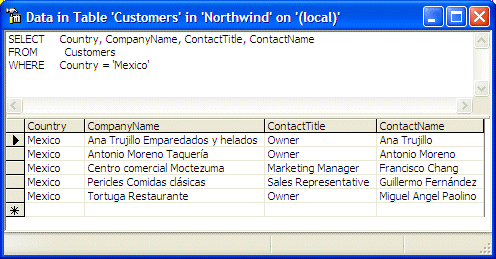
The equality operator is used to compare one value to another. For a WHERE condition, this operator can be used to compare the values of a column to a particular value for a match. The condition would have the following formula: ColumnName = 'Value' In this case, you can specify a name for the column that holds the type of value you want to use as a criterion. Once you have identified the column, you can assign it the particular value of its records that would excluding non-abiding columns. For example, imagine you have a list of business customers in different countries, to get a list of only the customers who live in Mexico, you would set the criterion as Country = 'Mexico'. Here is an example of such a statement:
If you are using a class from the System::Data::SqlTypes namespace, each class is equipped with an Equals() method overloaded with two versions. The first corresponds to the routine Equals() method that all .NET Framework class inherit from the Object class. The second version allows you to compare, for equality, two columns created with the same data type. |
|
Comparison Operators: Not Equal <> |
|
To find out if two fields hold different values, you can use the inequality operator which is represented by <>. Its syntax is: Value1 <> Value2 This comparison is performed between Value1 and Value2. If they hold different values, then the comparison produces a TRUE value. If they hold the same value, the comparison produces FALSE. This shows that the equality (=) and the inequality (<>) operators are opposite each other. Here is an example: |
SELECT FirstName, LastName, Gender FROM Students WHERE Gender <> 'Female'; |
|
If you are using a class from the System::Data::SqlTypes namespace, each class is equipped with an NotEquals() method used to compare, for inequality, two columns created with the same data type. |
|
Comparison Operators: Less Than < |
|
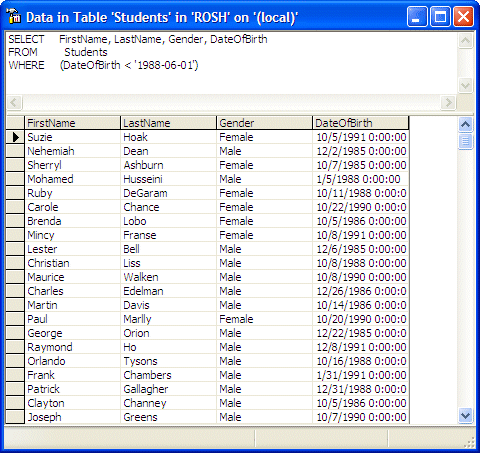
The "Less Than" operator uses the following formula: Value1 < Value2 If Value1 holds a value that is lower than that of Value2, the comparison produces TRUE. If Value1 holds a value that is greater than or similar to that of Value2, the comparison renders FALSE. You can formulate the condition as follows: SELECT FirstName, LastName, Gender, DateOfBirth FROM Students WHERE DateOfBirth < '1988-06-01' Here is an example:
|
|
If you are using a class from the System::Data::SqlTypes namespace, each class is equipped with an LessThan() method used to compare two columns created with the same data type. The value of the first argument to this method is compared with the value of the second argument. If the first value is lower than the second, this method returns true. Otherwise, it returns false. |
|
Comparison Operators: Less Than or Equal <= |
|
When comparing two values, you may want to know whether two fields hold the same value or if one is lower than the other. This comparison can be performed with the "Less Than Or Equal To" operator. It is represented by <= and its formula is: Value1 <= Value2 If both operands (Value1 and Value2) hold the same value, then the comparison produces a TRUE result. If Value1 holds a value that is lower than that of Value2, the comparison still produces a TRUE result. By contrast, if the value of Value1 is higher than that of Value2, the comparison renders a FALSE result. Notice that the > and the <= operators are opposite each other. Here is an example: |
SELECT FirstName, LastName, DateOfBirth, EmailAddress FROM Students WHERE DateOfBirth <= '1990-01-01'; |
|
If you are using a class from the System::Data::SqlTypes namespace, each class is equipped with an LessThanOrEqual() method used to compare two columns created with the same data type. The value of the first argument to this method is compared with the value of the second argument. If the first value is lower than the second or both are equal, this method returns true. If the value of the first argument is strictly less than that of the second, this method returns false. |
|
Comparison Operators: Greater Than > |
|
The > operator is used to find out whether one value is "Greater Than" another. Its syntax is: Value1 > Value2 The operation is performed on the values of Value1 and Value2. If Value1 holds a value greater than that of Value2, then the comparison produces TRUE. Otherwise, the comparison produces FALSE. That is, if the value of Value2 is greater than or equal to that of Value1, then the comparison produces FALSE. If you are using a class from the System::Data::SqlTypes namespace, each class is equipped with an GreaterThan() method used to compare two columns created with the same data type. The value of the first argument to this method is compared with the value of the second argument. If the first value is higher than the second, this method returns true. Otherwise, it returns false. |
|
Comparison Operators: Greater Than or Equal >= |
|
If you have two values and want to find out whether they hold similar values or the first is greater than the second, you can use the >= operator whose syntax is: Value1 >= Value2 If both Value1 and Value2 hold the same value, then the comparison renders a TRUE result. Similarly, if the left operand, Value1, holds a value greater than that of the right operand, Value2, the comparison still produces TRUE. If the value of Value1 is less than the value of Value2, the comparison produces a FALSE result. Therefore, < and >= are opposite. If you are using a class from the System::Data::SqlTypes namespace, each class is equipped with an LessThanOrEqual() method used to compare two columns created with the same data type. The value of the first argument to this method is compared with the value of the second argument. If the first value is higher than the second or both are equal, this method returns true. If the value of the first argument is strictly higher than that of the second, this method returns false. |
|
|
 |
|||||||||||||||||||||||||
|
System::Void Form1_Load(System::Object *  sender, System::EventArgs *  e)
{
	 DataTable *tblStudents = this->dsROSH1->Tables->Item[S"Students"];
	 DataColumnCollection *colStudents = tblStudents->Columns;

	 for(int i = 0; i < colStudents->Count; i++)
		 this->cboColumns->Items->Add(colStudents->Item[i]->ColumnName);

	 this->cboColumns->SelectedIndex = 0;
	 this->cboSortOrder->SelectedIndex = 0;

	 this->sqlDataAdapter1->Fill(this->dsROSH1);

	 colSelected = new DataColumn;

	 for(int i = 0; i < colStudents->Count; i++)
		 this->cboFilterFor->Items->Add(colStudents->Item[i]->ColumnName);
}
|
System::Void mnuFiltBySel_Click(System::Object *  sender, System::EventArgs *  e)
{
	 DataGridCell curCell = this->dataGrid1->CurrentCell;

	 Text = dataGrid1->Item[curCell]->ToString();
	 this->dvwStudents->RowFilter = String::Concat(colSelected->ColumnName,
			S" = '", dataGrid1->Item[curCell]->ToString(), S"'");
}
|
System::Void mnuFiltExclSel_Click(System::Object *  sender, System::EventArgs *  e)
{
	 DataGridCell curCell = this->dataGrid1->CurrentCell;

	 Text = dataGrid1->Item[curCell]->ToString();
	 this->dvwStudents->RowFilter = String::Concat(colSelected->ColumnName,
			S" <> '", dataGrid1->Item[curCell]->ToString(), S"'");
}
|
System::Void cboFilterFor_SelectedIndexChanged(System::Object *  sender, System::EventArgs *  e)
{
	 String *strColSelected = this->cboFilterFor->Text;

	 DataRowCollection *colRows = this->dsROSH1->Tables->Item[S"Students"]->Rows;

	 this->cboRecValue->Items->Clear();

	 this->cboRecValue->Items->Add(S"NULL");
	 for(int i = 0; i < colRows->Count; i++)
	 {
		 String *strRecValue = colRows->Item[i]->Item[strColSelected]->ToString();
		 if( strRecValue->Equals(S"") )
			 continue;
		 if( this->cboRecValue->Items->Contains(strRecValue) )
			 continue;
		 this->cboRecValue->Items->Add(strRecValue);
	 }

	 this->cboOperator->SelectedIndex = 0;
}
|
private: System::Void cboRecValue_SelectedIndexChanged(System::Object *  sender, System::EventArgs *  e)
{
	 String *strColSelected  = this->cboFilterFor->Text;
	 String *strOperSelected = this->cboOperator->Text;
	 String *strRecValue     = this->cboRecValue->Text;

	 if( strColSelected->Equals(S"") )
		 return;

	 String *strOperator = S"=";
	 if( strOperSelected->Equals(S"<> Not Equal") )
		 strOperator = S"<>";
	 else if( strOperSelected->Equals(S"< Less Than") )
		 strOperator = S"<";
	 else if( strOperSelected->Equals(S"<= Less Than or Equal To") )
		 strOperator = S"<=";
	 else if( strOperSelected->Equals(S"> Greater Than") )
		 strOperator = S">";
	 else if( strOperSelected->Equals(S">= Greater Than or Equal To") )
		 strOperator = S">=";

	 if( strRecValue->Equals(S"NULL") )
 this->dvwStudents->RowFilter = String::Concat(S"IsNull(", strColSelected, S", 'Null Column') = 'Null Column'");
	 else
 this->dvwStudents->RowFilter = String::Concat(strColSelected, S" ", strOperator, S" '",  strRecValue, S"'");

 Text = String::Concat(S"ROSH - Student Analysis: ", this->dvwStudents->Count.ToString(), S" Records Found");
}
|
System::Void cboOperator_SelectedIndexChanged(System::Object *  sender, System::EventArgs *  e)
{
	 // This event should work only if the used has already selected
	 // a column in the most right combo box
	 if( this->cboRecValue->Text->Equals(S"") )
		 return;

	 cboRecValue_SelectedIndexChanged(sender, e);
}
|
|
|
||
| Home | Copyright © 2005-2016, FunctionX | |
|
|
||