 |
Anatomy of a Table |
|
Accessories for Records of a Table
The Scroll Bars
If you start entering data into a table and there are more records than the height of the table can display, the table would be equipped with a vertical scroll bar. On the other hand, if the number of columns or their total width is larger than can be displayed, the table would be equipped with a horizontal scroll bar.
 Practical Learning: Introducing
Tables Accessories
Practical Learning: Introducing
Tables Accessories
- Start Microsoft Access
- From the resources that accompany these lessons, open the Ceil Inn1 database
- In the Navigation Pane, double-click Customers to open the file
- Resize the table as follows and notice the scroll bars

The Navigation Buttons
The lower left side of the table is made of buttons used to navigate the records. A text box shows the index (in the English meaning of the word) of the current report. A last button is used to create a new record. The roles of the buttons are:
| Button |
Name |
Role |
 |
First Record |
Allows moving to the first record of the table |
 |
Previous Record |
Allows you to move one record back (if there is one) from the current record |
 |
Current Record |
Displays the number representing the current record out of the total number of records |
 |
Next Record |
Allows moving you one record ahead |
 |
Last Record |
Allows moving you to the last record of the table |
 |
New (Blank) Record |
Used to enter a new record on the table |
Practical Learning: Introducing
Tables Accessories
- Notice the buttons in the bottom section of the table.
Position the mouse on each button to see its name (or tool tip)

Characteristics of Columns of a Table
The Caption of a Column
The caption is text that the user sees on the column header. The caption of a column is not closely related to the name of the column. This means that the caption can be completely different from the name of the column. If you don't specify a caption for a column, Microsoft Access uses the name of the column as caption.
To specify the caption of a column:
- Open the table in Datasheet View. Click any cell in or under the column header. On the Ribbon, click Fields. In the Properties section, click Name & Caption. In the Enter Field Properties dialog box, click Caption and type anything you want
- Open the table in Design View. In the top section, click the name of the field. In the lower section of the window, click Caption and type anything you want
Practical Learning: Setting Objects Captions
- On the Ribbon, click File
- From the files that accompany these lessons, open the Cruise1 database
- In the Navigation Pane, double-click Employees: Table.
Notice the words in the columns headers (the captions)

- To switch the table to Design View,
right-click its tab and click Design View
- In the top section of the table, make sure EmployeeNumber is selected
In the lower section of the window, click Caption
- Type Empl #
- In the top section, click MiddleInitial and press F6
- In the lower section of the window, click Caption
- Type MI
- Complete the series of captions as follows:
| Field Name |
Caption |
| EmployeeNumber |
Empl # |
| FirstName |
First Name |
| MiddleInitial |
MI |
| LastName |
Last Name |
| MaritalStatus |
Marital Status |
| DepartmentCode |
Department |
- Right-click the tab of the table and click Datasheet View
- When asked whether you want to save, click Yes
- As seen in Lesson 2, you can resize a column to be enough to show
the caption on the column header. This is especially useful after setting the
caption of a column.
Right-click the column header of each column and click Field
Width:

- In the Column Width dialog box, click Best Fit

- On the Ribbon, click File and click Open
- In the list of files, click Ceil Inn1 used earlier
- When asked whether you want to save, click Yes
- In the Navigation Pane, double-click Customers to open the table in
Datasheet View
- In the table, click any cell under PhoneNumber
- On the Ribbon, click Fields
- In the Properties section, click the Name & Caption button

- In the Enter Fields Properties dialog box, click Caption and type
Phone #
- Click OK
- In the same way, set the captions of the other columns as follows:
| Column |
Caption |
| AccountNumber |
Account # |
| FirstName |
First Name |
| LastName |
Last Name |
| PhoneNumber |
Phone # |
| EmergencyName |
Emergency Name |
| EmergencyPhone |
Emergency # |
- Right-click the column headers of Account #, Emergency Name, and Emergency
# click Field
Width. Then click Best Fit

- In the Navigation Pane, right-click Employees and click Design View
- Create the captions as follows:
| Column |
Caption |
| EmployeeNumber |
Employee # |
| FirstName |
First Name |
| LastName |
Last Name |
| HourlySalary |
Hourly Salary |
- Close the Employeees table
- When asked whether you want to save the changes, click Yes
The Status Bar of a Table
When a field receives focus on a table, you can display a sentence
on the status bar. To specify the text of the status bar:
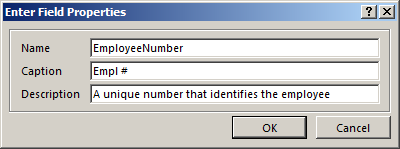
- Open the table in Datasheet View. Click any cell in or under the column header. On the Ribbon,
click Fields. In the Properties section, click Name & Caption. In the Enter Field Proprties
dialog box, click Description and type anything you want
- Open the table in Design View. Under the Description, click the cell that corresponds
to the column and type what you want
Practical Learning: Setting Status Bar Text for Fields
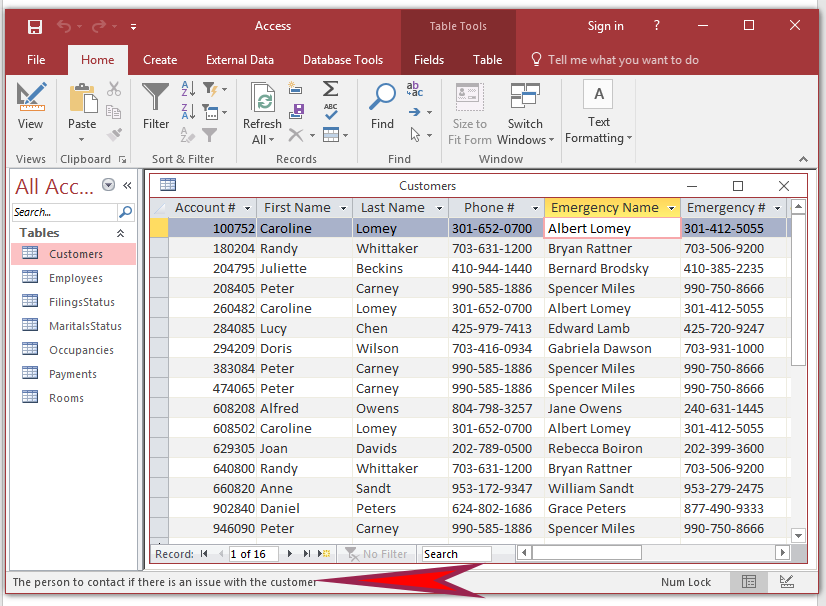
- The Customers table of the Ceil Inn1 database should still be opened in Datasheet View.
On the Ribbon, click Home if necessary.
To switch the table to Design View, in the Views section of the Ribbon, click the View button

- In the top section of the table, click AccountNumber and press Tab twice
- In the Description field for the AccountNumber field, type
Unique number that identifies the resident
- In the same way, using the Description side of each field, create the status bar texts as follows:
| Field Name |
Description |
| AccountNumber |
Unique number that identifies the resident |
| EmergencyName |
The person to contact if there is an issue with the customer |
| EmergencyPhone |
The phone number to call in case of an emergency with the customer |
- To save the table, in the title bar of Microsoft Access, click the Save button
- To switch the table to Datasheet View, in the Views section of the Design tab of the Ribbon (if necessary, on the Ribbon, click Design or click Home), click
the View button


- Click any cell under Emergency Name
- On the Ribbon, click File and click Open
- In the list of files, click Cruise1 used earlier
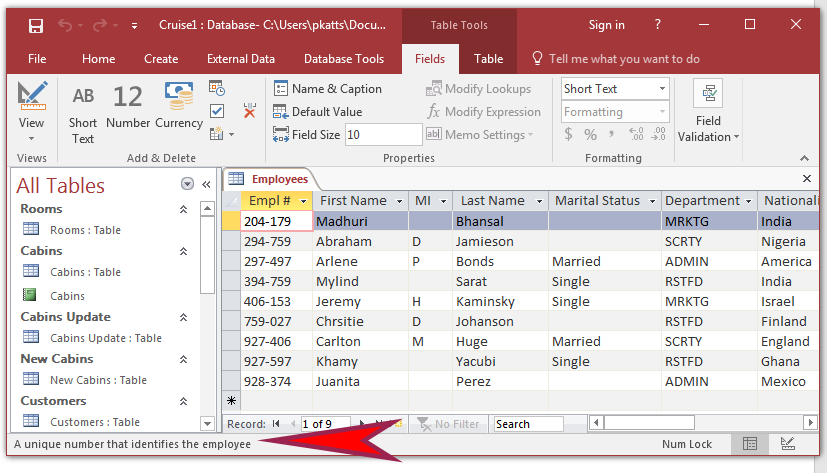
- In the Navigation Pane, double-click Employees to open the table
- In the table, click any cell under Empl #
- On the Ribbon, click Fields
- In the Properties section of the Ribbon, click Name & Caption
- In the Enter Field Properties dialog box, click Description and type A unique number that identifies the employee
- Press Enter
- In the same way, create a description for the other columns as follows:
| Column |
Description |
| Empl # |
A unique number that identifies the employee |
| Department |
The cruise department that defines the employee's function(s) |
| Nationality |
The country that is the employee formal residence |
- Click any cell under Department

The Text Alignment of a Column
The text alignment specifies on what side the values of a column
would be displayed, to the left, to the center, or to the right within the cells. To
specify the text alignment of a column of a table, first display it in the Datasheet
View. Click any cell under that column. On the Ribbon, click Home. In the Text
Formatting section, click:
- The Align Left button
 (this is the default button of the section) to position the text to the left
- The Center button
 to position the text to the center
- The Align Right button
 to position the text to the right
Practical Learning: Aligning Fields Text
- The Employees table should still be displaying in Datasheet View.
On the table, click any cell under Empl #
- On the Ribbon, click Home
- In the Text Formatting section, click the Center button
- On the table, click any cell under MI
- In the Text Formatting section of the Ribbon, click the Center button

Design Accessories: Colors
Introduction
The color is an aesthetic visual characteristic of a human being's perception of red, green, blue and/or other aspects such as transparency (seeing through an object). To specify or change the color of something, you will be asked to click a button or the arrow of a button. This action will display a table of colors:
If you see the desired color, click it. If not, click the More
Colors... button. This action will display a Colors dialog box:
In the Standard property page, if you see a color you like, click it. If you
don't, click the Custom tab. This action will display a geometric figure and other controls you can
use to create a color:
The Background Color of a Table
To control one of the background colors of a table, first display it in Datasheet
View and click the Home button on the Ribbon. In the Text Formatting section, click the arrow of the
Background Color button:
Practical Learning: Setting the Background Color of a Table
- The Employees table of the Cruise1 database should still be displaying in Datasheet View.
On the Ribbon, if necessary, click Home.
In the Text Formatting section, click the arrow of the Background Color button (the button that displays a pouring bucket) and click the Dark Blue color (Standard Colors: 9th column - 7th row)

The Alternate Row Color of a Table
The alternate row color is the color use to paint the
background of every other row in the table. To specify the Alternate Row Color of a table, while it is displaying in
Datasheet View, click the arrow of the Alternate Row Color
button:
Practical Learning: Setting the
Alternate Background Color of a Table
- Still in the Text Formatting section of the Ribbon, click the arrow of the
Alternate Row Color button and click the Light Blue color (Standard
Colors: 7th column - 7th row)

Design Accessories: Fonts
Introduction
The font is the design used to paint text on a table, a form or a report.
In a table, you can apply only one font to all columns and records.
The Name of a Font
A font is primarily known by its name. The names of fonts are set
and controlled by the operating system and you can simply use the font available in
your computer. Applying a font primarily consists of specifying the name of the font
that must be applied to a table or control. To specify the font applied to a table,
while the table is displaying in the Datasheet View, on the Ribbon, click either Home
or Format. Click the arrow of the Font combo box and select the desired font.
Practical Learning: Setting the Font of a Table
- The Employees table should still be displaying in Datasheet View.
On the Ribbon, click Home if necessary.
In the Text Formatting section, click the arrow of the Font combo box (the top-left
combo box of the Text Formatting section) and click Garamond

The Size of a Font
The size of a font of a table is the combination of the width and height
available to paint the letters in the cells. To specify the font size of a table while
in the Datasheet View, on the Ribbon, click either Home or Format. Click the arrow of
the Font Size combo box and select the desired size.
You can also access the combo box and type the number.
Practical Learning: Setting the Font Size of a Table
- The Employees table should still be displaying in Datasheet View.
In the Text Formatting section of the Home tab of the Ribbon, click the arrow of the Font
Size combo box (the top-right combo box of the Text Formatting section) and click 12

The Style of a Font
A font has four styles:
| Style |
Example |
| Regular |
Regular Text |
| Bold |
This text is bold |
| Italic |
Italicized section |
| Underline |
The words are underlined |
To change the font style of a table, display it in the Datasheet View.
On the Ribbon, click Home. In the Text Formatting section, click the button that represents the desired style:
Bold
 ,
Italic
,
Italic
 ,
or Underline
,
or Underline
 .
.
Practical Learning: Setting the Font Style of a Table
- The Employees table should still be displaying in Datasheet View.
In the Text Formatting section of the Home tab of the Ribbon, click the Bold
button

The Font Color
By default, text of a table is painted in black. To change the font color
on a table, display it in Datasheet View. On the Ribbon, click Home. In the Home section,
click the arrow of the Font Color button.
Practical Learning: Setting Text Font on a Table
- The Employees table should still be displaying in Datasheet View.
In the Text Formatting section of the Home tab of the Ribbon, click the arrow of the Font
Color button (the button that displays A) and click the More Colors
button
- In the Colors dialog box, click Custom
- Set the color values as follows:
| Red: 255 |
| Green: 250 |
| Blue: 135 |
|
- Click OK

The Grid Lines of a Table
To set the grid lines of a table, in the Datasheet View, on the Ribbon,
click Home. In the Text Formatting section, click the Gridlines button  .
A window would appear where you can select an option by clicking its button:
.
A window would appear where you can select an option by clicking its button:
If
you click:
- Gridlines: None, the gridlines would be removed from the table
- Gridlines: Vertical, only the vertical lines that divide the
columns would display on the table
- Gridlines: Horizontal, only the horizontal lines that divide the
records of the table would display
- Gridlines: Both, both the vertical and the horizontal lines would
display. This is the default
Practical Learning: Setting the
Grid Lines of a Table
- The Employees table should still be displaying in Datasheet View.
In the Text Formatting section of the Home tab of the Ribbon, click the
arrow of the Gridlines
button and click Gridlines: Horizontal

- Close the table
- When asked whether you want to save, click Yes
- On the Ribbon, click File and click Open
- In the list of files, click FunDS1 from
Lesson 3
- In the Navigation Pane, right-click the Employees table and click Design
View
- Create the captions as follows:
| Field Name |
Caption |
| EmployeeNumber |
Employee # |
| FirstName |
First Name |
| LastName |
Last Name |
- In the Navigation Pane, right-click the ShoppingSessions table and click Design
View
- Create the captions as follows:
| Field Name |
Caption |
| ReceiptNumber |
Receipt # |
| EmployeeNumber |
Employee # |
- In the Navigation Pane, right-click the SoldItems table and click Design
View
- Create the captions as follows:
| Field Name |
Caption |
| SoldItemID |
Sold Item ID |
| ReceiptNumber |
Receipt # |
| ItemNumber |
Item # |
| SubCategory |
Sub-Category |
| ItemName |
Item Name |
| ItemSize |
Item Size |
- In the Navigation Pane, right-click the StoreItems table and click Design
View
- Create the captions as follows:
| Field Name |
Caption |
| ItemNumber |
Item # |
| SubCategory |
Sub-Category |
| ItemName |
Item Name |
| ItemSize |
Item Size |
- Close Microsoft Access
- When asked whether you want to save, click Yes every time