Home

Form Design


Forms Fundamentals


Introduction to Form Creation

A visual application such as a computer database usually starts with a rectangular object that hosts other controls. Such an object is a form. In Microsoft Access, you can create a form that stands on its own like the forms of other programming environments, or you can create a form that is tied to a list. This means that the process of creating a form may depend on how you proceed.


To manually create a new form, on the Ribbon, you can click Create. In the Forms section, you can click Blank Form or Form Design.

To help you programmatically create a form, the Application class is equipped with a method named CreateForm(). The syntax of this method is:

CreateForm([database[, formtemplate]])

The first argument to this method is the name of the database that will receive the form. If the form will be added to the current database, you can omit this argument. The second argument is the name of an existing form that you want to use as template. If you specify this argument, you must make sure that you provide the name of a form. Otherwise, you can omit it. Here is an example of creating a form:

Private Sub cmdCreateForm_Click()
    Dim frmEmployees As Form
    
    Set frmEmployees = CreateForm
End Sub

Practical LearningPractical Learning: Introducing Forms

  1. Start Microsoft Access and open the gcs1 database you started in Lesson 9
  2. On the Ribbon, click Create
  3. To create a new form, in the Forms section, click Form Design
  4. To save the form, on the Quick Access toolbar, click the Save button Save
  5. Set the name to Central
     
    Save As
  6. Click OK
  7. To close the form, on the right side of its tab, click the close button Close
  8. On the Ribbon, click Create
  9. To create another form, in the Forms section, click Form Design
  10. To save the form, on the Quick Access toolbar, click the Save button Save
  11. Type CleaningOrders as the name of the new form and press Enter
  12. Close the form

A Form From a Table or Query

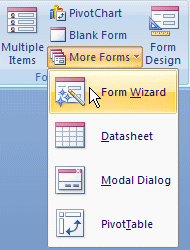
While the table is probably the most appropriate object for you, it may not be convenient to most users. An alternative is to create a form and make it user friendly. Fortunately, Microsoft Access provides fast means of creating a form.

To create a form that uses the fields of a table or query, in the Navigation Pane, click the table or query to select it. On the Ribbon, click Create. In the Forms section, click Form.

You can also create a table-linked form using a wizard. To do this, on the Ribbon, click Create and, in the Forms section, click More Forms -> Form Wizard:

More Forms

This would start a wizard where you can select the columns of a table or query.

Practical LearningPractical Learning: Creating a Form From a Table

  1. In the Navigation Pane, click Customers
  2. On the Ribbon, click Create
  3. In the Forms section, click Form
  4. To save the form, click its close button Close
  5. When asked whether you want to save it, click Yes
  6. Accept the suggested name of the form and click OK

Using a Form


Selecting a Form

Some operations to perform on a form require that you select it first. If a form is opened on the screen, it may not have focus or it may not be activated. To select a form, if the database is configured to display overlapped windows, you can click its title bar or any section of its body. If a form is closed, to manually select it, in the Navigation Pane, click the form to select it. The name of the form would become highlighted, indicating that it is selected. Here is an example where a form named CD@Home is selected:

A form selected in the Navigation Pane

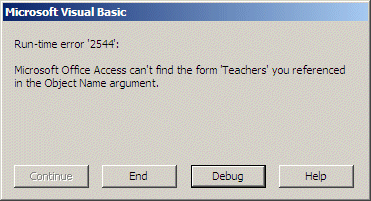
You can also select a form by pressing the up or the down arrow key continuously until the desired form is selected.

To programmatically select a form, use the DoCmd object that is equipped with the SelectObject() method. The syntax to use would be:

DoCmd.SelectObject acForm, [objectname][, indatabasewindow]

The first argument must be acForm to indicate that you are select a form. The second argument is the name of the form to select. If you only want to highlight the form in the Navigation Pane, then pass the third argument as True.

Here is an example that selects a form named Teachers to highlight it in the Database window:

Private Sub cmdSelect_Click()
    DoCmd.SelectObject acForm, "Teachers", True
End Sub

If the form is already displaying, it may be in the background. If there is no form by the name you specified in the second argument, you would receive a 2544 error:

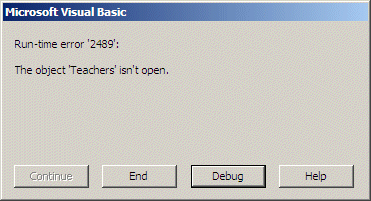
If you omit the third argument or pass it as False, the form would be displayed in the foreground. If the form is not opened and you omit the third argument or pass it as False, you would receive a 2489 error:

You can use a conditional statement and error handling to make sure the user doesn't see this dialog box.

Opening a Form

Before using a form or performing an update in it, in most cases, you probably would need to open it first but this may depend on what you want to do at the time. This is because a form offers many types of views. One of them in the Form View.

To programmatically open a form, you can use the DoCmd object that provides the OpenForm() method. Its syntax is:

DoCmd.OpenForm FormName[, view][, datamode]

The first argument of this method is the name of the form that you want to open. This second argument is optional. Here is an example:

Private Sub cmdOpenForm_Click()
    DoCmd.OpenForm "Employees"
End Sub

If you want to use it, the second argument is a member of the acFormView enumeration. Its value can be one of the following:

acFormView Member Result
acDesign The form will display in Design View
acFormDS The form will display like a table in Datasheet View
acFormPivotChart The form will display as a pivot chart
acFormPivotTable The form will display as a pivot table
acLayout The form will display in Layout View
acNormal The form will display in Form View
acPreview The form will display in Print Preview

If you omit the second argument, the acNormal option applies. Here is an example:

Private Sub cmdOpenForm_Click()
    DoCmd.OpenForm "Employees", AcFormView.acNormal
End Sub

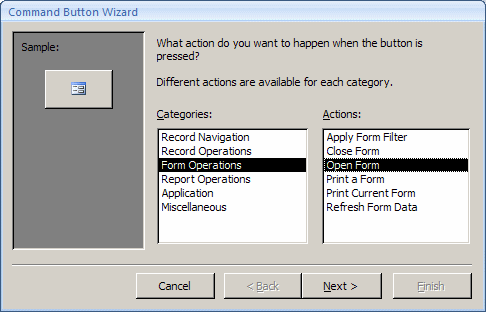
When this  code executes, a form named Employees would be opened in Form View.

Instead of writing the code to open a form, you can use the Command Button Wizard that can do this for you. To do this, while the form is opened in Design View, make sure the Use Control Wizards button is down Use Control Wizards. Then, click the Button Button and click the form. The wizard would start and you can select the Open Form option after selecting Form Operations.

Practical Learning Practical Learning: Opening a Form

  1. To open the Central form, in the Navigation Pane, right-click Central and click Design View
  2. On the Ribbon, make sure the Design tab is active.
    In the Controls section, make sure the Control Wizards button is pushed Control Wizard.
    To automate the opening of a form,  click Button Button and click the top-left section of the form
  3. In the Categories list of the first page of the Command Button Wizard, click Form Operations
  4. In the Actions list, click Open Form
     
    Command Button Wizard
  5. Click Next
  6. In the second page of the wizard, click CleaningOrders and click Next
  7. In the third page of the wizard, click the text box and change its string to Cleaning Orders
     
    Command Button Wizard
  8. Click Next
  9. Change the name of the button to cmdOpenCleaningOrders and click Finish
  10. Switch the Central form to Form View and click the button

Closing a Form

After using a form, you can close it if is (still) opened. If there is a structural change that needs to be saved, Microsoft Access would prompt you.

To manually close a form, you can click its close button Close. You can also press Ctrl + F4.

To programmatically close a form, you can call the Close() method of the DoCmd object. Its syntax is:

DoCmd.Close ObjectType, [objectname], [save]

 Once again, the first argument is a member of the AcObjectType enumeration. For a form, the object to use is:

DoCmd.Close AcObjectType.acForm, [objectname], [save]

Of course, you can omit the AcObjectType and use the following syntax:

DoCmd.Close acForm, [objectname], [save]

The first argument must be specified as acForm to indicate that you want to close a form. If you are closing the same form that is calling this method, this is the only argument you would need. Consider the following example:

Private Sub cmdClose_Click()
    DoCmd.Close
End Sub

In this case, the form would be closed.

The second argument can be the name of the form you want to close. This argument is useful if you are trying to close a form other than the one that is making the call. Here is an example:

Private Sub cmdClose_Click()
    DoCmd.Close acForm, "Employees"
End Sub

In this example, a form named Employees is asked to be closed. If you suspect that the form would need to be saved before formally being closed, you can pass a third argument that is a member of the AcCloseSave enumeration. The available values are:

View Name Result
acSaveNo The form doesn't need to be saved
acSavePrompt Prompt the user to save the changes. This is the default
acSaveYes Save the form without having to prompt the user

When calling the Close() method to close a form, if the form is not opened or if the specified form doesn't exist, nothing would happen (you would not receive an error).

Instead of writing your own code, to let Microsoft Visual Basic write it for you, you can use the Command Button Wizard.

The Properties of a Form


Introduction

A form appears as a rectangular object that occupies the necessary portion of the screen and is used to represent its application. A form by itself accomplishes little to no purpose. Its main role is revealed in its ability to be a container. That is, a form is mainly used to hold or host other controls. As a regular window, a form is equipped with a system icon, a title bar, one or more system buttons, borders, corners, and a body. Depending on the role of your form, you may want to design forms that present differing characteristics, even if these forms belong to the same database. For example, while one form presents a normal title bar, you may want another form not to present a title bar at all. While you may allow the user to be able to minimize or maximize a form, you may want to present one or both of these actions for the user. As an application design environment, Microsoft Access provides most of the features you will need for a regular and even advanced database product.

Referring to a Form

To refer to a form of a Microsoft Visual Basic application, you can use the Me keyword.

After creating a database, or while working on one, all of the forms that belong to it are stored in a collection called AllForms. As seen for the AllTables collection, the AllForms collection is equipped with the Count property that holds the number of the forms that belong to the current database. Each form can be located by its name or its index, using the Item() property.

In Microsoft Access, a form is an object of type Form. A form that is opened in a database is a member of the Forms collection. To refer to an open form in your code, you can enter the Forms collection, followed by an exclamation point !, followed by the name of the form. Here is an example that refers to a form named Students:

Forms!Students

You can also include the name of the form between an opening square bracket and a closing square bracket but, if the name is in one word, then the square brackets are optional:

Forms![Students]

If the name is made of more than one word, then square brackets become required. Here is an example that refers to a form named Potential Applicants:

Forms![Potential Applicants]

If you omit the square brackets in this case, the expression or the code may not work.

A form can also be referred to by an index in the Forms collection. The first form of the collection has an index of 0 and can be accessed with Forms(0). The second form in the collection has an index of 1 and can be referred to by Forms(1), and so on. The name of the form can also be used as index. For example, a form named Students can be referred to as Forms("Students").

We mentioned that a form is mostly used as a container because it hosts some of the controls of its application. The controls that a form hosts are members of the Controls collection.

The Record Source

If a form has been designed or exists already but you want its Windows controls to display the values from a table or query, you can change its Record Source property to that of the table or query. After doing this, all columns from the table or query become available to controls on the form.

To programmatically specify the table or query that holds the data that would be made available to the controls on a form or a report, assign the name of the table or query to its RecordSource property. Here is an example:

Private Sub cmdRecordSource_Click()
    Me.RecordSource = "Employees"
End Sub

The System Buttons

If a database is configured to show overlapped windows, the right side of a form’s title bar displays three system buttons Minimize, Maximize (or Restore), or Close . The group of these buttons is called the Control Box. If you do not want these system buttons at all, access the Properties window of the form and set the Control Box Boolean property to No from its Yes default value. In this case, the form would appear with neither the system icon nor the system buttons as seen above. Once again, if you do this, make sure the user has a way to close the form.

To programmatically minimize a form, you can call the Minimize() method of the DoCmd object. Here is an example:

Private Sub cmdManipulate_Click()
    DoCmd.Minimize
End Sub

To programmatically maximize a form, you can call the Maximize() method of the DoCmd object. If a form is maximized, to restore it, the user can click the Restore button.

To programmatically restore a form, call the Restore() button of the DoCmd object.

To close a form, the user can click its system Close button. As seen earlier, to close a form, you can call the DoCmd.Close method.

The Form's Width

A form displays on the screen using its dimensions. These are the width and height. The form itself controls only the width. The height is controlled by the form's sections. To change the width of a form, in the Properties window, type the desired decimal value in the Width field of the Format property page.

To programmatically change the width of a form, access its Width property and assign the desired value. Here is an example:

Private Sub cmdWidth_Click()
    Width = 8650
End Sub

The Detail Section of a Form

The most visible part of a form is an area called Detail. This section starts on a bar labeled Detail and ends at the bottom unless a new section starts. To programmatically access the Detail section of a form, if you working in an event of the form, you can use either Detail or Me.Detail.

The Header and Footer Sections

Besides the Detail section, a form can be enhanced with one or two more sections: Header and Footer.

To access the Header section in your code, use the form's FormHeader property. To programmatically access the Footer section, use the form's FormFooter property. This also applies for the BackColor property. The SpecialEffect property allows you to raise or sink a section.

Practical LearningPractical Learning: Closing a Form

  1. To select a different form, in the Window section of the Ribbon, click Switch Windows and click Cleaning Orders
  2. Switch the form to Design View
  3. To add the Header and Footer sections to the form, right-click the body of the form and click Form Header/Footer
  4. On the Ribbon, make sure the Use Control Wizards button is pushed Use Control Wizard.
    Click the Button Button and click the right section under the Footer bar of the form
  5. In the Categories list of the first page of the Command Button Wizard, click Form Operations
  6. In the Actions list, click Close Form, and click Next
  7. In the second page of the wizard, click the text box and change its string to Close
  8. Click Next
  9. Change the name of the button to cmdClose and click Finish

Record Selectors

Record Selector

The Record Selector is a vertical bar on the left side of a form. It allows the user to select all of the fields’ contents of one or more records and copy them to the clipboard. Such a selection can then be pasted to another record, other records, or to a text or another type of file (for example you can paste the record in Notepad, Microsoft Word, Microsoft Excel, or any text file).

There are two reasons you would use a record selector on a form. If you want the user to be able to access all fields of a record as a whole, make sure that the form is equipped with the record selector. In the same way, you can hide the scroll bar if the user would not need them. Another reason you would use a record selector is for aesthetic reasons. Most of the time, if designing a form for data entry, you would mostly allow the presence of the record selector. If you are designing a dialog box that would display the same content all the time, you should not allow the record selector.

The presence or absence of the record selector is controlled by the Boolean Record Selectors property field. If you set the field value to Yes, the form would display the record selector. Setting the field value to No would hide the record selector. To programmatically control the presence or absence of the record selector on a form, assign a value of True (to display it) or False (to hide it) to the RecordSelector property of the form. Here is an example:

Private Sub cmdManipulate_Click()
    Me.RecordSelectors = False
End Sub
 

The Form's Scroll Bars

As much as you can, you should design your (non-Datasheet) form to display all of the fields of a record. Sometimes this will not be possible. If a form possesses too many fields, Microsoft Access would equip the form with one or two scroll bars. A scroll bar allows the user to scroll from one side of the form to another. The vertical scroll bar is used to scroll up and down while the horizontal scroll allows scrolling left and right:

Scroll Bars

The presence of scroll bars is controlled by the Scroll Bars property. To programmatically control the presence or absence of scroll bars, access the ScrollBars property of the form and assign one of the following four values:

Value Description
0 No scroll bar will display
1 Only the horizontal scroll bar will display
2 Only the vertical scroll bar will display
3 Both the horizontal and the vertical scroll bars will display
 

Navigation Buttons

By default, a form (also a table, a query, or a report) is equipped with some buttons in its lower section:

Navigation Buttons

These buttons allow the user to navigate back and forth between records. These buttons are very useful during data entry and data analysis. If you are creating a form that would display the same content all the time, such as a form that does not actually display records, you can hide the form navigation buttons.

The presence or absence of navigation buttons is controlled by the Boolean Navigation Buttons property. To programmatically control the presence or absence of the navigation buttons, access the form's NavigationButtons property and assign the desired Boolean value. Here is an example:

Private Sub cmdManipulate_Click()
    Me.NavigationButtons = False
End Sub

Dividing Lines

A form is equipped with special horizontal lines used to visually separate sections of a form. The presence or absence of the horizontal lines is controlled by the Boolean Dividing Lines property. To programmatically control the presence or absence of the dividing lines of a form, access its DividingLines property and assign the desired Boolean value. Here is an example:

Private Sub cmdManipulate_Click()
    DividingLines = False
End Sub

Form Automatic Centering

By default, when a previously created and saved form appears, Microsoft Access remembers the previous position the form had and restores it. If you can make sure that the form is always centered when it comes up. To make this possible, the form is equipped with the Auto Center Boolean property. When set to Yes, this property causes the form to be centered when it displays to the user.

To programmatically center a form, access its AutoCenter property and assign True or False to it.

Form Maintenance


Deleting a Form

Form maintenance includes deleting, copying, or renaming a form, etc. Most of these operations require that the form be closed. To manually delete a form, in the Navigation Pane, right-click it and click Delete. To programmatically delete a form, call the DeleteObject() method of the DoCmd object. Its syntax is:

DoCmd.DeleteObject ObjectType, [objectname]

The ObjectType argument is a member of the AcObjectType enumeration. For a form, it would be acForm. Since the second argument is optional, you can call this method as follows:

Private Sub cmdDelete_Click()
    DoCmd.DeleteObject AcObjectType.acForm
End Sub

You can omit AcObjectType. When this method is called, the form that is selected in the Navigation Pane would be deleted. As mentioned already, the second argument is optional. If you want to use it, pass the name of the form to be deleted. Here is an example:

Private Sub cmdDelete_Click()
    DoCmd.DeleteObject AcObjectType.acForm, "Customers"
End Sub

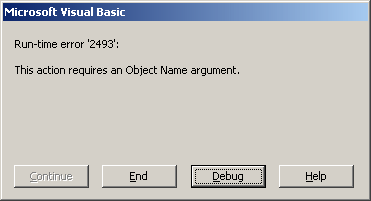
When this code executes, a form named Customers would be deleted. When you call this method and pass the second argument, if no form is selected in the Navigation Pane and if you omit the second argument, you would receive a 2493 error stating that the action requires a form name:

Error 2493

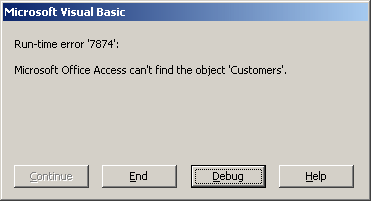
If you decide to pass the second argument but provide a name for a form that cannot be found in the Navigation Pane, you would receive a 7874 error:

Error 7874

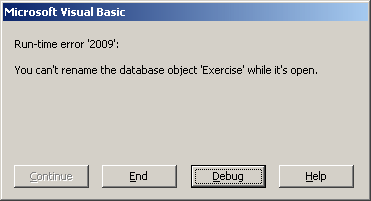
This means that, either you select a form prior to calling this method, or you pass the name of the form to delete as the second argument.

Renaming a Form

If you create a new form, it automatically receives a temporary name but you must save it to have an actual name for the form. Once a form exists, if you want, you can change its name if you judge this necessary. In order to rename a form, it must be closed.

To visually rename a form, in the Navigation Pane, right-click it and click Rename. This would put the name in edit mode, allowing you to type the new name and press Enter.

To programmatically rename a form, you can call the Rename() method. of the DoCmd object. The syntax to use is:

DoCmd.Rename(NewName, ObjectType, OldName)

The first argument is the new name that the form will have. Normally, only the first argument is required. If you call this method using only the first argument and if you call this argument from a form, the form you are using would be renamed. But, based on the rules of the Microsoft Windows operating system, you cannot rename a form that is currently opened. Consequently, if you call this method from a form and provide only the first argument, you would receive a 2009 error:

Error 2009

This means that, you should always pass the third argument.

The second argument is a member of the AcObjectType enumeration. For a form, this member must be acForm. The third argument is the name of the existing form that you want to rename. Here is an example:

Private Sub cmdRename_Click()
    DoCmd.Rename "Children", AcObjectType.acForm, "Pupils"
End Sub

Copying a Form

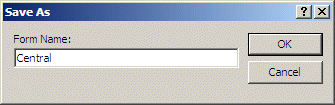
Instead of renaming a form, you can make a copy of it and keep the original. To visually copy an existing form, in the Navigation Pane, right-click the form and click Copy. Then right-click an area of the Navigation Pane and click Paste. This would open the Paste Table As dialog box in which you can enter the new name of the copied object.

To programmatically copy a form, you can call the CopyObject() method of the DoCmd object using the following syntax:

DoCmd.CopyObject [destinationdatabase][, newname], ObjectType, sourceobjectname]

The destinationdatabase argument is the name or path of the database where the copied form would be sent to. If you are copying the form in the same database, you can omit this argument. The newname argument is the name that you want the new form to hold. The third argument must be acForm. The last argument is the name of the existing form.


Reports


Introduction

Printing allows a user to print the values of a database. To print from a table, a query, or a form, you can right-click the object and click Print... When you do this, the document is sent directly to the printer.

Like a table, a query, or a form, there are various ways you create a report. You can create a report that would be used to print simple text that is not related to any data source. You can create such a report in the Design View. After creating the report, to keep it in your database, you must save it by giving it a name. The name of a report follows the rules and suggestions we have applied to tables, queries, and forms.

Programmatically Creating a Report

To programmatically create a report, you can call the CreateReport() method of the Application object. The syntax of this method is:

CreateReport([database[, reporttemplate]])

Both arguments of this method are optional. Here is an example of calling it:

Private Sub cmdReport_Click()
    Dim rptMaintenance As Report

    Set rptMaintenance = CreateReport
End Sub

If you call the method like this, it generates a temporary report named Report1 but it doesn't save it. After the report has been generated, it appears in Microsoft Access. If you want to keep it, you can save it. If fact, if you try closing it, you would be asked whether you want to save it. If yes, you would be asked to give it a name.

The first argument of this method is the name of the database that will receive the report. If the report will be added to the current database, you can omit this argument. The second argument is the name of an existing report that you want to use as template. If you specify this argument, you must make sure that you provide the name of a report. Otherwise, you can omit it.

Using a Report


Selecting a Report

To perform an operation on a report, you may need to select it first. To do this, in the Reports section of the Database window, you can simply click it, once. 

To programmatically select a report, you can use the DoCmd object that is equipped with the SelectObject() method. The syntax to use would be:

DoCmd.SelectObject acReport, [objectname][, indatabasewindow]

The first argument must be acReport to indicate that the object you are selecting is a report. The second argument is the name of the report you want to select. To select but only highlight the report in the Database window, you can pass the third argument as True.

If the report is already opened and it is displaying, and if you omit the third argument or pass it as False, the report would be displayed in the foreground. If the report is not opened and you omit the third argument or pass it as False, you would receive an error.

Visually Opening a Report

When you start Microsoft Access and open a database, if it has some reports, obviously they would be closed. To use a report, you can open it first. A  report can be opened in Design View or in Print Preview. If you (or the user) double-click(s) a report in the Reports section of the Database window, it opens in Print Preview. This views allows the user to review the document before printing. By default, the view may appear blurred to show as much of its area as possible. To be able to read it, you can click the body of the report to zoom. To print it, you can click the Print button on the toolbar to send the document to the printer.

A report can also display in Design View. To show it, if the report is currently closed, you can right-click it and click Design View. You can also select it first, then click the Design button under the title bar of the Database window. If the report is already opened, to display it in Design View, as done for the form, you can click the View button on the toolbar. You can also click View -> Design on the main menu.

Programmatically Opening a Report

To programmatically open a report, you can call the OpenReport() method of the DoCmd object. Its syntax is:

DoCmd.OpenReport(ReportName, View, FilterName, WhereCondition, WindowMode, OpenArgs)

The first argument of this method is the name of the report that you want to open.

The second argument is a constant value that can be one of the following:

View Name Result
acViewDesign The report will display in Design View
acViewNormal The report will be sent directly to the printer
acViewPreview The report will display in Print Preview

This third argument, optional, is the name of a query in the database.

The fourth argument, also optional, allows you to specify what record would be printed. If you omit this argument, all records of the Record Source value of the report would be printed. If you want to print only one or a few selected records, you can create a WHERE statement and pass it as this argument.

The fifth argument specifies how the report should be displayed. It is a constant value that can be acDialog, acHidden, acIcon, or acWindowNormal. This argument is almost never used as it has little to no effect.

In most cases, instead of writing the code manually, you can use the Command Button Wizard to select the report to print and how you want the printing to be done.

Closing a Report

After using a report, you (or the user) can close it. To close a report, the user can click the system Close button Close. You can also press Ctrl + F4. To programmatically close a report, you can call the Close() method of the DoCmd object whose syntax is the same we saw for a form. Here is an example:

Private Sub cmdCloseStafMembers_Click()
    DoCmd.Close acReport, "Employees", acSavePrompt
End Sub

When this code runs, if a report named Employees is opened, it would be closed. If there is no report opened by that name, nothing would happen (Nice!).

Report Maintenance


Introduction

As done for tables and queries, part of your job as a database developer consists of maintaining your reports. This include renaming, copying, or deleting the reports. Microsoft Access supports all of the necessary operations. As mentioned for a report, make sure that you need to perform the maintenance operation. If you perform an operation by mistake but have completed it, you cannot reverse it at will. You may have to recreate the object.

Renaming a Report

You can rename a report if you judge this necessary. As mentioned for a table or query, you cannot rename a report if it is opened: you would receive an error.

To rename a report in the Database window, first click the Reports button that leads to its section. Once in the appropriate section, you can right-click the report and click Rename. This would put the name in edit mode, allowing you to type the new name and press Enter.

To programmatically rename a report, you can call the Rename() method of the DoCmd object. The syntax to use is:

DoCmd.Rename(NewName, acReport, OldName)

The first argument is the name that the new or other report will have. The second argument must be acReport. The third argument is the name of the existing report that you want to rename. The object must exist in the Database window's section as specified by the second argument.

Copying a Report

Instead of renaming a report, you can copy it and keep the original. To copy an existing report using the Microsoft Windows Save As routine, in the Reports section of the Database window, you can right-click the report and click Save As... This would open the Save As dialog box that allows you to enter the desired name of the copied report. Alternatively, you can right-click the report, click Copy, then right-click an empty area of the same section of the Database window and click Paste. This would open the Paste Report As dialog box in which you can enter the new name of the copied object.

To programmatically copy a report, you can call the CopyObject() method of the DoCmd object using the following syntax:

DoCmd.CopyObject [destinationdatabase] [, newname], acReport, sourceobjectname]

The destinationdatabase argument is the name or path of the database where the copied report would be sent to. If you are copying the report in the same database, you can omit this argument. The newname argument is the name that you want the new report to hold. The third argument must be acReport. The last argument is the name of the existing report.

Deleting a Report

If you find out that you don't need a particular report anymore, you can delete it from the database. As mentioned already, when in doubt, don't delete it.

To visually delete an object, in the Reports section of the Database window, right-click the report and click Delete. You would receive a warning before the report is actually deleted.

To programmatically delete a report, you can call the DeleteObject() method of the DoCmd object using the following syntax:

DoCmd.DeleteObject acReport, [objectname]

The first argument must be acReport. When this method is called, if the report is already selected in the Database window, you can omit the second argument and the selected report would be deleted. Otherwise, to specify the report you want to delete, pass its name as the second argument of the method.

Windows Controls on Forms and Reports


Introduction

A typical database is made of forms (and reports) and these objects are equipped with Windows controls that allow a user to interact with the computer. To create such a database, you add forms and reports to it. Then you populate them with the necessary objects. This is the essence of application design and you should know how to design the controls.

Form and report design consist of populating them with the necessary controls that would allow a person to use your database. To perform this design, you first open the form or report in Design View.

Practical LearningPractical Learning: Introducing Control Design

  1. On the Ribbon, click Create
  2. To create a new form, in the Forms section, click Form Design
  3. Save the form as Employees

Form and Report Design Accessories

When designing a form or a report, one of the most usual actions you will perform consists of adding the necessary controls to it. To do this, in the Controls section of the Ribbon, click the desired control and click a section of the form or report.

During form or report design, there are accessories you will display and dismiss at will. These are the Field List and the Properties window. These objects are modeless windows that share the same window. This means that at one particular time, you will decide what object to display and which one to hide. The Field List displays a list of items that are related to the form or report you are building. These items are from the data source that could be a table or a query.

The Properties window is made of 5 property pages:

The Properties window displays the characteristics associated with the object or the control that is selected on the form or report. To get the Properties window of the properties associated with a control:

  • Right-click that control and click Properties
  • Double-click the control or one of its borders
  • In the Tools section of the Ribbon, click Property Sheet Property Sheet

To display the Properties window for the form or report, double-click the button that is at the intersection of both rulers . You can also click the Properties button Property Sheet on the Ribbon.

Practical LearningPractical Learning: Adding Controls

  1. To add a control, in the Controls section of the Ribbon, click the Text Box Text Box and click the form
  2. Again, on the Toolbox, click the Option Group Option Group and click the form.
    If a wizard starts, click Cancel

Control Creation

As mentioned already, to design a form or report, you typically click the desired control in the Controls section of the Ribbon and click the form or report.

To support the ability to programmatically create a control, the Application class is equipped with a method named CreateControl(). Its syntax is:

Function CreateControl(ByVal FormName/ReportName As String, _
		       ByVal Controltype As AcControlType, 
	               ByVal Optional Section As AcSection = AcSection.acDetail, _
		       ByVal Optional Parent As String, _
		       ByVal Optional ColumnName As String, 
	               ByVal Optional Left As Integer, _
		       ByVal Optional Top As Integer, _
		       ByVal Optional Width As Integer, _
		       ByVal Optional Height As Integer) As Control

The first argument is the name of the form or report on which the control would be positioned. For this method to work, the form or report must be opened in Design View.

The second argument is a member of the AcControlType enumeration. The controls available are:

AcControlType Member Ribbon Control Control Name
acAttachment Attachment Attachment
acBoundObjectFrame Bound Object Frame Bound Object Frame
acCheckBox Check box
acComboBox Combo Box Combo box
acCommandButton Command button
acCustomControl ActiveX control
acImage Image
acLabel Label Label
acLine Line Line
acListBox List box
acObjectFrame Unbound object frame
acOptionButton Option Button Option button
acOptionGroup Option group Option group
acPage   Page
acPageBreak Page break
acRectangle Rectangle
acSubform Subform 
acTabCtl  Tab control Tab control
acTextBox Text box
acToggleButton  Toggle button Toggle button

Only the first and the second argument are required. Here is an example of calling the Application.CreateObject method:

Private Sub cmdCreateControl_Click()
    Application.CreateControl("Central", AcControlType.acTextBox)
End Sub

This code asks Microsoft Access to create a text box and position it on a form named Central.

Because the Application object is automatically available when you start Microsoft Access, you can omit Application in your code. In the same way, you can omit the AcControlType enumeration.

The third argument specifies in what section of the form or report the new control would be positioned. This argument is a member the AcSection enumeration. The available values are:

AcSection Member Section Name
acDetail Detail
acHeader Header 
acFooter Footer
acPageHeader Page Header
acPageFooter Page Footer
acGroupLevel1Header  Group Level 1 Header on a Report
acGroupLevel1Footer  Group Level 1 Footer on a Report 
acGroupLevel2Header  Group Level 2 Header on a Report
acGroupLevel2Footer  Group Level 2 Footer on a Report

The default value of this argument is acDetail. This means that if you omit the third argument as in the above code, the control would be created in the Detail section. If you want the control to be positioned in another section, pass a third argument and specify the desired member of the AcSection enumeration.

The fourth argument to this method is the name of the control that would serve as the parent of the new control. It can be the name of the form or report on which the control will be positioned. Here is an example:

Private Sub cmdCreateControl_Click()
     CreateControl "Central", AcControlType.acTextBox, acDetail, "Central"
End Sub

You can pass this argument as an empty string "".

If you are creating a form or report that is not tied to a table or query, you can pass the fifth argument as an empty string. If you are creating a form or report whose controls would be linked to columns on a table or query, pass the fifth argument as the column that will be linked to the control you are creating. For example, suppose you had created a table named Customers that has a column named Last Name and suppose you are programmatically creating a text box whose values would come from the Last Name column of the Customers table. To tie the control to that column, you would pass the fifth argument as a string whose value is Last Name. This would be done as follows:

Private Sub cmdCreateControl_Click()
     CreateControl "Customers", acTextBox, acDetail, "Customers", "Last Name"
End Sub

The sixth and the seventh arguments specify the location of the control. The values of these arguments are integers.

The eighth and the ninth arguments specify the dimensions of the new control. If you omit these two arguments, their default values would be used. Here is an example:

Private Sub cmdCreateControl_Click()
     CreateControl "Customers1", _
                   AcControlType.acTextBox, _
                   acDetail, _
                   "Customers1", _
                   "Last Name", _
                   840, 300
End Sub

After creating the control, you may want to do something else on it, such as assigning a new value to it or involving it in a calculation. To do this, you must get a reference to the control when creating it. To do this, first declare a variable of type Control. Use the Set operator to assign the return value of the Application.CreateObject() method. This time, call the method as a function member using parentheses. Once you have created the control, you can use it. After using the control in the code, you should free the memory it was using. To do this, assign Nothing to it. Here is an example of how you would do it:

Private Sub cmdCreateControl_Click()
    Dim ctlLastName As Control
    
    Set ctlLastName = CreateControl("Customers1", _
                                    AcControlType.acTextBox, _
                                    acDetail, _
                                    "Customers1", _
                                    "Last Name", _
                                    840, 300)
    
    . . . Use the control here

    Set ctlLastName = Nothing
End Sub

Common Properties of Controls


Control Location

While or after creating a control, you can either specify its location or change it. This is easily done when designing a form or report. To position a control, first select it. When the mouse moves over a selected control, its pointer displays a cross. To move a control, click and drag in the direction of your choice:

Move

The distance from the left border of the container to the left border of a control is represented by its Left property. Based on this, to programmatically move a control horizontally, assign a numeric value to its Left property. Here is an example:

Private Sub cmdMove_Click()
    cmdSubmit.Left = 450
End Sub

In the same way, the distance from the top border of a host to the top border of a control is its Top property.

A Control's Size

The size of a control or a section of a container is a combination of the distance from its left to its right borders and from its top to its bottom borders. These dimensions are represented by the Height and the Width properties respectively. 

When the mouse moves over a selected control and reaches one of the handles, the mouse pointer displays a double-arrow cursor. The possible mouse pointers are:

Pointer Role
Shrinks or heightens the control
Resizes the control in North-East <-> South-West direction
Narrows or widens the control
Resizes the control in North-West <-> South-East direction

To programmatically change the height of a control, assign a numeric value to its Height property. In the same way, to heighten a control, assign the desired numeric value to its Width property. Here is an example:

Private Sub cmdResize_Click()
    cmdSubmit.Width = 2450
End Sub

Deleting a Control

When a control is on a form or report, you can delete it. You can also delete a group of controls in one step. To remove a control from the form or report, first click it and press Delete. If you click a text box or a control that is accompanied by a label and delete it, its label is deleted also. To remove a group of controls, select them and press Delete.

To allow you to programmatically delete a control, the Application class is equipped with a method named DeleteControl. Its syntax is:

Sub Application.DeleteControl(ByVal FormName/ReportName As String, _
			      ByVal ControlName As String)

The first argument is the form or report on which the control is positioned. The second argument is the name of the control you want to delete.

Practical LearningPractical Learning: Designing Controls

  1. Based on the common properties of the controls, design the Employees form as follows:
     
     Employees
  2. Names of text boxes: txtSalary, txtEmployeeID, txtDateHired, txtEmployeeNumber, txtFirstName, txtLastName, txtAddress, txtCity, txtState, txtZIPCode, txtWorkPhone, txtNotes
  3. Save the form and close it

Tables Columns and Windows Controls


Introduction

The foundation of a database is on its table(s). Even if you consider that the forms or reports present the friendlier link between the user and your application, most of the information in your database is stored in one or more tables, and table(s) is(are) made of columns. After creating a table and its columns, you can directly create the forms and/or report that are based on the table(s) and get their data from a table's column(s).

Remember that, after creating a table or query, to generate a form or report based on it, you can first select that table or query in the Navigation Pane. Then, on the Ribbon, click Create and, in the Forms or the Reports section, click Form or Report.

The Names of Columns and Controls

If you generate a form or report that is bound to a table or query, each control added to the container has a name that is the same as the column it is bound to. If you add an unbound text box or control to a form or report, it receives a default name that is cumulative. Whether a control on a form or report is bound or not to a column of a table or query, the name of that control does not have anything to do with that of a column. This means that you can easily set or change the name of a control.

We reviewed how to name a control and how to change it. You should refrain from programmatically changing the name of a control.

If the form or report has already been created but its controls are not bound to the columns of a table or query, you should first specify the Record Source of the form or report. After doing this, to associate or link a control to a column of the Record Source, first select the column and, in the Properties window, set its Control Source to the name of the column. To do this programmatically, assign the name of the column to the name of the control. Here are two examples:

Private Sub cmdRecordSource_Click()
    Me.RecordSource = "CleaningOrders"
    Me.txtPhoneNumber.ControlSource = "CustomerPhone"
    Me.txtCustomerName.ControlSource = "CustomerName"
End Sub

In this case, the CustomerPhone column of a table named CleaningOrders would be bound to a text box named txtPhoneNumber of the current table.

Practical LearningPractical Learning: Creating a Table

  1. On the Ribbon, click Create
  2. In the Tables section, click Table
  3. To switch the table to Design View and save it, right-click its title bar and click Design View
  4. In the Save As dialog box, type Employees as the name of the table and click OK
  5. As ID is selected (if it is not selected, double-click it to select it), type EmployeeID
  6. Click the box under EmployeeID and type DateHired
  7. Continually click the empty boxes under Field Name and create the following fields: EmployeeNumber, FirstName, LastName, Address, City, StateOrProvince, PostalCode, WorkPhone, Salary, and Notes

The Captions of Columns and Controls

If you generate a form or report that is based on a table or query, its Windows controls would use default captions on their accompanying labels. If the originating column has a caption, that caption would be used. If the column doesn't have a caption, its name would be used as the caption of the accompanying label.

Practical LearningPractical Learning: Setting Captions

  1. In the top section, click EmployeeID
  2. In  he lower section, click Caption and type Employee ID
  3. Continually click a control in the top section and change its Caption in the lower section as follows:
     
    Field Name Caption
    EmployeeID Employee ID
    EmployeeNumber Employee #
    FirstName First Name
    LastName Last Name
    ZIPCode ZIP Code
    WorkPhone Work Phone
  4. Save and close the table

Selecting a Control

To manipulate controls on the form or report, you will regularly need to select them. To select a control, you can just click it. A control that is selected displays 8 handles around it. To select more than one control, at random, click one, then press and hold Shift. While holding Shift, click each of the desired controls. After selecting the controls, release Shift. To select all controls on the form or report, press Ctrl + A. You can also click inside of one of the rulers on one end and drag to the other end.

Practical LearningPractical Learning: Associating Controls to Columns

  1. In the Navigation Pane, under Unrelated Objects, right-click Employees and click Design View
  2. Double-click the button at the intersection of the rulers and, in the Properties window, change its Record Source to Employees
  3. On the form, click each control and change its Control Source in the Properties window as follows:
     
    Control Control Source
    txtSalary Salary
    txtEmployeeID EmployeeID
    txtDateHired DateHired
    txtEmployeeNumber EmployeeNumber
    txtFirstName FirstName
    txtLastName LastName
    txtAddress Address
    txtCity City
    txtState State
    txtZIPCode ZIPCode
    txtWorkPhone WorkPhone
    txtNotes Notes
     
    Employees
  4. Save the form and close it

Setting Focus

The focus is the visual aspect that indicates the control that would receive a change if the user types a new value. This also means that a control must receive focus before it can receive a value. A user usually gives focus to a control by clicking it or pressing Tab continuously until the control indicates that it has focus.

To programmatically give focus to a control, you can call its SetFocus() method. Here is an example:

Private Sub Form_Load()
    NavigationButtons = False
    [Company Name].SetFocus
End Sub

Alternatively, to support this operation, the DoCmd object is equipped with a method named GoToControl. Its syntax is:

DoCmd.GoToControl(ByVal ControlName As String)

This method takes the name of a control as argument. When this method is called, the database engine gives focus to the control passed as argument.

Common Events of Windows Controls


Click

An application is usually made of various and different objects. Still, just like properties, there are some events that many types of objects can fire. For example, many objects accept that you use the mouse with them. Some other objects allow the keyboard.

To interact with the computer, one of the most usually performed actions is to click. The mouse is equipped with two buttons. The most clicked button is the left one. Because the action simply consists of clicking, when the user presses this button, a simple event, called Click is sent or fired. When the user presses the (left) button on the mouse, the mouse pointer is usually on a Windows control. Based on this, the control that is clicked "owns" the event and must manage it. Therefore, no detailed information is provided as part of the event. The operating system believes that the control that fired the event knows what to do and should take care of everything. For this reason, whenever you decide to code a Click event, you should make sure you know what control sent or fired the event. This is (one of) the most common events of Windows controls.

Double-Click

To make the mouse more useful and to verify its role, another action can be performed on it. This consists of pressing the left button very fast twice. This action initiates an event known as DblClick.

By default, the DblClick event provides  a simple structure to the programmer. You must know what control has been double-clicked and what you want to do. This means that the operating system relies on the control that "owns" the event.

Focus Events

Microsoft Windows operating systems allow the user of your database to work with more that one object in the database. In fact, they allow the user to work on as many objects as the computer can handle, but only one object can receive input at a given time. An object that can receive values or input at one particular moment is said to have focus.

When an object has focus, Microsoft Visual Basic applies the GotFocus event to it. If the focus shifts to another object, the control that had focus fires a LostFocus event and sends it to the operating system.

Keyboard Events

Besides allowing the user to enter text into objects made for it, the keyboard is also used to perform various other actions such as accepting what a dialog box displays or dismissing it. When the user presses the keys on a keyboard, the object on which the characters are being typed sends one or more messages to the operating system.

There re three main events that Microsoft Windows associates to the keyboard:

  • KeyDown: When the user presses a key on the keyboard, an event called KeyDown is fired

  • KeyUp: When the user releases a key that was pressed, an even called KeyUp is fired.
    These previous two events apply to almost any key on the keyboard, even if the user is not typing; that is, even if the result of pressing a key did not display a character on the document

  • KeyPress: The KeyPress event fires if the key the user pressed is recognized as a character key, that is, a key that would result in displaying a character

When programming your database, you will need to know what result you are expecting, then choose the right event. Some keys on the keyboard do not display anything on an object. Instead, they perform (only) an action. Examples of such keys are Enter, Tab, Esc. Therefore, if you mean to find out what key the user pressed, use the KeyDown event and not the KeyPress event, even though the user will have pressed a key.

Mouse Events

A mouse is equipped with buttons, usually two, that the user presses to request an action. Compared to the keyboard, the mouse claims many more events that are directly or indirectly related to pressing one of its buttons.

When the user presses one of the buttons on the mouse, an event called MouseDown fires. This event carries enough information through three parameters. It appears as follows:

Private Sub txtFirstName_MouseDown(Button As Integer, Shift As Integer,
      X As Single, Y As Single)

End Sub
  • The operating system needs to know what button was pressed; this is represented as the left or the right button. The left button is known as vbLeftButton. The right button is referenced as vbRightButton. If the mouse is equipped with a middle button, it would be recognized as vbMiddleButton. In reality, these buttons have (constant) numeric values of 0, 1, and 2 respectively
  • Secondly, the operating system needs to know whether a special key, Shift, Ctrl, or Alt, was pressed. These buttons are called vbShiftMask, vbCtrlMask, and vbAltMask respectively. In reality, they are represented with 1, 2, and 4 respectively
  • Lastly, the operating system needs to know the screen coordinates of the mouse pointer, that is, the coordinates of the point where the mouse landed. X represents the distance from the left border of the screen to the point where the mouse landed. Y represents the distance from the top border of the screen to the point where the mouse landed

When the user releases a button that was pressed on the mouse, the MouseUp event fires. It provides the same types of information as the MouseDown event:

Private Sub txtFirstName_MouseUp(Button As Integer, Shift As Integer,
      X As Single, Y As Single)

End Sub

The MouseMove event fires while the user is moving the mouse on an object. It provides the same pieces of information as the MouseDown and the MouseUp events:

Private Sub txtFirstName_MouseMove(Button As Integer, Shift As Integer,
      X As Single, Y As Single)

End Sub


Previous Copyright © 2005-2016, FunctionX Next