Home

Assistance With Data Entry


Record Navigation


Introduction

There are two main types of views a user displays when using a database. One view is referred to as data sheet because it displays a series of columns and rows. This is the regular view of a table. Here is an example:

Students

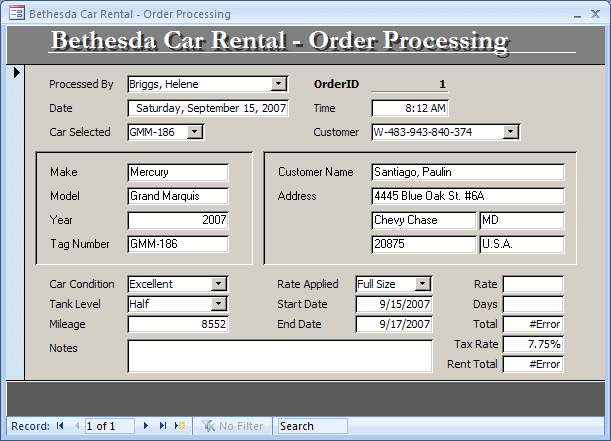
This type of view displays as many records as it can afford, based on its dimensions. To navigate among records, the user can click the Navigation Buttons in the bottom section of the window. This moves the focus from one record to the next or from one record to the previous one. When the view displays the last record, it would not move further. To move a particular record based on its number, the user can type an index, such as 12, in the text box located between the navigation buttons and press Enter.

Besides the data sheet, the Form View of a form or report consists of displaying one record at a time:

Once again, to move from one record to another, the user can click the buttons in the bottom section of the form or report.

Object Role
First Record First Record: allows moving to the first record
Previous Record Previous Record: allows moving one record back (if there is one) from the current record
Record Indicator: Displays the number representing the current record
Next Record Next Record: allows moving one record ahead
Last Record Last Record: Allows moving to the last record
New Record New Record: Used to enter a new record for a form or report
Since you cannot create a new record on a report, this button is not available on it
 

Programmatic Navigation

Most users know how to use navigation buttons to move among records. Some others don't. This means that, sometimes, you will need a way to make it easy for the user to perform this navigation. Fortunately, Microsoft Access provides everything you need to do this.

To assist you with programmatically navigating among records, the DoCmd object is equipped with a method named GoToRecord. Its syntax is:

DoCmd.GoToRecord(ByVal Optional ObjectType As AcDataObjectType = _
			AcDataObjectType.acActiveDataObject, _
	         ByVal Optional ObjectName As String = "", _
	         ByVal Optional Record As AcRecord = AcRecord.acNext, _
	         ByVal Optional Offset As Integer = 1)

As you can see, this method takes four arguments and all of them are optional.

The first argument is a member of the AcDataObjectType enumeration. If allows you to specify the type of object on which the action will be applied. The members of this enumeration and their integral values are:

AcDataObjectType Member Value Description
acActiveDataObject -1 The action will apply on the current record of the object that is opened
acDataTable 0 The action will be applied on a record of a table
acDataQuery   The action will be applied on a record of a query
acDataForm 2 The action will be applied on a record of a form
acDataReport 3 The action will be applied on a record of a report
acDataServerView 7 The action will be applied on a view of a Microsoft SQL Server database 
acDataStoredProcedure 9 The action will be applied on a stored procedure of a Microsoft SQL Server database 
acDataFunction 10 The action will be applied on a function of a Microsoft SQL Server database

As you can see, if you omit the first argument and you call the DoCmd.GoToRecord() method from a form or report, the navigation action will be applied on the record that is currently displaying on that form or report.

The second argument is the name of the object selected in the first argument. For example, if you specify the first argument as a form (AcDataObjectType.acDataForm), you can pass the name of that form or report as the second argument.

The third argument specifies the actual action to perform. This argument is a member of the AcRecord enumeration. The members of this enumeration are:

AcRecord Member Value Same as Clicking Description
acFirst 2 Navigates to the first record
acPrevious  0 Navigates to the previous record
acNext 1 Navigates to the Next record
acLast 3 Navigates to the last record
acGoTo 4 Navigates to a record. In this case, pass a number as the fourth argument
acNewRec 5 Opens a new empty record

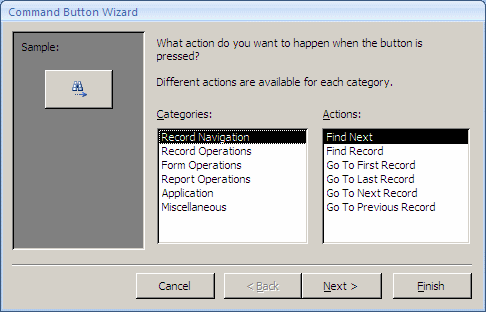
To assist you with creating your own navigation buttons, Microsoft Access provides the Button Wizard. To use it, with the Use Control Wizards button down, after adding a Command Button to the form or report, when the Command Button Wizard, in the first page, select Record Navigation (it should be selected by default):

Command Button Wizard

In the Actions list, you can select the type of navigation you want the new button to perform. In the second page, you have the option of using a suggested bitmap for the button or you can enter a caption in the top text box and click Next. In the third page, you can enter a name for the button and click Finish. At the end, the wizard will have code for you that essentially calls the DoCmd.GoToRecord method. Here is an example:

Private Sub cmdNextStudent_Click()
On Error GoTo Err_cmdNextStudent_Click

    DoCmd.GoToRecord , , acNext

Exit_cmdNextStudent_Click:
    Exit Sub

Err_cmdNextStudent_Click:
    MsgBox Err.Description
    Resume Exit_cmdNextStudent_Click
    
End Sub

This code is used to move to the next record.

Practical Learning Practical Learning: Navigating the Records

  1. Start Microsoft Access
  2. From the resources that accompany these lessons, open the Clarksville Ice Cream1 database
  3. In the Navigation Pane, right-click the IceCreamOrders form and click Design View
  4. Right-click the top bottom left button on the form and click Build Event...
  5. In the Choose Builder dialog box, double-click Code Builder
  6. Implement the event as follows:
     
    Private Sub cmdFirst_Click()
        DoCmd.GoToRecord , , AcRecord.acFirst
    End Sub
  7. In the Object combo box, select cmdPrevious and implement the event as follows:
     
    Private Sub cmdPrevious_Click()
        DoCmd.GoToRecord , , AcRecord.acPrevious
    End Sub
  8. In the Object combo box, select cmdNext and implement the event as follows:
      
    Private Sub cmdNext_Click()
        DoCmd.GoToRecord , , AcRecord.acNext
    End Sub
  9. In the Object combo box, select cmdLast and implement the event as follows:
     
    Private Sub cmdLast_Click()
        DoCmd.GoToRecord , , AcRecord.acLast
    End Sub
  10. Return to Microsoft Access

Record Navigation in a Record Set


Introduction

Navigating through a record set consists of visiting its records. This is similar to using the navigation buttons at the bottom of a table, a query, a form or a report. We saw how to do this manually or programmatically using the DoCmd object. The Recordset class also supports record navigation through various methods.

Moving Among Records

Whenever performing an operation on a record, you should know your position in the set. Whenever in doubt, you can reset your position by moving to the first record. To support this, the Recordset object is equipped with a method named MoveFirst. This method takes no argument. Here is an example of calling it:

Private Sub cmdVideoAnalyze_Click()
    Dim rstVideos As ADODB.Recordset
    Dim fldEach As ADODB.Field
    
    Set rstVideos = New ADODB.Recordset
    rstVideos.Source = "Blah Blah Blah"
    rstVideos.ActiveConnection = Application.CodeProject.Connection
    rstVideos.CursorType = adOpenStatic
    rstVideos.LockType = adLockOptimistic
    rstVideos.Open
    
    rstVideos.MoveFirst
    
    For Each fldEach In rstVideos.Fields
        MsgBox fldEach.Value
    Next
    
    rstVideos.Close
    Set rstVideos = Nothing
End Sub

Besides the first record, another extreme position you can move to is the last record. To do this, you can call the MoveLast() method of the Recordset object. To move from one record to the next, you can call the MoveNext() method of the Recordset object. 

When this code executes, the record position is first moved to the first. Then it immediately moves to the second record. Then it visits each column, retrieves its value corresponding to the second record and displays it in a message box.

To move to the previous record in the set, call the MovePrevious() method of the Recordset object.

The MoveFirst() and MoveLast() methods allow you to navigate one record at a time until you get to a certain record. If you are positioned at a certain record and you want to jump a certain number of records ahead or you want to move back by a certain number of records, you can call the Move() method. Its syntax is:

recordset.Move NumRecords, Start

The first argument is required. Its specifies the number of records to jump to. If you pass a positive value, the position would be moved ahead by that number. Here is an example:

Private Sub cmdEditRecord_Click()
   Dim dbCustomers As Object
   Dim rstCustomers As Object

   Set dbCustomers = CurrentDb
   Set rstCustomers = dbCustomers.OpenRecordset("Customers")

   rstCustomers.Move 4
End Sub

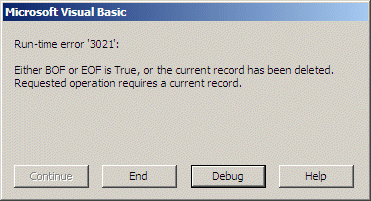
When this code executes, it would jump 4 records ahead of the current record of a table named Customers. You can also pass a negative value. In this case the position would be moved behind the current record by the value passed. If the record set doesn't contain any record when you call the Move() method, you would get a 3021 error:

Don't Move Beyond the Extremes

Some, if not most operations require that you remain within the range of values of the record set. If you move below the first record record, you (actually the user) may receive an error. In the same way, if you move beyond the last record, you would receive an error. To assist you with checking whether you are in the first record, the Recordset object provides the BOF() method. This method returns a Boolean value as follows:

  • If it returns TRUE, then you are currently positioned before the first record
  • If it returns FALSE, then you are at or above the first record

On the other hand, if you want to check whether you are at the highest position of the records, you can call the EOF() method of the Recordset object. It also returns a Boolean value as follows:

  • If it returns TRUE, then you are currently positioned after the last record
  • If it returns FALSE, then you are at or below the last record

Record Location

As we will see in Lesson 23 on record maintenance, editing a record consists of changing the value of one or more columns. As done visually using a table, a query or a form, on a record set, editing a record is done in various steps. First, you must locate the record.

If you know exactly the index of the record that contains the value you want to edit, you can call the Move() method to jump to it. Before editing the value, you can first jump to the record number. Here is an example that use Microsoft Access Object library:

Private Sub cmdMovePosition_Click()
   Dim dbVideoCollection As Object
   Dim rstVideos As Object

   Set dbVideoCollection = CurrentDb
   Set rstVideos = dbVideoCollection.OpenRecordset("Videos")

   rstVideos.Move 6
End Sub

Although this uses the Microsoft Access Object Library, you can also apply it to DAO by simply changing the names of the objects to the appropriate ones:

Private Sub cmdMovePosition_Click()
   Dim dbVideoCollection As DAO.Database
   Dim rstVideos As DAO.Recordset

   Set dbVideoCollection = CurrentDb
   Set rstVideos = dbVideoCollection.OpenRecordset("Videos")

   rstVideos.Move 6
End Sub

We also saw that you could call one of the other Move-oriented methods (MoveFirst(), MovePrevious(), MoveNext(), or MoveLast()). Once you get to a record, you can then perform the necessary operation. For example, you can retrieve the values held by that record.

Assistance With Data Entry: The Nullity of a Field


Introduction

When performing data entry, you can expect the user to skip any column whose value is not available and move to the next. In some cases, you may want to require that the value of a column be specified before the user can move on. If you are creating the table in the Design View, to require that the user enter a value for a particular column, in the lower section of the window, use the Required Boolean property.

By default, the value of the Required property is set to No, which means the user doesn't have to provide a value for the column in order to create the record. If you want to require the value, set this property to Yes.

Field Nullity in the Microsoft Access Object Library

To support the nullity of a value, the Field class of the Microsoft Access Object Library is equipped with a Boolean property named Required. By default, the value of this property is False, which means the user can skip the field during data entry. If you set this property to True, the user must enter a value for the field. Here is an example:

Private Sub cmdCreateTable_Click()
    Dim curDatabase As Object
    Dim tblStudents As Object
    Dim fldFirstName As Object, fldLastName As Object

    ' Get a reference to the current database
    Set curDatabase = CurrentDb
    ' Create a new table named Students
    Set tblStudents = curDatabase.CreateTableDef("Students")
    
    Set fldFirstName = tblStudents.CreateField("FirstName", dbText)
    tblStudents.Fields.Append fldFirstName
    
    Set fldLastName = tblStudents.CreateField("LastName", dbText)
    fldLastName.Required = True
    tblStudents.Fields.Append fldLastName
    
    ' Add the Students table to the current database
    curDatabase.TableDefs.Append tblStudents
End Sub

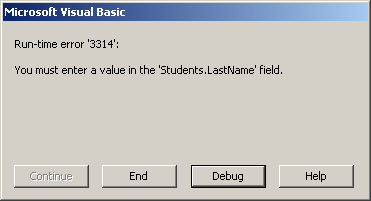
During data entry, if a value is not provided for the field, the compiler would produce a 3314 error:

Private Sub cmdCreateRecord_Click()
    Dim curDatabase As Object
    Dim rstStudents As Object
    
    Set curDatabase = CurrentDb
    Set rstStudents = curDatabase.OpenRecordset("Students")
    
    rstStudents.AddNew
    rstStudents("FirstName").Value = "Helene"
    Rem rstStudents("LastName").Value = "Mukoko"
    rstStudents.Update
    
    Set rstStudents = Nothing
    Set curDatabase = Nothing
End Sub

Error 3314

Field Nullity in the Microsoft DAO Library

In the DAO library, the Field class provides the Required property. You can use this property to allow the user to skip a field during data entry. You can also use this property to make sure a value is entered for the field before the record is considered complete. The default value of this property is False. If you set it to True, a value must always be entered for the field. Here is an example:

Private Sub cmdCreateTable_Click()
    Dim dbExercise As DAO.Database
    Dim tblEmployees As DAO.TableDef
    Dim fldEmployeeNumber As DAO.Field
    Dim fldEmployeeName As DAO.Field
    Dim fldEmailAddress As DAO.Field
    
    ' Specify the database to use
    Set dbExercise = CurrentDb

    ' Create a new TableDef object.
    Set tblEmployees = dbExercise.CreateTableDef("Employees")

    Set fldEmployeeNumber = tblEmployees.CreateField("EmployeeNumber", DB_TEXT)
    fldEmployeeNumber.Required = True
    tblEmployees.Fields.Append fldEmployeeNumber

    Set fldEmployeeName = tblEmployees.CreateField("EmployeeName", DB_TEXT)
    tblEmployees.Fields.Append fldEmployeeName

    Set fldEmailAddress = tblEmployees.CreateField("EmailAddress", DB_TEXT)
    tblEmployees.Fields.Append fldEmailAddress

   ' Add the new table to the database.
   dbExercise.TableDefs.Append tblEmployees
   dbExercise.Close
End Sub

If you try or the user tries skipping a field whose Required property is set to True, the database would produce an error.

Field Nullity in the SQL

If you are programmatically creating the column using SQL, if you want to let the user add or not add a value for the column, type the NULL keyword on the right side of the data type. If you want to require a value for the column, type NOT NULL. Here are examples:

Private Sub cmdTable_Click()
    DoCmd.RunSQL "CREATE TABLE Contractors(" & _
                 "FirstName TEXT NULL, " & _
                 "LastName VARCHAR NOT NULL);"
End Sub

In this case, when performing data entry, the user must always provide a value for the LastName column in order to create a record. If you omit to specify the nullity of a field, it is assumed NULL.


Assistance With Data Entry: The Size of a Field


Introduction

When creating a text-based field, you have the option of controlling the number of characters that a field can hold.

If you are creating the table in Microsoft Access, to control the maximum number of characters it can contain, display the table in Design View. After setting the column name and the data type as Text, in the lower section of the window, click Field Size and type the desired value. You can set a value from 1 to 255.

Setting the Field Size in Microsoft Access Object Library

In our introduction to table creation in the Microsoft Access Object Library, we saw that the CreateField() method of a table takes three arguments. By now, we know that the first argument is for the name of the column and the second argument can be either dbText or DB_TEXT:

Private Sub cmdCreateTable_Click()
    Dim curDatabase As Object
    Dim tblStudents As Object
    Dim fldFullName As Object

    ' Get a reference to the current database
    Set curDatabase = CurrentDb
    ' Create a new table named Students
    Set tblStudents = curDatabase.CreateTableDef("Students")
    
    Set fldFullName = tblStudents.CreateField("FullName", dbText, Size)
    tblStudents.Fields.Append fldFullName
    
    ' Add the Students table to the current database
    curDatabase.TableDefs.Append tblStudents
End Sub

To specify the maximum number of characters a text-based column can hold, provide a third argument to the CreateField() method and enter the desired number. Here is an example:

Private Sub cmdCreateTable_Click()
    Dim curDatabase As Object
    Dim tblStudents As Object
    Dim fldFullName As Object

    ' Get a reference to the current database
    Set curDatabase = CurrentDb
    ' Create a new table named Students
    Set tblStudents = curDatabase.CreateTableDef("Students")
    
    Set fldFullName = tblStudents.CreateField("FullName", dbText, 120)
    tblStudents.Fields.Append fldFullName
    
    ' Add the Students table to the current database
    curDatabase.TableDefs.Append tblStudents
End Sub

Setting the Field Size in Microsoft DAO Library

The DAO library uses the same approach as the Microsoft Access Object Library. Therefore, when creating a text-based column, to specify the maximum number of characters it can have, pass a third argument to the DAO.TableDef.CreateField() method as a number. Here is an example:

Private Sub cmdCreateTable_Click()
    Dim dbExercise As DAO.Database
    Dim tblEmployees As DAO.TableDef
    Dim fldEmploymentStatus As DAO.Field
    
    ' Specify the database to use
    Set dbExercise = CurrentDb

    ' Create a new TableDef object.
    Set tblEmployees = dbExercise.CreateTableDef("Employees")

    Set fldEmploymentStatus = tblEmployees.CreateField("EmploymentStatus", DB_TEXT, 80)
    tblEmployees.Fields.Append fldEmploymentStatus

   ' Add the new table to the database.
   dbExercise.TableDefs.Append tblEmployees
   dbExercise.Close
End Sub

Setting the Field Size in SQL

We saw that, in SQL, a text-based field can use the TEXT, CHAR, or VARCHAR data type. By default, when a column of a table has been set to TEXT, CHAR, or VARCHAR, it is made to hold 255 characters. To specify the number of characters of the string-based column, add an opening and a closing parentheses to the TEXT, the CHAR, or the VARCHAR data types. In the parentheses, enter the desired number. Here are examples:

Private Sub cmdCreateTable_Click()
    DoCmd.RunSQL "CREATE TABLE Contractors (" & _
             	 "EmplNumber TEXT(6)," & _
             	 "FirstName Text(20)," & _
             	 "LastName Text(20)," & _
             	 "Address varchar(100)," & _
             	 "City VARCHAR(40)," & _
             	 "State char(2));"
End Sub

Using Long Text

All of the text data types we have used so far can hold only a maximum of 255 characters. Of course, sometimes you will want to have a column that can hold longer text. If you are creating a table in Microsoft Access, you can display it in Design View. After specifying the name of the column, set its Data Type to Memo. Like the Text data type, the Memo type is used for any type of text, any combination of characters, and symbols, up to 64000 characters.

If you are programmatically creating a column, using the Microsoft Access Object Library, if you want it to hold longer text than the Text data type or a regular String would handle, pass its type as DB_MEMO. Here is an example:

Private Sub cmdCreateTable_Click()
    Dim curDatabase As Object
    Dim tblStudents As Object
    Dim colFullName As Object
    Dim colComments As Object

    Set curDatabase = CurrentDb
    Set tblStudents = curDatabase.CreateTableDef("Students")
    
    ' Create a colume named FullName in the Students table
    Set colFullName = tblStudents.CreateField("FullName", DB_Text)
    tblStudents.Fields.Append colFullName
    ' Create the Comments column
    Set colComments = tblStudents.CreateField("Comments", DB_MEMO)
    tblStudents.Fields.Append colComments
    
    ' Add the Students table to the current database
    curDatabase.TableDefs.Append tblStudents
    
    DoCmd.SelectObject acTable, "Students", True
End Sub

If you are creating the table using DAO and want to use long text values on a column, specify its data type as dbMemo. Here is an example:

Private Sub cmdTableCreation_Click()
    Dim curDatabase As DAO.Database
    Dim tblStudents As DAO.TableDef
    Dim colFullName As DAO.Field
    Dim colAnnualReview As DAO.Field

    ' Get a reference to the current database
    Set curDatabase = CurrentDb
    ' Create a new table named Students
    Set tblStudents = curDatabase.CreateTableDef("Students")

    Set colFullName = tblStudents.CreateField("FullName", dbText)
    tblStudents.Fields.Append colFullName
    
    Set colAnnualReview = tblStudents.CreateField("AnnualReview", dbMemo)
    tblStudents.Fields.Append colAnnualReview
    
    ' Add the Students table to the current database
    curDatabase.TableDefs.Append tblStudents
    
    DoCmd.SelectObject acTable, "Students", True
End Sub

If you are using SQL to create your table, you can apply the MEMO, the NOTE, or the LONGTEXT data types to a column that would hold long text. 

Assistance With Data Entry: A Default Value for a Field


Introduction

A default value allows a column to use a value that is supposed to be common to most cells of a particular column. The default value can be set as a constant value or it can use a function that would adapt to the time the value is needed.

Setting a Default Value in Microsoft Access Object Library

To support the default value, the Field class of the Microsoft Access Object Library is equipped with a property named DefaultValue. When creating a field, get its reference from calling the TableDef.CreateField() method. With that reference, access its DefaultValue property and assign the desired value to it. The value must be a string for a text-based field. Here is an example:

Private Sub cmdCreateTable_Click()
    Dim curDatabase As Object
    Dim tblStudents As Object
    Dim fldFullName As Object
    Dim fldGender As Object

    ' Get a reference to the current database
    Set curDatabase = CurrentDb
    ' Create a new table named Students
    Set tblStudents = curDatabase.CreateTableDef("Students")
    
    Set fldFullName = tblStudents.CreateField("FullName", dbText, 120)
    tblStudents.Fields.Append fldFullName
    
    Set fldGender = tblStudents.CreateField("Gender", dbText, 20)
    fldGender.DefaultValue = "Female"
    tblStudents.Fields.Append fldGender
    
    ' Add the Students table to the current database
    curDatabase.TableDefs.Append tblStudents
End Sub

After specifying a default value for a column, during data entry, you or the user can skip that field. Here is an example:

Private Sub cmdCreateRecord_Click()
    Dim curDatabase As Object
    Dim rstStudents As Object
    
    Set curDatabase = CurrentDb
    Set rstStudents = curDatabase.OpenRecordset("Students")
    
    rstStudents.AddNew
    rstStudents("FullName").Value = "Helene Mukoko"
    rstStudents.Update
    
    Set rstStudents = Nothing
    Set curDatabase = Nothing
End Sub

If you skip the field, the field would receive the default value as its value.

Setting a Default Value in Microsoft DAO Library

Once again, DAO uses the same approach as the Microsoft Access Object Library to perform this type of operation. In the DAO library, the DAO.Field class is equipped with the DefaultValue property. To specifying a default value for a new field you are creating, assign that value to it. Here is an example:

Private Sub cmdCreateTable_Click()
    Dim dbExercise As DAO.Database
    Dim tblEmployees As DAO.TableDef
    Dim fldEmployeeNumber As DAO.Field
    Dim fldEmployeeName As DAO.Field
    Dim fldEmploymentStatus As DAO.Field
    
    ' Specify the database to use
    Set dbExercise = CurrentDb

    ' Create a new TableDef object.
    Set tblEmployees = dbExercise.CreateTableDef("Employees")

    Set fldEmployeeNumber = tblEmployees.CreateField("EmployeeNumber", DB_TEXT, 10)
    fldEmployeeNumber.Required = True
    tblEmployees.Fields.Append fldEmployeeNumber

    Set fldEmployeeName = tblEmployees.CreateField("EmployeeName", DB_TEXT, 100)
    tblEmployees.Fields.Append fldEmployeeName

    Set fldEmploymentStatus = _
        tblEmployees.CreateField("EmploymentStatus", DB_TEXT, 20)
    fldEmploymentStatus.DefaultValue = "Full Time"
    tblEmployees.Fields.Append fldEmploymentStatus

   ' Add the new table to the database.
   dbExercise.TableDefs.Append tblEmployees
   dbExercise.Close
End Sub

Once a field has a default value, it can be skipped during data entry, in which case the default value would be used for its value.


Previous Copyright © 2005-2016, FunctionX, Inc. Next