|
Details on Column Selection |
|
Consider a table created with the following code: Private Sub cmdTable_Click()
Dim dbCurrent As Object
Dim tblEmployees As Object
Dim fldEmployee As Object
Set dbCurrent = CurrentDb
Set tblEmployees = dbCurrent.CreateTableDef("Employees")
Set fldEmployee = tblEmployees.CreateField("DateHired", dbDate)
tblEmployees.Fields.Append fldEmployee
Set fldEmployee = tblEmployees.CreateField("FirstName", dbText, 40)
tblEmployees.Fields.Append fldEmployee
Set fldEmployee = tblEmployees.CreateField("LastName", dbText, 40)
tblEmployees.Fields.Append fldEmployee
Set fldEmployee = tblEmployees.CreateField("Department", dbText, 50)
tblEmployees.Fields.Append fldEmployee
Set fldEmployee = tblEmployees.CreateField("HourlySalary", dbDouble)
tblEmployees.Fields.Append fldEmployee
dbCurrent.TableDefs.Append tblEmployees
MsgBox "A table named Employees has been created"
DoCmd.RunSQL "INSERT INTO Employees(DateHired, FirstName, LastName, " & _
"Department, HourlySalary) " & _
"VALUES('10/22/2006', 'Jerry', 'Carlton', " & _
"'Corporate', 22.45);"
DoCmd.RunSQL "INSERT INTO Employees(DateHired, FirstName, LastName, " & _
"Department, HourlySalary) " & _
"VALUES('05/12/2000', 'Christopher', 'Haloux', " & _
"'Accounting', 28.05);"
DoCmd.RunSQL "INSERT INTO Employees(DateHired, FirstName, LastName, " & _
"Department, HourlySalary) " & _
"VALUES('12/05/2005', 'Grattie', 'Sanion', " & _
"'Human Resources', 18.45);"
DoCmd.RunSQL "INSERT INTO Employees(DateHired, FirstName, LastName, " & _
"Department, HourlySalary) " & _
"VALUES('08/08/2002', 'Nicolas', 'Sands', 'IT', 19.85);"
DoCmd.RunSQL "INSERT INTO Employees(DateHired, FirstName, LastName, " & _
"Department, HourlySalary) " & _
"VALUES('12/04/1998', 'Dennis', 'Fleming', " & _
"'Corporate', 14.55);"
DoCmd.RunSQL "INSERT INTO Employees(DateHired, FirstName, LastName, " & _
"Department, HourlySalary) " & _
"VALUES('06/10/2008', 'Julie', 'Woods', " & _
"'Corporate', 30.2);"
DoCmd.RunSQL "INSERT INTO Employees(DateHired, FirstName, LastName, " & _
"Department, HourlySalary) " & _
"VALUES('12/05/2005', 'Barbara', 'Seans', " & _
"'Human Resources', 18.45);"
End Sub
Imagine that you want to create a list of employees
using their names and you want to show their work department. Imagine that you want the list to
include only the employees who work at the corporate office, that is,
employees whose Department value is Corporate. You can create a SQL
statement as follows:
Private Sub cmdDataSource_Click()
    RecordSource = "SELECT Employees.DateHired, " & _
                   "       Employees.FirstName, " & _
                   "       Employees.LastName, " & _
                   "       Employees.Department " & _
                   "FROM Employees " & _
                   "WHERE Employees.Department = 'Corporate';"

    txtDateHired.ControlSource = "DateHired"
    txtFirstName.ControlSource = "FirstName"
    txtLastName.ControlSource = "LastName"
    txtDepartment.ControlSource = "Department"
End Sub
This would produce:
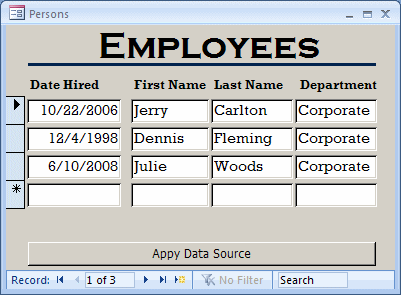
Notice that the Department column is included as part
of the SELECT statement. Since the list includes employees who work at the corporate office
and we know that this is what the query would produce, it becomes
redundant, quite useless, to include the Department column in our list.
Therefore, we can hide it. To create such a query, omit the column in the SELECT
statement but include it as part of your WHERE condition. Here is an
example:
Private Sub cmdDataSource_Click()
    RecordSource = "SELECT Employees.DateHired, " & _
                   "       Employees.FirstName, " & _
                   "       Employees.LastName " & _
                   "FROM Employees " & _
                   "WHERE Employees.Department = 'Corporate';"

    txtDateHired.ControlSource = "DateHired"
    txtFirstName.ControlSource = "FirstName"
    txtLastName.ControlSource = "LastName"
End Sub
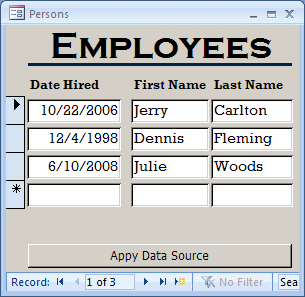
Notice that the Department column is not included as
part of the SELECT statement. This would produce:
|
The Alias Name of a Column |
|
In your SELECT statement, after specifying the
column(s) as we have done so far, when you execute the query, the name of
each column would appear as the column header. When creating the table, if
you had explicitly specified a caption for the column, the caption would
display also when the query shows its result. On a query, instead of the
default name used as the caption, if you want, you can
display any string of your choice for a column header. To specify a column header other than the name of the
column, if you are visually creating the SQL statement in the Select Query
window, in the box that receives the name of the selected column, type the
desired string, followed by a colon ":", followed by the actual
name of the column from the table.
 |
In Microsoft Access (unlike many other database
environments), if the column has a caption that was set in the table,
creating the alias would not have any effect in the query. |
If you are
manually writing the SQL statement, type the actual name of the column,
followed by the AS keyword, followed by the desired string. If the desired column header is in one word, you can
simply type it. Here is an example:
SELECT DateHired AS EmployedSince, LastName, HourlySalary
FROM Employees;
If the string is in more than one
word or contains a symbol that could be confused with an operator, you
should include the whole string between an opening square bracket and a
closing square bracket. In fact, you should always include the string
between square brackets. Here are two examples:
SELECT DateHired AS [EmployedSince], LastName, HourlySalary AS [Pay Rate]
FROM Employees;
You can also include the string in single-quotes. Here are
two examples: SELECT DateHired AS [EmployedSince], LastName, HourlySalary AS 'Pay Rate'
FROM Employees;
|
A Combination or Expression of Columns |
|
When creating a query, instead of having separate columns, you can combine
two or more columns to
create a string or a value that is in fact an expression. For example, you
can combine a first name and a last name to create a full name.
An expression that combines columns can be performed
on text-based columns. such as a first name being added to a last name to
get a full name. To create this type of expression, you can use the +
operator to concatenate the string as in FirstName + " " +
LastName. After creating the
expression, because the result is not part of the table (or the query)
from which the query is based, you must give an alias name to the result.
Here is an example:
Private Sub cmdDataSource_Click()
    RecordSource = "SELECT Employees.DateHired, " & _
                   "       Employees.LastName + ', ' + " & _
                   "       Employees.FirstName As FullName, " & _
                   "       Employees.Department " & _
                   "FROM Employees;"

    txtDateHired.ControlSource = "DateHired"
    txtFullName.ControlSource = "FullName"
    txtDepartment.ControlSource = "Department"
End Sub
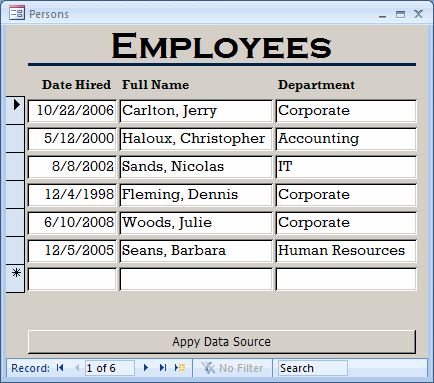
Instead of the addition operator, you can use the ampersand
& operator to perform the same operator. Instead of the
single-quotes used to add a string in the expression, you can use
double-quotes.
Besides string, you can create a type of expression
that uses a date on the table, add a
number to it to get a date on another day. An expression can also be used
to perform a calculation on two or more columns such as employees weekly
hours multiplied by their hourly salary to get their weekly salary.
|
Field Selection Into a Record Set |
|
In the previous lesson, we saw different ways of creating
simple SELECT statement and we saw how to use them. We saw that, using
fields from a table, we could create a SELECT statement and use it to
generate a query in the Microsoft Access Object Library or in DAO:
Private Sub cmdCreateQuery_Click()
    Dim curDatabase As DAO.Database
    Dim qryEmployees As DAO.QueryDef
    Dim strStatement As String

    ' Get a reference to the current database
    Set curDatabase = CurrentDb
    strStatement = "SELECT FirstName, LastName FROM Employees;"
    ' Create a new query named EmployeesInfo
    Set qryEmployees = curDatabase.CreateQueryDef("EmployeesInfo", strStatement)
End Sub
In the same way, we can also call the RunSQL() method
of the DoCmd object and pass a SQL statement to it. Besides these
techniques, we can also use a record set object.
|
 Practical Learning: Introducing
Domain Aggregate Functions Practical Learning: Introducing
Domain Aggregate Functions
|
|
- Create a blank database named Greenbelt Auto Parts1
- Close the default table without saving it
- From the resources that accompany these lessons, import the AutoParts
table from the Exercise1 database
- Click the Office button and click Access Options...
- Click Current Database and click Overlapped Windows
- Click OK and click OK
- Close Microsoft Access
- Start Microsoft Access again and open the Greenbelt Auto Part database
- On the Ribbon, click Create
- In the Forms section, click Form Design
- In the Controls section of the Ribbon, click the Button and
click the Detail section of the form. If the Button Wizard starts, click
Cancel
- On the form, double-click the button to access its Properties window.
Change its Name to cmdCreateTables
- Change its Caption to Create Table
- Right-click the Create Tables button and click Build Event...
- In the Choose builder dialog box, double-click Code Builder
- Implement the event as follows:
Private Sub cmdCreateTable_Click()
    DoCmd.RunSQL "CREATE TABLE Invoices(" & _
                 "InvoiceID AutoIncrement(1, 1) " & _
                 "           primary key not null, " & _
                 "InvoiceDate Date, CustomerName varchar(80), " & _
                 "CustomerAddress varchar(80), CustomerCity varchar(50), " & _
                 "CustomerState varchar(50), " & _
                 "CustomerZIPCode varchar(40), Part1Number varchar(20), " & _
                 "Part1Name varchar(50), Part1Quantity Integer, " & _
                 "Part1SubTotal double, Part2Number varchar(20), " & _
                 "Part2Name varchar(50), Part2Quantity Integer, " & _
                 "Part2SubTotal double, Part3Number varchar(20), " & _
                 "Part3Name varchar(50), Part3Quantity Integer, " & _
                 "Part3SubTotal double, Part4Number varchar(20), " & _
                 "Part4Name varchar(50), Part4Quantity Integer, " & _
                 "Part4SubTotal double, Part5Number varchar(20), " & _
                 "Part5Name varchar(50), Part5Quantity Integer, " & _
                 "Part5SubTotal double, Part6Number varchar(20), " & _
                 "Part6Name varchar(50), Part6Quantity Integer, " & _
                 "Part6SubTotal double, " & _
                 "PartsTotal double, TaxRate double, " & _
                 "TaxAmount double, InvoiceTotal double);"
    MsgBox "A table named Invoices has been created."
End Sub
|
-
Return to Microsoft Access
- Switch the form to Form View and click the button
- Click OK each time to create the table and create its records
- Close the form
- When asked whether you want to save it, click No
- On the Ribbon, click Create
- In the Forms section, click Form Design
- Save the form as NewInvoice
- Design the form as follows (You don't have to follow the exact same
design; you only need to have the same controls and names):
 |
| Control |
Caption |
Name |
Format |
Decimal Places |
| Text Box |
Invoice Date: |
txtInvoiceDate |
Short Date |
|
| Group Box |
Customer Information |
|
|
|
| Text Box |
Name: |
txtCustomerName |
|
|
| Text Box |
Address: |
txtCustomerAddress |
|
|
| Text Box |
City: |
txtCustomerCity |
|
|
| Text Box |
State: |
txtCustomerState |
|
|
| Text Box |
ZIP Code: |
txtCustomerZIPCode |
|
|
| Label |
Part # |
|
|
|
| Label |
Part Name/Description |
|
|
|
| Label |
Unit Price |
|
|
|
| Label |
Qty |
|
|
|
| Label |
Sub Total |
|
|
|
| Text Box |
|
txtPart1Number |
|
|
| Text Box |
|
txtPart1Name |
|
|
| Text Box |
|
txtPart1UnitPrice |
Fixed |
|
| Text Box |
|
txtPart1Quantity |
Fixed |
0 |
| Text Box |
|
txtPart1SubTotal |
Fixed |
|
| Text Box |
|
txtPart2Number |
|
|
| Text Box |
|
txtPart2Name |
|
|
| Text Box |
|
txtPart2UnitPrice |
Fixed |
|
| Text Box |
|
txtPart2Quantity |
Fixed |
0 |
| Text Box |
|
txtPart2SubTotal |
Fixed |
|
| Text Box |
|
txtPart3Number |
|
|
| Text Box |
|
txtPart3Name |
|
|
| Text Box |
|
txtPart3UnitPrice |
Fixed |
|
| Text Box |
|
txtPart3Quantity |
Fixed |
0 |
| Text Box |
|
txtPart3SubTotal |
Fixed |
|
| Text Box |
|
txtPart4Number |
|
|
| Text Box |
|
txtPart4Name |
|
|
| Text Box |
|
txtPart4UnitPrice |
Fixed |
|
| Text Box |
|
txtPart4Quantity |
Fixed |
0 |
| Text Box |
|
txtPart4SubTotal |
Fixed |
|
| Text Box |
|
txtPart5Number |
|
|
| Text Box |
|
txtPart5Name |
|
|
| Text Box |
|
txtPart5UnitPrice |
Fixed |
|
| Text Box |
|
txtPart5Quantity |
Fixed |
0 |
| Text Box |
|
txtPart5SubTotal |
Format: Fixed |
|
| Text Box |
|
txtPart6Number |
|
|
| Text Box |
|
txtPart6Name |
|
|
| Text Box |
|
txtPart6UnitPrice |
Fixed |
|
| Text Box |
|
txtPart6Quantity |
Fixed |
0 |
| Text Box |
|
txtPart6SubTotal |
Fixed |
|
| Line |
|
|
|
|
| Text Box |
Items Total: |
txtPartsTotal |
Fixed |
|
| Text Box |
Tax Rate: |
txtTaxRate |
Percent |
|
| Text Box |
Tax Amount: |
txtAmountAmount |
Fixed |
|
| Text Box |
Invoice Total: |
txtInvoiceTotal |
Fixed |
|
| Line |
|
|
|
|
| Button |
btnSave |
Save |
|
|
| Button |
btnClose |
Close |
|
|
|
- Right-click the Reset Invoice button and click Build Event...
- Double-click Code Builder
- Implement the event as follows:
Private Sub cmdResetInvoice_Click()
    Me.txtInvoiceDate = Date: Me.txtCustomerName = ""
    Me.txtCustomerAddress = "": Me.txtCustomerCity = ""
    Me.txtCustomerState = "": Me.txtCustomerZIPCode = ""
    Me.txtPart1Number = "": Me.txtPart1Name = ""
    Me.txtPart1UnitPrice = "0.00": Me.txtPart1Quantity = "0"
    Me.txtPart1SubTotal = "0.00": Me.txtPart2Number = ""
    Me.txtPart2Name = "": Me.txtPart2UnitPrice = "0.00"
    Me.txtPart2Quantity = "0": Me.txtPart2SubTotal = "0.00"
    Me.txtPart3Number = "": Me.txtPart3Name = ""
    Me.txtPart3UnitPrice = "0.00": Me.txtPart3Quantity = "0"
    Me.txtPart3SubTotal = "0.00": Me.txtPart4Number = ""
    Me.txtPart4Name = "": Me.txtPart4UnitPrice = "0.00"
    Me.txtPart4Quantity = "0": Me.txtPart4SubTotal = "0.00"
    Me.txtPart5Number = "": Me.txtPart5Name = ""
    Me.txtPart5UnitPrice = "0.00": Me.txtPart5Quantity = "0"
    Me.txtPart5SubTotal = "0.00": Me.txtPart6Number = ""
    Me.txtPart6Name = "": Me.txtPart6UnitPrice = "0.00"
    Me.txtPart6Quantity = "0": Me.txtPart6SubTotal = "0.00"
    Me.txtPartsTotal = "0.00": Me.txtTaxRate = "5.75"
    Me.txtTaxAmount = "0.00": Me.txtInvoiceTotal = "0.00"
End Sub
|
- In the Object combo box, select Form
- Implement the event as follows:
Private Sub Form_Load()
    cmdResetInvoice_Click
End Sub
|
- In the Object combo box, select txtPart1Quantity
- In the Procedure combo box, select LostFocus and implement the event as
follows:
Private Sub CalculateInvoice()
    Dim Part1UnitPrice As Double, Part1Quantity As Integer
    Dim Part1SubTotal As Double, Part2UnitPrice As Double
    Dim Part2Quantity As Integer, Part2SubTotal As Double
    Dim Part3UnitPrice As Double, Part3Quantity As Integer
    Dim Part3SubTotal As Double, Part4UnitPrice As Double
    Dim Part4Quantity As Integer, Part4SubTotal As Double
    Dim Part5UnitPrice As Double, Part5Quantity As Integer
    Dim Part5SubTotal As Double, Part6UnitPrice As Double
    Dim Part6Quantity As Integer, Part6SubTotal As Double
    Dim PartsTotal As Double, TaxRate As Double
    Dim TaxAmount As Double, InvoiceTotal As Double

    Part1UnitPrice = CDbl(Nz(txtPart1UnitPrice))
    Part1Quantity = CInt(Nz(txtPart1Quantity))
    Part1SubTotal = Part1UnitPrice * Part1Quantity

    Part2UnitPrice = CDbl(Nz(txtPart2UnitPrice))
    Part2Quantity = CInt(Nz(txtPart2Quantity))
    Part2SubTotal = Part2UnitPrice * Part2Quantity

    Part3UnitPrice = CDbl(Nz(txtPart3UnitPrice))
    Part3Quantity = CInt(Nz(txtPart3Quantity))
    Part3SubTotal = Part3UnitPrice * Part3Quantity

    Part4UnitPrice = CDbl(Nz(txtPart4UnitPrice))
    Part4Quantity = CInt(Nz(txtPart4Quantity))
    Part4SubTotal = Part4UnitPrice * Part4Quantity

    Part5UnitPrice = CDbl(Nz(txtPart5UnitPrice))
    Part5Quantity = CInt(Nz(txtPart5Quantity))
    Part5SubTotal = Part5UnitPrice * Part5Quantity

    Part6UnitPrice = CDbl(Nz(txtPart6UnitPrice))
    Part6Quantity = CInt(Nz(txtPart6Quantity))
    Part6SubTotal = Part6UnitPrice * Part6Quantity

    TaxRate = CDbl(Nz(txtTaxRate))

    PartsTotal = Part1SubTotal + Part2SubTotal + Part3SubTotal + _
                 Part4SubTotal + Part5SubTotal + Part6SubTotal
    TaxAmount = PartsTotal * TaxRate / 100
    InvoiceTotal = PartsTotal + TaxAmount

    txtPart1SubTotal = FormatNumber(Part1SubTotal)
    txtPart2SubTotal = FormatNumber(Part2SubTotal)
    txtPart3SubTotal = FormatNumber(Part3SubTotal)
    txtPart4SubTotal = FormatNumber(Part4SubTotal)
    txtPart5SubTotal = FormatNumber(Part5SubTotal)
    txtPart6SubTotal = FormatNumber(Part6SubTotal)

    txtPartsTotal = FormatNumber(PartsTotal)
    txtTaxAmount = FormatNumber(TaxAmount)
    txtInvoiceTotal = FormatNumber(InvoiceTotal)
End Sub

Private Sub txtPart1Quantity_LostFocus()
    CalculateInvoice
End Sub
|
- In the Object combo box, select txtPart2Quantity
- In the Procedure combo box, select LostFocus and implement the event as
follows:
Private Sub txtPart2Quantity_LostFocus()
    CalculateInvoice
End Sub
|
- In the Object combo box, select txtPart3Quantity
- In the Procedure combo box, select LostFocus and implement the event as
follows:
Private Sub txtPart3Quantity_LostFocus()
    CalculateInvoice
End Sub
|
- In the Object combo box, select txtPart4Quantity
- In the Procedure combo box, select LostFocus and implement the event as
follows:
Private Sub txtPart4Quantity_LostFocus()
    CalculateInvoice
End Sub
|
- In the Object combo box, select txtPart5Quantity
- In the Procedure combo box, select LostFocus and implement the event as
follows:
Private Sub txtPart4Quantity_LostFocus()
    CalculateInvoice
End Sub
|
- In the Object combo box, select txtPart6Quantity
- In the Procedure combo box, select LostFocus and implement the event as
follows:
Private Sub txtPart5Quantity_BeforeUpdate(Cancel As Integer)
    CalculateInvoice
End Sub
|
- In the Object combo box, select cmdClose
- Implement the event as follows:
Private Sub txtPart6Quantity_BeforeUpdate(Cancel As Integer)
    CalculateInvoice
End Sub
|
- In the Object combo box, select txtPart2Quantity
|
Data Selection in a Recordset
|
|
So far, when we needed a record set, we passed the name of a
table or query to it. This meant that we were getting all fields from the table
or query. Here is an example:
Private Sub cmdSelectSomeFields_Click()
    Dim curDatabase As Object
    Dim rstEmployees As Object
    Dim fldEmployee As Object

    Set curDatabase = CurrentDb
    Set rstEmployees = curDatabase.OpenRecordset("Employees")

    . . . Use the record set here

    Set rstEmployees = Nothing
    Set curDatabase = Nothing
End Sub
In some case, you may not be interested in all fields from a
table or table. In this case, you can create a record set that uses only
selected fields from a table or query.
To create a record set that involves only some desired
fields, create a SELECT statement and pass it to a Recordset
object. Here is an example:
Private Sub cmdSelectSomeFields_Click()
    Dim curDatabase As Object
    Dim rstEmployees As Object
    Dim fldEmployee As Object

    Set curDatabase = CurrentDb
    Set rstEmployees = curDatabase.OpenRecordset( _
            "SELECT FirstName, LastName FROM Employees")

    . . . Use the record set here

    Set rstEmployees = Nothing
    Set curDatabase = Nothing
End Sub
You can use any of the techniques we saw in the previous
lesson and those we will study in next sections for your record set. After
creating the record set, you can use it as we have done so far. Keep in mind
that only the fields that are part of the SELECT statement will be
available to you.
|
 Practical Learning:
Looking for a Record in a Domain Practical Learning:
Looking for a Record in a Domain
|
|
- In the Object combo box, select txtPart1Number
- In the Properties window, click Event and double On Lost Focus
- Click its ellipsis button
- Implement the event as follows:
Private Sub txtPart1Number_LostFocus()
On Error GoTo txtPart1Number_Error

    Dim i As Integer
    Dim dbAutoParts As Database
    Dim rstAutoParts As Recordset

    If txtPart1Number = "" Then
        Exit Sub
    End If

    Set dbAutoParts = CurrentDb
    Set rstAutoParts = dbAutoParts.OpenRecordset( _
        "SELECT AutoParts.PartName , " & _
        "       AutoParts.UnitPrice " & _
        "FROM AutoParts " & _
        "WHERE AutoParts.PartNumber = '" & txtPart1Number & "';")

    With rstAutoParts
        Do While Not .EOF
            For i = 0 To rstAutoParts.Fields.Count - 1
                If rstAutoParts(i).Name = "PartName" Then
                    Me.txtPart1Name = rstAutoParts(i).Value
                End If

                If rstAutoParts(i).Name = "UnitPrice" Then
                    txtPart1UnitPrice = rstAutoParts(i).Value
                End If

                txtPart1Quantity = "1"
                txtPart1SubTotal = txtPart1UnitPrice

		CalculateInvoice
            Next

            .MoveNext
        Loop
    End With

txtPart1Number_Exit:
    Exit Sub

txtPart1Number_Error:
    MsgBox "The system encountered a problem when " & _
           "trying to locate the part." & vbCrLf & _
           "Error #:" & vbTab & Err.Number & vbCrLf & _
           "Error Message: " & Err.Description
    Resume txtPart1Number_Exit
End Sub
|
- In the Object combo box, select txtPart2Number
- In the Procedure combo box, select LostFocus
- Implement the event using the same code as above but replacing
txtPart1Number with txtPart2Number, txtPart1Name with txtPart2Name, txtItem1UnitPrice
with txtItem2UnitPrice, and txtPart1SubTotal and txtPart2SubTotal
- In the Object combo box, select txtPart3Number
- In the Procedure combo box, select LostFocus
- Implement the event using the same code as above but replacing
txtPart1Number with txtPart3Number, txtPart1Name with txtPart3Name, txtItem1UnitPrice
with txtItem3UnitPrice, and txtPart1SubTotal and txtPart3SubTotal
- In the Object combo box, select txtPart4Number
- In the Procedure combo box, select LostFocus
- Implement the event using the same code as above but replacing
txtPart1Number with txtPart4Number, txtPart1Name with txtPart4Name, txtItem1UnitPrice
with txtItem4UnitPrice, and txtPart1SubTotal and txtPart4SubTotal
- In the Object combo box, select txtPart5Number
- In the Procedure combo box, select LostFocus
- Implement the event using the same code as above but replacing
txtPart1Number with txtPart5Number, txtPart1Name with txtPart5Name, txtItem1UnitPrice
with txtItem5UnitPrice, and txtPart1SubTotal and txtPart5SubTotal
- In the Object combo box, select txtPart6Number
- In the Procedure combo box, select LostFocus
- Implement the event using the same code as above but replacing
txtPart1Number with txtPart6Number, txtPart1Name with txtPart6Name, txtItem1UnitPrice
with txtItem6UnitPrice, and txtPart1SubTotal and txtPart6SubTotal
- In the Object combo box, select cmdClose
- Implement the event as follows:
Private Sub cmdClose_Click()
On Error GoTo Err_cmdClose_Click

    DoCmd.Close

Exit_cmdClose_Click:
    Exit Sub

Err_cmdClose_Click:
    MsgBox Err.Description
    Resume Exit_cmdClose_Click
End Sub
|
- Close Microsoft Visual Basic and return to Microsoft Access
- Click the first text box under Part #
- Type 118448 and press Tab
- Type 4 and press Tab
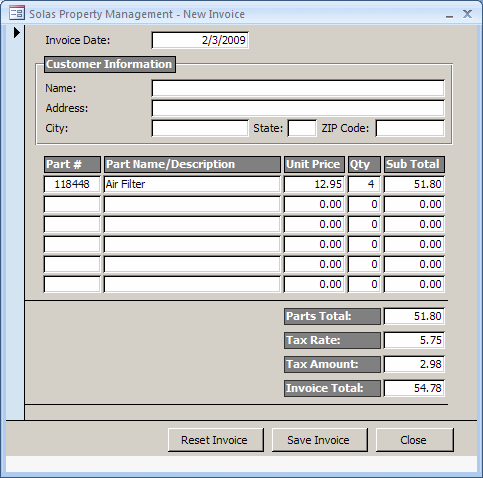
- Type 283615 and press Tab twice
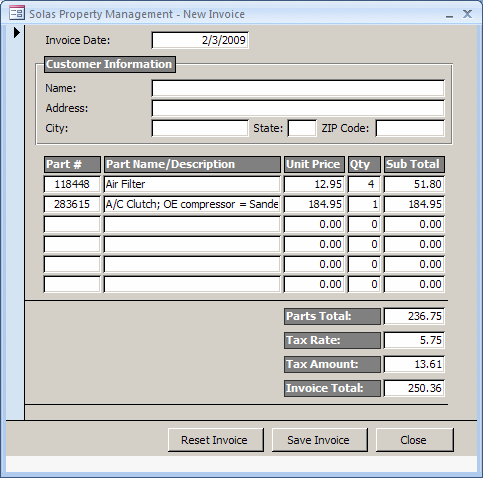
- Close the form
- When asked whether you want to save, click Yes
|
|