
A Data View
 |
A Data View |
Introduction to the Data View
Description
We have learned how to create a data set and use it to display some values on a data grid view. Consider the following form where a data set had been created and was associated to a data grid view:
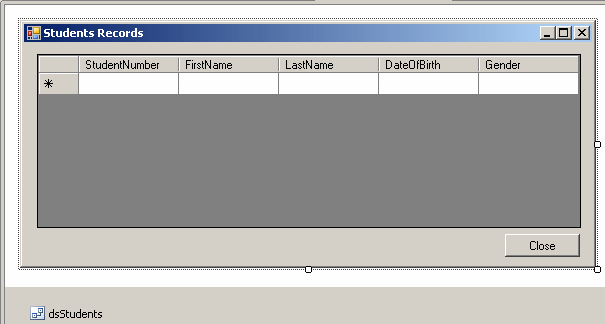
To display the values, we were using all available records from a table specified as a the DataMember of the DataGridView object:
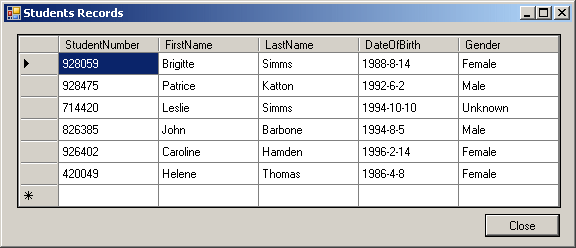
Instead of displaying all values, in some cases you may want to display only some values that respond to a criterion you set. Also, we were displaying the records in the order they appeared in the table. In some cases, you may want to re-arrange the order of records, following an arrangement of your choice. To perform these and other operations, you can create a data view.
A data view is a control used to get a particular view of the records of a table. In order to use a data view, you must specify a table that the view gets its values from, and then use that data view to specify how the records should be displayed.
Creating a Data View
To support data views, the .NET Framework provides a class called DataView. Because a data view is a control, there are two ways you can create it: visually or programmatically.
To visually create a data view, you must import it or add it to the Toolbox. To do this, you can right-click the Data section (actually you can right-click any section but the object would be added to the section you right-clicked; since the data view is a database object, it is a better idea to put it in the Data section) of the Toolbox and click Choose Items... In the .NET Framework Component property page, scroll down and put a check mark on DataView:
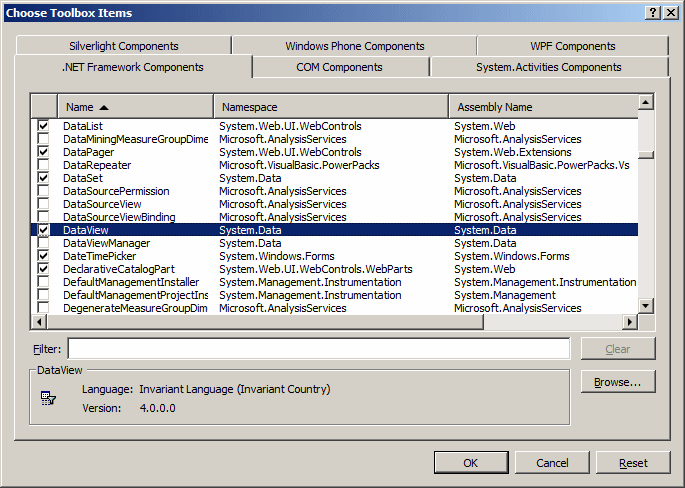
Click OK. This would add a DataView object to the Toolbox. From there, you can click the DataView button and click the form.
To programmatically create a data view, declare a variable of type DataView and initialize it using one of its three constructors. The default constructor allows you to create a data view without specifying any detail. Here is an example:
namespace Exercise5
{
    public partial class Exercise : Form
    {
        DataView dvwStudents;

        public Exercise()
        {
            InitializeComponent();
        }

        private void Exercise_Load(object sender, EventArgs e)
        {
            dvwStudents = new DataView();
        }
    }
}
The Table of a Data View
Introduction
In order to play its role, a data view must know the table on which it would apply its operations. Therefore, when creating a data view, the first piece of information you should provide is the table. Of course, you must have previously created a table, such as one from a data set.
If you visually create a data view, to specify its table, in the Properties window, click the arrow of the Table field, expand the data set node and select the desired table:
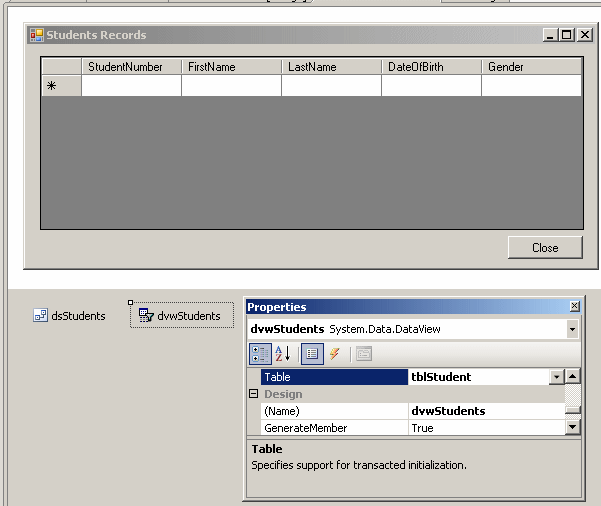
To programmatically specify the table of a data view, you have various (three) options. If you had declared a DataView variable using the default constructor, to specify the table, you can assign the table by its index to the DataView.Table property. Here is an example:
private void Exercise_Load(object sender, EventArgs e)
{
    dvwStudents = new DataView();
    dvwStudents.Table = dsStudents.Tables[0];
}
You can also use to object name of the variable. Here is an example:
private void Exercise_Load(object sender, EventArgs e)
{
    dvwStudents = new DataView();
    dvwStudents.Table = dsStudents.Tables["Student"];
}
You can also use the variable table of the table. Here is an example:
private void Exercise_Load(object sender, EventArgs e)
{
    dvwStudents = new DataView();
    dvwStudents.Table = tblStudent;
}
When declaring the DataView variable, to specify the table, the DataView class provides the following constructor:
public DataView(DataTable table);
This constructor expects a DataTable object as argument. Here are examples:
public partial class Exercise : Form
{
    DataView dvwStudents;

    public Exercise()
    {
        InitializeComponent();
    }

    private void Exercise_Load(object sender, EventArgs e)
    {
        // Using the table's index in the data set
        dvwStudents = new DataView(dsStudents.Tables[0]);
        // Using the table object name
        dvwStudents = new DataView(dsStudents.Tables["Student"]);
        // Using the table variable name
        dvwStudents = new DataView(tblStudent);
    }
}
The Default View of a Table
We already saw that, to create a data view, you could declare a variable of type DataView. You do not have to formally create a data view. To provide you with an alternative, the DataTable class is equipped with a property named DefaultView. This property produces a data view:
public DataView DefaultView { get; }
This property allows you to access a default directly from a table object.
Sorting Records
Introduction
By default, when you display the records of a table in a control such as a data grid view, the records appear in the order they were created. Sorting records consists of arranging them in an alphabetical, numerical, or chronological order. To support this operation, you can use the DataView class. This class is equipped with a property of type string and named Sort. The DataView.Sort property expects the name of a column. The data view would arrange the records using that column as the basis. Here is an example:
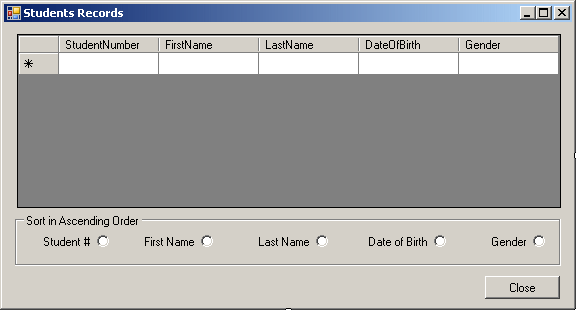
private void rdoStudentNumber_CheckedChanged(object sender, EventArgs e)
{
    dvwStudents.Sort = "StudentNumber";
}

private void rdoFirstName_CheckedChanged(object sender, EventArgs e)
{
    dvwStudents.Sort = "FirstName";
}

private void rdoLastName_CheckedChanged(object sender, EventArgs e)
{
    dvwStudents.Sort = "LastName";
}

private void rdoDateofBirth_CheckedChanged(object sender, EventArgs e)
{
    dvwStudents.Sort = "DateOfBirth";
}

private void rdoGender_CheckedChanged(object sender, EventArgs e)
{
    dvwStudents.Sort = "Gender";
}
Sorting in Ascending Order
When it comes to sorting, you can arrange a list in alphabetical or reverse alphabetical order, in numerical or reverse numerical order, in incremental or decremental order, in chronological or reverse chronological order. When sorting in alphabetical, numerical, incremental, in chronological order, you can specify the name of the column as done above or follow that name with the ASC operator. Here is an example:
private void rdoStudentNumber_CheckedChanged(object sender, EventArgs e)
{
    dvwStudents.Sort = "StudentNumber ASC";
}
Sorting in Descending Order
To sort a list in reverse alphabetical, reverse numerical, decremental, or reverse chronological order, you must specify the name of the column followed by the DESC operator. Here is an example:
private void rdoStudentNumber_CheckedChanged(object sender, EventArgs e)
{
    dvwStudents.Sort = "StudentNumber DESC";
}
These operators are not case-sensitive. This means that ASC, Asc, and asc have the same effect. Here are examples:
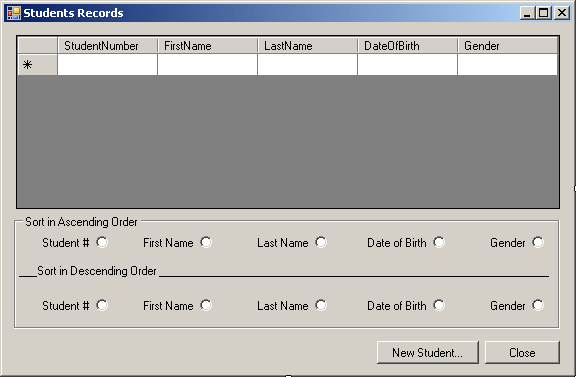
private void rdoStudentNumberAsc_CheckedChanged(object sender, EventArgs e)
{
    dvwStudents.Sort = "StudentNumber asc";
}

private void rdoFirstNameAsc_CheckedChanged(object sender, EventArgs e)
{
    dvwStudents.Sort = "FirstName asc";
}

private void rdoLastNameAsc_CheckedChanged(object sender, EventArgs e)
{
    dvwStudents.Sort = "LastName asc";
}

private void rdoDateofBirthAsc_CheckedChanged(object sender, EventArgs e)
{
    dvwStudents.Sort = "DateOfBirth asc";
}

private void rdoGenderAsc_CheckedChanged(object sender, EventArgs e)
{
    dvwStudents.Sort = "Gender asc";
}

private void rdoStudentNumberDesc_CheckedChanged(object sender, EventArgs e)
{
    dvwStudents.Sort = "StudentNumber desc";
}

private void rdoFirstNameDesc_CheckedChanged(object sender, EventArgs e)
{
    dvwStudents.Sort = "FirstName desc";
}

private void rdoLastNameDesc_CheckedChanged(object sender, EventArgs e)
{
    dvwStudents.Sort = "LastName desc";
}

private void rdoDateofBirthDesc_CheckedChanged(object sender, EventArgs e)
{
    dvwStudents.Sort = "DateOfBirth desc";
}

private void rdoGenderDesc_CheckedChanged(object sender, EventArgs e)
{
    dvwStudents.Sort = "Gender desc";
}
Here is an example of running the program:
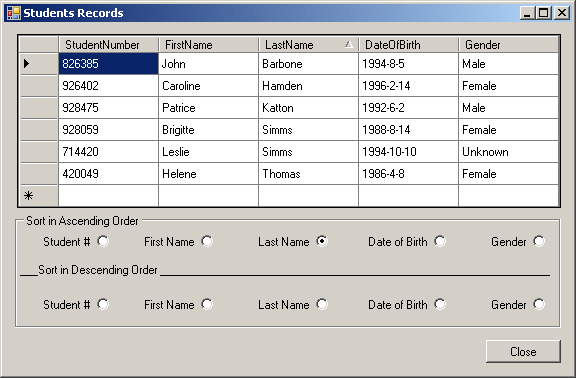
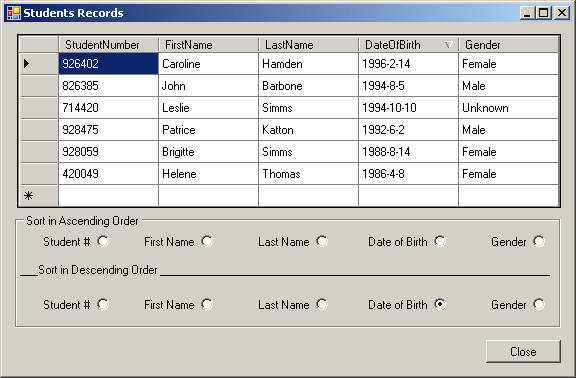
So far, we specified that the sorting apply to only one column. You can ask the compiler (actually the interpreter) to sort more than one record. To do this, you would put the list of columns in a string, and then assign that string to the DataView.Sort property. Here is an example:
private void btnSort_Click(object sender, EventArgs e)
{
    dvwStudents.Sort = "FirstName, LastName";
}
When asked to arrange the records, the data view would sort the records based on the first column first, then the records would be arranged based on the second column. If you provide only the list of records, they would be arranged in ascending order. To enforce this, you can add the ASC operator on the right side of the list of columns. Here is an example:
private void btnSort_Click(object sender, EventArgs e)
{
    dvwStudents.Sort = "FirstName, LastName, DateOfBirth ASC";
}
To arrange the records in reverse order, add the DESC operator to the list of columns. Here is an example:
private void btnSort_Click(object sender, EventArgs e)
{
    dvwStudents.Sort = "FirstName, LastName DESC";
}
Filtering Records
Introduction
So far, when displaying the records, we were showing all those that existed in the table of our choice. Data filtering consists of showing only some records, based on a condition, called a criterion, or more than one condition, in which case the plural is criteria.
To support filtering, the DataView class is equipped with a property named RowFilter:
public virtual string RowFilter { get; set; }
The DataView.RowFilter property is string based. This means that you must assign a string to it. The string must follow strict rules that the database parser will analyze. The simplest way to create this string is to assign a double-quoted value to the name of a column. An example would be:
LastName = "Simms"
The value to assign to the DataView.RowFilter must be in the form of a string. Since the value assigned to the column name must be stringed itself, you must include it in single-quotes. Therefore, the above string would be assigned as:
private void btnFilter_Click(object sender, EventArgs e)
{
    dvwStudents.RowFilter = "LastName = 'Simms'";
}
This would produce:

If the value is a string or a number, you can include it in single-quotes. If the value is a time or a date, you must include it between two pound signs "#" without the single-quotes. Here is an example:
private void btnFilter_Click(object sender, EventArgs e)
{
    dvwStudents.RowFilter = "DateOfBirth = #10/10/1994#";
}
This would produce:

Using Operators and Functions
Instead of using a simple value, that is, instead of assigning the value of a column to the name of a column, you may want to create an expression that would be used as the criterion. To create an expression, you use some logical operators. Most of the operators are the same you are already familiar with from your knowledge of C#, except as follows:
| Operator Name | C# | Data View |
| Equal | == | = |
| Less Than | < | < |
| Less Than Or Equal To | <= | <= |
| Greater Than | > | > |
| Greater Than Or Equal To | >= | >= |
| Not Equal | != | <> |
The DataView class actually does not have operators. It uses those of Visual Basic, and those are the operators we will use. Here is an example:
private void btnFilter_Click(object sender, EventArgs e)
{
    dvwStudents.RowFilter = "DateOfBirth > #10/10/1994#";
}
You can also use the other logical operators, such as the negation operator, the conjunction operator, and the disjunction operator. Once again, you must use them as they are implemented for the data view as follows:
| Operator Name | C# | Data View |
| Negation | ! | NOT |
| Logical Conjunction | && | AND |
| Logical Disjunction | || | OR |
Here is an example:
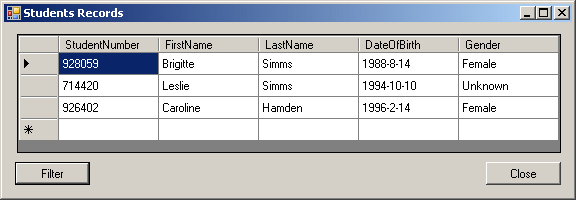
private void btnFilter_Click(object sender, EventArgs e)
{
    dvwStudents.RowFilter = "(LastName = 'Simms') OR (LastName = 'Hamden')";
}
This would produce:
Databases uses other logical operators such LIKE. Here is an example:
private void btnFilter_Click(object sender, EventArgs e)
{
    dvwStudents.RowFilter = "LastName LIKE '*on*'";
}
This would produce:

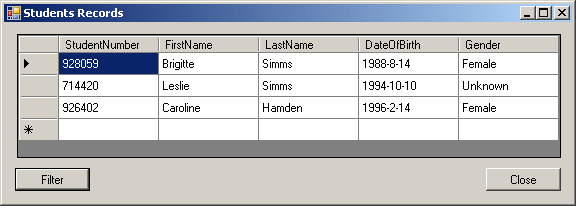
You can also use the IN logical operator. Here is an example:
private void btnFilter_Click(object sender, EventArgs e)
{
    dvwStudents.RowFilter = "LastName IN ('Simms', 'Hamden')";
}
This would produce:
Besides the operators, you can also use some of the available functions.
Finding Records
Finding a Record Using a Unique Field
Besides sorting and filtering records, another one of the most valuable actions you can perform using a data view consists of looking for a record. Finding a record consists of isolating one particular record based on a condition that can distinguish the intended record from the other records in the table. You have many options.
Before asking the data view to find a record, you must sort the records using the column by which you will apply the value. Here is an example:
private void btnFind_Click(object sender, EventArgs e)
{
    dvwStudents.Sort = "StudentNumber";
}
In previous lessons, we saw how to use the unique properties or the primary key to make sure each record was uniquely identifiable among the other records of the same list. To find a record, you can provide this unique identifier to the interpreter. To support this technique, the DataView class is equipped with a method named Find that is overloaded with two versions. One of the versions of the method uses the following syntax:
public int Find(object key);
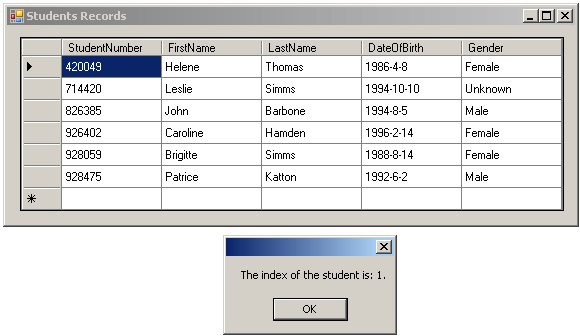
This method takes as argument the value, usually the primary key, that can be used to uniquely identify a record. If a record exists with that value, the method returns its index. If there is no record with that value, the method returns -1. Here is an example:
private void btnFind_Click(object sender, EventArgs e)
{
    long  StudentNumber = 0;

    if (txtStudentNumber.Text.Length == 0)
    {
        MessageBox.Show("You must enter the student number you want to look for.");
        return;
    }

    try
    {
        StudentNumber = long.Parse(txtStudentNumber.Text);
        dvwStudents.Sort = "StudentNumber";
        int Index = dvwStudents.Find(StudentNumber);

        if (Index >= 0)
            MessageBox.Show("The index of the student is: " + Index.ToString() + ".");
        else
            MessageBox.Show("Student not found");
    }
    catch (FormatException)
    {
        MessageBox.Show("Invalid Student Number!");
    }
}
Here is an example of running the program:
Finding a Record Using a Combination of Fields
Instead of using a value from a primary key, if you know a combination of values of different columns of the same record, you can submit that combination to the data view to find a record that contains that combination. As done previously, before performing this operation, you must sort the record. This time, you must sort using the combination, and order, of the columns you will submit to the data view. Here is an example:
private void btnFind_Click(object sender, EventArgs e)
{
    dvwStudents.Sort = "FirstName, LastName";
}
To support the idea of finding a record using a combination of columns, the DataView class is equipped with another version of its Find() method. Its syntax is:
public int Find(object[] key);
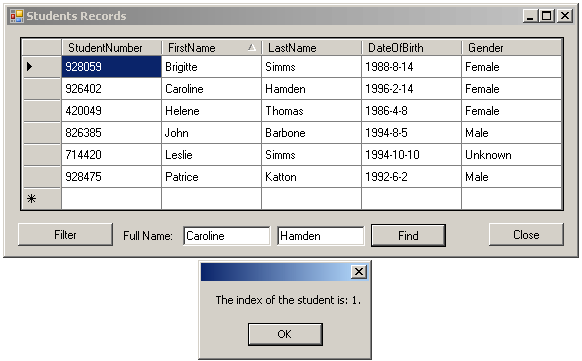
This version of the DataView.Find() method expects as argument an array that holds the combination of values. You create that combination in an array variable and pass that array to the method. The elements of the array must be stored in the same combination the columns were sorted. Here is an example:
private void btnFind_Click(object sender, EventArgs e)
{
    var FullName = new string[2];

    if (txtFirstName.Text.Length == 0)
    {
        MessageBox.Show("You must enter the student number you want to look for.");
        return;
    }

    try
    {
        FullName[0] = txtFirstName.Text;
        FullName[1] = txtLastName.Text;

        dvwStudents.Sort = "FirstName, LastName";
        int Index = dvwStudents.Find(FullName);

        if (Index >= 0)
            MessageBox.Show("The index of the student is: " + Index.ToString() + ".");
        else
            MessageBox.Show("Student not found");
    }
    catch (FormatException)
    {
        MessageBox.Show("Invalid Student Number!");
    }
}
This is an example of running the program:
A Data View as a Pseudo-Table
Introduction
In our introduction, we saw that we could use a data view as an accessory to perform sorting or filtering operations on a table. You can in reverse create a temporary table using the results of a data view. You can create a table, add records to it, delete some records, or get the number of its records. The data view itself supports these minimal operations.
Creating a Table
You can use the values of a data view to create a table. To support this operation, the DataView class is equipped with a method named ToTable that is overloaded with various versions. One of the versions uses the following syntax:
public DataTable ToTable();
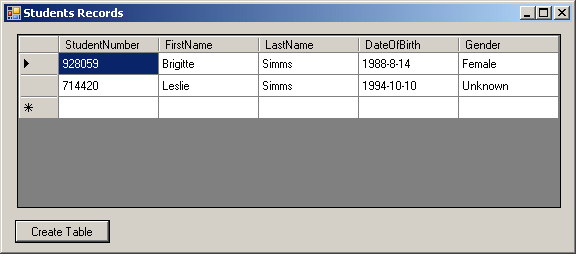
This method creates a table. Here is an example of calling it:
private void btnCreateTable_Click(object sender, EventArgs e)
{
    DataTable tblSimms = new DataTable();

    dvwStudents.RowFilter = "LastName = 'Simms'";
    tblSimms = dvwStudents.ToTable();

    dgvStudents.DataSource = tblSimms;
}
This would produce:
If you create the table as above, it would receive a default name. If you want to specify the name, you can use the following version of the DataView.ToTable() method:
public DataTable ToTable(string tableName);
Here is an example:
private void btnCreateTable_Click(object sender, EventArgs e)
{
    DataTable tblSimms = new DataTable();

    dvwStudents.RowFilter = "LastName = 'Simms'";
    tblSimms = dvwStudents.ToTable("StudentsNamedSimms");

    dgvStudents.DataSource = tblSimms;
}
Operations on a Table
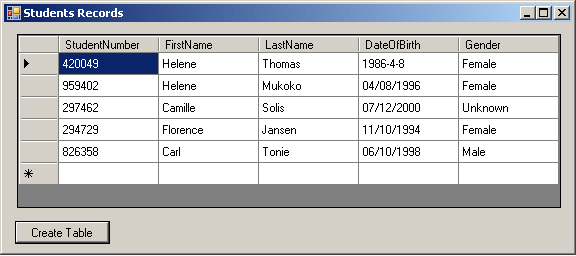
As a normal list, there are many operations you can perform on a table created from a data view. In fact, you can use any of the properties and methods we reviewed for tables. Here is an example that adds new records to a table created from a data view:
private void btnCreateTable_Click(object sender, EventArgs e)
{
            DataTable tblTempTable = new DataTable();

            dvwStudents.RowFilter = "LastName = 'Thomas'";
            tblTempTable = dvwStudents.ToTable();

            DataRow Record = null;

            Record = tblTempTable.NewRow();
            Record[0] = "959402";
            Record[1] = "Helene";
            Record[2] = "Mukoko";
            Record[3] = "04/08/1996";
            Record[4] = "Female";
            tblTempTable.Rows.Add(Record);

            Record = tblTempTable.NewRow();
            Record[0] = "297462";
            Record[1] = "Camille";
            Record[2] = "Solis";
            Record[3] = "07/12/2000";
            Record[4] = "Unknown";
            tblTempTable.Rows.Add(Record);

            Record = tblTempTable.NewRow();
            Record[0] = "294729";
            Record[1] = "Florence";
            Record[2] = "Jansen";
            Record[3] = "11/10/1994";
            Record[4] = "Female";
            tblTempTable.Rows.Add(Record);

            Record = tblTempTable.NewRow();
            Record[0] = "826358";
            Record[1] = "Carl";
            Record[2] = "Tonie";
            Record[3] = "06/10/1998";
            Record[4] = "Male";
            tblTempTable.Rows.Add(Record);

            dgvStudents.DataSource = tblTempTable;
}
This would produce:
Operations on a Data View
Adding a New Record
Besides the normal operations you would perform on a table, you can use the data view's own method to perform additional operations. For example, you can allow a user to add new records to a data view. The ability to add new records to a data view is controlled by the Boolean AllowNew property of the DataView class:
public bool AllowNew { get; set; }
The default value of this property is true, which indicates that new records can be added to the data view. To prevent new records on a data view, set this property to false.
Editing a Record
As studied for the records of a table, you can add a new record to a data view. You can also edit an existing record. The ability to edit or deny editing a record of a data view is controlled by the AllowEdit property of the DataView class. This is a Boolean property:
public bool AllowEdit { get; set; }
The default value of this property is true, which indicates that the records of a data view can be changed. To prevent that the records be edited, you can set this property to false.
To edit a record, you can locate one or more of its values using the columns.
Deleting a Record
To delete a record from a data view, you can call the Delete() method of the DataView class. Its syntax is:
public void Delete(int index);
The ability to delete a record from a data view is controlled by the AllowDelete property of the DataView. This is a Boolean property:
public bool AllowDelete { get; set; }
Its default value is true. If you set it to false (programmatically or in the Properties window), no new record can be added to the data view.