|
A car is the object that a customer comes to rent to a car
rental company. You should have a list of the cars that the company
owns. There are usually two categories of information needed for a car. Basic
information is needed when processing a rental order. On the other hand, at
times, a customer may want some extended information about a car he or she is
renting. Based on these, we will create one table of cars by different forms to
access its information, depending on the task at hand.
|
 Practical Learning: Introducing the Application
|
|
- Save the following cars to a folder. This application assumes that you
would have saved them to a folder named Cars inside of a folder name
Programs in a computer named Training (and that the Programs folder is
shared)
- In the Microsoft SQL Server Management Studio, if necessary, expand the
Databases, the bcr, and the Tables node.
To create a new table, right the Tables node under bcr and click New
Table...
- Set the first column name to CarID and set its Data Type to int
- In the lower section, expand Identity Specification and set the (Is
Identify) field to Yes
- On the table, right-click CarID and click Set Primary Key
- Complete the table with the following columns
| Column Name |
Data Type |
Allow Nulls |
| CarID |
int |
|
| TagNumber |
varchar(50) |
Uncheck
|
| Make |
varchar(50) |
Uncheck |
| Model |
varchar(50) |
Uncheck
|
| CarYear |
int |
|
| Mileage |
int
|
|
| Category |
varchar(50)
|
|
| PictureName |
varchar(200)
|
|
| K7Player |
bit
|
|
| DVDPlayer |
bit
|
|
| CDPlayer |
bit
|
|
| Available |
bit
|
Uncheck
|
- Save the table as Cars and close it
- In Microsoft Visual Studio, if necessary, open the bcr1 application
created in the first section.
In the Data Source window, right-click dsBCR and click Configure DataSet
With Wizard...
- Expand the Tables node and click the check box of Cars
- Click Finish
- To create a new form, on the main menu, click Project . Add Windows
Form...
- Set the name to CarDetails and press Enter
- Design the form as follows:
 |
| Control |
Text |
Name |
Modifiers |
Additional Properties |
| Label |
Tag Number: |
|
|
|
| TextBox |
|
txtTagNumber |
Public |
|
| Label |
Make: |
|
|
|
| TextBox |
|
txtMake |
Public
|
|
| Label |
Model: |
|
|
|
| TextBox |
|
txtModel |
Public
|
|
| Label |
Year: |
|
|
|
| TextBox |
|
txtYear |
Public
|
AlignText: Right |
| Label |
Mileage |
|
|
|
| TextBox |
|
txtMileage |
Public
|
AlignText: Right |
| Label |
Category: |
|
|
|
| ComboBox |
|
cboCategory |
Public
|
Items:
Economy
Compact
Standard
Full Size
Mini Van
SUV
Truck
Van |
| CheckBox |
K7 Player |
chkK7Player |
Public
|
|
| CheckBox |
DVD Player |
chkDVDPlayer |
Public
|
|
| CheckBox |
CD Player |
chkCDPlayer |
Public
|
|
| CheckBox |
Available |
chkAvailable |
Public
|
|
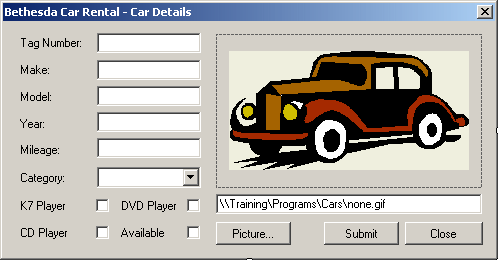
| PictureBox |
|
pctCar |
|
Image: none.gif |
| TextBox |
\\Training\Programs\Cars\none.gif |
txtPictureName |
Public
|
|
| Button |
Picture... |
chkPicture |
|
|
| Button |
Submit |
btnSubmit |
|
DialogResult: OK |
| Button |
Close |
btnClose |
|
|
|
- To create a new form, on the main menu, click Project . Add New
Item...
- In the Templates list, click Windows Form and set the name to CarsRecords
- Click Add
- Design the form as follows:
|
|
| Control |
Text |
Name |
Additional Properties |
| Label |
Car ID: |
|
|
| TextBox |
|
txtCarID |
|
| Label |
Tag Number: |
|
|
| TextBox |
|
txtTagNumber |
|
| Label |
Make: |
|
|
| TextBox |
|
txtMake |
|
| Label |
Model: |
|
|
| TextBox |
|
txtModel |
|
| Label |
Year: |
|
|
| TextBox |
|
txtYear |
AlignText: Right |
| Label |
Mileage |
|
|
| TextBox |
|
txtMileage |
AlignText: Right |
| Label |
Category: |
|
|
| ComboBox |
|
cboCategory |
Items:
Economy
Compact
Standard
Full Size
Mini Van
SUV
Truck
Van |
| CheckBox |
K7 Player |
chkK7Player |
|
| CheckBox |
DVD Player |
chkDVDPlayer |
|
| CheckBox |
CD Player |
chkCDPlayer |
|
| CheckBox |
Available |
chkAvailable |
|
| PictureBox |
|
pctCar |
Image: none.gif |
| TextBox |
\\Training\Programs\Cars\none.gif |
txtPictureName |
|
| Button |
Picture... |
chkPicture |
Modifiers: Public |
| Button |
Close |
btnClose |
|
| Button |
New Car |
btnNewCar |
|
| Button |
First |
btnFirst |
|
| Button |
Previous |
btnPrevious |
|
| Button |
Next |
btnNext |
|
| Button |
Last |
btnLast |
|
|
- Return to the form
- On the Toolbox, click DataSet In the Data section) and click the form
- In the Add Dataset dialog box, accept the Typed dataset radio button and
the contents of the Name combo box. Click OK
- In the (Data section of the) Toolbox, click BindingSource and click the
form
- In the Properties window, change its characteristics as follows:
Name: bsCars
DataSource: dsBCR1
DataMember: Cars
- Click each control and set
its data bindings
- On the Toolbox, click the OpenFileDialog button and click the form
- Set its name to dlgPicture
- Set its Filter to
Image Files(*.BMP;*.JPG;*.GIF)|*.BMP;*.JPG;*.GIF|All files (*.*)|*.*
- Double-click the Picture button and implement its event as follows:
private void btnPicture_Click(object sender, EventArgs e)
{
    if( dlgPicture.ShowDialog() == DialogResult.OK )
    {
	 txtPictureName.Text = dlgPicture.FileName;
	 pctCar.Image = Image.FromFile(txtPictureName.Text);
    }

}
|
- Return to the form
- Double-click the Close button and implement its event as follows:
private void btnClose_Click(object sender, EventArgs e)
{
     Close();
}
|
- Return to the form
- Double-click the New Car button and implement the event as follows:
private void btnNewCar_Click(object sender, EventArgs e)
{
    CarDetails dlgCar = new CarDetails();

    dlgCar.btnPicture.Visible = true;
    dlgCar.btnSubmit.Visible = true;

    if( dlgCar.ShowDialog() == DialogResult.OK )
    {
	if( dlgCar.txtTagNumber.Text == "" )
	{
      MessageBox.Show("You must specify the tag number of the car\n" +
		              "The record will not be created");
		 return;
	}
	if( dlgCar.txtMake.Text == "" )
	{
		 MessageBox.Show("You must specify the car make\n" +
		              "The record will not be created");
		 return;
	}
	if( dlgCar.txtModel.Text == "" )
	{
		 MessageBox.Show("You must specify the car model\n" +
			              "The record will not be created");
		 return;
	}
	if( dlgCar.txtYear.Text == "" )
	{
		 MessageBox.Show("You must specify the year of the car\n" +
			              "The record will not be created");
		 return;
	}

string strNewCar = string.Concat("INSERT INTO Cars(TagNumber, Make, ",
                                 "Model, CarYear, Mileage, Category, ",
				 "PictureName, K7Player, DVDPlayer, ",
				 "CDPlayer, Available) VALUES('",
                                 dlgCar.txtTagNumber.Text, "', '",
                                 dlgCar.txtMake.Text, "', '",
				 dlgCar.txtModel.Text, "', '",
				 dlgCar.txtYear.Text, "', '",
				 dlgCar.txtMileage.Text, "', '",
				 dlgCar.cboCategory.Text, "', '",
				 dlgCar.txtPictureName.Text, "', '",
				 dlgCar.chkK7Player.Checked, "', '",
				 dlgCar.chkDVDPlayer.Checked, "', '",
				 dlgCar.chkCDPlayer.Checked, "', '",
				 dlgCar.chkAvailable.Checked, "')");

        System.Data.SqlClient.SqlConnection conCar =
            new System.Data.SqlClient.SqlConnection("Data Source=" +
			"(local);Database=bcr;Integrated Security=yes");
        System.Data.SqlClient.SqlCommand cmdCar =
            new System.Data.SqlClient.SqlCommand(strNewCar, conCar);

		 conCar.Open();
		 cmdCar.ExecuteNonQuery();
		 conCar.Close();
    }
}
|
- Return to the form and double-click the First button
- Implement its event as follows:
private void btnFirst_Click(object  sender, System.EventArgs  e)
{
	 bsCars.MoveFirst();
	 this.pctCar.Image = Image.FromFile(txtPictureName.Text);

	 // This section is used to save the record
	 // if the user had changed anything before moving on
	 this.Validate();
	 this.bsCars.EndEdit();
	 this.CarsTableAdapter.Update(this.dsOrder1.Cars);
}
|
- Return to the form and double-click the Previous button
- Implement its event as follows:
private void btnPrevious_Click(object  sender, System.EventArgs  e)
{
	 bsCars.MovePrevious();
	 this.pctCar.Image = Image.FromFile(txtPictureName.Text);

	 this.Validate();
	 this.bsCars.EndEdit();
	 this.CarsTableAdapter.Update(this.dsOrder1.Cars);
}
|
- Return to the form and double-click the Next button
- Implement its event as follows:
private void btnNext_Click(object  sender, System.EventArgs  e)
{
	 bsCars.MoveNext();
	 this.pctCar.Image = Image.FromFile(txtPictureName.Text);

	 this.Validate();
	 this.bsCars.EndEdit();
	 this.CarsTableAdapter.Update(this.dsOrder1.Cars);
}
|
- Return to the form and double-click the Last button
- Implement its event as follows:
private void btnLast_Click(object  sender, System.EventArgs  e)
{
	 bsCars.MoveLast();
	 this.pctCar.Image = Image.FromFile(txtPictureName.Text);

	 this.Validate();
	 this.bsCars.EndEdit();
	 this.CarsTableAdapter.Update(this.dsOrder1.Cars);
}
|
- Return to the form and double-click the Close button
- Implement its event as follows:
private void btnClose_Click(object sender, EventArgs e)
{
    Close();
}
|
- Access the first form
- Add a button to it and set its properties as follows:
Text: Cars Review
Name: btnCarsReview
- Double-click the Cars Review button and implement the event as follows:
private void btnCarsReview_Click(object  sender, System.EventArgs  e)
{
	 CarsRecords  frmCarsRecords = new CarsRecords;
	 frmCarsRecords.ShowDialog();
}
|
- Execute the application to test it
- Using the New Car form Create a few
records
- Close the form(s)
|
|


