There are two main ways users print a document. They can ask the application they are using to send the document directly to a printer or they can use a dialog box to decide how the printing should be done.
One of the ways users print consists of sending the
document to the printer. To directly send a document to the printer, you
need to make sure that the control, whose value needs to be printed,
supports printing. To accommodate the users of your application, you can
provide a menu item or a button they would click. An example of such a
button would be
If you want users to be able to configure or customize the printing process, Microsoft Windows provides a common dialog box called Print. Here is an example:  The Print dialog box allows a user to select a printer if more than one is available. The user can decide either to print the whole document, to print a range of pages, or to print a portion of the document that was previously selected. The user can also decide on the number of copies to print from the document, the range specified, or the selected portion. Furthermore, the user can access the particular characteristics of the selected printer and specify how the printer should perform the job. For example, if the selected printer can print in color and the document is in color but the user wants to print in black and white, he or she can specify this using the Properties button.
To provide the users with the ability to customize
printing through the Print dialog box, you can add a PrintDialog object
using System;
using System.Drawing;
using System.Windows.Forms;

public class Exercise : Form
{
    Button btnPrint;

    public Exercise()
    {
        InitializeComponent();
    }

    void InitializeComponent()
    {
        btnPrint  = new Button ();
        btnPrint.Location = new Point(12, 12);
        btnPrint.Text = "&Print...";
        btnPrint.Click += new EventHandler(btnPrintDocument);

        Controls.Add(btnPrint);
    }

    void btnPrintDocument(object sender, EventArgs e)
    {
        PrintDialog dlgPrint = new PrintDialog();
    }
}

public class Program
{
    static int Main()
    {
        System.Windows.Forms.Application.Run(new Exercise());
        return 0;
    }
}
To present the Print dialog box to the user, you can call its ShowDialog() method.
In order to print, the Print dialog box must be given a
document to print. This means that you must first prepare a document prior
to printing. To support this, the .NET Framework provides the
PrintDocument class that is defined in the System.Drawing.Printing
namespace. This class is represented in the Toolbox by the PrintDocument
button
using System;
using System.Drawing;
using System.Windows.Forms;
using System.Drawing.Printing;

public class Exercise : Form
{
    Button btnPrint;

    public Exercise()
    {
        InitializeComponent();
    }

    void InitializeComponent()
    {
        btnPrint  = new Button ();
        btnPrint.Location = new Point(12, 12);
        btnPrint.Text = "&Print...";
        btnPrint.Click += new EventHandler(btnPrintDocument);

        Controls.Add(btnPrint);
    }

    void btnPrintDocument(object sender, EventArgs e)
    {
        PrintDialog dlgPrint = new PrintDialog();
        PrintDocument docPrint = new PrintDocument();
    }
}
After creating the document to print through a PrintDocument object, you can associate it with a PrintDialog. To support this, the PrintDialog class is equipped with the Document property. To specify the object that would carry the printing, you can assign the PrintDocument object to the PrintDialog.Document property. Here is an example: System.Void btnPrint_Click(System.Object sender, System.EventArgs e)
{
PrintDialog dlgPrint = new PrintDialog;
PrintDocument docPrint = new PrintDocument;
dlgPrint.Document = docPrint;
dlgPrint.ShowDialog();
}
A document to print can be made of only one or many pages. Each page has a number of characteristics. The characteristics of a page are controlled by the PrintDocument.PageSettings property which itself is based on the PageSettings class. The PageSettings class is defined in the System.Drawing.Printing namespace. This class holds the dimensions of the page, the values of the margins applied on the page, the tray that would supply the paper (since some printers have many trays), the printer resolution, whether the page would be printed in color or black and white, whether the page would be printed in Portrait or Landscape orientation, etc. If you don't want to specify these characteristics, you can set the PrintDocument.PageSettings property to DefaultPageSettings. If you know the name of the document to be printed, you can assign it to the PrintDocument.DocumentName property. Here is an example: void btnPrintDocument(object sender, EventArgs e)
{
PrintDialog dlgPrint = new PrintDialog();
PrintDocument docPrint = new PrintDocument();
dlgPrint.Document = docPrint;
dlgPrint.ShowDialog();
}
To actually print the document, you can call the PrintDocument.Print() method. Its syntax is: public void Print();
When the PrintDocument.Print() method is called, the printing process would start by firing the BeginPrint event but this event occurs before the first page is printed. The BeginPrint event is of type PrintEventArgs which does not hold any particular information, especially for the BeginPrint event. This event allows you to take some early actions, if necessary, before the printer receives the job. Once the printer is ready, the application would then need to know what needs to be printed on the paper. At this time, the PrintPage event is fired. The PrintPage event is of type PrintPageEventArgs. The PrintPageEventArgs class allows you to fully customize the page of the document to be printed. For example, it is equipped with a Graphics property that allows you to "draw" anything you want on the paper. The PrintPageEventArgs class also allows you to get the location and dimensions of the area to be printed. This is represented by the PageBounds property, which produces a Rectangle object. Once the PrintDocument object is ready, you must pass it to the Print dialog box. To do that, assign the name of the PrintDocument variable to the PrintDialog.Document property.
In the above example, we saw a somewhat simplistic way of making the Print dialog box available to the user. This dialog box offers many options defined as the Printer Settings. To support the various options of a Print dialog box, the PrintDialog class is equipped with a property called PrinterSettings, which itself is defined from the PrinterSettings class: public PrinterSettings PrinterSettings { get; set; }
This property holds all possible characteristics of a printer. The first option presented to the user is the name of the printer to be used. This is represented by the PrinterName property: public string PrinterName { get; set; }
Because there can be many printers available to the user, the printers are presented as a combo box: 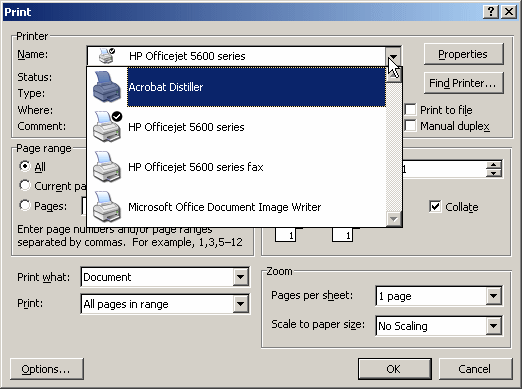 The available printers may also be presented as a list view: 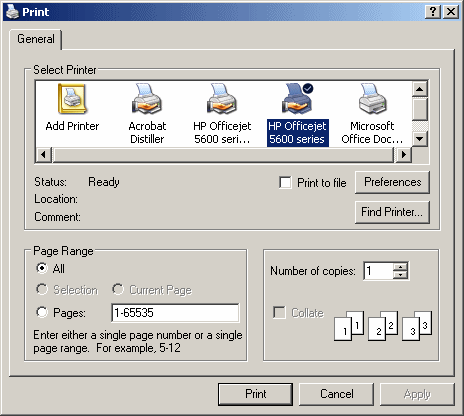 The Name combo box in the Printer section or the Select Printer list view allows the user to select the printer that will handle the job. If you are writing a universal application and cannot predict what printer(s) the user would have, you should not be concerned with this characteristic. If you are writing an application for a special company or you are creating a particular application and you know for sure what printer should be used to print the current document, then you can specify the printer to use. To do this, assign the (exact) name of the printer to the PrinterSettings.PrinterName property. On the other hand, if for some reason you want to know what printer the user selected to print the document, you can get the value of this PrinterName property. Under the Name combo box, the labels provide the status of the selected printer (whether it is ready or not), the type of printer (such as its manufacturer), its location (such as where in the building the printer is located), the person who installed the printer or may have provided this printer, and an optional comment (this information is created by the person who installed the printer or it can be changed in the printer's properties). After selecting the printer, the user can access the properties of that particular printer. Different printers support different options. To configure the printed paper based on the selected printer, the user can click either Properties or Preferences. This opens the Document Properties or the Printing Preferences dialog box. The content of this dialog box (highly) depends on the printer that was selected but some characteristics are shared among printers. On the lower-right side of the Printer section or of the Select Printer section, there is a check box labeled Print To File. When this check box is checked, the document is transformed into a file rather than being printed. In this case, if the user clicks OK or Print, a dialog box would come up, asking the user to specify the path and a name for the new file that will be created. The appearance of that dialog box depends. Here is an example:  If you want the Print To File check box to be checked, set the PrinterSettings.PrintFoFile Boolean property: public bool PrintToFile { get; set; }
The default value of this property is false, which lets the user decide whether to check it or not. After selecting the printer and deciding whether to physically print or to only create a printed file, the user can click OK. If the document is made of only one page, it would be printed. If the document contains more than one page, the user may want to print only one page, a range of pages, or all pages. The user can also select a section in the document and print only that section. This decision is made using the Page Range section and is controlled by the PrintRange property: public PrintRange PrintRange { get; set; }
This section provides four radio buttons. The first radio button labeled All is selected by default and allows the user to print the whole document. By default, the second radio button is disabled. If the user had selected a section of the document to print, then the second radio button, labeled Selection would be enabled:  This allows the user to still specify whether to print the whole document or only the section that was selected. If the document contains more than one page, the user can navigate to a particular page and decide to print only that page using the Current Page radio button. Again, if the document contains more than one page, the user can specify a range of pages to print. All these options are usually left up to the user. On the other hand, if you want to specify the range of pages to print, you can use the PrinterSettings.FromPage and the ToPage properties: public int FromPage { get; set; }
public int ToPage { get; set; }
If you want to specify the limits of ranges allowed to the user, use the MinimumPage and the MaximumPage properties: public int MinimumPage { get; set; }
public int MaximumPage { get; set; }
On the right side of the Page Range section, a spin button allows the user to specify the number of copies to make when printing. If you want to specify this number by default, assign the desired value to the Copies property: public short Copies { get; set; }
If the user (or you) set this number to a value higher than 1, then the printed papers can be collated or not. This is specified using the Collate check box. If you want to programmatically collate the pages or not, change the Boolean value of the Collate property: public bool Collate { get; set; }
As opposed to directly printing a file, a user may want to perform some preliminary preparation on the document or the printer. Microsoft Windows provides another dialog box used to control printing. It is called Page Setup:  To provide a Page Setup to your application, you can use
the PageSetupDialog button
When using the Page Setup dialog box, the user must first select a printer. This is usually done already by the operating system that selects the default printer of the computer that called this dialog box. Otherwise, to select a printer or to change the printer, the user can click the Printer button and select or change it using the Name combo box: 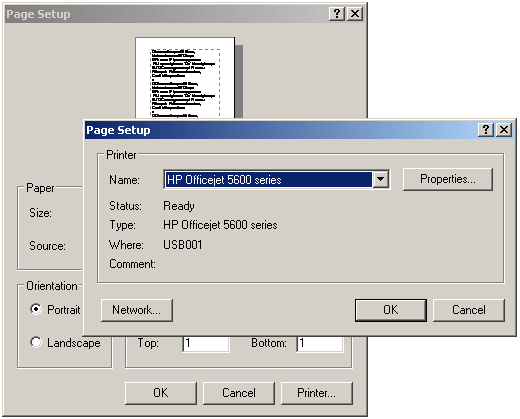 Displaying the Page Setup Printer dialog box also allows you and/or the user to customize the printing process if necessary. If you want to do this, you can use the PageSetupDialog.PrinterSettings property which is a value of the PrinterSettings class reviewed earlier. After selecting the printer, the user can click OK. The options of the Page Setup dialog box depend on the driver of the printer selected in the Name combo box. The Page Setup dialog box allows the user to customize the appearance of the paper on which the document would be printed. On the Page Setup, the user can click the arrow of the Size combo box and select one of the configured sizes of paper. The characteristics of the paper are controlled by the PageSettings class that we mentioned earlier. For example, if the printer has many trays, as indicated by the driver of the selected printer, the user can select which tray would be used when printing. As it happens, one printer can have only one tray while another printer can have 3, 5, or more trays. If the desired printer is on a network, the user can click the Network button to locate it. To programmatically show or hide the Network button, specify a false or true result to the PageSetupDialog.ShowNetwork Boolean property. The user also has the option to print the document in Portrait (vertical) or in Landscape (horizontal) position. The option to allow the user to select Portrait or Landscape is controlled by the AllowOrientation Boolean property.
If you use the printing process that solely involves the print dialog box, you may send a document to the printer without knowing what the printed document would look like on the piece of paper. In the same way, the user would have to simply accept the way you designed the printed document to appear. One way you can assist the user consists of displaying a preview of what the printed sheet would look like. This is the idea behind the concept of print preview. Print preview consists of displaying, on the computer monitor, a sample representation of what the document would look like once printed.
Print preview is primarily a technique of drawing a
sample printed sheet on a form. It is implemented by the PrintPreviewDialog
button
In the .NET Framework, print preview is implemented through the PrintPreviewDialog class. This class is derived from the Form class. Based on this, to programmatically create a print preview, you can start by declaring a variable of type PrintPreviewDialog. Here is an example: using System;
using System.Drawing;
using System.Windows.Forms;
public class Exercise : Form
{
Button btnPrintPreview;
public Exercise()
{
InitializeComponent();
}
void InitializeComponent()
{
btnPrintPreview = new Button();
btnPrintPreview.Location = new Point(12, 12);
btnPrintPreview.Text = "&Print Preview...";
btnPrintPreview.Width = 100;
btnPrintPreview.Click += new EventHandler(PreviewDocumentClick);
Controls.Add(btnPrintPreview);
}
void PreviewDocumentClick(object sender, EventArgs e)
{
PrintPreviewDialog dlgPrint = new PrintPreviewDialog();
}
}
public class Program
{
static int Main()
{
System.Windows.Forms.Application.Run(new Exercise());
return 0;
}
}
As a dialog-based object, to display the print preview, the PrintPreviewDialog class inherits the ShowDialog() method from its parent the Form class. Here is an example: void PreviewDocumentClick(object sender, EventArgs e)
{
PrintPreviewDialog dlgPrintPreview = new PrintPreviewDialog();
dlgPrintPreview.ShowDialog();
}
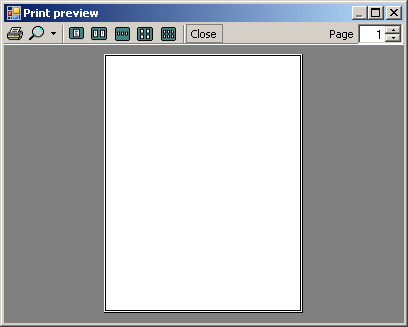
This would produce:
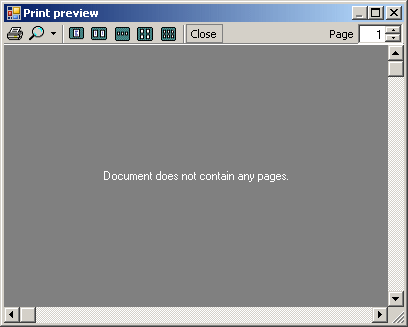
The Print Preview window appears as a finished designed form with a toolbar, a preview area, and two scroll bars. The preview area shows a sample of what a printed sheet would look like. If the dialog box is not "aware" of what would be printed, it displays the "Document does not contain any pages" string. This means that, in order to display something, you must create and design it. To make this possible, the PrintPreviewDialog class is equipped with a property named Document. The PrintPreviewDialog.Document property is of type PrintDocument. Therefore, in order to design a sample sheet, you should have created and configured a PrintDocument object. Here is an example: using System;
using System.Drawing;
using System.Windows.Forms;
using System.Drawing.Printing;
public class Exercise : Form
{
Button btnPrintPreview;
PrintPreviewDialog dlgPrintPreview;
PrintDocument docPrint;
public Exercise()
{
InitializeComponent();
}
void InitializeComponent()
{
btnPrintPreview = new Button();
btnPrintPreview.Location = new Point(12, 12);
btnPrintPreview.Text = "&Print Preview...";
btnPrintPreview.Width = 100;
btnPrintPreview.Click += new EventHandler(PreviewDocumentClick);
Controls.Add(btnPrintPreview);
dlgPrintPreview = new PrintPreviewDialog();
docPrint = new PrintDocument();
dlgPrintPreview.Document = docPrint;
}
void PreviewDocumentClick(object sender, EventArgs e)
{
dlgPrintPreview.ShowDialog();
}
}
public class Program
{
static int Main()
{
System.Windows.Forms.Application.Run(new Exercise());
return 0;
}
}
This would produce:
As you can see, simply assigning a PrintDocument object to a print preview form only creates a blank sheet. In order to show a preview, you must design it. To make this possible, the PrintDocument class To assist you with actually designing what you want to display in the preview area, the PrintDocument class fires an event named PrintPage. This event is of type PrintPageEventArgs. The PrintPageEventArgs class is equipped with a property named Graphics, which is of type Graphics. You can then use your knowledge of the Graphics class to create or design the preview. Here is an example: using System;
using System.Drawing;
using System.Windows.Forms;
using System.Drawing.Printing;
public class Exercise : Form
{
Button btnPrintPreview;
PrintPreviewDialog dlgPrintPreview;
PrintDocument docPrint;
public Exercise()
{
InitializeComponent();
}
void InitializeComponent()
{
btnPrintPreview = new Button();
btnPrintPreview.Location = new Point(12, 12);
btnPrintPreview.Text = "&Print Preview...";
btnPrintPreview.Width = 100;
btnPrintPreview.Click += new EventHandler(PreviewDocumentClick);
Controls.Add(btnPrintPreview);
dlgPrintPreview = new PrintPreviewDialog();
docPrint = new PrintDocument();
docPrint.PrintPage += new PrintPageEventHandler(docPrintPage);
dlgPrintPreview.Document = docPrint;
}
void PreviewDocumentClick(object sender, EventArgs e)
{
dlgPrintPreview.ShowDialog();
}
void docPrintPage(object sender, PrintPageEventArgs e)
{
Image imgPerson = Image.FromFile(@"E:\Programs\persons1.gif");
e.Graphics.DrawImage(imgPerson, 10, 10);
}
}
On our computer, this produced:
To print the contents of the preview area, the user can
click the Print button
By default, when the print preview window appears to the user, it assumes some default dimensions that may make it small. Because it is derived from the Form class, you can maximize it if you want. Here is an example: void PreviewDocumentClick(object sender, EventArgs e)
{
dlgPrintPreview.WindowState = FormWindowState.Maximized;
dlgPrintPreview.ShowDialog();
}
If the print preview is not maximized, the content of the preview area may appear (too) small for the user, especially if it is made of text. To enlarge it, the user has two alternatives. If the user maximizes the window, the preview area would also be enlarged and the content would be easier to see. As an alternative, the user can click the arrow of the Zoom button. This would display a list of the zoom rates:
The user can then click one of the values.
So far, we were assuming that the user was printing a one-page document. With some files, the document may span more than one page. By default, when the print preview comes up, the preview are would display only one page. The user has the choice of displaying two or more pages at a time, even to specify some arrangement of these pages. To support this, the toolbar of the print preview is equipped with various buttons labeled One Page, Two Pages, Three Pages, Four Pages, and Six Pages. After using the print preview, the user can close it.
|
|||||||||||||||||||||||||||||||||||||||||||||||||||||||||||||||||||||||||||||||||||||||||||||||||||||||||||||||||||||||||||||||||||||||||||||||||||||||||||||||||||||||||||||||||||||||||||||||||||||||||||||||||||||||||||||||||||