|
An Icon is a small picture that displays in various
places to represent an application. For example, an icon displays on the
top-left section of the title and is defined by the application. In this
case it also holds the system menu. An icon is also used in Windows Explorer
and My Computer to represent an application. Icons are also used by other
controls (tree views, list views, combo boxes, etc).
The Win32 library ships with only a few icons.
Microsoft Windows, on the other hand, ships with various icons for its
internal use. The icon we have used so far is a standard icon provided in
case you don't have one on your own. This means that you are free to
create a custom icon for your application.
|
|
To provide your own icon for your application, you
should create one or two icons (you can even create more) for your
application. Both icons have the same name and, in fact, are stored as one
file. Internally, the operating system will choose which one to display
and when, depending on the scenario.
An icon is created following the same steps as we
described for a cursor, with a few differences. While a cursor is mostly
limited to two colors, an icon can use up to 16 colors.
|
|
 Practical Learning: Creating an Icon
|
|
- If you are using C++ Builder, on the main menu of Image Editor,
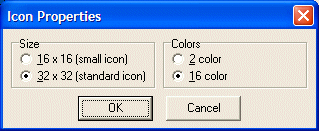
click File -> Icon File (.ico). In the Icon Properties dialog box,
make sure 32x32 is selected and click OK
If you are using Visual C++, display the Add Resource dialog box and
double-click Icon
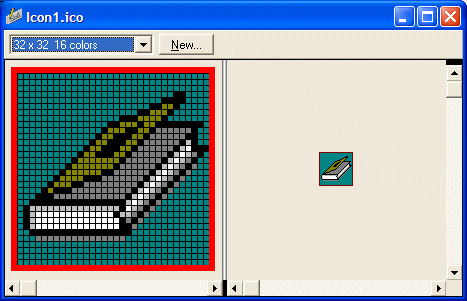
- Design the icon as follows:
- To associate a 16x16 icon:
If you are using Image Editor, on its toolbar, click New, make sure
the 16 x 16 radio button is selected

and click OK
If you are using Visual C++, on the toolbar of the image, click the
button with a lens. In the New Icon Image, click Small (16x16)
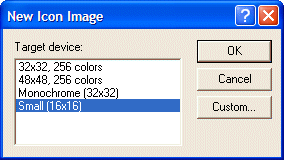
and click OK
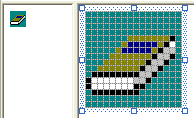
- Design the icon as follows
- If you are using Image Editor, save the icon in the folder of the
current project as resfund
If you are using Visual C++, change the ID of the icon to IDI_RESFUND
and its file name to resfund.ico
- To add the new icon to the resource, if you are using C++ Builder,
add its identifier in the Resource.h header file with a 1001 constant:
#define IDC_TARGET  1000
#define IDI_RESFUND 1001
|
Still in C++ Builder, add a resource for the icon in the rc file:
#include "Resource.h"

IDC_TARGET  CURSOR  "Target.cur"
IDI_RESFUND ICON    "resfund.ico"
|
To use the new icon in the application, change the Exercise.cpp source
file as follows:
//---------------------------------------------------------------------------
#include <windows.h>
#pragma hdrstop

#include "Resource.h"
//---------------------------------------------------------------------------

#pragma argsused
//---------------------------------------------------------------------------
LPCTSTR ClsName = L"FundApp";
LPCTSTR WndName = L"Resources Fundamentals";
LRESULT CALLBACK WndProcedure(HWND hWnd, UINT uMsg,
			                  WPARAM wParam, LPARAM lParam);
//---------------------------------------------------------------------------
INT WINAPI WinMain(HINSTANCE hInstance, HINSTANCE hPrevInstance,
                   LPSTR lpCmdLine, int nCmdShow)
{
	MSG        Msg;
	HWND       hWnd;
	WNDCLASSEX WndClsEx;

	// Create the application window
	WndClsEx.cbSize        = sizeof(WNDCLASSEX);
	WndClsEx.style         = CS_HREDRAW | CS_VREDRAW;
	WndClsEx.lpfnWndProc   = WndProcedure;
	WndClsEx.cbClsExtra    = 0;
	WndClsEx.cbWndExtra    = 0;
	WndClsEx.hIcon         = LoadIcon(hInstance,
                                          MAKEINTRESOURCE(IDI_RESFUND));
	WndClsEx.hCursor       = LoadCursor(hInstance,
                                        MAKEINTRESOURCE(IDC_TARGET));
	WndClsEx.hbrBackground = (HBRUSH)GetStockObject(WHITE_BRUSH);
	WndClsEx.lpszMenuName  = NULL;
	WndClsEx.lpszClassName = ClsName;
	WndClsEx.hInstance     = hInstance;
	WndClsEx.hIconSm       = LoadIcon(hInstance,
					  MAKEINTRESOURCE(IDI_RESFUND));

	// Register the application
	RegisterClassEx(&WndClsEx);

	. . . No Change

	return Msg.wParam;
}
//---------------------------------------------------------------------------
LRESULT CALLBACK WndProcedure(HWND hWnd, UINT Msg,
			   WPARAM wParam, LPARAM lParam)
{
    . . . No Change
}
//---------------------------------------------------------------------------
|
- In C++ Builder, compile the .rc file again. To execute your program, in Borland C++ Builder,
on the main menu, click Project -> Build Resources1. When it is
ready, press F9
In Visual C++, simply press Ctrl + F5 to execute the application

- Return to your programming environment
|
|
|
