Home

Dialog Boxes


Message Boxes


Introduction

A message box is a rectangle object that displays short message to the user. The message can be made of one sentence, one paragraph, or a few paragraphs. To make the creation of a message box easy, the Win32 library provides a specific function that can be used to for this purpose.

Message Box Creation

To create a message box, use the MessageBox() function. Its syntax is:

int MessageBox(HWND hWnd, LPCTSTR lpText, LPCTSTR lpCaption, UINT uType);

The first argument, hWnd, can be a handle to the window from where the message box will be called. Otherwise, it can NULL.

The second argument, lpText, is a null-terminated string, such as an array of characters. This is the actual message that will be presented to the user. As stated already, it can be one word, a whole sentence, a paragraph, even a hew paragraphs.

The third argument, lpCaption, is the title that will display on the title bar. It also can be a null-terminated string, if you know what title you would like to display. Otherwise, it can be NULL, in which case the title bar would display Error.

The simplest way you can create a message is by calling the MessageBox() function with all arguments set to NULL, in which case the message box would not make any sense:

MessageBox(NULL, NULL, NULL, NULL);

As stated already, the first argument is either a handle of the window that is calling it, or NULL.

The simplest way to specify the second argument is by including a word or a sentence in double-quotes. Here is an example:

MessageBox(NULL, L"I am just trying my wedding dress", NULL, NULL);

If you want to display the message on various lines, you can separate sections with the new line character '\n'. Here is an example:

MessageBox(NULL, L"It happened earlier\nDidn't it?", NULL, NULL);

You can also use string editing techniques to create a more elaborate message. This means that you can use functions of the C string library to create your message.

The caption of the message can be any word or sentence but convention wisdom would like this sentence to be in tune with the actual message. After all, unless the message is about bad news, Error as a title is not particularly cute.

The fourth argument actually does three things. First it displays one or a few buttons. The buttons depend on the value specified for the argument. If this argument is NULL, the message box displays (only) OK. The values and their buttons can be as follows:

Constant Integer Buttons
  MB_OK OK
  MB_OKCANCEL OK Cancel
  MB_ABORTRETRYIGNORE Abort
  MB_YESNOCANCEL Yes Cancel
  MB_YESNO Yes No
  MB_RETRYCANCEL Retry Cancel
  MB_CANCELTRYCONTINUE Cancel Try Continue
  MB_HELP  Help

Besides the buttons, the message box can also display a friendly icon that accompanies the message. Each icon is displayed by specifying a constant integer. The values and their buttons are as follows:

Value Icon Suited when
MB_ICONEXCLAMATION
MB_ICONWARNING
Exclamation Exclamation Icon Warning the user of an action performed on the application
MB_ICONINFORMATION
MB_ICONASTERISK
Information Information Icon Informing the user of a non-critical situation
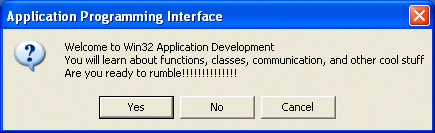
MB_ICONQUESTION Question Question Icon Asking a question that expects a Yes or No, or a Yes, No, or Cancel answer
MB_ICONSTOP
MB_ICONERROR
MB_ICONHAND
Critical Stop Icon A critical situation or error has occurred. This icon is appropriate when informing the user of a termination or deniability of an action

The icons are used in conjunction with the buttons constant. To combine these two flags, use the bitwise OR operator “|”.

The second thing this fourth argument does is to let the user close the message box after selecting one of the buttons. Once the user clicks one of the buttons, the message box is closed.

The third role of this fourth argument is to control the result derived from the user dismissing the message box. For example, clicking OK usually means that the user acknowledges what the message. Clicking Cancel usually means the user is changing his or her mind about the action performed previously. Clicking Yes instead of No usually indicates that the user agrees to perform an action.

In reality, the message box only displays a message and one or a few buttons. It is your responsibility as the programmer to decide what to do when what button is clicked.

When a message box is configured to display more than one button, the operating system is set to decide which button is the default. The default button has a thick border that sets it apart from the other button(s). If the user presses Enter, the message box would behave as if the user had clicked the default button. Fortunately, if the message box has more than one button, you can decide what button would be the default. To specify the default button, use one of the following constants:

Value If the message box has more than one button, the default button would be
MB_DEFBUTTON1   The first button
MB_DEFBUTTON2   The second button
MB_DEFBUTTON3   The third button
MB_DEFBUTTON4   The fourth button

To specify the default button, use the bitwise OR operator to combine the constant integer of the desired default button with the button's constant and the icon.

Practical Learning Practical Learning: Introducing Additional Resources

  1. Create a new Win32 application
  2. If you are using Borland C++ Builder, save the application in a new folder called Win32C and save the project as MessageBox
    If you are using Microsoft Visual C++, set the location to a folder called Win32C
  3. If you are using Borland C++ Builder, save the unit as Main.cpp
    If you are using Microsoft Visual C++, create a C++ source file and save it as Main.cpp
  4. Replace the file's content with the following:
     
    //---------------------------------------------------------------------------
    #include <windows.h>
    
    //---------------------------------------------------------------------------
    INT WINAPI WinMain(HINSTANCE hInstance, HINSTANCE hPrevInstance,
                       LPSTR lpCmdLine, int nCmdShow)
    {
        MessageBox(NULL, L"Welcome to Win32 Application Development\n",
    	       NULL, NULL);
    
        return 0;
    }
    //---------------------------------------------------------------------------
  5. Test the program and return to your programming environment
  6. To create a more elaborate message, change the file as follows:
     
    //---------------------------------------------------------------------------
    #include <windows.h>
    
    //---------------------------------------------------------------------------
    
    LPCTSTR Caption = L"Application Programming Interface";
    
    INT WINAPI WinMain(HINSTANCE hInstance, HINSTANCE hPrevInstance,
                       LPSTR lpCmdLine, int nCmdShow)
    {
        MessageBox( NULL,
                    L"Welcome to Win32 Application Development\n"
                    L"You will learn about functions, classes, "
                    L"communication, and other cool stuff\n"
                    L"Are you ready to rumble!!!!!!!!!!!!!!",
                    Caption,
                    MB_YESNOCANCEL | MB_ICONQUESTION);
    
        return 0;
    }
    //---------------------------------------------------------------------------
  7. Test the application
     
    Message Box
  8. Return to your programming environment

Dialog Boxes


Introduction

A dialog box is a rectangular object that displays a message, a control, or a few controls, allowing the user to interact with an application.

A dialog box is created from a resources file, which is a file with the rc extension. The resource file contains all pertinent information about the dialog box. This means that, in this file, you must specify the size and location of the dialog box, its caption, whether it contains buttons.

After creating the resource file, make sure you add it to your project so you can compile it.

There are two main reasons you would create or use a dialog box. You can create a dialog-based application, that is, a dialog that uses only one or a few dialog box. You can also use a dialog box as an addition to your application.

Using Borland C++ Builder

  1. Create a new Win32 application using the Console Wizard
  2. Save the application in a new folder called Win32D and save the project as DialogBox
  3. Save the unit as Main.cpp
  4. To create the resource header file, on the main menu, click File -> New... or File -> New -> Other...
  5. In the New Items dialog box, click Header File and click OK
  6. Save the new file as Resource.h (make sure you specify the .h extension when saving the file.
  7. In the empty header file, type:
     
    #define IDD_DLGFIRST 101
  8. To create the rc resource file, on the main menu of C++ Builder, click File -> New -> Other...
  9. In the New Items dialog box, click the Text icon and click OK
  10. To save the resource file, on the Standard toolbar, click the Save All button
  11. Type the file name as "Win32D.rc" (the double-quotes allow you to make sure the file is saved as rc and not as txt)
  12. In the empty file, type the following (the referenced header file will be created next):
     
    #include "Resource.h"
    
    IDD_DLGFIRST DIALOG 260, 200, 188, 95
    STYLE DS_MODALFRAME | WS_POPUP | WS_CAPTION | WS_SYSMENU
    CAPTION "Win32 Programming"
    FONT 8, "MS Shell Dlg"
    BEGIN
        DEFPUSHBUTTON   "OK", IDOK, 130, 10, 50, 14
    END
  13. In the Code Editor, click the Win32D.rc tab to select it. To compile the resource, on the main menu of Bcb, click Project -> Compile Unit
  14. After the unit has been compiled, click OK
  15. To add the rc file to the project, on the main menu, click Project -> Add To Project...
  16. Select Win32D.rc and click Open

Using Microsoft Visual C++

  1. Create a new Win32 Application. Specify the desired path in the Location edition box. In the Project Name, type Win32D
  2. Make sure you create it as an Empty Project.
  3. To create a dialog box along with the resource files, on the main menu, click Insert -> Resource...
  4. In the Insert Resource dialog box, click Dialog and click New
  5. Right-click in the main body of the new dialog box and click Properties. In the Dialog Properties window, change the ID to IDD_DLGFIRST and press Tab.
  6. In the Caption box, type Win32 Programming
  7. In the X Pos box, type 260
  8. In the Y Pos box, type 200
  9. To close and save the resource file, click the system Close button of the Script1 - IDD_DLGFIRST window (or the lower X in the upper-right section)
  10. When asked whether you want to save the script, click Yes.
  11. Locate the folder in which the application is being created (in this case Win32D) and display it in the Save In combo box.
  12. In the File Name box, replace the Script1 name with Win32D.rc and click Save
  13. To add the rc file to your project, on the main menu, click Project -> Add To Project -> Files...
  14. Select Win32D.rc and click OK.
  15. To create the main source file of the project, on the main menu, click File -> New...
  16. In the Files property page of the New dialog box, click C++ Source File. In the File Name edit box, type Main and press Enter.

Programmatically Creating Dialog Boxes

A dialog box is created using the DialogBox function. Its syntax is:

INT_PTR DialogBox(HINSTANCE hInstance, LPCTSTR lpTemplate, HWND hWndParent, DLGPROC lpDialogFunc);

The first argument of this function is a handle to the application that is using the dialog box.

The lpTemplate specifies the dialog box template.

The hWndParent is a handle to the parent window that owns this dialog box.

The lpDialofFunc must a procedure that is in charge of creating this dialog box.

Therefore, you must define a CALLBACK procedure that whose syntax is:

INT_PTR CALLBACK DialogProc(HWND hwndDlg, UINT uMsg, WPARAM wParam, LPARAM lParam);
  1. In the Main.cpp file, create the program as follows:
     
    #include <windows.h>
    #include "Resource.h"
    
    //---------------------------------------------------------------------------
    HWND hWnd;
    LRESULT CALLBACK DlgProc(HWND hWnd, UINT Msg, WPARAM wParam, LPARAM lParam);
    //---------------------------------------------------------------------------
    INT WINAPI WinMain(HINSTANCE hInstance, HINSTANCE hPrevInstance,
    				   LPSTR lpCmdLine, int nCmdShow)
    {
    	DialogBox(hInstance, MAKEINTRESOURCE(IDD_DLGFIRST),
    	          hWnd, reinterpret_cast<DLGPROC>(DlgProc));
    
    	return FALSE;
    }
    //---------------------------------------------------------------------------
    LRESULT CALLBACK DlgProc(HWND hWndDlg, UINT Msg, WPARAM wParam, LPARAM lParam)
    {
    	switch(Msg)
    	{
    	case WM_INITDIALOG:
    		return TRUE;
    
    	case WM_COMMAND:
    		switch(wParam)
    		{
    		case IDOK:
    			EndDialog(hWndDlg, 0);
    			return TRUE;
    		}
    		break;
    	}
    
    	return FALSE;
    }
    //---------------------------------------------------------------------------
  2. Test the program

Previous Copyright © 2003-2015, FunctionX Next