Introduction to Applications Graphics

Introduction to Applications Graphics
Graphics Fundamentals
Introduction
Microsoft Windows is a graphics-oriented operating system. It uses shapes, pictures, lines, colors, and various types of options to convey the impression of physical objects. To support graphics, the .NET Framework provides various classes created in many assemblies and namespaces. The most fundamental assembly that supports graphics is named System.Drawing.dll. This assembly contains a namespace named System.Drawing. That namespace contains various classes used to draw things, called shapes, on an application so those shapes would appear on a computer screen as part of your application.
Creating a Graphic
The main object on which you will perform the drawings is called a graphic. To support graphics, the .NET Framework provides a class named Graphics. This class is defined in the System.Drawing namespace. Before drawing, you should obtain a graphic object. Fortunately, every Windows control, that is, every object based on the Control class, automatically inherits a method called CreateGraphics(), which gives you access to the graphic part of a control. The syntax of the Control.CreateGraphics() method is:
public Graphics CreateGraphics();
As you can see, the CreateGraphics() method returns the Graphics object of the variable you call it from. Here is an example of getting the Graphics object of a form:
private void btnGraphics_Click(object sender, EventArgs e)
{
    Graphics graph = CreateGraphics();
}
Another technique you can use to get the Graphics object of a control is to call the Graphics.FromHwnd() static method. Its syntax is:
public static Graphics FromHwnd(IntPtr hwnd);
Remember that this method is static. The argument passed to it must be a handle to the object whose Graphics object you want to access. Every Windows control has a handle called Handle. Here is an example of using it to get the Graphics part of a form:
private void btnGraphics_Click(object sender, EventArgs e)
{
    Graphics graph = Graphics.FromHwnd(this.Handle);
}
If you are using the Paint event of a window, it provides a readily available Graphics object from its PaintEventArgs argument. You can access the Graphics object as follows:
private void Form1_Paint(object sender, PaintEventArgs e)
{
    e.Graphics . . .
}
Applications Accessories: A Point
Introduction to the Drawing Namespace
Probably the most common operation an application does is to draw things on the computer monitor. Of course, this is controlled by the operating system. To give you the most fundamental accessories for drawing shapes on an application, the a library named The System.Drawing.dll libraries contains various classes and structures created in diffrent namespaces. One of the namespaces of the System.Drawing.dll is named Drawing.
To use a class or a structure of the System.Drawing.dll library in your application, you must import that library. If you create a Windows Forms Application, that library is automatically made available to you and its namespace is added to the document of a form.
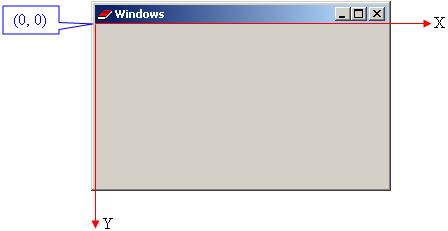
The Origin of an Object
Each object used in a graphical application must be drawn on the computer screen. To make this happen, many things must be taken into consideration. Everything that must be drawn depends on a well-thought coordinate system. In Microsoft Windows (as well as most operating systems), the coordinate system has its origin (0, 0) on its top-left corner:
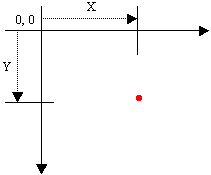
In the same way, every pixel on the monitor screen is recognized by its address. The address of a pixel is set by the distance from its left border and the distance from its top border. These two measures are represented as a point. To support the concept of points, the .NET Framework provides a structure named Point. The Point structure is defined in thenamespace of the System.Drawing.dll library.
Characteristics of a Point
One of the properties of the Point structure is X, which represents the horizontal distance of the point from the top-left corner of the object that owns the point. Another property, Y, represents the vertical measurement of the point with regards to the top-left corner of the object that owns the point. Based on this, a Point object can be represented on the Windows coordinate system as follows:
Both the X and the Y properties of the Point structure are of type int. If you have a point that cannot be identified, to let support unidentified points, the Point structure is equipped with a static field named Empty. In this property, both the X and the Y values are set to 0:

Here is an example of accessing it:
using System.Windows.Forms;

public class Exercise : Form
{
    public Exercise()
    {
        InitializeComponent();
    }

    private void btnPointClick(object sender, EventArgs e)
    {
        Point origin = new Point.Empty;
    }
}
To help you find out whether a point is empty, the Point structure is equipped with a Boolean property named IsEmpty. You can enquire about this property using a conditional statement.
To create or identify a point, you can use one of the three constructors of the Point structure. One of these constructors uses the following syntax:
public Point(int x, int y);
This constructor takes a left and a top arguments. Here is an example of creating a point using it:
using private void btnPoint_Click(object sender, EventArgs e)
{
    Point pt = new Point(6, -2);
}
The Point structure is equipped with methods to perform various operations such as adding or subtracting points, etc.
The Location of a Control
Introduction
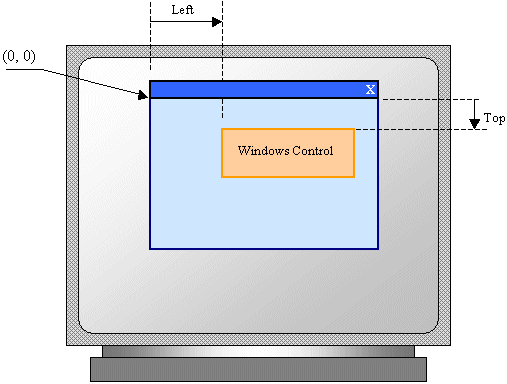
From our introduction to application design and Windows controls, we know that the distance from the left border of a control to the left border of its container is represented by a property named Left, and the distance from the top border of a control to the top border of its container is held by a property named Top. The body of the container uses a Cartesian coordinate system whose origin is located on the top-left corner. If the parent is a form, the origin is located just under the title bar to the left. The horizontal measurements move from the origin to the right. The vertical measurements move from the origin to the bottom. This can be illustrated as follows:
The combination of the Left and the Top properties of a control is referred to as its location. To support the location, the public class is equipped with a property named Location that is of type Point:
public Point Location { get; set; }
Locating a Control
To programmatically specify the location of a control, access its Location property and assign the Point() constructor that takes two int arguments. The syntax of this constructor is:
public Point(int x, int y);
This constructor takes a left and a top arguments respectively. Here is an example of programmatically setting the location of a control:
using System.Drawing;
using System.Windows.Forms;

public class Exercise : Form
{
    private Button btnSubmit;

    private void InitializeComponent()
    {
        btnSubmit = new Button();
        btnSubmit.Text = "Submit";
        btnSubmit.Location = new Point(100, 40);
    }

    public Exercise()
    {
        InitializeComponent();
    }
}
You can also use an existing Point object and assign it to the Location property of the control. Here is an example:
public class Exercise : Form
{
    private Button btnSubmit;

    private void InitializeComponent()
    {
        btnSubmit = new Button();
        btnSubmit.Text = "Submit";

        Point pt = new Point();
        pt.X = 100;
        pt.Y =  40;
        btnSubmit.Location = pt;
    }
}
You can also retrieve the location of a control and store it in a Point object. To do this, you can simply assign the Location property of a control to a Point object. Here is an example:
public class Exercise : Form
{
    private Button btnSubmit;

    private void InitializeComponent()
    {
        btnSubmit = new Button();
        btnSubmit.Text = "Submit";
        btnSubmit.Location = new Point(100, 40);

        Point pt = btnSubmit.Location;
    }
}
You can use the location of one control as a reference to position another control. You can do this by retrieving the location of one control and changing either its X or its Y values to position the new control. Here is an example:
using System.Drawing;
using System.Windows.Forms;

public class Exercise : Form
{
    private Button btnSubmit;
    private TextBox txtEmployeeName;

    private void InitializeComponent()
    {
        btnSubmit = new Button();
        btnSubmit.Text = "Submit";
        btnSubmit.Location = new Point(100, 40);

        txtEmployeeName = new TextBox();
        Point pt = btnSubmit.Location;

        txtEmployeeName.Location = new Point(pt.X, pt.Y + 32);
    }

    public Exercise()
    {
        InitializeComponent();
    }
}
The Size of an Object
Introduction
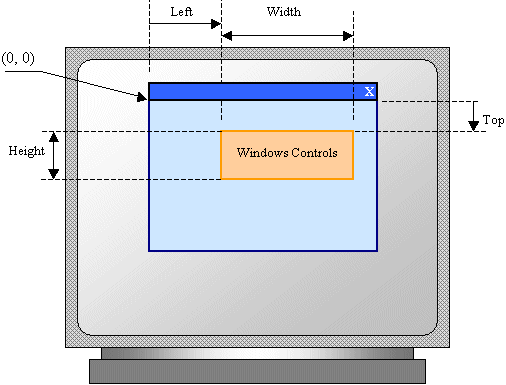
In our introduction to Windows controls, we saw that the distance from the left border to the right border of an object is referred to as its width. We also saw that the distance from the top to the bottom borders of a control is its height. This can be illustrated as follows:
The combination of the width and the height of an object is referred to as its size.
To support the size of an object, the System.Drawing namespace defines a structure named Size. There are four characteristics that define a Size value. These involve its location and its dimensions. A Size value must have a starting point (X, Y) just as the Point object was illustrated earlier. The width is the distance from the left to the right borders of a Size object. The height represents the distance from the top to the bottom borders of a Size value:
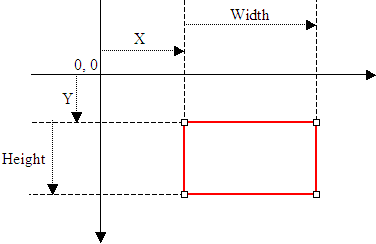
The members of a Size structure use values of type int.
Characteristics of a Size
The Size structure is equipped with properties named Width and Height that represent their width and height respectively.
To let you specify a size, the Size structure is equipped with the following constructor:
public Size(int width, int height);
You can also define a Size object using a Point value. To support this, the Size structure is equipped with the following constructor:
public Size(Point pt);
After declaring a variable with this constructor, you can access its Width and Height properties.
The Size of a Windows Control
Introduction
To specify the size of a control, you can access its Width and Height properties and assign the desired values to them. To support the size of a Windows control, the Control class is equipped with a property named Size:
public Size Size { get; set; }
All the other Windows controls inherit this property. Therefore, to specify the size of a Windows control, call the Size constructor that takes the width and height as arguments and assign it to the Size property of the control. In the parenthesis, pass the width and height respectively.
The client area of a control is the size without its borders. To support this, the Control class is equipped with a property named ClientSize that is of type Size:
public Size ClientSize { get; set; }
The role of the client size is to specify the bounding section where the control can be accessed by other controls, whether they are positioned on it (for a container) or not. Based on this, a control can be visible only within the client area of its parent.
The client area of a form is the body of the form without its title bar, its borders and other sections we have not mentioned yet (such as the menu, scroll bars, etc). This can be illustrated as follows:
The client area of a form is controlled by its client size. To support this, the Form class is equipped with its own version of the ClientSize property:
public Size ClientSize { get; set; }
The client size of a form is the area that hosts the controls positioned on the form. To specify the size of a form with certainty, call the Size(width, height) constructor and assign it to the ClientSize property of the form. Since this is a read-write property, if you want to know the area that a form is making available to its hosted control, get the value of its ClientSize property.
The Rectangle
Introduction
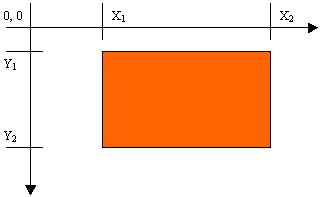
The combination of the location and size of an object is represented as a rectangle: a quadrilateral geometric figure with four right angles. To support this figure, the System.Drawing namespace provides a structure named Rectangle. Like every geometric representation in your program, a rectangular figure is based on a coordinate system whose origin is located on a top-left corner. A rectangle can be represented as follows:
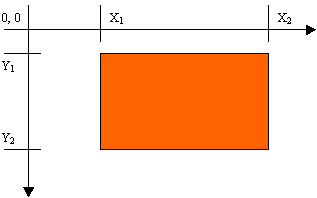
The object that "owns" or defines the rectangle also owns this origin.
Characteristics of a Rectangle
To completely represent it, a rectangle is defined by its location and its size. The location is defined by a point on the top-left corner of the rectangle:
Based on this, a rectangle can be further illustrated as follows:
To create a rectangle, you must provide at least its location and size. The location can be represented by a Point object and the dimensions can be represented with a Size value. To support this, the Rectangle structure provides the following constructor that you can use to declare a variable:
public Rectangle(Point location, Size size);
This constructor requires a Point object and a Size value. If instead you know the values of the location, the width and the height, the Rectangle structure provides the following constructor:
public Rectangle(int x, int y, int width, int height);
At any time, you can access or retrieve the characteristics of a Rectangle object as illustrated in the above picture from its properties. You use the same names we used in the picture.
The Client Area of a Control
Besides the form, every control also has a client area. The role of the client area is to specify the bounding section where the control can be accessed or distinguished from other controls. Based on this, a control can be visible only within the client area of its parent.
To let you access the client area of a control, the Control class is equipped with a property named ClientRectangle. This property gives you the location and size of its control, as well as any characteristic we reviewed for the Rectangle structure.
The Color of an Object
Introduction
The color is a non-spatial value that controls the transparency of an object. To support colors, the System.Drawing namespace of the System.Drawing.dll library provides a structure named Color:
public struct Color
Composing a Color
A color is created as a combination of four values. The first value is referred to as alpha but it is mostly used internally. The second value is called red. The third value is called green. The fourth value is called blue:
| Bits | ||||||||||
| Alpha |
|
|||||||||
| Red |
|
|||||||||
| Green |
|
|||||||||
| Blue |
|
Converted to decimal, each one of the red, green, and blue numbers would produce:
27 + 26 + 25 + 24 + 23 + 22 + 21 + 20
= 128 + 64 + 32 + 16 + 8 + 4 + 2 + 1
= 255
Therefore, each number can have a value that ranges from 0 to 255 in the decimal system. The alpha section is reserved for the operating system. The other three numbers are combined to produce a single value as follows:
| Color |
|
|||||||||||||||||||||||||||||||||||||||||||||||||
| Value | ||||||||||||||||||||||||||||||||||||||||||||||||||
Converted to decimal, this number has a value of 255 * 255 * 255 = 16581375. This means that we can have approximately 16 million colors available.
You computer monitor has a surface that resembles a series of tinny horizontal and vertical lines. The intersection of a horizontal line and a vertical line is called a pixel. This pixel holds, carries, or displays one color:
![]()
As the pixels close to each other have different colors, the effect is a wonderful distortion that creates an aesthetic picture. It is by changing the colors of pixels that you produce the effect of color variances seen on pictures and other graphics.
Using a Color
To make color selection easier, the Color structure is equipped with various read-only static properties that each represents a name for a color. Therefore, to use any of the available colors, type the Color structure followed by the "." operator, followed by the desired color. All the popular names of colors are recognized by name. These include Red, Green, Blue, Black, White, Yellow, Pink, Navy, Violet, Teal, Maroon, Orange, Fuchsia, Silver, Gray, Olive, Brown, Aqua, Beige, Gold, Firebrick, and Khaki, etc, just to name a few. There are many other colors that are not necessarily popular.
Extracting a Color
If none of the existing colors suits you, you can define your own color as a combination of red, green, and blue values. To create a color using this approach, declare a variable of type Color. To let you specify the values of the color, the Color structure is equipped with a static method named FromArgb() that is overloaded with four versions whose syntaxes are:
public static Color FromArgb(int argb);
public static Color FromArgb(int alpha, Color baseColor);
public static Color FromArgb(int red, int green, int blue);
public static Color FromArgb(int alpha, int red, int green, int blue);
The third version, which is the most used, allows you to specify three values that each ranges from 0 to 255. Instead of defining a color by its RGB composition, if you know the name of the color you want to use, the Color structure provides a method named FromName that you can use. Its syntax is:
public static Color FromName(string name);
This method expects as argument the name of the color. When calling this method, make sure you know the name of the color you want to use. If you provide an unrecognized name, the compiler does not produce an error but sets the values of the red, green, and blue so that the object may become transparent. Therefore, you should know the color to use.
You cannot realistically know the names of all available colors. To assist you with identifying a color, the Color structure provides a method named FromKnownColor. Its syntax is:
public static Color FromKnownColor(KnownColor name);
This method takes as argument a member of an enumeration named KnownColor. The KnownColor enumeration holds the names of common colors (such as Red, Green, Blue, Yellow, Violet, etc), the colors used on Windows controls (such as LightBlue or DarkGreen), the colors defined in Microsoft Windows (such as ActiveBorder, AppWorkspace, or ButtonFace, etc), and many others.
Converting a Color
Whether a color was initialized with one of the Color pre-defined color properties, using the FromArgb(), the FromName(), or the FromKnownColor() methods, to let you retrieve the red, green, or blue components of a color, the Color structure is equipped with read-only properties named R, G, and B. The R property produces the red value of the color value that accessed it. The G property produces the green portion of the color. The B property produces the blue component of its color. As an alternative, you can call the Color.ToArgb() method. Its syntax is:
public int ToArgb();
This method returns an integer.
We mentioned that the colors are commonly known by their names. While the ToArgb() method produces an integer that represents a color, if you instead want to get the color by its common or known name, the Color structure provides a method named ToKnownColor. Its syntax is:
public KnownColor ToKnownColor();
This method returns a value that is based on the KnownColor enumeration.
The Background Color of a Control
The operating system is equipped to paint every control with a default color. Still, if you don't like the default color, you can apply a color of your choice. To support this, the Control class is equipped with a property named BackColor that is of type Color. The other controls inherit that property.
To visually specify the color of a control, access the BackColor field of the Properties window:
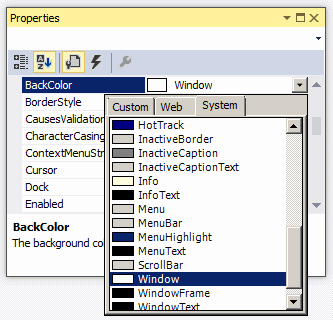
You can then select one of the preset colors from 3 windows represented with tabs:
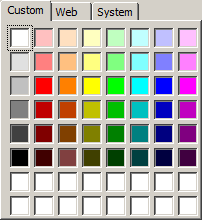 |
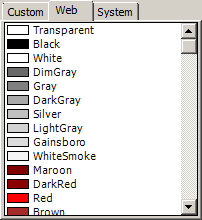 |
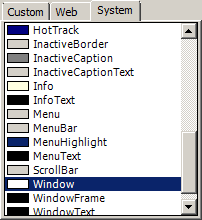 |
To programmatically set the color of a control, access its BackColor property and assign the desired color to it. You can use one of the pre-defined colors available as static properties of the Color structure. Otherwise, you can create a color by calliing the Color.FromArgb() method. Here is an example:
private void btnBackColorClick(object sender, EventArgs e)
{
    pnl.BackColor = Color.FromArgb(26, 69, 174);
}
If you know the name of the color you want to use, you can call the Color.FromName() method. Here is an example:
private void btnBackColorClick(object sender, EventArgs e)
{
    pnl.BackColor = Color.FromName("LightBlue");
}
You can also use one of the commonly knowned colors. To do this, call the Color.FromKnownColor() method and pass a member of the KnownColor enumeration. Here is an example:
private void btnBackColor_Click(object sender, EventArgs e)
{
    panel1.BackColor = Color.FromKnownColor(KnownColor.DarkTurquoise);
}
To programmatically specify the background color of a control, access its BackColor property and assign it the desired member of the Color enumeration. Here is an example:
public class Exercise : Form
{
    private Button btnSubmit;

    private void InitializeComponent()
    {
        btnSubmit = new Button();
        btnSubmit.Text = "Submit";
        btnSubmit.BackColor = Color.Aquamarine;
    }
}
The Font of Text
Introduction
Probably the most fundamental aspects of a computer application is to display text. This is done by the operating system drawing symbols on the computer screen. To make these drawings less boring and to provide more options to applications users, various designs were made and are continued being made so that characters can be done with various variations.
The Font Applied to a Control
So far, we have seen controls displaying some text. You can make such text display aesthetically. To allow you to do this, Control class is equipped with a property named Font. At design time, to specify the font to apply to the text of a control, select the control on the form. Then, in the Properies window, click Font that has a + button to its left. When you click the Font field, it becomes equipped with an ellipsis button. To visually specify the font of a control:
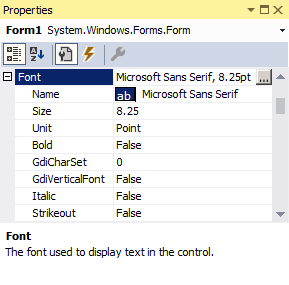
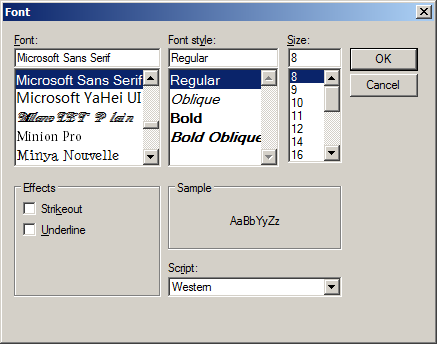
![]() Practical Learning: Setting the Font of Text
Practical Learning: Setting the Font of Text
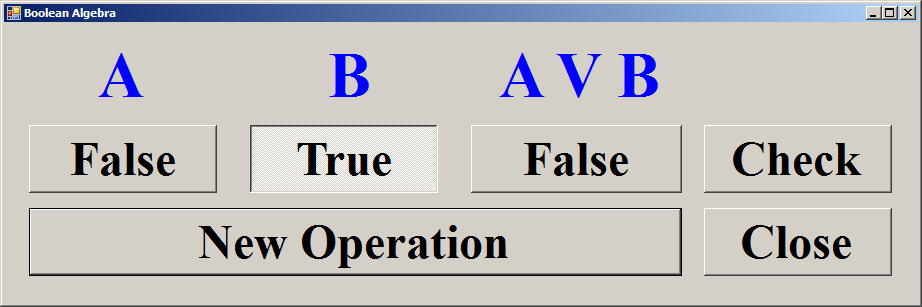
Size: 36
Bold: True
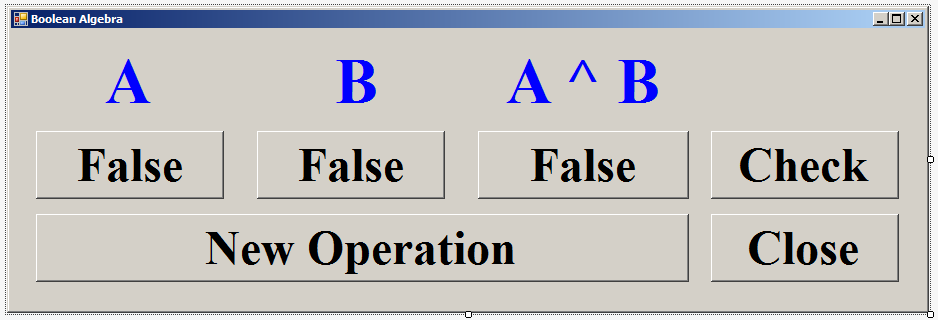
| Control | (Name) | Text | Font | Other Properties |
| Label | lblOperand1 | A | Times New Roman, 48pt, style=Bold | ForeColor: Blue |
| Label | lblOperand2 | B | Times New Roman, 48pt, style=Bold | ForeColor: Blue |
| Label | lblOperation | A ^ B | Times New Roman, 48pt, style=Bold | ForeColor: Blue |
| CheckBox | chkOperand1 | False | Times New Roman, 36pt, style=Bold | Appearance: Button |
| CheckBox | chkOperand2 | False | Times New Roman, 36pt, style=Bold | Appearance: Button FlatStyle: System TextAlign: MiddleCenter |
| CheckBox | chkResult | False | Times New Roman, 36pt, style=Bold | Appearance: Button FlatStyle: System TextAlign: MiddleCenter |
| Button | checkCheck | Check | Times New Roman, 36pt, style=Bold | |
| Button | btnNewOperation | New Operation | Times New Roman, 36pt, style=Bold | |
| Button | btnClose: | Close | Times New Roman, 36pt, style=Bold |
using System;
using System.Windows.Forms;
namespace BooleanAlgebra1
{
public partial class Form1 : Form
{
public Form1()
{
InitializeComponent();
}
private void chkOperand1_CheckedChanged(object sender, EventArgs e)
{
if (chkOperand1.Checked == true)
chkOperand1.Text = "True";
else
chkOperand1.Text = "False";
}
private void chkOperand2_CheckedChanged(object sender, EventArgs e)
{
if (chkOperand2.Checked == true)
chkOperand2.Text = "True";
else
chkOperand2.Text = "False";
}
private void chkResult_CheckedChanged(object sender, EventArgs e)
{
if (chkResult.Checked == true)
chkResult.Text = "True";
else
chkResult.Text = "False";
}
private void btnNewOperation_Click(object sender, EventArgs e)
{
string[] values = { "True", "False" };
string[] operations = { "A ^ B", "A V B" };
Random rndOperation = new Random();
chkOperand1.Text = values[rndOperation.Next(2)];
chkOperand2.Text = values[rndOperation.Next(2)];
if( chkOperand1.Text == "True" )
chkOperand1.Checked = true;
else
{
chkOperand1.Text = "False";
chkOperand1.Checked = false;
}
if( chkOperand2.Text == "True" )
chkOperand2.Checked = true;
else
{
chkOperand2.Text = "False";
chkOperand2.Checked = false;
}
lblOperation.Text = operations[rndOperation.Next(2)];
}
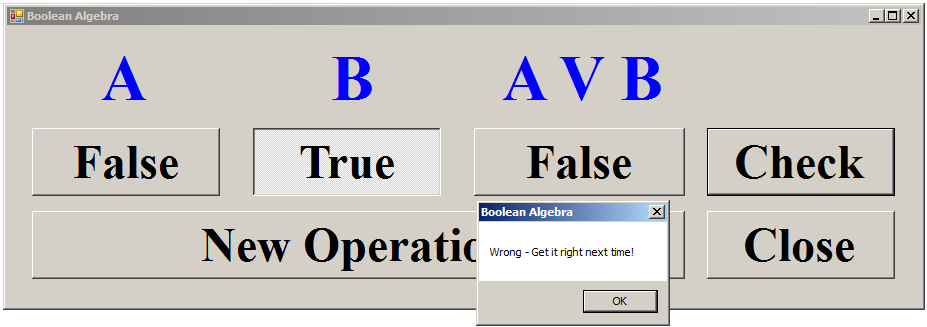
private void btnCheck_Click(object sender, EventArgs e)
{
// Logical Conjunction
if( lblOperation.Text == "A ^ B" )
{
// If A = true
if (chkOperand1.Checked == true)
{
if (chkOperand2.Checked == true)
{
if (chkResult.Checked == true)
{
// | A | B | A ^ B |
// | T | T | T |
MessageBox.Show("Bravo - Good Answer", "Boolean Algebra");
}
else if (chkResult.Checked == false)
{
// | A | B | A ^ B |
// | T | T | F |
MessageBox.Show("Wrong - Get it right next time!", "Boolean Algebra");
}
}
else if (chkOperand2.Checked == false)
{
if (chkResult.Checked == false)
{
// | A | B | A ^ B |
// | T | F | F |
MessageBox.Show("Bravo - Good Answer", "Boolean Algebra");
}
else if (chkResult.Checked == true)
{
// | A | B | A ^ B |
// | T | F | T |
MessageBox.Show("Wrong - Get it right next time!", "Boolean Algebra");
}
}
}
else if (chkOperand1.Checked == false)
{
if (chkOperand2.Checked == true)
{
if (chkResult.Checked == false)
{
// | A | B | A ^ B |
// | F | T | F |
MessageBox.Show("Bravo - Good Answer", "Boolean Algebra");
}
else if (chkResult.Checked == true)
{
// | A | B | A ^ B |
// | F | T | T |
MessageBox.Show("Wrong - Get it right next time!", "Boolean Algebra");
}
}
else if (chkOperand2.Checked == false)
{
if (chkResult.Checked == false)
{
// | A | B | A ^ B |
// | F | F | F |
MessageBox.Show("Bravo - Good Answer", "Boolean Algebra");
}
else if (chkResult.Checked == true)
{
// | A | B | A ^ B |
// | F | F | T |
MessageBox.Show("Wrong - Get it right next time!", "Boolean Algebra");
}
}
}
}
else if (lblOperation.Text == "A V B") // Logical Disjunction:
{
// If A = true
if (chkOperand1.Checked == true)
{
if (chkOperand2.Checked == true)
{
if (chkResult.Checked == true)
{
// | A | B | A V B |
// | T | T | T |
MessageBox.Show("Bravo - Good Answer", "Boolean Algebra");
}
else if (chkResult.Checked == false)
{
// | A | B | A V B |
// | T | T | F |
MessageBox.Show("Wrong - Get it right next time!", "Boolean Algebra");
}
}
else if (chkOperand2.Checked == false)
{
if (chkResult.Checked == true)
{
// | A | B | A V B |
// | T | F | T |
MessageBox.Show("Bravo - Good Answer", "Boolean Algebra");
}
else if (chkResult.Checked == false)
{
// | A | B | A V B |
// | T | F | F |
MessageBox.Show("Wrong - Get it right next time!", "Boolean Algebra");
}
}
}
else if (chkOperand1.Checked == false)
{
if (chkOperand2.Checked == true)
{
if (chkResult.Checked == true)
{
// | A | B | A V B |
// | F | T | T |
MessageBox.Show("Bravo - Good Answer", "Boolean Algebra");
}
else if (chkResult.Checked == false)
{
// | A | B | A V B |
// | F | T | F |
MessageBox.Show("Wrong - Get it right next time!", "Boolean Algebra");
}
}
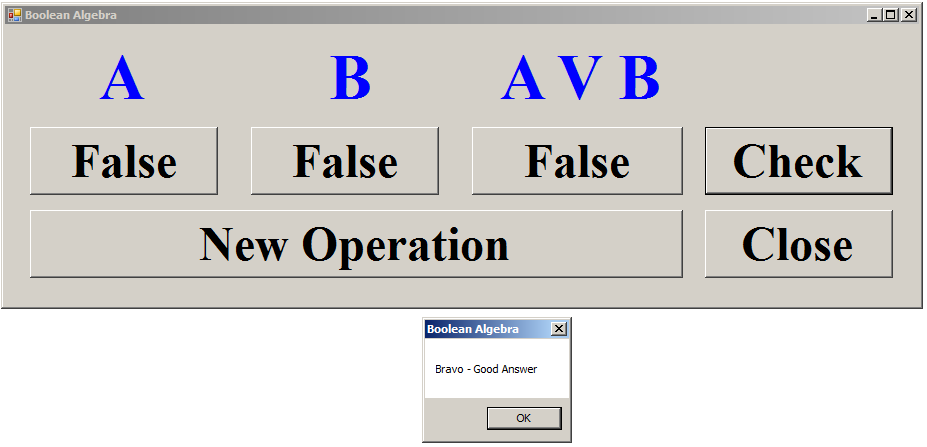
else if (chkOperand2.Checked == false)
{
if (chkResult.Checked == false)
{
// | A | B | A V B |
// | F | F | F |
MessageBox.Show("Bravo - Good Answer", "Boolean Algebra");
}
else if (chkResult.Checked == true)
{
// | A | B | A V B |
// | F | F | T |
MessageBox.Show("Wrong - Get it right next time!", "Boolean Algebra");
}
}
}
}
btnNewOperation_Click(sender, e);
}
private void Form1_Load(object sender, EventArgs e)
{
btnNewOperation_Click(sender, e);
}
private void btnClose_Click(object sender, EventArgs e)
{
Close();
}
}
}
Font:       Georgia
Font Style: Bold Oblique
Size:       12
Underline:  Checked

|
|
||
| Previous | Copyright © 2001-2021, FunctionX | Next |
|
|
||