Introduction to Sealing a Class

Introduction to Sealing a Class
A Sealed Class
Introduction
A sealed class is a class that cannot serve as a base class in inheritance. That is, you cannot derive a class from a sealed class.
![]() Practical Learning: Introducing Static Classes
Practical Learning: Introducing Static Classes
namespace PayrollPreparation13
{
    public class Calculations
    {
    }

    public class Operations
    {
    }
}
Static Classes
As seen previously, a static class is a class marked with the static keyword and whose all members are static. When a class has been made static, no class can be derived from it. This means that when you create a static class, it becomes automatically sealed.
![]() Practical Learning: Creating a Static Class
Practical Learning: Creating a Static Class
namespace PayrollPreparation13
{
    public sealed class Calculations
    {
    }

    public class Operations : Calculations
    {
    }
}
namespace PayrollPreparation13
{
    public static class Calculations
    {
        public static double Add(double a, double b)
        {
            return a + b;
        }

        public static double Add5(double a, double b, double c, double d, double e)
        {
            return a + b + c + d + e;
        }

        public static double Subtract(double a, double b)
        {
            return a - b;
        }

        public static double Multiply(double a, double b)
        {
            return a * b;
        }
    }
}
A regular class, that is, a non-static class, can be sealed so it would not act as a base class for another class. To let you seal a class, the C# language provides the sealed keyword. Therefore, to seal a class, type the sealed keyword to the left of the class keyword.
If the class is marked with an access modifier, the sealed keyword can appear before or after the access modifier. Here are examples:
sealed public class TimeWorked
{

}

public sealed class WorkingTime
{

}
A class that is derived from another can also be sealed. Here is an example:
public abstract class Triangle
{
}

sealed public class Irregular : Triangle
{
}
Remember that once a class is sealed, it cannot serve as a parent of another class. As an alternative, the class can be used to create a property in another class that would use it as a pseudo-parent.
![]() Practical Learning: Creating a Sealed Class
Practical Learning: Creating a Sealed Class
namespace PayrollPreparation13
{
    public sealed class Payroll
    {
    }

    public class TimeSheet : Payroll
    {
    }
}
namespace PayrollPreparation13
{
    public sealed class Payroll
    {
        private double timeSpecified;

        public Payroll(double salary, double time)
        {
            HourSalary = salary;
            timeSpecified = time;
        }

        public double HourSalary { get; set; }

        public double OvertimeSalary
        {
            get { return Calculations.Multiply(HourSalary, 1.50); }
        }

        public double RegularTime
        {
            get
            {
                if (timeSpecified <= 40.00)
                    return timeSpecified;
                else
                    return 40.00;
            }
        }

        public double Overtime
        {
            get
            {
                if (timeSpecified <= 40.00)
                    return 0.00;
                else
                    return Calculations.Subtract(timeSpecified, 40.00);
            }
        }

        public double RegularPay
        {
            get { return Calculations.Multiply(HourSalary, RegularTime); }
        }

        public double OvertimePay
        {
            get { return Calculations.Multiply(OvertimeSalary, Overtime); }
        }

        public double NetPay
        {
            get { return Calculations.Add(RegularPay, OvertimePay); }
        }
    }
}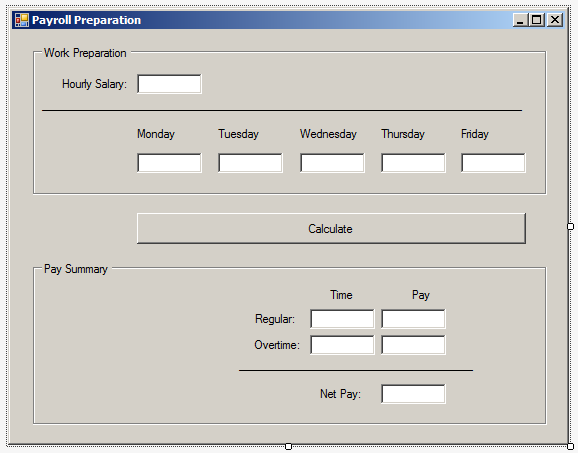
| Control | (Name) | Text | TextAlign |
| GroupBox | Work Preparation | ||
| Label | Hourly Salary: | ||
| TextBox | txtHourlySalary | Right | |
| Label | ____________________ | ||
| Label | Monday | ||
| Label | Tuesday | ||
| Label | Wednesday | ||
| Label | Thursday | ||
| Label | Friday | ||
| TextBox | txtMonday | Right | |
| TextBox | txtTuesday | Right | |
| TextBox | txtWednesday | Right | |
| TextBox | txtThursday | Right | |
| TextBox | txtFriday | Right | |
| Button | btnCalculate | Calculate | |
| GroupBox | Pay Summary | ||
| Label | Time | ||
| Label | Pay | ||
| Label | Regular: | ||
| TextBox | txtRegularTime | Right | |
| TextBox | txtRegularPay | Right | |
| Label | Overtime: | ||
| TextBox | txtOvertime | Right | |
| TextBox | txtOvertimePay | Right | |
| Label | ____________________ | ||
| Label | Net Pay | ||
| TextBox | txtNetPay | Right |
using System;
using System.Windows.Forms;

namespace PayrollPreparation13
{
    public partial class Form1 : Form
    {
        public Form1()
        {
            InitializeComponent();
        }

        string CreateMessage(string day)
        {
            return "If the employee worked on " + day +
                   ", enter the amount of time worked on that day or type 0.";
        }

        private void btnCalculate_Click(object sender, EventArgs e)
        {
            double salary    = 0.00;
            double monday    = 0.00,
                   tuesday   = 0.00,
                   wednesday = 0.00,
                   thursday  = 0.00,
                   friday    = 0.00;

            try
            {
                salary = Convert.ToDouble(txtHourlySalary.Text);
            }
            catch (FormatException)
            {
                MessageBox.Show("Since the employee must be payed, " +
                                "make sure you indicate the hourly salary.",
                                "Payroll Preparation");
            }

            try
            {
                monday = Convert.ToDouble(txtMonday.Text);
            }
            catch (FormatException)
            {
                MessageBox.Show(CreateMessage("monday"), "Payroll Preparation");
            }
            try
                {
                    tuesday = Convert.ToDouble(txtTuesday.Text);
            }
            catch (FormatException)
            {
                MessageBox.Show(CreateMessage("tuesday"), "Payroll Preparation");
            }
            try
                    {
                        wednesday = Convert.ToDouble(txtWednesday.Text);
            }
            catch (FormatException)
            {
                MessageBox.Show(CreateMessage("wednesday"), "Payroll Preparation");
            }
            try
                        {
                            thursday = Convert.ToDouble(txtThursday.Text);
            }
            catch (FormatException)
            {
                MessageBox.Show(CreateMessage("thursday"), "Payroll Preparation");
            }
            try
                            {
                                friday = Convert.ToDouble(txtFriday.Text);
            }
            catch (FormatException)
            {
                MessageBox.Show(CreateMessage("friday"), "Payroll Preparation");
            }

            double totalTime = Calculations.Add(monday, tuesday, wednesday, thursday, friday);

            Payroll preparation = new Payroll(salary, totalTime);

            txtRegularTime.Text = preparation.RegularTime.ToString("F");
            txtOvertime.Text = preparation.Overtime.ToString("F");
            txtRegularPay.Text = preparation.RegularPay.ToString("F");
            txtOvertimePay.Text = preparation.OvertimePay.ToString("F");
            txtTotalPay.Text = preparation.NetPay.ToString("F");
        }
    }
}
namespace PayrollPreparation13
{
    public static class Calculations
    {
        public static double Add(double a, double b) => a + b;

        public static double Add(double a,
                                 double b,
                                 double c,
                                 double d,
                                 double e) => a + b + c + d + e;

        public static double Subtract(double a, double b) => a - b;
        public static double Multiply(double a, double b) => a * b;
    }
}namespace PayrollPreparation13
{
using static Calculations;
public sealed class Payroll
{
private double timeSpecified;
public Payroll(double salary, double time)
{
timeSpecified = time;
HourSalary = salary;
}
public double HourSalary { get; set; }
public double OvertimeSalary
{
get => Multiply(HourSalary, 1.50);
}
public double RegularTime
{
get
{
return (timeSpecified <= 40.00) ? timeSpecified : 40.00;
}
}
public double Overtime
{
get
{
return (timeSpecified <= 40.00) ? 0.00 : Calculations.Subtract(timeSpecified, 40.00);
}
}
public double RegularPay
{
get => Multiply(HourSalary, RegularTime);
}
public double OvertimePay
{
get => Multiply(OvertimeSalary, Overtime);
}
public double NetPay
{
get => Add(RegularPay, OvertimePay);
}
}
}using System;
using System.Windows.Forms;
namespace PayrollPreparation13
{
using static Calculations;
public partial class Form1 : Form
{
public Form1() => InitializeComponent();
string CreateMessage(string day) => "If the employee worked on " + day +
", enter the amount of time worked on that day or type 0.";
private void btnCalculate_Click(object sender, EventArgs e)
{
double salary = 0.00;
double monday = 0.00,
tuesday = 0.00,
wednesday = 0.00,
thursday = 0.00,
friday = 0.00;
try
{
salary = Convert.ToDouble(txtHourlySalary.Text);
}
catch (FormatException)
{
MessageBox.Show("Since the employee must be payed, " +
"make sure you indicate the hourly salary.",
"Payroll Preparation");
}
try
{
monday = Convert.ToDouble(txtMonday.Text);
}
catch (FormatException)
{
MessageBox.Show(CreateMessage("monday"), "Payroll Preparation");
}
try
{
tuesday = Convert.ToDouble(txtTuesday.Text);
}
catch (FormatException)
{
MessageBox.Show(CreateMessage("tuesday"), "Payroll Preparation");
}
try
{
wednesday = Convert.ToDouble(txtWednesday.Text);
}
catch (FormatException)
{
MessageBox.Show(CreateMessage("wednesday"), "Payroll Preparation");
}
try
{
thursday = Convert.ToDouble(txtThursday.Text);
}
catch (FormatException)
{
MessageBox.Show(CreateMessage("thursday"), "Payroll Preparation");
}
try
{
friday = Convert.ToDouble(txtFriday.Text);
}
catch (FormatException)
{
MessageBox.Show(CreateMessage("friday"), "Payroll Preparation");
}
Payroll preparation = new Payroll(salary,
Add(monday, tuesday, wednesday, thursday, friday));
txtRegularTime.Text = preparation.RegularTime.ToString("F");
txtOvertime.Text = preparation.Overtime.ToString("F");
txtRegularPay.Text = preparation.RegularPay.ToString("F");
txtOvertimePay.Text = preparation.OvertimePay.ToString("F");
txtTotalPay.Text = preparation.NetPay.ToString("F");
}
}
}namespace Geometry19
{
public class Quadrilateral
{
public virtual double CalculateArea()
{
return 0.00;
}
}
}using System;
namespace Geometry19
{
public class Rhombus : Quadrilateral
{
public double Horizontal { get; set; }
public double Vertical { get; set; }
public Rhombus(double length, double high)
{
Vertical = high;
Horizontal = length;
}
}
}Characteristics of a Sealed Class
If you use the sealed keyword on a class, the whole class becomes sealed, but you may not want the whole class to be sealed. Sometimes, you may want only some members to be sealed.
One of the charateristics of inheritance is that a derived class can provide a behavior of a parent's method. This can be done by overriding a method of the parent. Sometimes when creating a non-sealed class, you may want to prevent the deriving class(es) from overriding a certain method. In this case, you can seal the method. A sealed method is one doesn't allow deriving classes to override it.
If you create a new method in a derived class, that is, a method that does not exist in the parent class, you cannot seal it. This means that you can seal only a method that can be overridden. Therefore, before sealing a method, you must first create it in class. You must mark that method as abstract or virtual.
Remember that, in a derived class, you must override every parent's abstract or virtual method. To seal a method, in the derived class, precede the return type by the sealed keyword. The sealed keyword can appear before or after override. Here are examples:
using System;

public abstract class RoundShape
{
    public virtual  double Radius { get; set; }
    public abstract double Diameter { get; }
}

public class Circle : RoundShape
{
    private double rad;

    public sealed override double Radius // sealed before override
    {
        get
        {
            return this.rad;
        }

        set
        {
            this.rad = value;
        }
    }

    public override sealed double Diameter // override before sealed = same thing
    {
        get
        {
            return this.rad * 2;
        }
    }
}
![]() Practical Learning: Creating a Sealed Method
Practical Learning: Creating a Sealed Method
using System;

namespace Geometry19
{
    public class Rhombus : Quadrilateral
    {
        public double Horizontal { get; set; }
        public double Vertical   { get; set; }

        public Rhombus(double length, double high)
        {
            Vertical = high;
            Horizontal = length;
        }

        public sealed override double CalculateArea()
        {
            return Horizontal * Vertical / 2.00;
        }
    }
}
A property from a class A is said to be sealed if no class B deriving from class A is allowed to provide a new version of the property.
As seen for a method, before creating a sealed property, its class must be derived from another class. Here is an example of such as class created as abstract:
public abstract class RoundShape
{
    public virtual  double Radius { get; set; }
    public abstract double Diameter { get; }
}
Of course, you must derive a class from such as class. Before sealing a property, you must override it from the parent class. That is, you must mark the property in the derived class as override. To seal a property, type the sealed keyword close to the override keyword. The sealed keyword can appear before or after override.
![]() Practical Learning: Creating a Sealed Property
Practical Learning: Creating a Sealed Property
namespace Geometry19
{
    public class Quadrilateral
    {
        public virtual double CalculateArea()
        {
            return 0.00;
        }

        public virtual double Inradius { get; }
    }
}using System;
namespace Geometry19
{
using static Math;
public class Rhombus : Quadrilateral
{
public double Horizontal { get; set; }
public double Vertical { get; set; }
public Rhombus(double length, double high)
{
Vertical = high;
Horizontal = length;
}
public sealed override double CalculateArea()
{
return Horizontal * Vertical / 2.00;
}
public override sealed double Inradius
{
get
{
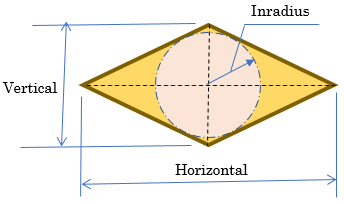
// http://mathworld.wolfram.com/Rhombus.html
return (Horizontal * Vertical) / (2.00 * Sqrt((Horizontal * Horizontal) + (Vertical * Vertical)));
}
}
}
}
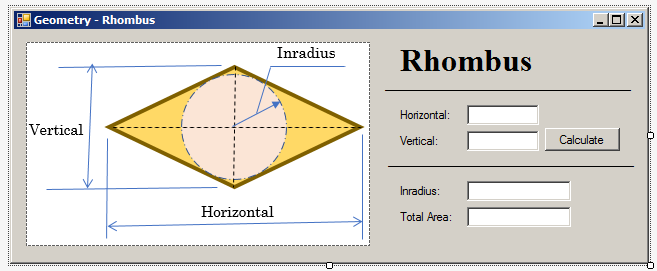
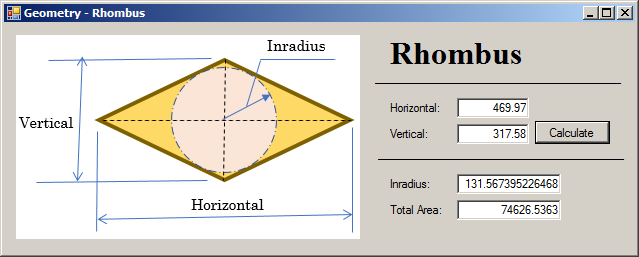
| Control | (Name) | Text | Other Properties |
| PictureBox | Image: rhombus.png | ||
| Label | Rhombus: | Font: Times New Roman, 24pt, style=Bold | |
| Label | __________________ | ||
| Label | Horizontal: | ||
| TextBox | txtHorizontal | TextAlign: Right | |
| Label | Vertical: | ||
| TextBox | txtVertical | TextAlign: Right | |
| Button | btnCalculate | Calculate | |
| Label | __________________ | ||
| Label | Inradius: | ||
| TextBox | txtInradius | TextAlign: Right | |
| Label | Total Area: | ||
| TextBox | txtTotalArea | TextAlign: Right |
using System;
using System.Windows.Forms;
namespace Geometry19
{
public partial class Form1 : Form
{
public Form1()
{
InitializeComponent();
}
(double x, double y) Specify()
{
double h = 0.00;
double v = 0.00;
try
{
h = Convert.ToDouble(txtHorizontal.Text);
}
catch (FormatException)
{
MessageBox.Show("Make sure you provide a valid value for the horizontal measure of the rhombus.", "Geometry - Rhombus");
}
try
{
v = Convert.ToDouble(txtVertical.Text);
}
catch (FormatException)
{
MessageBox.Show("You must specify an appropriate value for the vertical measure of the shape.", "Geometry - Rhombus");
}
return (h, v);
}
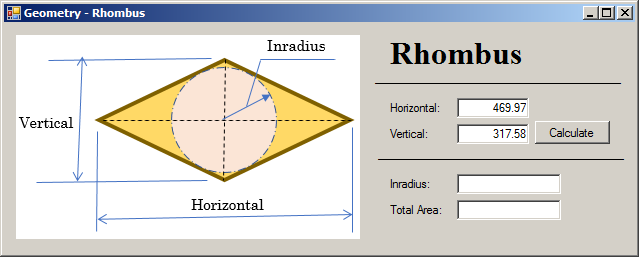
private void btnCalculate_Click(object sender, EventArgs e)
{
(double length, double height) values = Specify();
Rhombus quad = new Rhombus(values.length, values.height);
txtInradius.Text = quad.Inradius.ToString();
txtTotalArea.Text = quad.CalculateArea().ToString();
}
}
}
Built-In Classes: The Object Class
Introduction
The .NET Framework is a huge library made of various classes you can directly use in your C# applications. To start, this main library of C# provides a class called Object.
As you may have realized by now, every variable or function in C# must belong to a class. When you create a class, it automatically inherits its primary characteristics from Object. This class is the parent of all classes in a C# application.
Equality of Two Class Variables
When you declare and initialize two variables, one of the operations you may want to subsequently perform is to compare their values. To support this operation, the Object class provides its children with an overloaded Boolean method named Equals. The Equals() method comes in two versions. The first has the following syntax:
public virtual bool Equals(object obj);
This version allows you to call the Equals() method on a declared variable and pass the other variable as argument. Here are examples:
using static System.Math;

namespace Geometry17
{
    public class Rhombus : Quadrilateral
    {
        public double Horizontal { get; set; }
        public double Vertical { get; set; }

        public Rhombus(double length, double high)
        {
            Vertical = high;
            Horizontal = length;
        }

        public sealed override double CalculateArea()
        {
            return Horizontal * Vertical / 2.00;
        }

        public override sealed double Inradius
        {
            get
            {
                if( Horizontal.Equals(0.00) )
                    return 0.00;

                if( Vertical.Equals(0.00) )
                    return 0.00;

                if( Horizontal.Equals(Vertical) )
                    return 0.00;

                // http://mathworld.wolfram.com/Rhombus.html
                return (Horizontal * Vertical) / (2.00 * Sqrt((Horizontal * Horizontal) + (Vertical * Vertical)));
            }
        }
    }
}
The first version of the Object.Equals method is declared as virtual, which means you can override it if you create your own class. The second version of the Object.Equals() method is:
public static bool Equals(object obj2, object obj2);
As a static method, to use it, you can pass the variables of the two classes whose values you want to compare. Here are examples:
using static System.Math;

namespace Geometry17
{
    public class Rhombus : Quadrilateral
    {
        public double Horizontal { get; set; }
        public double Vertical { get; set; }

        public Rhombus(double length, double high)
        {
            Vertical = high;
            Horizontal = length;
        }

        public sealed override double CalculateArea()
        {
            return Horizontal * Vertical / 2.00;
        }

        public override sealed double Inradius
        {
            get
            {
                if( object.Equals(Horizontal, 0.00) )
                    return 0.00;

                if( object.Equals(Vertical, 0.00) )
                    return 0.00;

                if( object.Equals(Horizontal, Vertical) )
                    return 0.00;

                // http://mathworld.wolfram.com/Rhombus.html
                return (Horizontal * Vertical) / (2.00 * Sqrt((Horizontal * Horizontal) + (Vertical * Vertical)));
            }
        }
    }
}
In both cases, if the values of the variables are similar, the Equals() method returns true. If they are different, the method returns false. If you are using the Equals() method to compare the variables of two primitive types, the comparison should be straight forward. If you want to use this method on variables declared from your own class, you should provide your own implementation of this method.
Stringing an Object
In previous lessons, we learned that, to convert the value of a variable declared from a primitive type to a string, you could call the ToString() method of that variable. To support this operation, the Object class provides an a method named ToString. It syntax is:
public virtual string ToString();
Although the Object class provides this method as non abstract, its implemented version is more useful if you use a primitive type such as double or decimal. Probably the best way to rely on this method is to override it in your own class. Here is an example:
abstract public class Vehicle
{
    public string Make { get; set; }
    public string Model { get; set; }
    public int Year { get; set; }
}

public class Van : Vehicle
{
    public override string ToString()
    {
        return this.Year + " " + this.Make + " " + this.Model;
    }
}
Although the Object class provides this method as non abstract, its implemented version is more useful if you use a primitive type such as int, double and their variances or a string variable. The best way to rely on it consists of overriding it in your own class if you desired to use its role.
Boxing and Un-Boxing
When we studied inheritance, we learned that all data types used in a C# program are "based on" an object called object. As introduced earlier, you can use this data type to declare a variable that would hold any type of value. Because this is some type of a "universal" data type, it can also be initialized with any value. Here are examples:
using System;

class Exercise
{
	static void Main()
	{
		object Number = 244;
		object Thing  = "Professor Kabba";

		Console.WriteLine(Number);
		Console.WriteLine(Thing);
	}
}
This would produce:
244
Professor Kabba
As you can see, when an object variable is initialized, the compiler finds out the type of value that was assigned to it. This is referred to as boxing. This mechanism is transparently done in C# (and in Visual Basic but not in Visual C++ 2003 (it is possible that something will be done in the next version, or not)).
If you declare a variable using a primitive data type (int, float, double, etc), at one time, you may be interested in converting the value of that variable into an object. Here is an example:
using System;

class Exercise
{
    static int Main()
    {
    	int Number = 244;
	    object Thing  = Number;

    	Console.WriteLine(Number);
	    Console.WriteLine(Thing);

    	return 0;
    }
}
This would produce:
244
244
This operation is referred to as unboxing. As you can see, this operation is performed transparently.
Finalizing a Variable
While a constructor, created for each class, is used to instantiate a class. The object class provides the Finalize() method as a type of destructor.
Other Built-In Classes
The System namespace provides one of the largest definition of classes of the .NET Framework, but it doesn't contain everything. For example, when you start writing graphical user interface (GUI) applications, you will have to use other namespaces. The namespaces are contained in libraries called assemblies. The actual classes used in various applications are created and defined in these libraries. Before using a class, you must know the name of the assembly in which it is defined. You must also know the name of its namespace. These three pieces of information, the name of the class, the namespace in which it is defined, and the name of the assembly in which the namespace is contained, are very important. Because there are so many classes, namespaces, and libraries, the MSDN documentation is your best reference. We can only mention a few, especially those that are relevant for the subjects we are reviewing.
![]() Practical Learning: Ending the Lesson
Practical Learning: Ending the Lesson
|
|
||
| Previous | Copyright © 2002-2021, FunctionX | Next |
|
|
||