Introduction to Events of Windows Controls

Introduction to Events of Windows Controls
Fundamentals of Events
Introduction
Every class in an application is mostly meant to interact with other classes, either to request values and methods of the other classes or to provide other classes with some values or a behavior they need. When a class A requests a value or service from another class B, class A is referred to as a client of class B. This relationship is important not simply because it establishes a relationship between both classes but also because class B should be ready to provide the value or behavior that a client needs at a certain time.
While a class B is asked to provide some values to, or perform some assignment(s) for, another class A, many things would happen. In fact, there is an order that the actions should follow. For example, during the lifetime of a program, that is, while a program is running, a class may be holding a value it can provide to its client but at another time, that value may not be available anymore, for any reason. Because different things can happen to a class B while a program is running, and because only class B would be aware of these, it must be able to signal to the other classes when there is a change. This is the basis of objects events. An event is an action that occurs on an object and affects it in a way that its clients must be made aware of.
![]() Practical Learning: Creating a Project
Practical Learning: Creating a Project
namespace BusinessAccounting5
{
    static public class Calculations
    {
        public static double Add(double a, double b)
        {
            return a + b;
        }

        static public double Add(double a, double b, double c, double d, double e)
        {
            return a + b + c + d + e;
        }

        static public double Subtract(double a, double b)
        {
            return a - b;
        }
    }
}
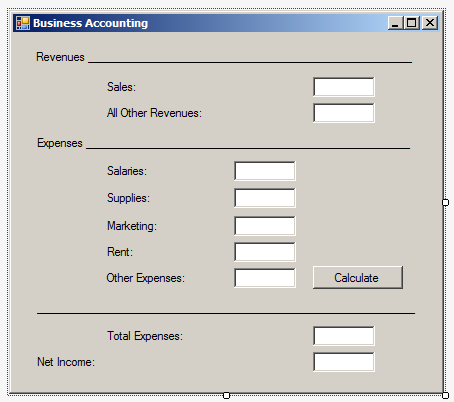
| Control | (Name) | Text | TextAlign |
| Label | Revenues __________________________________ | ||
| Label | Sales | ||
| TextBox | txtSales | Right | |
| Label | All Other Revenues | ||
| TextBox | txtOtherRevenues | Right | |
| Label | Expenses _______________________________ | ||
| Label | Salaries | ||
| TextBox | txtSalaries | Right | |
| Label | Supplies | ||
| TextBox | txtSupplies | Right | |
| Label | Marketing | ||
| TextBox | txtMarketing | Right | |
| Label | Rent | ||
| TextBox | txtRent | Right | |
| Label | Other Expenses | ||
| TextBox | txtOtherExpenses | Right | |
| Button | btnEvaluate | Evaluate | |
| Label | _______________________________________ | ||
| Label | Total Expenses | ||
| TextBox | txtTotalExpenses | Right | |
| Label | Net Income | ||
| TextBox | txtNetIncome | Right |
Introduction to Events and Windows Controls
An application is made of various objects or controls. During the lifetime of an application, its controls regularly send messages to the operating system to do something on their behalf. Since most of the time more than one application is running on the computer, the controls of such an application also send messages to the operating system. As the operating system is constantly asked to perform these assignments, because there can be so many requests presented unpredictably, the operating system leaves it up to the controls to specify what they want, when they want it, and what behavior or result they expect. These scenarios work by the controls creating and sending messages. A control is said to fire an event when it creates and sends a message about an action it wants.
Events in the .NET Framework are implemented through the concepts of delegates and events as reviewed above. The most common events have already been created for the objects of the .NET Framework controls so much that you will hardly need to define new events. Normally, you may need to create events only if you also want to create your own Windows controls. For our lessons, we will use only the available Windows controls, which are enough for anything we want to do, and we will use only their existing events. Most of what you will do consists of implementing the desired behavior when a particular event fires. To start, you should know what events are available, when they fire, how they work, and what they produce.
The code of an event is created as a private method of type void:
private void event-name(parameters)
{
}
The private keyword is optional. The void keyword is required. The name of an event can be any valid name of a method following the rules of names in C#. By tradition, the name of an event starts with the name of the control that is firing the event (remember that this is optional). This can be followed by an underscore. The name of the control and the optional underscore are followed by the actual name of the event (again, this is optional). In later sections, we will review the names of events.
To process an event, its message must provide two pieces of information: What created the message and what (type of) information or message it is carrying. Both pieces of information are included in the message, that is, in the event. This means that the method of an event uses two parameters::
private void event-name(parameter1, parameter2)
{
}
The first parameter must indicate the control that is firing the event. Practically all Windows controls fire events. For this reason, the first parameter represents a general type for all controls. Since all controls are based on classes and all classes in the .NET Framework are based on the Object class, the first argument is of type object. The name of its parameter can be anything. By tradition, this parameter is named sender:
private void event-name(object sender, parameter2)
{
}
As mentioned already, each control sends its own messages when necessary. Some messages are unique to some controls according to their roles. Some other messages are common to various controls, as they tend to perform similar actions. Some other events are unique to some controls. As a result, the second parameter holds the actual message of the event. The message is provided as a class. The most fundamental class of events is named EventArgs. As a result, if an event is not carrying any particular information, it is of type EventArgs. As seen for the first parameter, the name of the second parameter can be anything. By tradition, that parameter is named e. As a result, the basic formula of the method of an event is created as follows:
private void event-name(object sender, EventArgs e)
{
}
Some events carry some particular information. The classes of such events are derived directly or indirectly from the EventArgs class. In later sections and throughout our lessons, we will see what those events are and what classes manage their actions.
Implementing an Event
Manually Implementing an Event
There are various ways you can implement an event. As done so far in previous lessons, you can write the code of an event yourself. Then attach (or connect) the event to its control using the += operator. Otherwise, Microsoft Visual Studio can assist you.
The Default Event of a Control
The default event of a control is the control that it fires most regularly. For example, when you think of a button, the first action that comes to your mind is click. Practically every control has a default event. Therefore, if you are using Microsoft Visual Studio, to implement the default event of a control, double-click that control on the form. In this case, Microsoft Visual Studio would initiate the default event and open the Code Editor. The cursor would be positioned in the body of the method of the event.
![]() Practical Learning: Implementating a Default Event
Practical Learning: Implementating a Default Event
using System;
using System.Windows.Forms;
namespace BusinessAccounting5
{
public partial class BusinessAccounting : Form
{
public BusinessAccounting()
{
InitializeComponent();
}
double GatherRevenues()
{
double s = double.Parse(txtSales.Text);
double r = double.Parse(txtOtherRevenues.Text);
return Calculations.Add(s, r);
}
double SummarizeExpenses()
{
double sal = double.Parse(txtSalaries.Text);
double sup = double.Parse(txtSupplies.Text);
double mkt = double.Parse(txtMarketing.Text);
double rnt = double.Parse(txtRent.Text);
double oth = double.Parse(txtOtherExpenses.Text);
return Calculations.Add(sal, sup, mkt, rnt, oth);
}
void Present(double x, double y)
{
txtTotalExpenses.Text = x.ToString();
txtNetIncome.Text = y.ToString();
}
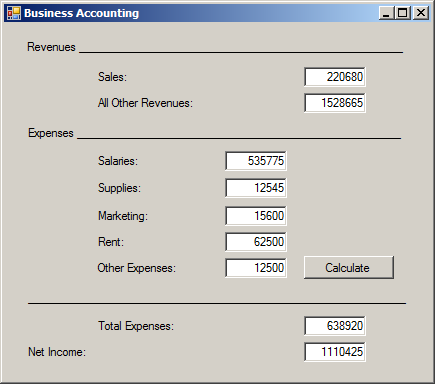
private void btnCalculate_Click(object sender, EventArgs e)
{
double revenues = GatherRevenues();
double expenses = SummarizeExpenses();
double netIncome = Calculations.Subtract(revenues, expenses);
Present(expenses, netIncome);
}
}
}
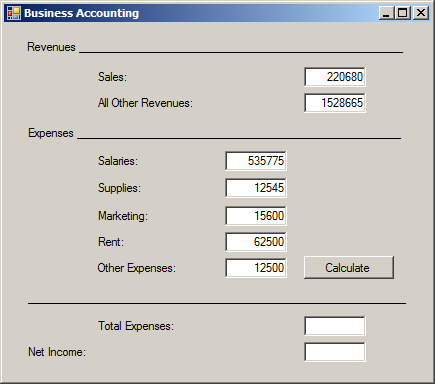
Sales:               220680
All Other Revenues: 1528665
Salaries:            535775
Supplies:             12545
Marketing:            15600
Rent:                 62500
Other Expenses:       12500
namespace Chemistry08
{
    public enum Phase { Gas, Liquid, Solid, Unknown }

    public class Element
    {
        public string Symbol       { get; set; }
        public string ElementName  { get; set; }
        public int    AtomicNumber { get; set; }
        public double AtomicWeight { get; set; }
        public Phase  Phase        { get; set; }

        public Element()                 { }
        public Element(int number)    => AtomicNumber = number;
        public Element(string symbol) => Symbol = symbol;

        public Element(int number, string symbol, string name, double mass, Phase phase)
        {
            ElementName = name;
            AtomicWeight = mass;
            Phase = phase;
            Symbol = symbol;
            AtomicNumber = number;
        }
    }
}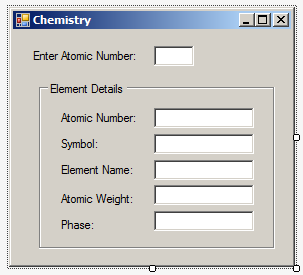
| Control | (Name) | Text |
| Label | Enter Atomic Number: | |
| TextBox | txtEntered | |
| GroupBox | Element Detais | |
| Label | Atomic Number: | |
| TextBox | txtAtomicNumber | |
| Label | Symbol: | |
| TextBox | txtSymbol | |
| Label | Element Name: | |
| TextBox | txtElementName | |
| Label | Atomic Weight: | |
| TextBox | txtAtomicWeight | |
| Label | Phase: | |
| TextBox | txtPhase |
Implementing Other Events
To implement (or fire) any event for a control in Microsoft Visual Studio, first select the control on the form. Then, in the Properties window, click the Events button ![]() . Double-click the name of the event you want to use.
. Double-click the name of the event you want to use.
![]() Practical Learning: Implementing Other Events
Practical Learning: Implementing Other Events
Focus-Based Events
Giving Focus to a Control
To use a control, the user must activate it somehow. One way the user can do this is by pressing the Tab key until the control is activated. At that time, the control is said to have received focus. As soon as a control receives focus, it fires an event named Enter. It is of type EventArgs.
Having Gotten Focus
After a control has received focus, it fires an event named GotFocus, which is of type EventArgs.
Losing Focus When Leaving a Control
After using a control, the user can press Tab or somehow move focus away from the control. At that time, the control fires an event named Leave. It is of type EventArgs.
![]() Practical Learning: Losing Control Focus
Practical Learning: Losing Control Focus
using System;
using System.Windows.Forms;
namespace Chemistry09
{
public partial class Form1 : Form
{
public Form1()
{
InitializeComponent();
}
Element SelectElement(int ? nbr)
{
Element H = new Element(1, "H", "Hydrogen", 1.008, Phase.Gas);
Element He = new Element(2, "He", "Helium", 4.002602, Phase.Gas);
Element Li = new Element(3, "Li", "Lithium", 6.94, Phase.Solid);
Element Be = new Element(4, "Be", "Beryllium", 9.0121831, Phase.Solid);
Element B = new Element(5, "B", "Boron", 10.81, Phase.Solid);
Element C = new Element(name: "Carbon", mass: 12.011, symbol: "C", number: 6, phase: Phase.Solid);
Element N = new Element(7);
N.Symbol = "N"; N.AtomicWeight = 14.007;
N.ElementName = "Nitrogen"; N.Phase = Phase.Gas;
Element O = new Element("O")
{
AtomicNumber = 8,
ElementName = "Oxygen",
AtomicWeight = 15.999,
Phase = Phase.Gas
};
Element F = new Element("F")
{
AtomicNumber = 9,
ElementName = "Fluorine",
AtomicWeight = 15.999,
Phase = Phase.Gas
};
Element Ne = new Element("Ne")
{
AtomicNumber = 10,
ElementName = "Neon",
AtomicWeight = 20.1797,
Phase = Phase.Gas
};
Element Na = new Element(11, "Na", "Sodium", 22.98976928, Phase.Solid);
Element Mg = new Element(12, "Mg", "Magnesium", 24.305, Phase.Solid);
Element Al = new Element(13, "Al", "Aluminium", 26.9815385, Phase.Solid);
Element Si = new Element() { ElementName = "Silicon", AtomicWeight = 28.085, Symbol = "Si", AtomicNumber = 14, Phase = Phase.Solid };
Element P = new Element() { ElementName = "Phosphorus", AtomicWeight = 30.973761998, Symbol = "P", AtomicNumber = 15, Phase = Phase.Solid };
Element S = new Element(16, "S", "Sulfur", 32.06, Phase.Solid);
Element Cl = new Element() { AtomicWeight = 35.446, Symbol = "Cl", ElementName = "Chlorine", AtomicNumber = 17, Phase = Phase.Gas };
Element Ar = new Element() { ElementName = "Argon", AtomicWeight = 39.792, Symbol = "Ar", AtomicNumber = 18, Phase = Phase.Gas };
Element K = new Element() { ElementName = "Potassium", Symbol = "K", Phase = Phase.Solid, AtomicWeight = 39.0983, AtomicNumber = 19 };
Element Ca = new Element() { Symbol = "Ca", Phase = Phase.Solid, AtomicNumber = 20, ElementName = "Calcium", AtomicWeight = 40.078 };
Element Sc = new Element() { AtomicNumber = 21, Symbol = "Sc", AtomicWeight = 44.9559085, Phase = Phase.Solid, ElementName = "Scandium" };
Element Ti = new Element() { ElementName = "Titanium", AtomicWeight = 47.8671, Symbol = "Ti", AtomicNumber = 22, Phase = Phase.Solid };
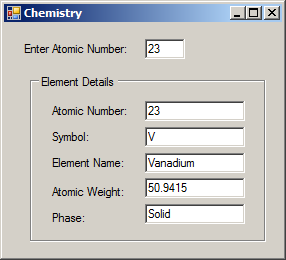
Element V = new Element() { AtomicWeight = 50.9415, Phase = Phase.Solid, AtomicNumber = 23, ElementName = "Vanadium", Symbol = "V" };
Element selected;
switch (nbr)
{
case 8:
selected = O;
break;
case 19:
selected = K;
break;
case 7:
selected = N;
break;
case 9:
selected = F;
break;
case 16:
selected = S;
break;
case 3:
selected = Li;
break;
case 6:
selected = C;
break;
case 10:
selected = Ne;
break;
case 5:
selected = B;
break;
default:
selected = H;
break;
case 23:
selected = V;
break;
case null:
selected = new Element(0, "", "Known", 0.00, Phase.Unknown); ;
break;
case 11:
selected = Na;
break;
case 2:
selected = He;
break;
case 12:
selected = Mg;
break;
case 4:
selected = Be;
break;
case 13:
selected = Al;
break;
case 21:
selected = Sc;
break;
case 14:
selected = Si;
break;
case 20:
selected = Ca;
break;
case 15:
selected = P;
break;
case 22:
selected = Ti;
break;
case 18:
selected = Ar;
break;
case 17:
selected = Cl;
break;
}
return selected;
}
void Display(Element ce)
{
txtSymbol.Text = ce.Symbol;
txtAtomicNumber.Text = ce.AtomicNumber.ToString();
txtElementName.Text = ce.ElementName;
txtAtomicWeight.Text = ce.AtomicWeight.ToString();
txtPhase.Text = ce.Phase.ToString();
}
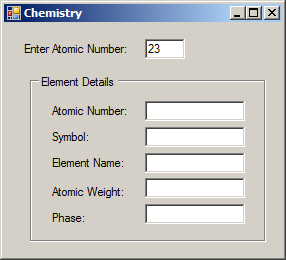
private void txEntered_Leave(object sender, EventArgs e)
{
int ? value = int.Parse(txtEntered.Text);
Element atom = SelectElement(value);
Display(atom);
}
}
}
Having Lost Focus
As soon as a control has lost focus, the control fires an event named LostFocus. It is of type EventArgs.
![]() Practical Learning: Losing Control Focus
Practical Learning: Losing Control Focus
namespace WaterDistributionCompany5
{
    public class WaterBill
    {
        private double ending;
        private double beginning;

        public WaterBill()
        {
            ending = 0.00;
            beginning = 0.00;
        }

        public WaterBill(string mSize, double counterStart, double counterEnd)
        {
            MeterSize = mSize;
            ending = counterEnd;
            beginning = counterStart;
        }

        public string MeterSize { get; set; }
        public double WaterUsage => ending - beginning;

        public double WaterUseCharges => WaterUsage * 4.18 / 1000;
        public double SewerUseCharges => WaterUsage * 5.85 / 1000;

        public double DistributationCharges
        {
            get
            {
                double meterCharge = 0.00;
                double ratioWaterCharge = (WaterUseCharges + SewerUseCharges) / 5.00;

                if (MeterSize == "1")
                    meterCharge = 4.15;
                else
                    meterCharge = 6.38;

                return ratioWaterCharge + meterCharge;
            }
        }

        public double EnvironmentCharge => ((WaterUseCharges + SewerUseCharges) / 7.00) * 1.85;
        public double TotalCharges => WaterUseCharges + SewerUseCharges + DistributationCharges + EnvironmentCharge;
    }
}
| Control | (Name) | Text | Other Properties |
| GroupBox | Meter Size | ||
| RadioButton | rdo3Quarters | 3/4 | |
| RadioButton | rdoOne | 1 | |
| RadioButton | rdoOneAndHalf | 1 1/5 | |
| RadioButton | rdoTwo | 2 | |
| RadioButton | rdoThree | 3/4 | |
| Label | Meter Reading Start . . . . . . . . . . . . . . . . . . . . . . . . . . | ||
| TextBox | txtMeterReadingStart | 0 | TextAlign: Right |
| Label | Gallons | ||
| Label | Meter Reading End . . . . . . . . . . . . . . . . . . . . . . . . . . . . | ||
| TextBox | txtMeterReadingEnd | 0 | TextAlign: Right |
| Label | Gallons | ||
| Label | ---------------------------------------------------------------------------------------------------------------------------------- | ||
| Label | Water and Sewer Usage . . . . . . . . . . . . . . . . . . . . . . | ||
| TextBox | txtWaterAndSewerUsage | 0.00 | TextAlign: Right |
| Label | Gallons | ||
| Label | Water Use Charges => 4.18 per 1,000 Gallons . . . . . . . | ||
| TextBox | txtWaterUseCharges | TextAlign: Right | |
| Label | Sewer Use Charges => 5.85 per 1,000 Gallons . . . . | ||
| TextBox | txtSewerUseCharges | TextAlign: Right | |
| Label | Distribution Charges . . . . . . . . . . . . . . . . . . . . . . . . . | ||
| TextBox | txtDistributionCharges | TextAlign: Right | |
| Label | Environment Charges . . . . . . . . . . . . . . . . . . . . . . . . | ||
| TextBox | txtEnvironmentCharges | TextAlign: Right | |
| Label | ---------------------------------------------------- | ||
| Label | Total Charges . . . . . . . . . . . . . . . . . . . . . . . . . . . . . . | ||
| TextBox | txtTotalCharges | TextAlign: Right |
using System;
using System.Windows.Forms;

namespace WaterDistributionCompany5
{
    public partial class WaterDistribution : Form
    {
        public WaterDistribution()
        {
            InitializeComponent();

            txtMeterReadingEnd.LostFocus += txtMeterReadingEndLostFocus;
        }

        private void txtMeterReadingEndLostFocus(object sender, EventArgs e)
        {
            string meterSize = "0";
            double meterReadingStart = double.Parse(txtMeterReadingStart.Text);
            double meterReadingEnd = double.Parse(txtMeterReadingEnd.Text);

            if (rdoOne.Checked)
                meterSize = "1";

            WaterBill wb = new WaterBill(meterSize, meterReadingStart, meterReadingEnd);

            txtWaterAndSewerUsage.Text = wb.WaterUsage.ToString();
            txtWaterUseCharges.Text = wb.WaterUseCharges.ToString("F");
            txtSewerUseCharges.Text = wb.SewerUseCharges.ToString("F");
            txtDistributionCharges.Text = wb.DistributationCharges.ToString("F");
            txtEnvironmentCharges.Text = wb.EnvironmentCharge.ToString("F");
            txtTotalCharges.Text = wb.TotalCharges.ToString("F");
        }
    }
}


Clicking a Control
Introduction
Probably the most popular action performed on Windows controls consists of clicking. When a user clicks a control, the control fires an event named Click. It is simply of type EventArgs.
![]() Practical Learning: Clicking a Control
Practical Learning: Clicking a Control
using System;

namespace Geometry08
{
    public class Circle
	  {
    	protected double radius;

	    public Circle()
    	{
        	Radius = 0.00;
	    }

	    public Circle(double rad)
    	{
        	radius = rad;
	    }

    	public double Radius
	    {
    	    get
        	{
            	return radius;
	        }

	        set
    	    {
        	    radius = value;
	        }
    	}

	    public double Area { get { return radius * radius * Math.PI; } }
	    public double Diameter { get { return radius * 2; } }

	    public double Circumferemce
    	{
        	get { return Diameter * Math.PI; }
	    }
   }
}namespace Geometry08
{
public class Cylinder : Circle
{
public double Height { get; set; }
public Cylinder(double baseRadius, double height)
{
radius = baseRadius;
Height = height;
}
public double LateralArea
{
get
{
return Circumferemce * Height;
}
}
public double Volume
{
get
{
return Area * Height;
}
}
}
}
| Control | (Name) | Text | TextAlign |
| Label | Radius: | ||
| TextBox | txtRadius | Right | |
| Label | Height | ||
| TextBox | txtHeight | Right | |
| Button | btnCalculate | Calculate | |
| Label | _________________________________ | ||
| Label | Base Diameter: | ||
| TextBox | txtBaseDiameter | Right | |
| Label | Base Circumference: | ||
| TextBox | txtBaseCircumference | Right | |
| Label | Base Area: | ||
| TextBox | txtBaseArea | Right | |
| Label | Lateral Area: | ||
| TextBox | txtLateralArea | Right | |
| Label | Volume: | ||
| TextBox | txtVolume | Right |
private void btnCalculateClick(object sender, EventArgs e)
    {
        double radius = double.Parse(txtRadius.Text);
        double height = double.Parse(txtHeight.Text);

        Cylinder cyl = new Cylinder(radius, height);

        txtBaseDiameter.Text = cyl.Diameter.ToString();
        txtBaseCircumference.Text = cyl.Circumferemce.ToString();
        txtBaseArea.Text = cyl.Area.ToString();
        txtLateralArea.Text = cyl.LateralArea.ToString();
        txtVolume.Text = cyl.Volume.ToString();
    }
The Double-Click Effect
Some controls require a double fast click, referred to as double-click, in order to get a certain behavior. If a user double-clicks a control, the control fires an event named DoubleClick. It is of type EventArgs.
Keyboard Messages
Introduction
A keyboard is used to enter recognizable symbols, letters, and other characters on a control. Each key on the keyboard displays a symbol, a letter, or a combination of those, to give an indication of what the key could be used for.
The user typically presses a key, which sends a signal to a program. The signal is analyzed to find its meaning. If the program or control that has focus is equipped to deal with the signal, it may produce the expected result. If the program or control cannot figure out what to do, it ignores the action.
Each key has a code that the operating system can recognize.
The keyboard provides many events; all work when the user presses a key or a combination of keys. Before doing this, one way or another, the application or one of its controls must have focus. For text-based controls such as the text box, the user can first click the control to give it focus. If a control doesn't have focus, no key action would have any effect on it.
Keying Down
When a key of the keyboard is pressed while a control has focus, the control fires an event nameed KeyDown. The KeyDown event is based on a class named KeyEventArgs that is interpreted through a delegate named KeyEventHandler. This event is defined as follows:
private void name_KeyDown(object sender, KeyEventArgs e)
{
}
This KeyEventArgs class defined in the System.Windows.Forms namespace. The KeyEventArgs class provides information such as the key or the combination of keys that was pressed.
When a Key Has Been Pressed
When the user presses a key, the control that has focus fires an event named KeyPress. The KeyPress event is carried by a class named KeyPressEventArgs. The code of this event appears as follows:
private void name_KeyPress(object sender, KeyPressEventArgs e)
{
}
The KeyPressEventArgs class has (only) two members as properties. The Handled property identifies whether this event was handled. The KeyChar property identifies the key that was pressed. The key pressed for this event should (must) be a character key as a letter or a recognizable symbol. Lowercase alphabetic characters, digits, and the lower base characters such as ; , " [ ] - = / are recognized as they are. For an uppercase letter or an upper base symbols, the user must press Shift + the key. The character would be identified as one entity. This means that the symbol % typed as Shift + 5 (in a QWERTY keyboard) is considered as one character.
Keying Up
When the user releases a key that was pressed, the control fires an event named KeyUp. This event is of type KeyEventArgs. Its implementation appears as follows:
private void name_KeyUp(object sender, KeyEventArgs e)
{
}
Because the he KeyDown and the KeyUp events use the same class (KeyEventArgs), they also share the sasme characteristics.
Mouse Messages
Introduction
The mouse is another object that is attached to the computer allowing the user to interact with the machine. The mouse and the keyboard can each accomplish some tasks that are not normally available on the other or both can accomplish some tasks the same way.
The mouse is equipped with two, three, or more buttons. When a mouse has two buttons, one is usually located on the left and the other is located on the right. When a mouse has three buttons, one usually is in the middle of the other two. A mouse can also have a round object referred to as a wheel.
The mouse is used to select a point or position on the screen. Once the user has located an item, which could also be an empty space, a letter or a word, he or she would position the mouse pointer on it.
To actually use the mouse, the user would press either the left, the middle (if any), or the right button. If the user presses the left button once, this action is called Click. If the user presses the right mouse button, the action is referred to as Right-Click. If the user presses the left button twice and very fast, the action is called Double-Click.
If the mouse is equipped with a wheel, the user can position the mouse pointer somewhere on the screen and roll the wheel. This usually causes the document or page to scroll up or down, slow or fast, depending on how it was configured.
The Mouse Enter Message
Before using a control using the mouse, the user must first position the mouse on it. When this happens, the control fires a MouseEnter event. This event is initiated as follows:
private void Control_MouseEnter(object sender, EventArgs e)
{

}
This event is carried by an EventArgs argument but doesn't provide much information, only to let you know that the mouse was positioned on a control.
The Mouse Move Message
Whenever the mouse is being moved on top of a control, a mouse event is sent. This event is called MouseMove and is of type MouseEventArgs. It is initiated as follows:
private void Control_MouseMove(object sender, System.Windows.Forms.MouseEventArgs e)
{
}
To implement this event, a MouseEventArgs argument is passed to the MouseEventHandler event implementer. The MouseEventArgs argument provides the necessary information about the event such as what button was clicked, how many times the button was clicked, and the location of the mouse.
The Mouse Hover Message
If the user positions the mouse on a control and hovers over it, a MouseHover event is fired. This event is initiated as follows:
private void Control_MouseHover(object sender, EventArgs e)
{
}
This event is carried by an EventArgs argument that doesn't provide further information than the mouse is hovering over the control.
The Mouse Down Message
Imagine the user has located a position or an item on a document and presses one of the mouse buttons. While the button is pressed and is down, a button-down message is sent. This event is called MouseDown and is of type MouseEventArgs and it is initiated as follows:
private void Control_MouseDown(object sender, MouseEventArgs e)
{
}
Like the other above mouse move event, the MouseDown event is carried by a MouseEventArgs argument.
The Mouse Up Message
After pressing a mouse button, the user usually releases it. While the button is being released, a button-up message is sent and it depends on the button, left or right, that was down. The event produced is MouseUp and it is initiated as follows:
private void Control_MouseUp(object sender, MouseEventArgs e)
{
}
Like the MouseDown message, the MouseUp event is of type MouseEventArgs which is passed to the MouseEventHandler for processing.
The Mouse Leave Message
When the user moves the mouse pointer away from a control, the control fires a MouseLeave event. This event is initiated as follows:
private void Form1_MouseLeave(object sender, EventArgs e)
{
}
Text/Value Change
Changing the Text of a Control
When using a text-based control, the user may change change, edit, or update text, usually using the keyboard. When its text changes, a control may fire an event named TextChanged. This event is of type EventArgs. This means that they only notification the control sends is that its text has been changed. If you want to find out what the new text is, you can get it from the control itself.
Changing the Value of a Control
Most controls display some type of value, such as a number or text. Most of those controls allow the user to change the value but the operation depends on the (type of) control. When its value changes, a control may fire an event named ValueChanged. This event is of type EventArgs. This means that the event knows neither the value that the control held previously nor the new value. Fortunately these values are easy to find out. In fact, after the event has fired, the control knows the value it is currently holding.
Drag and Drop Events Messages
Introduction
To support drag n' drop operations, the .NET Framework provides various events through the Control class. The object from where the operation starts is referred to as the source. This object may or may not be from your application. For example, a user can start a dragging operation from a file utility (such as Windows Explorer). The object or document where the dragged operation must end is referred to as the target. Because you are creating an application where you want to allow the user to drop objects, the target is usually part of your application.
Starting the Dragging Operation
To start the dragging operation, the user clicks and holds the mouse on an object or text. Then the user starts moving the mouse. At this time, if the source object is from your application, the control fires a DragLeave event:
public event EventHandler DragLeave
This event is of type EventArgs, which means it doesn't carry any information, just to let you know that a dragging operation has started.
Dragging Over an Object
The user drags an object from one location to another. Between the source and the target, the user may pass over another object but that is not the target. If this happens, the control that is being over passed fires a DragOver event:
public event DragEventHandler DragOver
The DragOver event is handled by a class named DragEventAgs. Most of the time, you will not be concerned with this event because most drag n' drop operations involve a source and a target. For this reason, we will not review this class at this time.
Entering the Target
At one time, the user will reach the target. That is, before dropping the item. At this time, the control over which the mouse is positioned fires the DragEnter event:
public event DragEventHandler DragEnter
At this time, the user has not yet decided to drop the object or not. This is important because at this time, you can still make some decisions, such as identifying the type of item the user is carrying, whether you want to allow this operation or not, etc.
The DragEnter event is handled by the DragEventArgs class. One of the properties of this class is named Effet. This property is of type DragDropEffects, which is an enumeration.
Probably the most important piece of information you want to know is what the user is carrying. For example, a user can drag text, a picture, or a document, etc. To assist you with identifying what the mouse is holding, the DragEventArgs class is equipped with the Data property, which is of type IDataObject.
Dropping the Object
Once the user has reached the target and still wants to complete the operation, he or she must release the mouse. At this time, the object on which the mouse is positioned fires the DragDrop event:
public event DragEventHandler DragDrop
The DragDrop event is handled by the DragEventArgs class.
Custom Message Implementation
Introduction
It is possible, but unlikely, that none of the available events featured in the controls of the .NET Framework suits your scenario. If this happens, you can implement your own event. To do this, you should first consult the Win32 documentation to identify the type of message you want to send.
There are two main techniques you can use to create or send a message that is not available in a control. You may also want to provide your own implementation of a message.
Sending a Custom Windows Message
In order to send a customized version of a Windows message from your control, you must first be familiar with the message. A message in the .NET Framework is based on the Message structure that is defined as follows:
public struct Message
{
    public IntPtr HWnd {get; set;}
    public IntPtr LParam {get; set;}
    public int Msg {get; set;}
    public IntPtr Result {get; set;}
    public IntPtr WParam {get; set;}
    public static Message Create(IntPtr hWnd,
                                 int msg,
                                 IntPtr wparam,
                                 IntPtr lparam);
    public override bool Equals(object o);
    public override int GetHashCode();
    public object GetLParam(Type cls);
    public override string ToString();
}
One of the properties of this structure is Msg. This property holds a constant integer that is the message to send. The constant properties of messages are defined in the Win32 library. To send a message, you can declare a variable of type Message and define it. Once the variable is ready, you can pass it to the DefWndProc() method. Its syntax is:
protected virtual void DefWndProc(ref Message m);
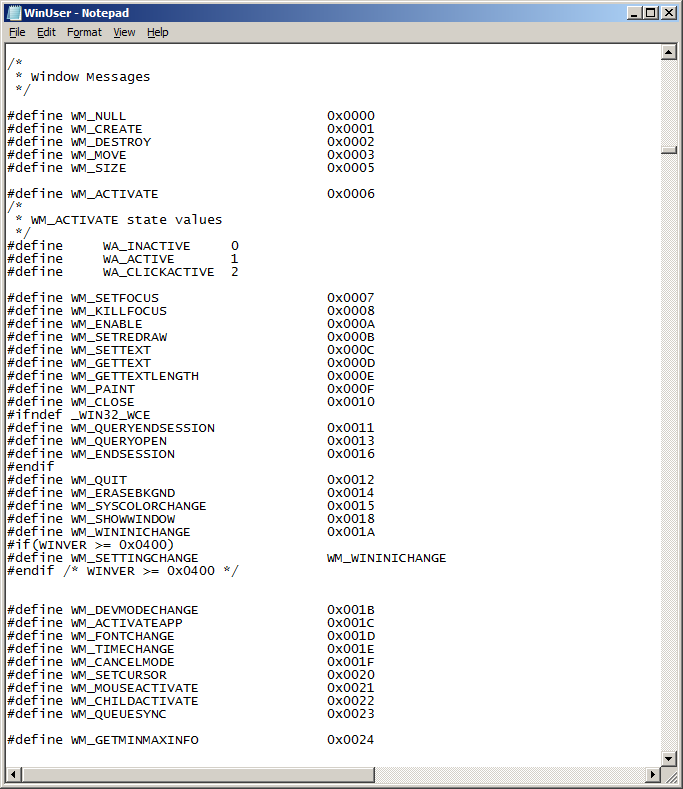
To know the various messages available, you can consult the Win32 documentation but you need a way to get the constant value of that message. Imagine you want to send a message to close a form when the user clicks a certain button named Button1. If you have Microsoft Visual Studio (any version) installed in your computer, you can open the Drive:\Program Files\Microsoft Visual Studio\VC98\Include\WINUSER.H file. In this file, the WM_CLOSE message that carries a close action is defined with the hexadecimal constant 0x0010:
You can then define a constant integer in your code and initialize it with this same value. Here is an example:
using System;
using System.Collections.Generic;
using System.ComponentModel;
using System.Data;
using System.Drawing;
using System.Linq;
using System.Text;
using System.Windows.Forms;

namespace WindowsApplication2
{
    public partial class Form1 : Form
    {
        private const int WM_CLOSE = 0x0010;
        public Form1()
        {
            InitializeComponent();
        }

        private void button1_Click(object sender, EventArgs e)
        {
            Message msg = new Message();

            msg.HWnd = this.Handle;
            msg.Msg = WM_CLOSE;
            DefWndProc(ref msg);
        }
    }
}
Creating a Custom Event
To process a Windows message that is not available for a control you want to use in your application, you can implement its WndProc() method. Its syntax is:
protected virtual void WndProc(ref Message m);
In order to use this method, you must override it in your own class. Once again, you must know the message you want to send. This can be done by consulting the Win32 documentation. Here is an example that fires an OnMove event whenever the user tries to move a window (this prevents the user from performing the action):
using System;
using System.Collections.Generic;
using System.ComponentModel;
using System.Data;
using System.Drawing;
using System.Linq;
using System.Text;
using System.Windows.Forms;
using System.Runtime.InteropServices;

namespace WindowsApplication2
{
    public partial class Form1 : Form
    {
        private const int WM_MOVE = 0x0003;

        public Form1()
        {
            InitializeComponent();
        }

        [DllImport("User32.dll")]
        public static extern bool ReleaseCapture();

        protected override void WndProc(ref Message m)
        {
            switch (m.Msg)
            {
                case WM_MOVE:
                    ReleaseCapture();
                    break;
            }

            base.WndProc(ref m);
        }
    }
}
![]() Practical Learning: Ending the Lesson
Practical Learning: Ending the Lesson
|
|
||
| Previous | Copyright © 2001-2021, FunctionX | Next |
|
|
||