A dialog box has the following characteristics:
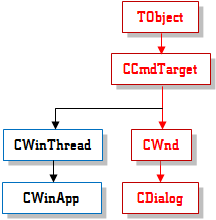
A dialog box is created from a class named CDialog. The CDialog class implements a class named CWnd. The CWnd class is derived from CCmdTarget:
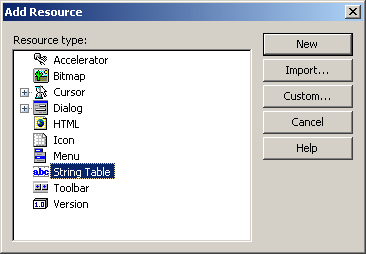
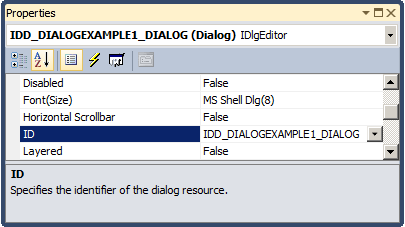
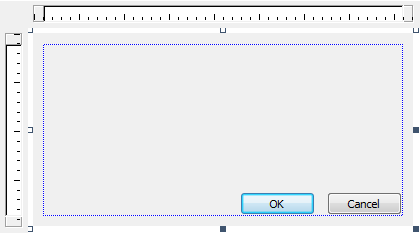
To visually create a dialog box in Microsoft Visual C++, from the Add Resources dialog box, click Dialog and click New. Then you can manipulate its characteristics using the Properties window. In reality, unlike most or all other controls, a dialog box requires some preparation before actually programmatically creating it. While most other controls can be easily added to a host, a dialog box must already “exist†before it is asked to display. Based on this, a dialog box can first be manually created as a text file (in a resource file). In the file, you create a section for the dialog box. This section itself is divided in lines each serving a specific purpose. /p> Like most other controls, a dialog box must be identified. The identifier of a dialog box usually starts with IDD_ (the second D stands for dialog). An example of a dialog identifier would be IDD_SCHOOL_SURVEY. Therefore, the section of the dialog box in the file can start with: IDD_SCHOOL_SURVEY At design time, the identifier of the dialog box is specified using the ID combo box:
The Win32 library provides a series of ready-made names for classes to create controls. In the same way, a dialog box has two types of classes used to create a dialog box. The DIALOG statement was primarily used to create a dialog box. It has been updated and replaced by the DIALOGEX name. Therefore, to indicate in the file that the section you are creating is for a dialog box, type DIALOGEX. Here is an example: IDD_SCHOOL_SURVEY DIALOGEX
A dialog box must be “physically†located on an application. Because a dialog box is usually created as a parent to other controls, its location depends on its relationship to its parent window or to the desktop. The location of a dialog box is defined by x for the distance from the left border of the monitor to the left border of the dialog box and by y for the distance from the top border of the monitor to the top border of the dialog box: IDD_SCHOOL_SURVEY DIALOGEX x, y, At design time, the x value is set using the X Pos field of the Properties window:
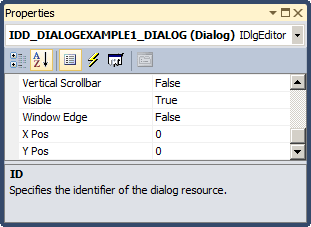
The y value is set using the Y Pos value in the Properties window. If you specify these two dimensions as 0, the left and top borders of the dialog box would be set so the object appears in the center-middle of the screen: IDD_SCHOOL_SURVEY DIALOGEX 0, 0, If you set the value of x or X Pos property to a number less than or equal to 0, the left border of the dialog box would be aligned with the left border of the monitor. If you set the value of x or of the X Pos property higher than 0, the value would be used as the distance, in Dialog Box Unit (DLU), from the left border of the screen to the left border of the dialog box. This scenario also applies for the y value or the Y Pos property.
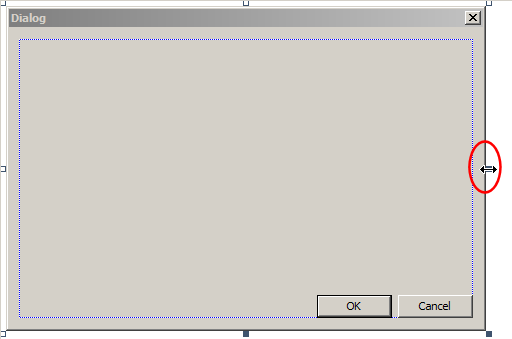
The dimensions of a dialog box are its width and its height. At design time, to set the desired width, position the mouse to its right border until the mouse pointer appears as a horizontal double arrow Then click and drag left or right. To set the desired height, position the mouse to the bottom border until the mouse cursor appears as a vertical double arrow . Then click and drag up or down. To set both the width and the height in one operation, position the mouse in the bottom-right corner until the mouse pointer becomes a North-West <=> South-East diagonal double arrow. Then click and drag up, down, left, or right as necessary. While dragging in any of these operations, you can refer to the right section of the status bar to get the current width and height. In the resource file, the width and the height of the dialog box follow the location values. Here is an example: IDD_SCHOOL_SURVEY DIALOGEX 0, 0, 340, 268 There are other items that can be entered on this first line but the identifier, the DIALOGEX statement, the location, and the dimensions are required.
As the most regular used parent of Windows controls, a dialog box must have some characteristics that would allow it to be as efficient as possible. The characteristics of a dialog box, as done with the controls, are referred to as its styles. In the resource file, to specify these aspects, start a line with the STYLE keyword: IDD_SCHOOL_SURVEY DIALOGEX 0, 0, 340, 268
STYLE
To programmatically change the style of a dialog box, you can call the SetWindowLongPtr() function. Its syntax is: LONG_PTR SetWindowLongPtr(HWND hWnd, int nIndex, LONG_PTR dwNewLong); The first argument is a handle to the dialog box. For a normal application, you can use m_hWnd that we will study in Lesson 7. The nIndex argument represents the type of change you want to make. In Lesson 8, we will come back to the possible values of this argument; but for now, if you want to change the style of a dialog box, this argument should have the GWL_STYLE value. The dwNewLong argument represents the new value you want to apply for the second argument. In this case, it would be the style you want to apply. To get the styles that a dialog box has, you can call the GetWindowLongPtr() function. Its syntax is: LONG_PTR GetWindowLongPtr(HWND hWnd, int nIndex); Both arguments follow the same rules as the first two parameters of the SetWindowLongPtr() function.
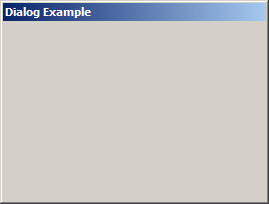
Because a dialog box serves only to hold other objects, it should indicate what it is used for. The top side of a dialog box is made of a horizontal section that we call the title bar. To have a title bar on a dialog box, it must be created with the WS_CAPTION style: IDD_SCHOOL_SURVEY DIALOGEX 0, 0, 340, 268
STYLE WS_CAPTION
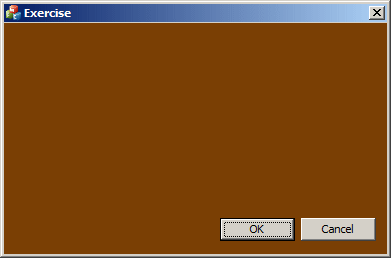
The main area of this bar contains a word or a group of words forming a sentence called a caption. There are various ways you can change it. At design time, in the Properties window, change the value of the Caption field. If you are creating a resource file, start a new line with the CAPTION keyword and provide the word or group of words as a null-terminated string. Here is an example: IDD_SCHOOL_SURVEY DIALOGEX 0, 0, 340, 268
STYLE WS_CAPTION
CAPTION "Exercise"
To programmatically specify the caption of a dialog box, call the SetWindowText() function (the following code, given as a reference, contains the OnCreate() and the SetWindowText() and the OnCreate() functions that we haven't studied yet; we will find out about them in the next lessons): int CExerciseDlg::OnCreate(LPCREATESTRUCT lpCreateStruct)
{
if (CDialog::OnCreate(lpCreateStruct) == -1)
return -1;
SetWindowText(_T("Yugo National Bank - Employees Records"));
return 0;
}
When creating a dialog box, you can equip it with either or both a vertical scroll bar and/or a horizontal scroll bar. To do this, in the Properties window, set the Horizontal Scrollbar and/or the Vertical Scrollbar fields to the desired value.
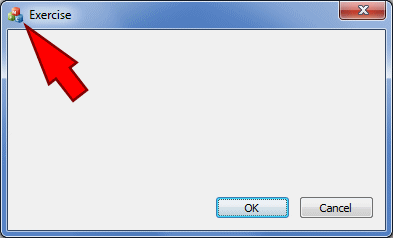
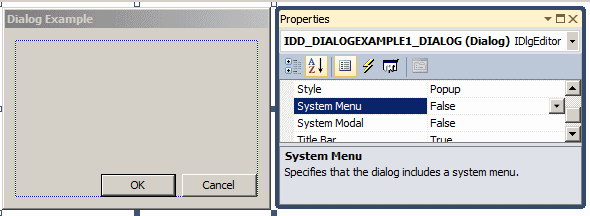
Depending on how it is designed, a dialog box may display a system icon on the left side of the title bar:
To make a dialog box display a system icon, at design time, access its Properties window and set its System Menu option to True. Otherwise, in its resource file, add the WS_SYSMENU style. Here is an example: IDD_SCHOOL_SURVEY DIALOGEX 0, 0, 340, 268
STYLE WS_CAPTION | WS_SYSMENU
CAPTION "Exercise"
By default, Microsoft Visual Studio or the operating system provides a default icon for the dialog box. If you want, you can change it. Probably the easier way is to access the IDR_MAINFRAME item from the Resource View and change its design. You can also use create another icon or use any icon you want. At run-time, you can change the icon by calling the LoadIcon() function. This function comes in two versions whose syntaxes are: HICON LoadIcon(LPCTSTR lpszResourceName) const; HICON LoadIcon(UINT nIDResource) const; If you had designed a new icon and added its resource, you can call the second version. Here is an example (the following code, given as a reference, contains the OnInitDialog(), the LoadIcon(), and the SendMessage() functions that we haven't studied yet; we will find out about them in other lessons): BOOL CDialogExample1Dlg::OnInitDialog()
{
CDialog::OnInitDialog();
// Set the icon for this dialog. The framework does this automatically
// when the application's main window is not a dialog
SetIcon(m_hIcon, TRUE); // Set big icon
SetIcon(m_hIcon, FALSE); // Set small icon
// TODO: Add extra initialization here
HICON hCustomIcon = LoadIcon(AfxGetApp()->m_hInstance,
MAKEINTRESOURCE(IDI_SOME_ICON));
if(hCustomIcon)
SendMessage(WM_SETICON, ICON_SMALL, (LPARAM)hCustomIcon);
return TRUE; // return TRUE unless you set the focus to a control
}
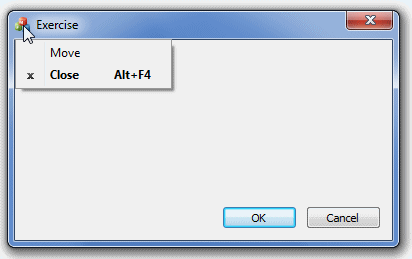
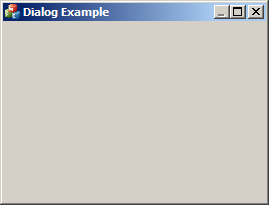
If a dialog box is equipped with a system icon, the user can click the icon and this would display a system menu:
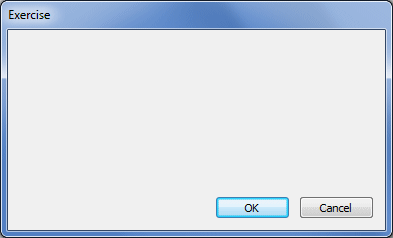
The presence of the system menu comes with a system Close button on the right side of the title bar. As mentioned already, this is made possible by adding the WS_SYSMENU style as seen earlier. As mentioned already, if you want to programmatically change the style of a dialog box, call the SetWindowLongPtr() function. To hide the system icon and its menu from the title bar, first call the function to remove the system menu, then call it again to add the WS_CAPTION style. here is an example (the following code, given as a reference, contains the OnInitDialog() function that we haven't studied yet): BOOL CDialogExample1Dlg::OnInitDialog()
{
CDialog::OnInitDialog();
// Set the icon for this dialog. The framework does this automatically
// when the application's main window is not a dialog
SetIcon(m_hIcon, TRUE); // Set big icon
SetIcon(m_hIcon, FALSE); // Set small icon
// TODO: Add extra initialization here
SetWindowLongPtr(m_hWnd, GWL_STYLE, ~WS_SYSMENU);
SetWindowLongPtr(m_hWnd, GWL_STYLE, WS_CAPTION);
return TRUE; // return TRUE unless you set the focus to a control
}
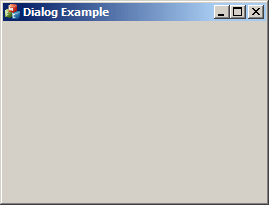
This would produce:
Normally, the standard characteristics of a dialog box state that it does not need to be minimize. Still, if you want, you can add a minimize and a maximize buttons to it. If you want to add the minimize button, at design time, set the Minimize Box property to True. This is equivalent to adding the WS_MINIMIZEBOX style to the class. To programmatically do this, call the SetWindowLongPtr() function and add the WS_MINIMIZEBOX style to the third argument. Here is an example: SetWindowLongPtr(m_hWnd, GWL_STYLE, WS_MINIMIZEBOX | WS_CAPTION | WS_SYSMENU); If you create a dialog box and equip it with the minimize button so the user can shrink it to the task bar, if you want the dialog box to be minimized when it comes up, if you are making the changes from the resource file, add the WS_MINIMIZE style. This would be done as follows: IDD_SCHOOL_SURVEY DIALOGEX 0, 0, 340, 268
STYLE WS_CAPTION | WS_SYSMENU | WS_MINIMIZEBOX | WS_MINIMIZE
CAPTION "Exercise"
Remember that a dialog box can be minimized only if its system menu indicates so.
WS_MAXIMIZEBOX: If you want the Maximize button , set the Maximize Box property to True or checked. This is equivalent to adding the WS_MAXIMIZEBOX style. WS_MAXIMIZE: If you create a dialog box equipped with the Maximize button, if you want the dialog box to be automatically maximized when it displays, you can add the WS_MAXIMIZE style to the resource file. This would be done as follows: IDD_SCHOOL_SURVEY DIALOGEX 0, 0, 340, 268
STYLE WS_CAPTION | WS_SYSMENU | WS_MINIMIZEBOX | WS_MINIMIZE |
WS_MAXIMIZEBOX | WS_MAXIMIZE
CAPTION "Exercise"
Remember that a window box can be maximized only if it includes the WS_MAXIMIZEBOX style. Setting one of these two system button properties to True or checked or adding either WS_MAXIMIZEBOX or WS_MINIMIZEBOX and not the other would disable the other system button. Therefore, here are the combinations you can get:
System Menu = False This is equivalent to: BOOL CDialogExample1Dlg::OnInitDialog()
{
CDialog::OnInitDialog();
// Set the icon for this dialog. The framework does this automatically
// when the application's main window is not a dialog
SetIcon(m_hIcon, TRUE); // Set big icon
SetIcon(m_hIcon, FALSE); // Set small icon
// TODO: Add extra initialization here
SetWindowLongPtr(m_hWnd, GWL_STYLE, ~WS_CAPTION);
SetWindowLongPtr(m_hWnd, GWL_STYLE, WS_SYSMENU);
return TRUE; // return TRUE unless you set the focus to a control
}
There is no system button
The borders of an object allow the user to "physically" locate it on the screen. Obviously a dialog box should have borders. Win32 allows you to customize the borders of a dialog box. At design time, the type of border used on a dialog box is controlled by the Border combo box in the Properties window. If you are working from the resource file, the dialog box provides a set of properties you can use. The options used to control the borders of a dialog box are:
|
|
|||||||||||||||||||||||||||||||||||||||||||||||||||||||||||
|
|
||||||||||||||||||||||||||||||||||||||||||||||||||||||||||||