Introduction to Databases

Introduction to Databases
Fundamentals of Computer Databases
Introduction
A database is a list of values or many lists of values. A computer database is one or many files that hold(s) one or more lists of values. To create a computer database, you can usse a computer application. There are many applications on the market and most (if not all) of them can be used in an ASP.NET MVC website. The applications include Microsoft Acccess, MySQL, etc. If you want to create a huge complex database, you can use Oracle, DB2, Sybase, Interbase, Microsoft SQL Server, etc.
To perform an operation on a database, you must have an appropriate application. In our lessons, we will use Microsoft SQL Server. If you don't have it available to you, you can download and install a trial version of Microsoft SQL Server from the Microsoft Web site (http://www.microsoft.com/en-us/sqlserver/) or another version. After downloading it, you must install it. If you are installing Microsoft SQL Server 2017, you should (probably must) also install SQL Server Management named SSMS separately.
If (since) you are using Microsoft Visual Studio, it already includes LocalDb (or Compact), a version that is good enough to explore Microsoft SQL Server in ASP.NET MVC.
![]() Practical Learning: Introducing Databases
Practical Learning: Introducing Databases
Introduction to ADO.NET
ADO.NET is a group of libraries used to create databases using various sources that include Microsoft SQL Server, Microsoft Access, Oracle, XML, etc. ADO.NET relies on the .NET Framework classes. Some of the operations are handled through the DataSet class.
While ADO.NET is the concept of creating and managing database systems, the DataSet class serves as an intermediary between the database engine and the user, namely the Web controls of an ASP.NET MVC website.
Getting Access to ADO.NET Libraries
As mentioned already, ADO.NET supports various types of databases. To make your job easy, ADO.NET considers databases in categories. For example, Oracle is its ADO.NET classes that fully understand how Oracle works. Databases that function like Microsoft Access have their own category. The classes used to deal with databases of each category are created in their own namespaces.
The classes used to deal with Microsoft SQL Server databases are defined in a namespace named System.Data.SqlClient that belongs to the System.Data.dll library. To access a class, if you are writing your code in a C# file, you can first include the namespace prior to using the class. If you are writing your code in a webpage, make sure you qualify the class with its namespace.
Introduction to SQL
Introduction to the Structured Query Language
The Structured Query Language, known as SQL, is a computer language used to create and manage databases.
|
|
SQL can be pronounced Sequel or S. Q. L. In our lessons, we will consider the Sequel pronunciation. For this reason, the abbreviation will always be considered as a word, which would result in "A SQL statement" instead of "An SQL statement". Also, we will regularly write, "The SQL" instead of "The SQL language", as the L already represents Language. |
To implement the SQL to Microsoft SQL Server, the company developed Transact-SQL as Microsoft's implementation of SQL. Transact-SQL is the language used internally by Microsoft SQL Server.
The SQL is made of two sub-languages or, we can say that the SQL gives two categories of instructions. The Data Definition Language, or DDL, is the part that gives instructions to create objects. The Data Manipulation Language, or DML, is used to explore the values (records) stored in a database.
The SQL Interpreter
As a computer language, the SQL is used to give instructions to an internal program called an interpreter. You must make sure you give precise instructions. SQL is not case-sensitive. This means that the words CREATE, create, and Create mean the same thing. It is a tradition to write SQL's own words in uppercase.
Introduction to SQL Statements
An instruction given in the SQL is called a SQL statement. There are various ways you can give such a statement. To visually give a statement, right-click something in the Server Explorer and click the desired option.
A SQL statement can be formulated by writing code. You have various options. To create a special window for writing SQL code, in the Server Explorer, right-click the database connection and click New Query. We will refer to this window as the Query window.
The Query window is made of four main sections.The tab displays the name of the file. The top section of the Query window displays a toolbar with various buttons. You will write your code in the main wide area. The bottom section shows the results of the statement(s).
The database engine is an application inside Microsoft SQL Server. It receives SQL instructions, interprets them, validates or rejects them, and decides what to do.
Creating Something
To create something in SQL, the DDL instruction starts with the CREATE keyword. It is followed by something. A SQL statement can end with a semicolon but this is only an option.
GOing to the Results
After creating a SQL statement, to indicate its end, you can add the GO keyword. If you didn't end the statement with a semicolon, you can omit the GO keyword. If you want to use the GO keyword, you must end the previous statement with a semicolon.
While most SQL statements can end with a semicolon, the GO statement doesn't use a semicolon.
Viually Executing a Statement
After writing an instruction in a Query window, to see the results, you must execute the statement. To let you do this visually, the toolbar of the Query window is equipped with the Execute button. To execute a statement:
Introduction to Connecting to a Microsoft SQL Server
Manually Establishing a Connection
To perform an operation on a database server, you must establish a connection to it. You have many options. Of course, you must have Microsoft SQL Server installed on a computer to which you have access. In our lessons, we will use Microsoft SQL Server 2014 installed in Microsoft Windows 7 Professional, Microsoft SQL Server 2017 installed in Microsoft Windows 10, and the local database installed with Microsoft Visual Studio 2015.
When creating an application, you must specify the type of database system you will use:
A Class for a SQL Connection
To support a connection to a (any) database, the .NET Framework provides an abstract class named DbConnection
public abstract class DbConnection : Component,
				                     IDbConnection,
				                     IDisposable
The DbConnection class is defined in the System.Data.dll library. To support a connection to a Microsoft SQL Server database, the .NET Framework provides a class named SqlConnection. It is derived from the DbConnection class and implements the ICloneable interface:
public sealed class SqlConnection : DbConnection, ICloneable
The SqlConnection class is defined in the System.Data.SqlClient namespace. Before using this class, you can first include its namespace in the document of your controller class or of your model. To connect to a database, you can first declare a variable of type SqlConnection. The class is equipped with two constructors. The default constructor allows you to declare the variable without specifying how the connection would be carried. Here is an example:
using System.Web.Mvc;
using System.Data.SqlClient;

namespace Exercises.Controllers
{
    public class ExerciseController : Controller
    {
        // GET: Exercise
        public ActionResult Index()
        {
            SqlConnection sc = new SqlConnection();

            return View();
        }
    }
}
If you are writing your code in a webpage, use the class name and qualify it from its namespace. Here is an example:
<!DOCTYPE html>
<html>
<head>
<title>Exercise</title>
</head>
<body>
<h2>Exercise</h2>

@{
    System.Data.SqlClient.SqlConnection sc = new System.Data.SqlClient.SqlConnection();
}
</body>
</html>
Opening a Connection
After creating a connection, before doing anything on its database, you must open the connection. If you are using the Add Connection dialog box, after specifying the necessary pieces of information, to open the connection, click OK.
To support connection opening, the SqlConnection class is equipped with a method named Open. Its syntax is:
public override void Open();
Here is an example of calling it:
<!DOCTYPE html>
<html>
<head>
<title>Exercise</title>
</head>
<body>
<h2>Exercise</h2>

@{
    System.Data.SqlClient.SqlConnection sc = new System.Data.SqlClient.SqlConnection();
    sc.Open();
}
</body>
</html>
As you can see, this method does not take any argument. The SqlConnection object that calls it is responsible to get everything ready:
Closing or Deleting a Connection
A database connection consumes resources such as a processor making calculations. When a connection is not needed anymore and you can perform operations without needing it, you should close it. To assist you with this, the SqlConnection class is equipped with a method named Close. Its syntax is:
public virtual void Close();
This method is simply called to close the current connection. Here is an example of calling it:
@{
    System.Data.SqlClient.SqlConnection sc = new System.Data.SqlClient.SqlConnection();

    sc.Open();

    // Do some things here

    sc.Close();
}
If necessary, you can call the Close() method more than once.
Disposing of a Connection
As mentioned earlier, the SqlConnection class is derived from the DbConnection class. The DbConnection class implements the IDisposable interface. This means that, to close the connection and free its resources, you can use the using keyword. This can be done as follows:
@{
    using (System.Data.SqlClient.SqlConnection sc = new System.Data.SqlClient.SqlConnection())
    {
	    sc.Open();
    }
}
When this code executes, it opens the connection. Inside of the curly brackets, you can do whatever you want. When the compiler reaches the closing curly bracket, it calls the SqlConnection.Close() method, which means you don't need to remember to close it.
Introduction to Connection Strings
Overview
A connection string is a piece of text that holds the information necessary to programmatically establish a connection to a database. You have various options to create a connection string.
To support connection strings, the second constructor of the SqlConnection class takes as argument a string value. Its syntax is:
public SqlConnection(string connectionString);
You can create the necessary (but appropriate) string in this constructor when declaring the variable. This would be done as follows:
@{
    System.Data.SqlClient.SqlConnection connection = new System.Data.SqlClient.SqlConnection("something");
}
If you want, you can first create the string that would be used to handle the connection, then pass that string to this construction. This would be done as follows:
@{
    string strConnection = "something";
    System.Data.SqlClient.SqlConnection connection = new System.Data.SqlClient.SqlConnection(strConnection);
}
The Connection String Builder
To assist you with creating a connection string, the System.Data.SqlClient namespace provides a class named SqlConnectionStringBuilder that is derived from a class named DbConnectionStringBuilder:
public sealed class SqlConnectionStringBuilder : DbConnectionStringBuilder
The DbConnectionStringBuilder class starts as follows:
public class DbConnectionStringBuilder : IDictionary,
                                         ICollection,
                                         IEnumerable,
                                         ICustomTypeDescriptor
As you can see, the DbConnectionStringBuilder class is a collection class that implements the IDictionary and the ICollection interfaces. Since this class creates a dictionnary, each of its members is of type key=value. This also means that the class inherits a property named Item that makes it possible to access members using an indexed property passed by name.
Since this class implements ICollection, it can add, remove, and insert items.
The SqlConnectionStringBuilder class has two constructors. If you already have a connection string, you can pass it to the following constructor:
public SqlConnectionStringBuilder(string connectionString);
The Characteristics of a Connection String
Introduction to the Attributes of a Connection String
To use a SqlConnection object, you must provide a connection string. A connection string is created like a dictionary connection. That is, the string is made of items created each as key=value. The combinations are separated with semi-colons: ";". In our lessons, we will refer to each of these pieces as an attribute of the connection string. When joined, these attributes appear as follows:
key1=value1;key2=value2;key_n=value_n
Anything that is part of this string is not case-sensitive. How you create the attributes of a connection string depends on the type of computer you are connecting to, whether you are connecting to a database, what level of security you would use (or need), etc. There are various of these attributes, some of them are always required, some of them are usually optional, and some others depend on the circumstances.
The Source of Data
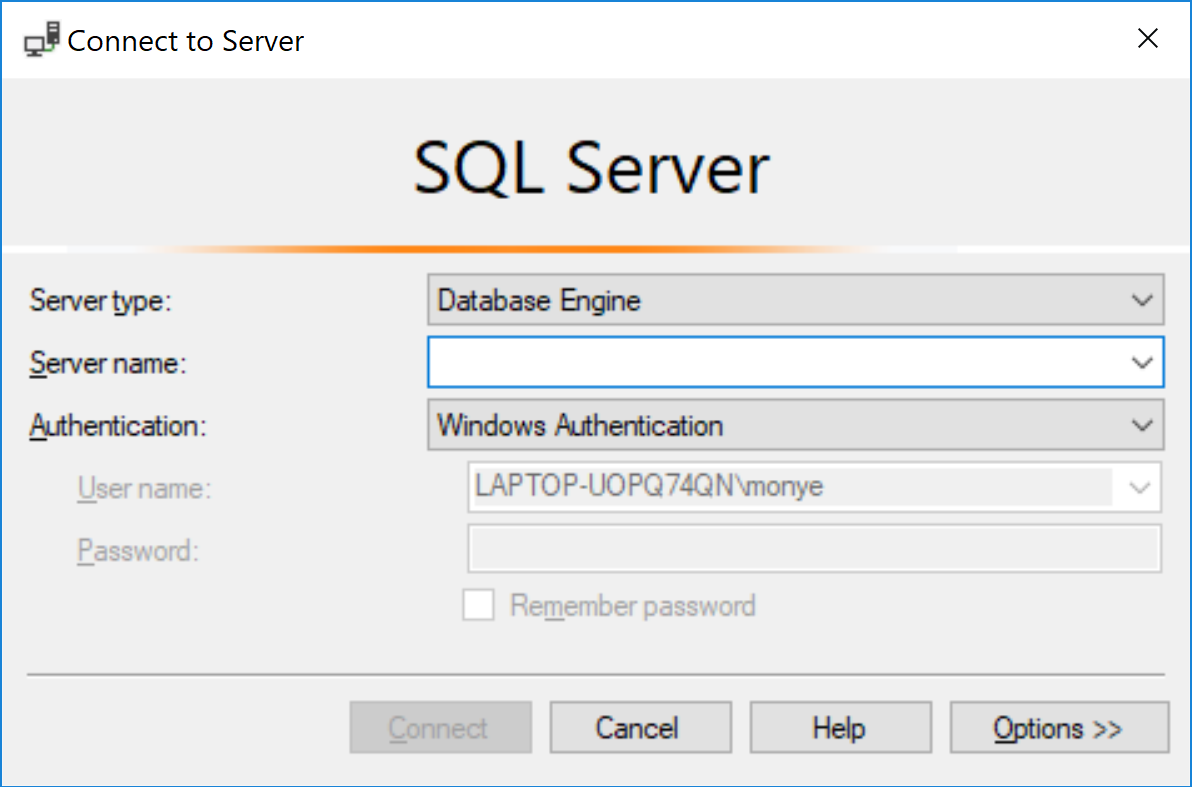
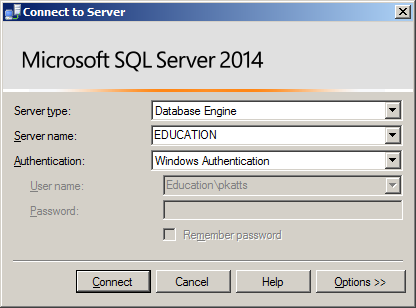
To establish a connection to a database, you must specify the computer to which you are connecting, that has Microsoft SQL Server installed. If you are using Microsoft SQL Server, specify the comuputer name in the Server Name combo box of the Connect to Server dialog box.
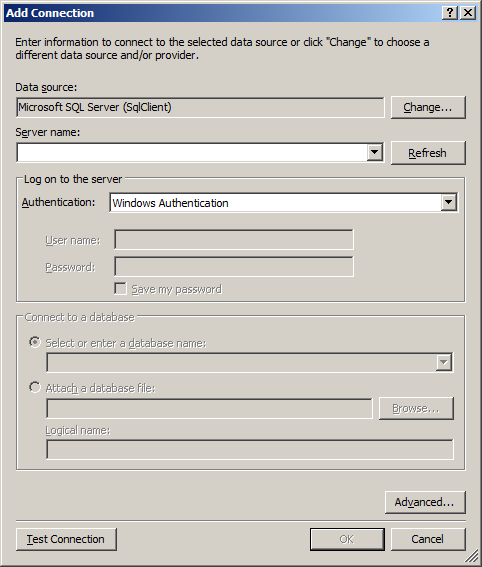
In the same way, if you are working from the Add Connection dialog box of Microsoft Visual Studio, to see the list of servers and select one, you can click the arrow of the Server Name combo box..
If you are working directly in Microsoft SQL Server, when using the Connect To Server dialog box, if you don't remember the name of the computer or the computer is connected to a network that has many computers with Microsoft SQL Server, click the arrow of the Server Name combo box and select Browse For More to select the desired computer.
If Microsoft SQL Server is intalled in the same computer you are using, you can set the computer name as (local) in the Server Name combo box. Here is an example:
If you are programmatically connecting to a computer using the SqlConnection class, the connection string includes an attribute named Server, Data Source, Address, Addr, or Network Address. For the rest of our lessons, this attribute will be referred to as the computer attribute. If you know the name of the computer, you can assign it to the computer attribute. As an option, you can include the name of the computer in single-quotes.
If you are creating your connection string using the SqlConnectionStringBuilder class, it is equipped with a property named DataSource, which is a string:
public string DataSource { get; set; }
Fundamentals of Authentication
Introduction
An important aspect of establishing a connection to a computer is security. The security referred to in this attribute has to do with the connection, not how to protect your database.
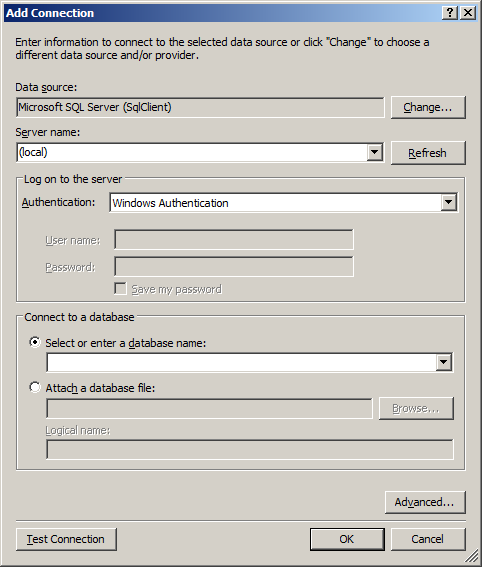
If you are working in the Connect To Server or the Add Connection dialog box, if you want to use the account that opened the application, you can accept the Windows Authentication radio button. If you want to specify the authentication:
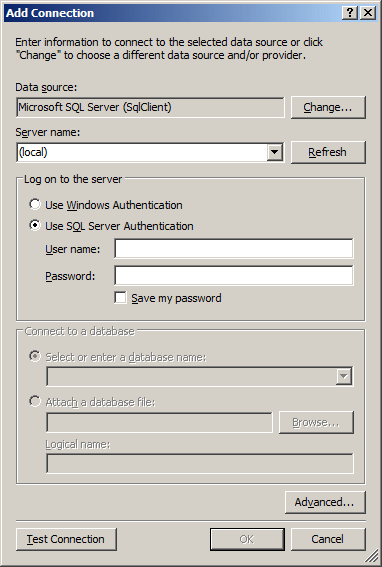
If you are programmatically establishing the connection, the connection string of the SqlConnection class includes an attribute named Trusted_Connection or Integrated Security. It can have a value of true, false, yes, no, or SSPI with the SSPI having the same indication as true.
If you are creating your connection string using the SqlConnectionStringBuilder class, it is equipped with a Boolean property named IntegratedSecurity:
public bool IntegratedSecurity { get; set; }
If you are establishing a trusted or simple connection that doesn't need to be verified, you can assign a value of true or SSPI. Here is an example:
@{
    string strConnection = "Server=(local);Trusted_Connection=SSPI";
}
If you are programmatically establishing the connection, to apply authentication, you can assign false or no to the security attribute you selected. Here is an example:
@{
    string strConnection = "Server='CustomersAccountss';Integrated Security=no";
}
The User ID
If you are programmatically connecting to a server and you are using the SqlConnection, in the connection string, add an attribute named User ID attribute to provide a username. If you are using the SqlConnectionStringBuilder class, it is equiped with a property named UserID, which is a string:
public string UserID { get; set; }
The Password
If you are establishing a connection to a server:
If yo are using SQL code, use either the PASSWORD or the PWD (remember that the attributes are not case-sensitive but the value of the password is) attribute and assign it the exact password associated with the User ID attribute of the same connection string. Here is an example:
@{
    string strConnection = "Server='HumanResourcesDepository';" +
                           "Integrated Security=no;" +
                           "User ID=wmessmann;PWD=$outh~@kotA";
}
If you are using the SqlConnectionStringBuilder class, it is equipped with a property named Password:
In some circumstances, you can use an empty password in which case you would assign an empty string to the password attribute.
Additional Attributes
There are various other attributes used in the connection string. They include Network Library (also called Net), Application Name, Workstation ID, Encrypt, Connection Timeout, Data Source, Packet Size, AttachDBFilename, Current Language, Persist Security Info.
Starting a Database
Introduction
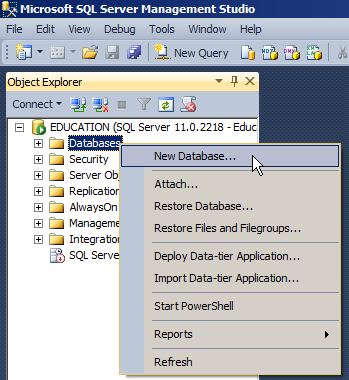
After establishing a connection to a database server, you can work on a database. First, you must create a database. A database is a file or a group of computer files that has (or have) (a) name(s) and (a) location(s). There are different ways to create a database, depending on the database application you are using. You can visually create a new database in Microsoft SQL Server Management Studio or in Microsoft Visual Studio. You can create a database by writing code in Microsoft SQL Server Management Studio, in Microsoft Visual Studio, at the Command Prompt, or programmatically in C#.
Visually Creating a Database
To visually create a database:
The New Database dialog box will open:
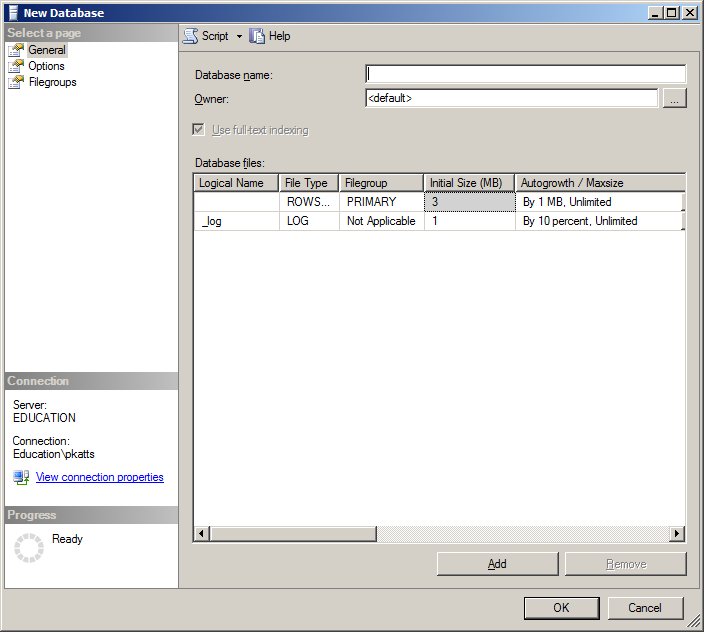
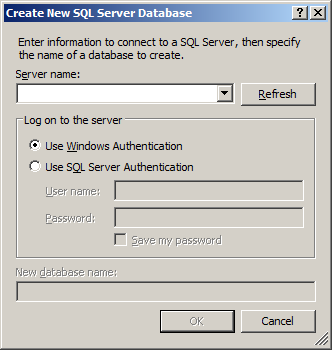
In both cases, you must name the database. When you have specified the other options and are ready, click OK.
![]() Practical Learning: Creating a Database
Practical Learning: Creating a Database
The Database in Use
While using the database server, you must always know what database you are currently using, otherwise, either the operation you are trying to perform would fail or you may perform an operation on the wrong database. If you are using Microsoft SQL Server, to indicate the database you are currently using, in the query window, before the line that performs the operation, type USE followed by a space and the name of the database you want to use. Here is an example:
USE RedOakHighSchool;
GO
The Database of a Connection String
If you are establishing a connection to a database that was created aalready, if you are using the Add Connection dialog box of Microsoft Visual Studio, click the arrow of the Select Or Enter A Database Name combo box and select the desired database. If you are working programmatically, to let you specify the database, the connection string includes an attribute named Database. The Database attribute allows you to specify the name of the database you are connecting to, if any. The Database keyword can also be substituted for the Initial Catalog value. If you are connecting to an existing database, assign its name to this attribute. If you are not connecting to a database, you can omit this attribute. Alternatively, you can assign nothing to this attribute. Here is an example:
@{
    string strConnection = "Server='MSSQLServerCorporate';Database=;";
}
Another alternative is to assign an empty, single-quoted, string to this attribute. Here is an example:
@{
    string strConnection = "Server='CityUniversity';Initial Catalog='exercise1';";
}
As mentioned above, the Database attribute is optional, especially if you are only connecting to the computer and not to a specific database.
If you are using the SqlConnectionStringBuilder class, it is equipped with a property named InitialCatalog:
public string InitialCatalog { get; set; }
You can assign the name of the database to this property.
A Web Configuration File
Introduction
To let you specify a connection string to use in your project, when you start an ASP.NET MVC project (in fact any ASP.NET application) in Microsoft Visual Studio, the studio creates a file named Web.config. This file is created at the root of the project (other folders or sections of a website may contain additional Web.config files for different goals) (the Web.config file uses the XML format). To add a connection string to your Web.config file, you must create a section named connectionStrings. Inside this element, create a child tag named Add. The Add tag must have three attributes named:
Based on this description, a connection string in the Web.config file can start as follows:
<?xml version="1.0" encoding="utf-8"?>
<!--
  For more information on how to configure your ASP.NET application, please visit
  https://go.microsoft.com/fwlink/?LinkId=301880
  -->
<configuration>

  . . . No Change

  <connectionStrings>
    <add name="connection-string-name"
         connectionString="connection-string-details"
         providerName="System.Data.SqlClient" />
  </connectionStrings>

  . . . No Change

</configuration>
If you are using many databases in your project, you should create a separate connection string for each. This means that you can create as many add nodes as you need in your Web.config document. This would be done as follows:
<?xml version="1.0" encoding="utf-8"?>
<!--
  For more information on how to configure your ASP.NET application, please visit
  https://go.microsoft.com/fwlink/?LinkId=301880
  -->
<configuration>

  . . . No Change

  <connectionStrings>
    <add name="connection-string1-name"
         connectionString="connection-string1-details"
         providerName="System.Data.SqlClient" />
    <add name="connection-string2-name"
         connectionString="connection-string2-details"
         providerName="System.Data.SqlClient" />

    . . .

    <add name="connection-string_n-name"
         connectionString="connection-string_n-details"
         providerName="System.Data.SqlClient" />

  . . . No Change

</configuration>
As a result, the connectionStrings node is a parent to one or more add child nodes. This means that the connectionStrings node is a collection of add nodes. Each add node is also referred to as a section.
In some cases, when you add a database to your project, Microsoft Visual Studio will add a new connectionStrings node if that section doesn't yet exist in your Web.config file. The studio would then add the necessary Add node(s) and provide the necessary values.
The Parts of a Connection String
The Source of Data
Remember that one of the characteristics of a connection string is the computer that holds the database you want to use. This is referred to as the data source. It can be identified as the Data Source. If you are using a local database for your ASP.NET MVC project in Microsoft Visual Studio, specify the Data Source as (LocalDb)\MSSQLLocalDB.
The Path to the Database
To support the file name of a local database, the connection string has a section named AttachDBFileName. To support the database file name, the SqlConnectionStringBuilder class is equipped with a property named AttachDBFilename:
public string AttachDBFilename { get; set; }
The path to the database must be assigned to this section or property. Normally, you should create your database(s) in the App_Data folder. To indicate that this is where the database resides, assign |DataDirectory| to AttachDBFilename. This is followed by a backslash and the name of the database file with its .mdf extension.
@{
    System.Data.SqlClient.SqlConnection connection = new System.Data.SqlClient.SqlConnection("Server=YellowCastle; ");
}
Other Attributes of the Connection String
There are various other attributes used in the connection string. They include Network Library (also called Net), Application Name, Workstation ID, Encrypt, Connection Timeout, Data Source, Packet Size, AttachDBFilename, Current Language, Persist Security Info.
After creating the connection string, when the application executes, the compiler would "scan" the string to validate each key=value section. If it finds an unknown Key, an unknown value, or an invalid combination of key=value, it would throw an ArgumentException exception and the connection cannot be established.
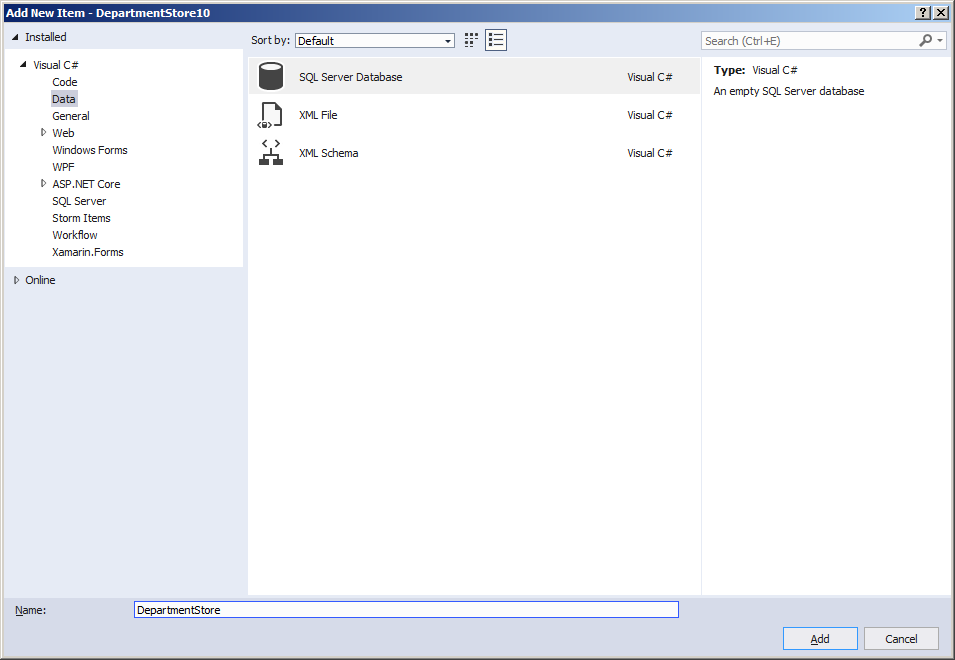
![]() Practical Learning: Setting Up a Web Configuration
Practical Learning: Setting Up a Web Configuration
<?xml version="1.0" encoding="utf-8"?>
<!--
  For more information on how to configure your ASP.NET application, please visit
  https://go.microsoft.com/fwlink/?LinkId=169433
  -->
<configuration>
  <connectionStrings>
    <add name="csDepartmentStore"
         connectionString="Data Source=(LocalDb)\MSSQLLocalDB;AttachDbFilename=|DataDirectory|\DepartmentStore.mdf;Initial Catalog=DepartmentStore;Integrated Security=True"
         providerName="System.Data.SqlClient" />
  </connectionStrings>
  <system.web>
    . . . No Change
</configuration>
A Web Configuration Manager
To help you create a new connection string or to access an existing connection string, the .NET Framework provides a static class named ConfigurationManager:
public static class ConfigurationManager
This is a small class with only two properties, a few methods, and no constructor. The ConfigurationManager class is defined in the System.Configuration namespace of the System.Configuration.dll library. Therefore, if you want to use this class in a class (such as a controller class) or a model document, you can first include its namespace in the top section of the document. If you are writing your code in a webpage, qualify the class with its parent namespace.
A ConfigurationManager object holds a collection of the sections of a connection string. To let you access those parts, the ConfigurationManager class is equipped with a property named ConnectionStrings. It is of a class named ConnectionStringSettingsCollection, which is a collection:
public static ConnectionStringSettingsCollection ConnectionStrings
ConnectionStringSettingsCollection is a complete collection class with all of the types of properties and methods we reviewed for collection classes. These include the ability to add a new item, locate an existing item, edit an item, or remove one. This class contains many more properties and methods than a traditional collection class.
The ConnectionStringSettingsCollection class is equipped with an indexed property overloaded with three versions. The indexer of a ConnectionStringSettingsCollection object produces an object of a class named CollectionStringSettings, which also is a collection class.
To give you access to the connection string produced by a ConnectionStringSettingsCollection object, the CollectionStringSettings class is equipped with a property named ConnectionString, which is a string.
If you want to access a section based on its position in the connectionStrings collection of a connection string, pass its index in the square brackets of the ConnectionStringSettingsCollection object. This version of the indexer is presented as follows:
public ConnectionStrings this[int index] { get; set; }
A better alternative is to access a section by its name. To support this, the ConnectionStringSettingsCollection class provides a read-only version of the indexer that takes a string as argument:
public ConnectionStrings this[string name] { get; }
Here is an example of using this property:
using System.Web.Mvc;
using System.Configuration;
using System.Data.SqlClient;

namespace Exercises.Controllers
{
    public class ExerciseController : Controller
    {
        // GET: Exercise
        public ActionResult Index()
        {
            SqlConnection sc = new SqlConnection(ConfigurationManager.ConnectionStrings["Something"].ConnectionString);

            return View();
        }
    }
}
![]() Practical Learning: Setting Up a Web Configuration Manager
Practical Learning: Setting Up a Web Configuration Manager
using System.Web.Mvc;
using System.Data.SqlClient;

namespace DepartmentStore10.Controllers
{
    public class StoreItemsController : Controller
    {
        // GET: StoreItems
        public ActionResult Index()
        {
            using (SqlConnection scDepartmentStore = new SqlConnection(System.Configuration.ConfigurationManager.ConnectionStrings["csDepartmentStore"].ConnectionString))
            {

            }

            return View();
        }
    }
}
Deleting a Database
Visually Deleting a Database
If you have created a database but don't need it anymore, you can delete it. To visually delete a database in the Microsoft SQL Server Management Studio, in the Object Explorer, righ-click the name of the database and click Delete. You will receive a Delete Object dialog box that asks you to confirm the deletion or change your mind.
Dropping a Database
You can programmatically delete a database in a Query window in the Microsoft SQL Server Management Studio, at the Command Prompt, or using C# code. The statement to delete a database in SQL uses the DROP DATABASE expression. The formula to follow is:
DROP DATABASE database-name
Before deleting a database in SQL, you must make sure the database is not being used or accessed by someone else or by another object. Otherwise you may receive an error when you execute the statement.
The System Databases
Introduction
When you install Microsoft SQL Server, it also installs four primary databases. Those databases are for internal use. This means that you should avoid directly using them, unless you know exactly what you are doing.
If you are working in the Microsoft SQL Server Management Studio, the default databases appear in the Object Inspector in the System Databases node.
The Master Database
One of the databases installed with Microsoft SQL Server is named master. This database holds all the information about the server on which your Microsoft SQL Server is installed. For example, we saw earlier that, to perform any operation on the server, you must login. The master database identifies any person, called a user, who accesses the database, including when and how.
Besides identifying who accesses the system, the master database also keeps track of everything you do on the server, including creating and managing databases.
You should not play with the master database; otherwise you may corrupt the system. For example, if the master database is not functioning right, the system would not work.
Commanding a Database
Introduction
After establishing a connection, if you are successful, the database system becomes available to you and you can take actions. An action you perform on the database server or on a database is called a command.
To support the various commands you can perform on a Microsoft SQL Server database, the System.Data.SqlClient namespace provides a class named SqlCommand. To use it, you can declare a variable of type SqlCommand using one of its constructors.
The Text to Command
The SqlCommand class is equipped with four constructors. The default constructor allows you to initiate a command without specifying what action would be taken. The action to perform is created as a string statement. This action is represented by the CommandText property of the SqlCommand class, which is of type string.
If you want to use the default constructor, you can create a string that would carry the action to perform. Once the string is ready, you can assign it the CommandText property. This would be done as follow:
@{
    string strCommandToExecute = "Blah Blah Blah";
    System.Data.SqlClient.SqlCommand cmdExecution = new System.Data.SqlClient.SqlCommand();

    cmdExecution.CommandText = strCommandToExecute;
}
After creating the action that would be performed, you must specify what connection would carry it. To do this, you can first create a SqlConnection object. To provide it to the command, the SqlCommand class is equipped with a property named Connection that is of type SqlConnection. After creating a SqlConnection object, to provide it to the command, you can assign it to the SqlCommand.Connection property. This can be done as follows:
@{
    using(System.Data.SqlClient.SqlConnection scExercuse =
        new System.Data.SqlClient.SqlConnection(System.Configuration.ConfigurationManager.ConnectionStrings["Something"].ConnectionString))
    {
        string strCommandToExecute = "Blah Blah Blah";
        System.Data.SqlClient.SqlCommand cmdExecution = new System.Data.SqlClient.SqlCommand();

        scExercuse.Open();

        cmdExecution.Connection = scExercuse;
        cmdExecution.CommandText = strCommandToExecute;
    }
}
Instead of declaring a SqlCommand variable and the command text separately, as an alternative, you can define the command text when declaring the SqlCommand variable. To do this, you can use the second constructor of the SqlCommand class. Its syntax is:
public SqlCommand(string cmdText);
Once again, after using this constructor, you must specify what connection would carry the action. To do this, you can assign a SqlConnectionobject to the Connection property of your SqlCommand. Here is an example:
@{
    using(System.Data.SqlClient.SqlConnection scExercuse =
        new System.Data.SqlClient.SqlConnection(System.Configuration.ConfigurationManager.ConnectionStrings["Something"].ConnectionString))
    {
        System.Data.SqlClient.SqlCommand cmdExecution = new System.Data.SqlClient.SqlCommand("Blah Blah Blah");

        scExercuse.Open();

        cmdExecution.Connection = scExercuse;
    }
}
Instead of assigning a SqlConnection object to the SqlCommand.Connection property, you can specify what connection would carry the action at the same time you are creating the command. To specify the connection when declaring the SqlCommand variable, you can use the third constructor of this class. Its syntax is:
public SqlCommand(string cmdText, SqlConnection connection);
The second argument to this constructor is an established connection you would have defined. Here is an example:
@{
    using(System.Data.SqlClient.SqlConnection scExercuse =
        new System.Data.SqlClient.SqlConnection(System.Configuration.ConfigurationManager.ConnectionStrings["Something"].ConnectionString))
    {
        System.Data.SqlClient.SqlCommand cmdExecution = new System.Data.SqlClient.SqlCommand("Blah Blah Blah", scExercuse);

        scExercuse.Open();

        cmdExecution.Connection = scExercuse;
    }
}
If you had initiated the action using the default constructor of the SqlCommand class, you can assign a SqlConnection object to the Connection property of the SqlCommand class.
Command Execution
After establishing a connection and specifying what command needs to be carried, you can execute it. To support this, the SqlCommand class is equipped with a method named ExecuteNonQuery(). Its syntax is:
public override int ExecuteNonQuery();
This method does not take any argument. The SqlCommand object that calls it must have prepared a valid command.
When a Command Times Out
Some actions take longer than others to execute. For this type of command, the compiler would keep trying to execute a command until successful. If there is a problem, this operation can take long or too long. You can specify how long the compiler should wait to try executing the command, again.
The SqlCommand.CommandTimeOut property allows you to specify the time to wait before trying to execute a command. The default value of this property is 30 (seconds). If you want a different value, assign it to your SqlCommand variable.
The Type of Command
Most commands are communicated as strings, but there arre other types of commands (such as stored procedures). To allow you to specify the type of command you want to perform, the SqlCommand class is equipped with a property named CommandType, which is based on an enumeration named CommandType.
The CommandType enumeration has three members: StoredProcedure, TableDirect, and Text. For a SqlCommand object, the default value is Text.
![]() Practical Learning: Ending the Lesson
Practical Learning: Ending the Lesson
|
|
||
| Home | Copyright © 2001-2021, FunctionX | Next |
|
|
||