Assistance with Data Entry

Assistance with Data Entry
Topics on Data Entry
Adjacent Data Entry
The most common technique of performing data entry requires that you know the sequence of the columns of the table in which you want to enter data. In this case, provide the value of each column in the order they were created in the table. Here is an example we used previously:
CREATE TABLE SaleItems
(
    Manufacturer VARCHAR(40),
    Category     VARCHAR(28),
    SubCategory  VARCHAR(25),
    ItemName     VARCHAR(120),
    Size         VARCHAR(20)
);
GO

INSERT SaleItems
VALUES('Ralph Lauren', 'Girls', 'Shirts', 'Girls 2-6X Short-Sleeved Mesh Polo Shirt', '3T');
GO
During data entry on adjacent columns, if you don't have a value for a text-based column, type two single-quotes '' to indicate emptiness.
Random Data Entry
To perform data entry in an order of your choice, you must provide your list of the columns of the table. You can either use all columns or provide a list of the same columns but in your own order. In the same way, you don't have to provide data for all fields, just those you want, in the order you want. Here are examples:
CREATE SCHEMA Inventory;
GO
CREATE TABLE Inventory.StoreItems
(
    ItemNumber   VARCHAR(8) PRIMARY KEY,
    Manufacturer VARCHAR(40),
    Category     VARCHAR(28),
    SubCategory  VARCHAR(25),
    ItemName     VARCHAR(120),
    Size         VARCHAR(20)
);
GO

INSERT Inventory.StoreItems
VALUES('927059', 'Ralph Lauren', 'Girls', 'Shirts', 'Girls 2-6X Short-Sleeved Mesh Polo Shirt', '3T');
GO
INSERT Inventory.StoreItems(ItemNumber, Manufacturer, Category, SubCategory, ItemName, Size)
VALUES('318495', 'Kenneth Cole', 'Women', 'Dresses', 'Three-Quarter Sleeved Dress', 'Medium');
GO
INSERT Inventory.StoreItems(Manufacturer, SubCategory, ItemName, Category, Size, ItemNumber)
VALUES('Polo Ralph Lauren', 'Pants', 'Classic Straight-Leg Jeans', 'Men', '30W - 30L', '397495');
GO
INSERT Inventory.StoreItems(Category, Size, ItemNumber, SubCategory, ItemName, Manufacturer)
VALUES('Girls', '3T', '830405', 'Shirts', 'Girls 2-6X Short-Sleeved Mesh Polo Shirt', 'Ralph Lauren');
GO
Creating Multiple Records
In previous sections, we added one record at a time. You can add various records with one call to INSERT. If you are adding a value to each column of the table, after the name of the table, type VALUES, open and close the first parentheses. Inside the parentheses, include the desired values. To add another record, type a comma after the closing parenthesis, open a new parenthesis, list the new values, and close the parenthesis. Do this as many times as you need to add records. Here is an example:
CREATE SCHEMA Inventory;
GO
CREATE TABLE Inventory.StoreItems
(
    ItemNumber   VARCHAR(8) PRIMARY KEY,
    Manufacturer VARCHAR(40),
    Category     VARCHAR(28),
    SubCategory  VARCHAR(25),
    ItemName     VARCHAR(120),
    Size         VARCHAR(20)
);
GO

INSERT Inventory.StoreItems
VALUES('840633', 'Nautica', 'Women', 'Shirts', 'Short-Sleeved Pima Cotton V-Neck Tee', 'M'),
	  ('724377', 'Polo Ralph Lauren', 'Men', 'Shirts', 'Short-Sleeved Knit Polo', 'S'),
	  ('679340', 'Kenneth Cole Reaction', 'Women', 'Coats', 'Double Breasted Peacoat', '8');
GO
This is valid for adjacent data entry. If you want to follow your own order of columns, on the right side of the name of the table, include a list of columns in parentheses. Then, when giving the values, for each record, follow the order in which you listed the columns. Here is an example:
INSERT Inventory.StoreItems(ItemNumber, Manufacturer, Category, SubCategory, ItemName, Size)
VALUES('292915', 'Kenneth Cole', 'Women', 'Dresses', 'Three-Quarter Sleeved Dress', 'Large'),
      ('242930', 'Ralph Lauren', 'Boys', 'Sweaters', 'Boys 2-7 Long-Sleeved Cable Crewneck T-Shirt', '3/3T'),
      ('506513', 'Lauren by Ralph Lauren', 'Baby Girls', 'Skirts', 'Infants Tiered Skirt', '18 Months');
GO
INSERT Inventory.StoreItems(Manufacturer, ItemName, SubCategory, Category, ItemNumber, Size)
VALUES('CK Calvin Klein', 'Two-Piece Slim Fit Suit', 'Suits', 'Men', '245443', '42'),
      ('Anne Klein', 'Drape Front Jacket', 'Jackets', 'Women', '957257', '4');
GO
Inserting a Number or Percentage of Records
Imagine you have a series of records and you want to add them to a table. Transact-SQL allows you to specify whether to insert all of the records, a certain number of records, or a portion of the records.
Based on a number of records, to insert a fraction of the records, after the INSERT keyword, type TOP (number) followed by the name of the table and the rest of the formula we have used so far. Here is an example:
INSERT TOP (2) INTO Videos(Rating, Title, Director)
VALUES('PG-13', 'Big Momma''s House ', 'Raja Gosnell'),
      ('G', 'Annie', 'John Huston'),
      ('PG', 'Incredibles (The)', 'Brad Bird'),
      ('PG-13', 'Mission: Impossible', 'Brian De Palma'),
      ('R', 'Negotiator (The)', 'F. Gary Gray');
GO
This code instructs the database engine to insert only 2 records from the list, regardless of the number of records that are provided.
Instead of specifying a fixed number of records, you can ask the database engine to insert a certain percentage of records. In this case, after TOP (Number), add the PERCENT word. Here is an example:
INSERT TOP (40) PERCENT INTO Videos(Rating, Title, Director)
VALUES('', 'Professionals (The)', 'Richard Brooks'),
      ('R', 'Trading Places', 'John Landis'),
      ('PG-13', 'Cellular', 'David R. Ellis'),
      ('R', 'Negotiator (The)', 'F. Gary Gray'),
      ('PG-13', 'Big Momma''s House ', 'Raja Gosnell'),
      ('G', 'Annie', 'John Huston');
GO
The code provides six records but asks the database engine to add 40% of them. That is 6 / (100/40) = 6 / 2.5 = 2.4. The closest higher integer to this number is 3. Therefore, 3 records are added.
Built-In Functions
Parsing an Expression or Value
Parsing consists of scanning an expression to check a pattern, a word, or a match. An example is to find out whether an expression or a string is or contains a number, a date, a time, etc.
To assist you with parsing, Transact-SQL provides the PARSE function. Its syntax is:
PARSE( string_value AS data_type [ USING culture ])
This function takes one argument, passed as a string and accompanied by its data type preceded by the AS keyword. The function is equivalent to the method of the same name used in the primitive data types of the .NET Framework (int, short, etc).
When calling the PARSE function, if the argument may include international characters or formats (Unicode), you should indicate the language, called a culture, that the argument follows.
If the PARSE() function is not able to determine the type or if the value of the argument doesn't follow the rule of the data_type, this function produces (throws) an error. As an alternative to PARSE(), Transact-SQL provides the TRY_PARSE() function. Its syntax is:
TRY_PARSE ( string_value AS data_type [ USING culture ] )
As you can see, this function uses the same argument as PARSE. The difference is that, while PARSE() produces an error if the parsing operation fails, TRY_PARSE produces NULL (if the parsing operation fails). This means that, in most cases, you should prefer TRY_PARSE() instead of PARSE().
Casting a Value
In a C# application, to convert a value, you can use either the Convert class or a Parse() method. In Transact-SQL, to convert a value, you can use either the CAST() or the CONVERT() function. The syntax of the CAST() function is:
CAST(expression AS data-type)
The expression is the value that needs to be cast. The data-type factor is the type of value you want to convert the expression to.
If the CAST() function is not able to cast the expression (if it fails), it produces (throws) an error. As an alternative to CAST(), Transact-SQL provides a function named TRY_CAST. Its syntax is:
TRY_CAST ( expression AS data_type [ ( length ) ] )
This function takes the same arguments as CAST. The difference is that, instead of producing an error, if TRY_CAST() fails, it returns NULL. This also means that, in most cases, you should use TRY_CAST() instead of CAST.
Converting a Value
To let you convert a value to a type of your choice, Transact-SQL provides the CONVERT() function. Unlike CAST(), CONVERT can be used to convert a value from its original type into a non-similar type. For example, you can use CONVERT to cast a number into a string and vice-versa.
The syntax of the CONVERT() function is:
CONVERT(DataType [ ( length ) ] , Expression [ , style ])
The first argument must be a known data type, such as those we reviewed already. If you are converting the value into a string (varchar, nvarchar, char, nchar) or a binary type, you should specify the number of allowed characters in the data type's own parentheses, as the length argument.
As reviewed for the CAST() function, the expression is the value that needs to be converted.
If the CONVERT() function is not able to perform its operation, it produces an error.
Because of some difficulties that can result from conversion, Transact-SQL provides a function named TRY_CONVERT. Its syntax is:
TRY_CONVERT ( data_type [ ( length ) ], expression [, style ] )
The arguments are the same used in the CONVERT() function. The difference is that if the TRY_CONVERT() function fails, it returns NULL instead of producing (throwing) an error.
Transact-SQL Macros and Metadata Functions
Introduction to Macros
A macro is an action that can be performed on a database or certain parts of a database or of a database server. A macro resembles a function without being exactly one. Transact-SQL provides various macros to assist you with managing databases and their objects.
Checking the Existence of a Record
One of the simplest operations a user can perform on a table consists of looking for a record. As the database developer, you too can look for a record. There are various techniques you can use. To assist you with this, Transact-SQL provides a macro named EXISTS. Its syntax is:
BIT EXISTS(SELECT Something)
This macro takes one argument. The argument must be a SELECT statement that would be used to get the value whose existence would be checked. For example, we know a system database named databases that contains a record of all databases stored on your server. You can use the EXISTS() macro to check the existence of a certain database.
Assistance with Strings
The Minimum Number of Characters
When creating or adding a property in a class or for an entity, you specify that you want the user to enter a certain minimum number of character in the corresponding text box. To support this, the System.ComponentModel.DataAnnotations namespace provides an attribute named MinLength. When applying this attribute to a property in a class, add the parentheses to it and enter the desired number in the parentheses.
If you are designing an entity, after adding a string-based Scalar Property, if you want to require a certain minimum number of characters, in the Properties window, click the Min Length and type the desired number.
The Maximum Number of Characters
As seen in our introduction to text-based fields, databases support a maximum number of characters for a column. We have already seen many examples of how to specify this number in the parentheses of CHAR, VARCHAR, NCHAR and NVARCHAR. To let you specify the maximum number of characters that a column can hold, the System.ComponentModel.DataAnnotations namespace provides an attribute named MaxLength. This attribute is used or applied like its MinLength counterpart.
As seen in our introduction to the entity framework, if you are designing an entity, after adding a string-based Scalar Property, to specify the maximum number of characters for a field, in the Properties window, click the Max Length and type the desired number.
To let you specify both the minimum and maximum number of characters for a field, the System.ComponentModel.DataAnnotations namespace provides an attribute named StringLength. To support the minimum string length, the StringLengthAttribute class is equipped with a property named MinimumLength. To use it in a class, apply it to a proproperty and add parentheses to it. In the parentheses, assign the desired value to MinimumLength. The he StringLengthAttribute class also supports a maximum number of characters through a property named MaximumLength. It is used like its counterpart.
An Identity Column
Introduction to Surrogate Keys
A surrogate key is a column whose values are provided, or generated, automatically, by the database engine. A surrogate key is used when there is a clear and justified need to have unique records but you don't want to spend time designing an algorithm that fulfills this condition. The values of a surrogate key are usually integers with no obvious or clear meaning. This also means that the values of a surrogate key mean nothing to the user and in fact the user doesn't have to know or care about them.
Microsoft SQL Server provides many ways to create a surrogate key. Two of the solutions are identify keys and sequences.
![]() Practical Learning: Introducing Databases
Practical Learning: Introducing Databases
CREATE SCHEMA Resources;
GO
CREATE TABLE Resources.WaterBills
(
    [InvoiceNumber] INT NOT NULL PRIMARY KEY
);
GO
Introduction to the Identity Columns
One of the goals of a good table is to have to unique records. To solve the problem of uniquely identifying a record, you can create a particular column whose main purpose is to distinguish one record from another. To assist you with this, the SQL allows you to create a column whose data type is an integer type but the user doesn't enter data for that column. A value would automatically be entered into the field when a new record is created. This type of column is called an identity column.
You cannot create an identity column on an existing table, only on a new table.
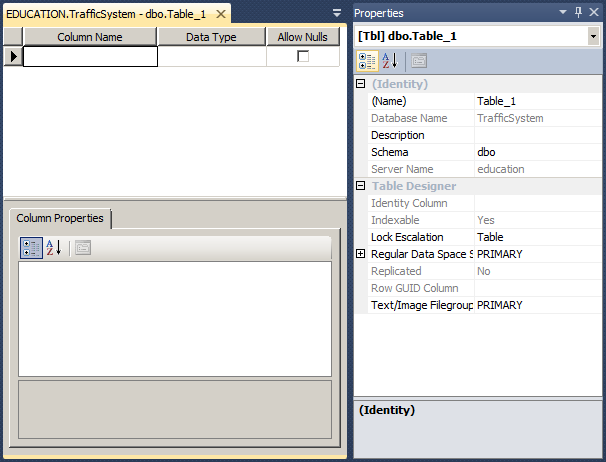
Visually Creating an Identity Column
To create an identity column, in the top section, specify the name of the column. By tradition, the name of the column ends with _id, Id, or ID; but you can give any name you want.
After specifying the name of the column, set its data type to an integer-based type. Usually, the data type used is INTEGER. In the Properties section, click and expand the Identity Specification property. The first action you should take is to set its (Is Identity) property from False to True.
If you are creating a model, when you add a new Entity, it automatically receive a columnn named Id and that has the identity behavior. Otherwise, if you want to apply the identity behavior to a column, select that column in the Designer. In the Properties window, click the StoreGeneratedPattern field, then click the arrow of its combo box and select Identity.
![]() Practical Learning: Creating an Identity Column
Practical Learning: Creating an Identity Column
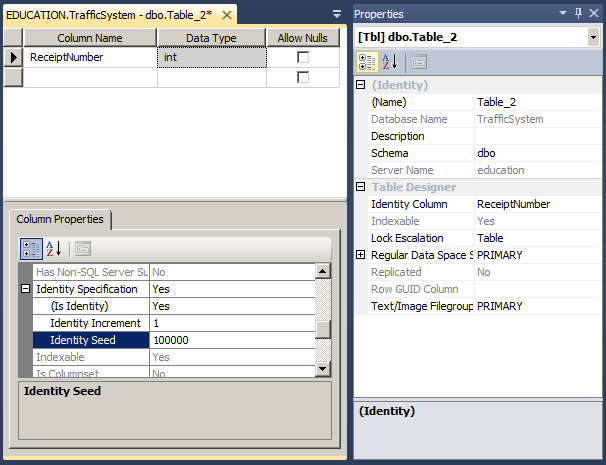
The Seed of an Identity Column
Once you have set the value of the (Is Identity) property to Yes, the first time the user performs data entry, the value of the first record would be set to 1. This characteristic is controlled by the Identity Seed property. If you want the count to start to a value other than 1, specify it on this property.
![]() Practical Learning: Setting the Identity Seed
Practical Learning: Setting the Identity Seed
| Column Name | Data Type |
| InvoiceNumbmer | int |
| MeterNumber | nvarchar(10) |
| FirstName | nvarchar(25) |
| LastName | nvarchar(25) |
| Address | nvarchar(100) |
| City | nvarchar(50) |
| State | nvarchar(2) |
The Identity Increment
After the (Is Identity) property has been set to Yes, the SQL interpreter would increment the value of each new record by 1. This aspect is controlled by the Identity Increment property. If you want to increment by more than that, you can change the value of the Identity Increment property.
Creating an Identity Column Using SQL
If you are programmatically creating a column, to indicate that it would be used as an identity column after its name and data type, type identity followed by parentheses. Between the parentheses, enter the seed value, followed by a comma, followed by the increment value. Here is an example:
CREATE TABLE StoreItems
(
	StoreItemID int IDENTITY(1, 1) NOT NULL,
	Category varchar(50),
	[Item Name] varchar(100) NOT NULL,
	Size varchar(20),
	[Unit Price] money
);
GO
Data Entry With an Identity Column
After creating an identity column, when performing data entry, don't specify a value for that column. Here is an example:
CREATE TABLE StoreItems
(
    ItemID int identity(1, 1) NOT NULL,
    Category nvarchar(50),
    [Item Name] nvarchar(100) NOT NULL,
    Size nvarchar(20),
    [Unit Price] money
);
GO
INSERT INTO StoreItems(Category, [Item Name], Size, [Unit Price])
VALUES(N'Men', N'Simplicity Leather Dress Oxfords', N'9', 65.85);
GO
If you provide a value for the identity column, you would receive an error.
Creating a Value for an Identity Column
If you want to specify a value for the identity column, set the SET IDENTITY_INSERT flag. The formula it uses is:
SET IDENTITY_INSERT [ database_name.[schema_name].] table { ON | OFF }
The database_name is the optional name of the database that owns the table. If you previously used the USE statement, in most cases, you can omit the name of the database. The schema_name is the (optional) name of the schema in which the table was created. The table factor is the name of the table to which the identity column belongs. After specifying the name of the table, set the flag to ON to allow a value for the identity column, or OFF to disallow it.
If you decide to use the SET IDENTITY_INSERT flag, you must provide a list of columns after the name of the table in the INSERT or INSERT INTO statement. Here is an example:
@{
    using (System.Data.SqlClient.SqlConnection connection = new System.Data.SqlClient.SqlConnection(. . .))
    {
        System.Data.SqlClient.SqlCommand command =
            new System.Data.SqlClient.SqlCommand("SET IDENTITY_INSERT StoreItems ON;" +
                           "INSERT INTO StoreItems(ItemID, Category, [Item Name], Size, [Unit Price])" +
                           "VALUES(10, N'Girls', N'Girls 2-6X Short-Sleeved Mesh Polo Shirt', N'2T', 18.95);",
                           connection);
        connection.Open();
        command.ExecuteNonQuery();
    }
}
This time, the data entry would not produce an error.
As mentioned already, after setting the IDENTITY_INSERT ON, you can put it back OFF and add a record without a value for the identity column. Here is an example:
SET IDENTITY_INSERT StoreItems ON;
GO
INSERT INTO StoreItems(ItemID, Category, [Item Name], Size, [Unit Price])
VALUES(50, N'Men', N'Simplicity Leather Dress Oxfords', N'10.5', 65.85);
GO
SET IDENTITY_INSERT StoreItems OFF;
GO
INSERT INTO StoreItems(Category, [Item Name], Size, [Unit Price])
VALUES(N'Women', N'Fiona High Heel Boot', N'6.50', 295.00);
GO
INSERT INTO StoreItems(Category, [Item Name], Size, [Unit Price])
VALUES(N'Women', N'Saddle East/West Leather Hobo Bag', N'Medium', 345.50);
GO
If you do this, the next value of the identity column would be the increment from the previous value.
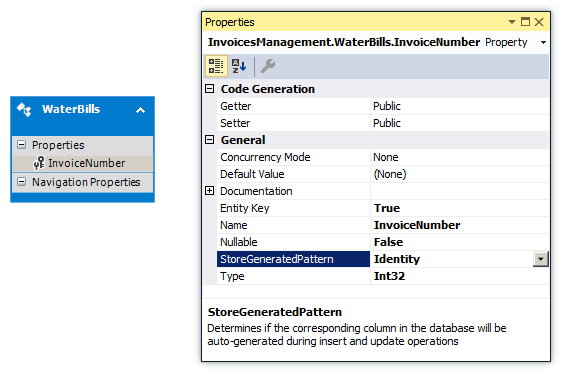
Creating an Identity Column in the Entity Framework
If you create an entity framework using the Empty EF Designer Model option of the Entity Data Model Wizard, when you add an entity in the designer, that entity receives a column whose type is an integer and is an identity column. Otherwise, to create an identity column, add a scalar property. In the Properties window, set the data Type to an integer. Set the StoreGeneratedPattern to Identity. Here is an example:
Introduction to Sequences
Overview
A sequence is a series of numbers that are continually generated and assigned to a column of a table. This works like an identity column. The difference is that, if you need an identity, you must create it in a column of a table and if you need the same type of identity on a column of another table, you must create the identity in the column of the other table. On the other hand, a sequence is a programmatic object, like a function, that you create at the database level and you can apply that sequence to any table you want.
Visually Creating a Sequence
To visually create a sequence, in the Object Explorer of Microsoft SQL Server Management Studio, expand the desired database and the Programmability nodes. Right-click Sequences and click New Sequence... This would present the New Sequence dialog box with some default (basic) values.
Programmatically Creating a Sequence
The Transact-SQL syntax to create a sequence is:
CREATE SEQUENCE [schema_name . ] sequence_name
    [ AS [ built_in_integer_type | user-defined_integer_type ] ]
    [ START WITH <constant> ]
    [ INCREMENT BY  <constant> ]
    [ { MINVALUE [  <constant> ] } | { NO MINVALUE } ]
    [ { MAXVALUE [  <constant> ] } | { NO MAXVALUE } ]
    [ CYCLE | { NO CYCLE } ]
    [ { CACHE [  <constant> ] } | { NO CACHE } ]
    [ ; ]
You start with the CREATE SEQUENCE expression.
Characteristics of a Sequence
A sequence shares many characteristics with an identity column but adds some others. Therefore, the characteristics of a sequence are:
Using a Sequence
After creating a sequence, it becomes an object you can use in any new table. Because a sequence generates (unique increment/decrement) values that a column would use, when creating the field on a table, specify its data type as the same or compatible type that the sequence is using. Here is an example:
CREATE TABLE Inventory.StoreItems
(
    ItemNumber int,
    ItemName nvarchar(60),
    UnitPrice money
);
GO
A sequence is used during data entry. When specifying the value of its column, type a formula as:
NEXT VALUE FOR [schema_name . ] sequence_name
The database engine would then find the next number in the sequence and assign it to the column. Here are examples:
USE DepartmentStore;
GO
CREATE SCHEMA Inventory;
GO
CREATE TABLE Inventory.StoreItems
(
    ItemNumber int,
    ItemName nvarchar(60),
    UnitPrice money
);
GO
CREATE SEQUENCE Inventory.ItemsCodes
AS int
START WITH 10001
INCREMENT BY 1;
GO
INSERT INTO Inventory.StoreItems
VALUES(NEXT VALUE FOR Inventory.ItemsCodes, N'Short Sleeve Shirt', 34.95),
      (NEXT VALUE FOR Inventory.ItemsCodes, N'Tweed Jacket', 155.00),
      (NEXT VALUE FOR Inventory.ItemsCodes, N'Evaded Mini-Skirt', 72.45),
      (NEXT VALUE FOR Inventory.ItemsCodes, N'Lombardi Men''s Shoes', 79.95);
GO
Details on Sequences
Sharing a Sequence
A sequence can be shared by many tables. This means that, after creating a sequence, you can apply it on any table that needs that series of numbers. When using a sequence from one table to another, if you use the NEXT VALUE FOR routine, the series would continue from where it left up. This is not an anomaly. It is by design, so that various tables can share the same sequence.
Resetting a Sequence
Resetting a sequence consists of restarting it from a certain point. To do this, use the following formula:
ALTER SEQUENCE [schema_name. ] sequence_name
    [ RESTART [ WITH constant ] ]
    [ INCREMENT BY constant ]
    [ { MINVALUE constant } | { NO MINVALUE } ]
    [ { MAXVALUE constant } | { NO MAXVALUE } ]
    [ CYCLE | { NO CYCLE } ]
    [ { CACHE [ constant ] } | { NO CACHE } ]
    [ ; ]
Setting a Sequence as Default
So far, to specify the value of a column with sequence, we were calling NEXT VALUE FOR. If you know that you will keep caling a sequence to provide the values of a column, you can set that sequence as the default value of the column. If you do this, you can omit the column in the INSERT statement. Here is an example:
USE ApartmentBuilding;
GO
CREATE TABLE Rentals.Registrations
(
	RegistrationID int
		DEFAULT (NEXT VALUE FOR Rentals.SeqRegistrations),
	EmployeeNumber int, -- Processed By
	TenantCode int, -- Processed For
	UnitNumber int,
	RentStartDate date,
	Notes nvarchar(max)
);
GO
After doing this, you can create the values of the column as done for an identity, by omiting the name of the column in the INSERT statement.
INSERT INTO Academics.UndergraduateStudents(StudentNumber, FirstName, MiddleName, LastName, BirthDate, Gender, EmailAddress, MajorID, MinorID, Username)
VALUES(N'88130480', N'Marie', N'Annette', N'Robinson', Administration.SetDateOfBirth(-6817), N'F', N'mrobinson@yahoo.com',    1021, 1004, N'mrobinson'),
      (N'24795711', N'Roger', N'Dermot',  N'Baker',    Administration.SetDateOfBirth(-6570), N'M', N'rbaker2020@hotmail.com', 1005, 1002, N'rbaker');
GO
INSERT INTO Academics.UndergraduateStudents(StudentNumber, FirstName, LastName, BirthDate, Gender, EmailAddress, MajorID, MinorID, Username)
VALUES(N'18073572', N'Patrick', N'Wisne', Administration.SetDateOfBirth(-11012), N'M', N'pwisdom@attmail.com', 1001, 1008, N'pwisne');
GO
The Nullity of a Field
Setting the Nullity of a Field
A field is referred to as null when no data entry has been made to it. A field is referred to as null if there is no way to determine the value of its content. As you can imagine, it is not a good idea to have a null field in your table.
A field is referred to as required if the user must provide a value for it before moving to another record. In other words, the field cannot be left empty during data entry.
If you are programmatically creating the table using SQL, to specify that a column can allow null values, type NULL on the right side of the column definition. To specify that the values of the column are required, on the right side, type NOT NULL. If you don't specify NULL or NOT NULL, the column will be created as NULL. Here are examples:
CREATE TABLE Persons
(
    FirstName varchar(20) NULL,
    LastName varchar(20) NOT NULL,
    Gender varchar(20)
);
GO
If the table was created already and it holds some values, you cannot change its nullity option.
![]() Practical Learning: Allowing NULL Records
Practical Learning: Allowing NULL Records
Data Entry for a Null Column
When a column has been marked as NULL or its Allow Null check box was cleared, it can be skipped during data entry. Otherwise, a NOT NULL column must always have a value.
Requiring a Value for a Field
The Entity Designer
If you are designing an entity, to specify whether a column must always hold a value, after adding its Scalar Property, in the Properties, use the Nullable field. If you set it to True, the user must provide a value for the column, otherwise the record will not be saved.
A Required Property
If you are creating a class that will be used in an entity framework, to let you indicate that the user must provide a value for the corresponding column of the table, the System.ComponentModel.DataAnnotations namespace provides an attribute named Required and that is reqpresented by the RequiredAttributre class.
To indicate that the user must provide a value for a column, mark its property by the Required attribute. Here are two examples:
using System.ComponentModel.DataAnnotations;

namespace DepartmentStore02.Models
{
    public class StoreItem
    {
        [Key]
        public int ItemNumber { get; set; }

        [Required]
        public string ItemName { get; set; }

        public string Size { get; set; }

        [Required]
        public double UnitPrice { get; set; }
    }
}
After creating a record in this scenario, if the user doesn't provide a value for the required field and tries to save the record:
The controls that are associated to a required field are configured to display a default error message. If you want, you can display an error message of your choice. To support this, the RequiredAttribute class is equipped with a property named ErrorMessage. Based on this, to specify your own error message, add the parentheses to the RequiredAttribute attribute. In the parentheses, assign your message is double-quotes to the ErrorMessage property. Here is an example:
public class Employee
{
    [Key]
    public int EmployeeNumber { get; set; }
    public string FirstName { get; set; }
    [Required(ErrorMessage = "You must provide a last name for the employee.")]
    public string LastName { get; set; }
    public double HourlySalary  { get; set; }
}
The Default Value of a Column
Introduction
When creating or modifying a column, you can specify its default value so that it would be applied if the user does not specify one.
To specify the default value in a SQL statement, when creating the column, before the semi-colon or the closing parenthesis of the last column, type the DEFAULT keyword followed by the desired value. Here are examples:
CREATE TABLE Employees
(
   FullName VARCHAR(50),
   Address VARCHAR(80),
   City VARCHAR(40),
   State VARCHAR(40) DEFAULT 'NSW',
   PostalCode VARCHAR(4) DEFAULT '2000',
   Country VARCHAR(20) DEFAULT 'Australia'
);
GO
![]() Practical Learning: Setting a Default Value for a Field
Practical Learning: Setting a Default Value for a Field
Data Entry for a Default Value
After creating the table, the user does not have to provide a value for a column that has a default value. If the user does not provide the value, the default would be used when the record is saved.
|
|
If the user provides a value for a column that has a default value and then deletes the value, the default value rule would not apply anymore: The field would become empty. |
During programmatic data entry, if you don't list a column that has a default value, its default value would be assigned to the column. On the other hand, if you add such a column in the list of an INSERT statement, you must provide a value or give an empty value. Fortunately, Transact-SQL makes it possible to force the default value for the column. To do this, in the placeholder of the value of the column, use the DEFAULT keyword. Here is an example:
CREATE TABLE Employees
(
    EmployeeNumber varchar(6),
    FirstName varchar(20),
    LastName varchar(20),
    [State] VARCHAR(2) default 'NC'
);
GO

INSERT INTO
VALUES('28-404', 'Amadou', 'Sulleyman', 'TX'),
      ('82-948', 'Frank', 'Arndt', DEFAULT),
      ('27-749', 'Marc', 'Engolo', 'TN');
GO
In this example, the second record would receive the default value, which is NC. In the same way, you can force the default keyword for each column whose default value was indicated when the table was created.
Unique Records
Introduction to the Uniqueness of Records
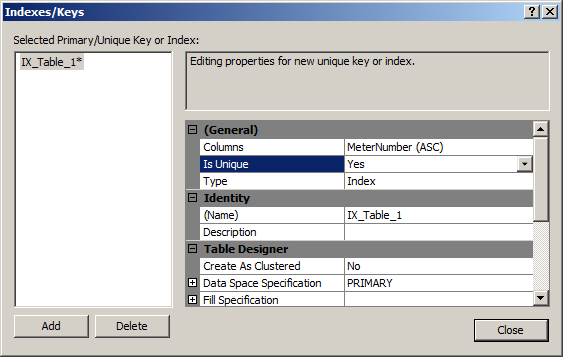
One of the primary concerns of records is their uniqueness. You usually want to make sure that each record on a table can be uniquely identified. One way to do this is to apply a uniqueness rule on a column.
To assist you with creating a column whose values will be distinguishable, Transact-SQL provides the UNIQUE keyword. To apply it on a column, after the data type, type UNIQUE. Here is an example:
CREATE TABLE Students
(
    StudentNumber VARCHAR UNIQUE,
    FirstName varchar(50),
    LastName varchar(50) NOT NULL
);
GO
![]() Practical Learning: Adding a Unique Column
Practical Learning: Adding a Unique Column
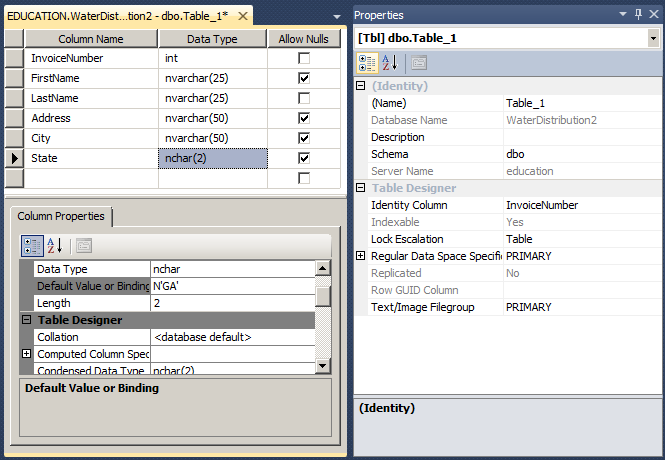
CREATE SCHEMA Resources;
GO
CREATE TABLE Resources.WaterBills
(
    [InvoiceNumber] INT PRIMARY KEY IDENTITY(100000, 1),
    [MeterNumber] NVARCHAR(10) UNIQUE NULL,
    [FirstName] NVARCHAR(25) NULL,
    [LastName] NVARCHAR(25) NULL,
    [Address] NVARCHAR(50) NULL,
    [City] NVARCHAR(50) NULL,
    [State] NCHAR(2) NULL DEFAULT 'GA'
);
GOData Entry with a Unique Field
When a column has been marked as unique, during data entry, the user must provide a unique value for each new record created. If an existing value is assigned to the column, this would produce an error.
An Expression for a Column
Introduction
To assist the user with data entry, you can create an expression using one or a combination of arithmetic and/or SQL operators. You can create an expression when creating a table.
To programmatically create an expression when creating a table, in the placeholder of the column, enter the name of the column, followed by AS, and followed by the desired expression. Here is an example:
CREATE TABLE Circle(
   CircleNbr int NOT NULL,
   Radius decimal(8, 3) NOT NULL,
   Area AS Radius * Radius * PI()
);
GO
Data Entry for an Expression Column
When performing data entry, you must not provide a value for a column that uses an expression; the SQL interpreter would provide the value automatically. Here is an example of entering data for the above Circle table:
INSERT Circle(CircleNbr, Radius) VALUES(200, 46.82);
GO
INSERT Circle(CircleNbr, Radius) VALUES(128, 8.15);
GO
INSERT Circle(CircleNbr, Radius) VALUES(432, 122.57);
GO
![]() Practical Learning: Ending the Lesson
Practical Learning: Ending the Lesson
|
|
||
| Previous | Copyright © 2001-2021, FunctionX | Next |
|
|
||