Introduction to Data Selection

Introduction to Data Selection
Fundamentals of Record Selections
Introduction
Data entry is probably the primary user-based operation performed on a database. This is the C in the CRUD acronym. Here are two examples that add a few records to two tables:
CREATE DATABASE RedOakHighSchool;
GO
USE RedOakHighSchool;
GO
CREATE SCHEMA Academics;
GO
CREATE TABLE Academics.Genders
(
	GenderCode	NCHAR(1) NOT NULL,
	Gender		NVARCHAR(24) NOT NULL,
	CONSTRAINT PK_Genders PRIMARY KEY(GenderCode)
);
GO
CREATE TABLE Students
(
	StudentNumber NVARCHAR(10) NOT NULL,
	FirstName	  NVARCHAR(20),
	LastName	  NVARCHAR(20) NOT NULL,
	GenderCode	  NCHAR(1) NOT NULL,
	[Address]	  NVARCHAR(100),
	City		  NVARCHAR(40),
	[State]		  NCHAR(2),
	CONSTRAINT FK_Genders FOREIGN KEY(GenderCode) REFERENCES Academics.Genders(GenderCode),
	CONSTRAINT PK_Students PRIMARY KEY(StudentNumber)
);
GO
INSERT INTO Academics.Genders(GenderCode, Gender)
VALUES(N'M', N'Male'), (N'F', N'Female'), (N'U', N'Unknown');
GO
INSERT INTO Students(StudentNumber, FirstName, LastName, GenderCode, [Address],	City, [State])
VALUES(N'9280534052', N'Oliver',  N'Stone',     N'M', N'10384 Montana Rd',    N'Mill Creek',   N'PA'),
	  (N'5386268480', N'Leslie',  N'Owens',     N'F', N'8644 Cagey str',      N'Wellsville',   N'NY'),
	  (N'2795007493', N'Gregory', N'Simeone',   N'M', N'927 N. Cranston Ave', N'Moorefield',   N'WV'),
	  (N'8374831186', N'Jeanne',  N'Schneider', N'F', N'2938 Lewson Crt',     N'Beaver Falls', N'PA');
GO
The second most routine operation consists of reading records. This is the R in the CRUD approach. In query languages such as the structured query language (SQL) or the LINQ, reading records is referred to as selecting records. You can select all of the records of a table or you can specify some particular records of your interest.
![]() Practical Learning: Introducing Data Selection
Practical Learning: Introducing Data Selection
body {
    background-color: #FFF;
}

.bold          { font-weight:   600;     }
.blue          { color:         #286090; }
.top-padding   { padding-top:   0.50em;  }
.common-font { font-family: Georgia, Garamond, 'Times New Roman', serif; }using System.Web.Optimization;
namespace WaterDistributionBusiness1
{
public class BundleConfig
{
// For more information on bundling, visit https://go.microsoft.com/fwlink/?LinkId=301862
public static void RegisterBundles(BundleCollection bundles)
{
bundles.Add(new ScriptBundle("~/bundles/jquery").Include(
"~/Scripts/jquery-{version}.js"));
bundles.Add(new ScriptBundle("~/bundles/jqueryval").Include(
"~/Scripts/jquery.validate*"));
// Use the development version of Modernizr to develop with and learn from. Then, when you're
// ready for production, use the build tool at https://modernizr.com to pick only the tests you need.
bundles.Add(new ScriptBundle("~/bundles/modernizr").Include(
"~/Scripts/modernizr-*"));
bundles.Add(new ScriptBundle("~/bundles/bootstrap").Include(
"~/Scripts/bootstrap.js"));
bundles.Add(new StyleBundle("~/Content/css").Include(
"~/Content/bootstrap.css",
"~/Content/site.css",
"~/Content/WaterDistribution.css"));
}
}
}<?xml version="1.0" encoding="utf-8"?>
<!--
For more information on how to configure your ASP.NET application, please visit
https://go.microsoft.com/fwlink/?LinkId=301880
-->
<configuration>
<appSettings>
<add key="webpages:Version" value="3.0.0.0"/>
<add key="webpages:Enabled" value="false"/>
<add key="ClientValidationEnabled" value="true"/>
<add key="UnobtrusiveJavaScriptEnabled" value="true"/>
</appSettings>
<system.web>
<compilation debug="true" targetFramework="4.6.1"/>
<httpRuntime targetFramework="4.6.1"/>
<httpModules>
<add name="ApplicationInsightsWebTracking" type="Microsoft.ApplicationInsights.Web.ApplicationInsightsHttpModule, Microsoft.AI.Web"/>
</httpModules>
</system.web>
<connectionStrings>
<add name="csWaterDistribution"
connectionString="Data Source=(local); Database='WaterDistribution'; Integrated Security=True;MultipleActiveResultSets=True"
providerName="System.Data.SqlClient" />
</connectionStrings>
. . . No Change
</configuration><?xml version="1.0" encoding="utf-8"?>
<!--
For more information on how to configure your ASP.NET application, please visit
https://go.microsoft.com/fwlink/?LinkId=301880
-->
<configuration>
<appSettings>
<add key="webpages:Version" value="3.0.0.0" />
<add key="webpages:Enabled" value="false" />
<add key="ClientValidationEnabled" value="true" />
<add key="UnobtrusiveJavaScriptEnabled" value="true" />
</appSettings>
<connectionStrings>
<add name="csWaterDistribution" connectionString="Data Source=(LocalDb)\MSSQLLocalDB;AttachDbFilename=|DataDirectory|\WaterDistribution.mdf;Initial Catalog=WaterDistribution;Integrated Security=True" providerName="System.Data.SqlClient" />
</connectionStrings>
<system.web>
. . . No Change
</configuration>CREATE TABLE WaterMeters ( WaterMeterID INT IDENTITY(1, 1), MeterNumber NVARCHAR(20) NOT NULL, Make NVARCHAR(30) NOT NULL, Model NVARCHAR(20) NOT NULL, MeterSize NVARCHAR(20) NOT NULL, CONSTRAINT PK_WaterMeters PRIMARY KEY(WaterMeterID) ); GO
using System.Web.Mvc;
using System.Data.SqlClient;

namespace WaterDistributionBusiness1.Controllers
{
    public class WaterMetersController : Controller
    {
        . . . No Change

        // GET: WaterMeters/Create
        public ActionResult Create()
        {
            return View();
        }

        // POST: WaterMeters/Create
        [HttpPost]
        public ActionResult Create(FormCollection collection)
        {
            try
            {
                // TODO: Add insert logic here
                using (SqlConnection scWaterDistribution = new SqlConnection(System.Configuration.ConfigurationManager.ConnectionStrings["csWaterDistribution"].ConnectionString))
                {
                    SqlCommand cmdWaterMeters = new SqlCommand("INSERT INTO WaterMeters(MeterNumber, Make, Model, MeterSize) " +
                                                             "VALUES(N'" + collection["MeterNumber"] + "', N'" + collection["Make"] + "', N'" + collection["Model"] + "', N'" +
                                                             collection["MeterSize"] + "');",
                                                             scWaterDistribution);

                    scWaterDistribution.Open();
                    cmdWaterMeters.ExecuteNonQuery();
                }

                return RedirectToAction("Index");
            }
            catch
            {
                return View();
            }
        }

        . . . No Change
    }
}
@{
    ViewBag.Title = "New Water Meter";
}

<h2 class="bold common-font blue">New Water Meter</h2>

<hr />

@using (Html.BeginForm())
{
    <div class="form-horizontal common-font">
        <div class="form-group">
            <label for="mtrNbr" class="control-label col-md-2">Meter #:</label>
            <div class="col-md-10">
                @Html.TextBox("MeterNumber", null, htmlAttributes: new { @class = "form-control", id = "mtrNbr" })
            </div>
        </div>

        <div class="form-group">
            <label for="make" class="control-label col-md-2">Make:</label>
            <div class="col-md-10">
                @Html.TextBox("Make", null, htmlAttributes: new { @class = "form-control", id = "make" })
            </div>
        </div>

        <div class="form-group">
            <label for="model" class="control-label col-md-2">Model:</label>
            <div class="col-md-10">
                @Html.TextBox("Model", null, htmlAttributes: new { @class = "form-control", id = "model" })
            </div>
        </div>

        <div class="form-group">
            <label for="mtrSize" class="control-label col-md-2">Meter Size:</label>
            <div class="col-md-10">
                @Html.TextBox("MeterSize", null, htmlAttributes: new { @class = "form-control", id = "mtrSize" })
            </div>
        </div>

        <div class="form-group">
            <label class="control-label col-md-2">@Html.ActionLink("Water Meters", "Index")</label>
            <div class="col-md-10">
                <input type="submit" value="Create Water Meter" class="btn btn-primary" />
            </div>
        </div>
    </div>
}| Meter # | Make | Model | Meter Size |
| 293-740 | Breston | S-93749 | 3/4 Inches |
| 820-418 | Vashty Worldwide | DD-3840 | 3/4 Inches |
SELECTing a Column
In the SQL, the primary formula to make (a) selection(s) on a table is:
SELECT column-name(s) FROM what-object;
To select a column, you can replace the column-name(s) placeholder of our formula with the name of the desired column. For example, to get a list of names from a table named Students that contains a column named FirstName, you would execute the following statement:
SELECT FirstName FROM Students;
GO
You can write such a SELECT statement in a Query window and then execute it. You can pass the statement as the command of a SQL connection. This can be done as follows:
@{
    ViewBag.Title = "Exercise";
}

<h2>Red Oak High School - Students</h2>
@{
    using (System.Data.SqlClient.SqlConnection scROSH = new System.Data.SqlClient.SqlConnection("Integrated Security='SSPI'; Initial Catalog='RedOakHighSchool';Data Source='(local)';"))
    {
        System.Data.SqlClient.SqlCommand cmdStudents = new System.Data.SqlClient.SqlCommand("SELECT FirstName FROM Students;", scROSH);

        scROSH.Open();
        cmdStudents.ExecuteNonQuery();

        System.Data.SqlClient.SqlDataAdapter sdaStudents = new System.Data.SqlClient.SqlDataAdapter(cmdStudents);
        System.Data.DataSet dsStudents = new System.Data.DataSet("StudentsSet");

        sdaStudents.Fill(dsStudents);

        <ul>
            @foreach (System.Data.DataRow drCustomer in dsStudents.Tables[0].Rows)
            {
                foreach (System.Data.DataColumn col in dsStudents.Tables[0].Columns)
                {
                    <li>@drCustomer["FirstName"]</li>
                }
        }

        </ul>
    }
}
Qualifying a Column
Qualifying an object consists of indicating its parent. When selecting a column, to indicate the table to which it belongs, precede the name of the column with the name of its table and a period. Here is an example:
SELECT Students.LastName FROM Students;
When you execute the statement, only the column that contains the last names would be selected.
Qualifying a Table
To qualify a table, that is, to indicate the schema to which it belongs, precede the name of the table wtih the name of the schema to which it belongs, and a period. Here is an example:
SELECT Gender FROM Academics.Genders;
GO
Selecting Some Columns
To select more than one column, replace the column-name(s) placeholder of our formula with the names of the desired columns, separating them with commas. The formula to follow is:
SELECT column_1, column_2, . . ., column_n FROM what-object;
For example, to get a list that includes the first name, the last name, the gender, the email address, and the home phone of records from a table called Students, you would create the SQL statement as follows:
SELECT FirstName, LastName, Gender, City, State FROM Students;
You can qualify each column by preceding it with the name of the table followed by the period operator. Here is an example:
@{
    ViewBag.Title = "Exercise";
}

<h2>Red Oak High School - Students</h2>
@{
    using (System.Data.SqlClient.SqlConnection scROSH = new System.Data.SqlClient.SqlConnection("Integrated Security='SSPI'; Initial Catalog='RedOakHighSchool';Data Source='(local)';"))
    {
        System.Data.SqlClient.SqlCommand cmdStudents =
            new System.Data.SqlClient.SqlCommand("SELECT Students.FirstName, " +
                                                 "       Students.LastName, " +
                                                 "       Students.City " +
                                                 "FROM Students;", scROSH);

        scROSH.Open();
        cmdStudents.ExecuteNonQuery();

        System.Data.SqlClient.SqlDataAdapter sdaStudents = new System.Data.SqlClient.SqlDataAdapter(cmdStudents);
        System.Data.DataSet dsStudents = new System.Data.DataSet("StudentsSet");

        sdaStudents.Fill(dsStudents);

        <table border="4">
            <tr>
                <td><b>First Name</b></td>
                <td><b>Last Name</b></td>
                <td><b>City</b></td>
            </tr>
        @foreach (System.Data.DataRow drCustomer in dsStudents.Tables[0].Rows)
        {
            <tr>
                <td>@drCustomer["FirstName"]</td>
                <td>@drCustomer["LastName"]</td>
                <td>@drCustomer["City"]</td>
            </tr>
        }
    </table>
    }
}
You don't have to qualify all columns, you can qualify some and not qualify some others. Here is an example:
SELECT Students.FirstName,
       LastName,
       Students.City
FROM Students;
You can use an alias name for a table by preceding each column with a letter or a word and a period operator, and then entering the name of the table followed by that letter or word. Here is an example:
SELECT std.FirstName, std.LastName, std.City, std.State
FROM Students std;
SELECTing ALL Columns of a Table
To select all columns of a table, in place of the column or the list of columns of a SELECT statement, use the asterisk. For example, to select all records from a table named Students, you can type:
SELECT * FROM Students;
Alternatively, you can precede the asterisk with the ALL keyword. Here is an example:
SELECT ALL * FROM RealEstate.Properties;
Data Selection with ASP.NET MVC
Introduction
To provide a better environment for your users to view the records of your database, you can create friendly webpages that display only selected records. You have many options. You can select the records in a method of a controller class and send those records to a webpage. To prepare the records, you should put them in a collection that implements the IEnumerable<> interface.
![]() Practical Learning: Specifying the Width of a Control
Practical Learning: Specifying the Width of a Control
namespace WaterDistributionBusiness1.Models
{
    public class WaterMeter
    {
        public int    WaterMeterID { get; set; }
        public string MeterNumber  { get; set; }
        public string Make         { get; set; }
        public string Model        { get; set; }
        public string MeterSize    { get; set; }
    }
}using System.Data; using System.Web.Mvc; using System.Data.SqlClient; using System.Collections.Generic; using WaterDistributionBusiness1.Models; namespace WaterDistributionBusiness1.Controllers { public class WaterMetersController : Controller { private List<WaterMeter> WaterMeters = new List<WaterMeter>(); // GET: WaterMeters public ActionResult Index() { using (SqlConnection scWaterDistribution = new SqlConnection(System.Configuration.ConfigurationManager.ConnectionStrings["csWaterDistribution"].ConnectionString)) { SqlCommand cmdWaterMeters = new SqlCommand("SELECT WaterMeterID, MeterNumber, Make, Model, MeterSize " + "FROM WaterMeters;", scWaterDistribution); scWaterDistribution.Open(); SqlDataAdapter sdaWaterMeters = new SqlDataAdapter(cmdWaterMeters); DataSet dsWaterMeters = new DataSet("WaterMetersSet"); sdaWaterMeters.Fill(dsWaterMeters); WaterMeter meter = null; foreach (DataRow drWaterMeter in dsWaterMeters.Tables[0].Rows) { meter = new WaterMeter() { WaterMeterID = int.Parse(drWaterMeter["WaterMeterID"].ToString()), MeterNumber = drWaterMeter["MeterNumber"].ToString(), Make = drWaterMeter["Make"].ToString(), Model = drWaterMeter["Model"].ToString(), MeterSize = drWaterMeter["MeterSize"].ToString() }; WaterMeters.Add(meter); } } return View(WaterMeters); } . . . No Change // POST: WaterMeters/Create [HttpPost] public ActionResult Create(FormCollection collection) { try { // TODO: Add insert logic here using (SqlConnection scWaterDistribution = new SqlConnection(System.Configuration.ConfigurationManager.ConnectionStrings["csWaterDistribution"].ConnectionString)) { SqlCommand cmdWaterMeters = new SqlCommand("INSERT INTO WaterMeters(MeterNumber, Make, Model, MeterSize) " + "VALUES(N'" + collection["MeterNumber"] + "', N'" + collection["Make"] + "', N'" + collection["Model"] + "', N'" + collection["MeterSize"] + "');", scWaterDistribution); scWaterDistribution.Open(); cmdWaterMeters.ExecuteNonQuery(); } return RedirectToAction("Index"); } catch { return View(); } } . . . No Change } }
Accessing Data as a Model
As we saw in previous lessons, the most professional way to access data in a view is through a Model object made available by a class derived from Controller. To make this possible, in your controller class, you should create a collection of an IEnumerable<> type. In a view associated with an action method of the controller, declare an @model statement that uses an IEnumerable<> object. Specify the parameter type as a class that represents a record of the table. In the body of the view, access the Model object as it holds a collection of the records of the table.
![]() Practical Learning: Accessing Data as a Model
Practical Learning: Accessing Data as a Model
@model IEnumerable<WaterDistributionBusiness1.Models.WaterMeter>

@{
    ViewBag.Title = "Water Meters";
}

<h2 class="bold blue common-font text-center">Water Meters</h2>

<hr />

<table class="table table-striped common-font">
    <tr>
        <th>Water Meter ID</th>
        <th>Make</th>
        <th>Model</th>
        <th>Meter Size</th>
    </tr>

    @foreach (var item in Model)
    {
        <tr>
            <td>
                @Html.DisplayFor(modelItem => item.WaterMeterID)
            </td>
            <td>
                @Html.DisplayFor(modelItem => item.Make)
            </td>
            <td>
                @Html.DisplayFor(modelItem => item.Model)
            </td>
            <td>
                @Html.DisplayFor(modelItem => item.MeterSize)
            </td>
        </tr>
    }
</table>

<p class="text-center common-font">@Html.ActionLink("New Water Meter", "Create")</p>| Meter # | Make | Model | Meter Size |
| 627-425 | Breston | T-39478 | 5/8 Inches |
| 304-861 | Vashty Worldwide | DD-3840 | 3/4 Inches |
| 925-935 | Igawa International | DTT 8802 | 1 Inch |
Topics on Selecting Records
Selecting Into a Table
Consider the following Employees table:
CREATE TABLE Employees
(
	EmployeeNumber int unique not null,
	FirstName nvarchar(20),
	LastName nvarchar(20) not null,
	Department nvarchar(50) null,
	EmploymentStatus nvarchar(30),
	HourlySalary money
);
GO
INSERT INTO Employees
VALUES(84628, N'Anthony', N'Holms', N'Corporate', N'Full Time', 24.72),
      (40574, N'William', N'Wilson', N'Information Technology', N'Full Time', 21.18),
      (27462, N'Peter',   N'Swanson', N'Corporate', N'Full Time', 22.84),
      (52835, N'Edward',  N'Johansen', N'Information Technology', N'Consultant', 15.50),
      (93075, N'Sharon',  N'Edson', N'Accounting', N'Full Time', 28.74),
      (82718, N'Yanuh',   N'Hadhah', N'Corporate', N'Full Time', 14.86),
      (29174, N'Hamin',   N'Souleyman', N'Public Relations', N'Consultant', 18.76);
GO
You can use all or some records from an existing table to create a new table that would contain those existing records. To do this, use the following formula:
SELECT columns INTO new-table-name FROM existing-table
To use all columns and all records, after the SELECT operator, type * INTO, a name for the table you want to create, followed by FROM, and the name of the original table that contains the records. Here is an example:
SELECT * INTO CompanyRecipients FROM Employees;
GO
Instead of using all columns, you can specify only some columns after the SELECT keyword. Here is an example:
SELECT EmployeeNumber, LastName, FirstName, EmploymentStatus
INTO Salaried FROM Employees;
GO
Distinct Field Selection
If you specify a column to select from a table, every record of that column would be selected. This can cause the same value to repeat over and over. Sometimes you want to show each value only once. To get such a result, you can use the DISTINCT keyword before the name of the column in the SELECT statement.
To perform a distinct selection, in most cases, you would get a better result if you select only one column. Still, you can use as many columns as you want.
Using an Alias Name for a Column
If you create a SELECT statement, when you select a column, you must specify its name. The string that displays in the column header is called a caption. As an alternative, if you want, you can display the caption of your choice. This is done by creating an alias for a column.
To create the alias of a column, in your SELECT statement, on the right side of the column name, put an empty space followed by the desired name of the column header. If the desired column header is in one word, you can simply type it. Here is an example:
SELECT CameraNumber Device
FROM CitationDivision.CamerasTickets;
GO
If you want the column header to appear with more than one word, provide the words as a string in single-quotes or between square brackets: [ and ] . Here are examples:
SELECT TicketNumber 'Ticket #',
	   CameraNumber Device,
	   ViolationCategory [Type of Violation],
	   PaymentDueDate [Payment Due Date]
FROM CitationDivision.CamerasTickets;
GO
As an alternative, instead of the empty space between the column name of its alias, use the AS keyword. Here are examples:
SELECT TicketNumber 'Ticket #',
	   CameraNumber Device,
	   VehicleTagNumber AS [Tag Nbr],
	   ViolationCategory [Type of Violation],
	   PaymentDueDate [Payment Due Date],
	   AmountDue AS 'Pmt Amt'
FROM CitationDivision.CamerasTickets;
GO
Of course, you can qualify each column. Here are examples of preceding the names of columns by their parent table:
SELECT Students.FirstName AS [First Name],
       Students.LastName AS [Last Name],
       Students.City AS [City],
Students.State
FROM   Students;
A Combination or Expression of Columns
When formulating a SELECT statement, you can combine some column names in an expression. You can use any of the available operators.
To create an expression in a SELECT statement, type the expression where a column would be used. Here is an example:
SELECT FirstName + N' ' + LastName
FROM   Students;
This type of expression would appear without a caption. To specify the caption of the column, use the alias features we reviewed in the previous section.
The addition can also be used on numeric values. All other arithmetic operators can be used. For example, you can multiply a weekly hours value to an hourly salary to get a weekly salary. Here is an example:
SELECT WeeklyHours * HourlySalary
FROM Payroll
Of course, you can add as many expressions as you want in the SELECT operation of a table. You can also create an alias for an expression to give it the desired name. To do this, on the right side of the expression, add an alias as we saw already. Here are examples:
SELECT FirstName + N' ' + LastName AS [Full Name],
       Address + N', ' + City + N' ' + State AS [Home Address]
FROM   Students
The Assignment Operator
If you just create a regular expression using arithmetic operators, the new column would not have a name. The SQL allows you to specify a different name for any column during data selection or a name for an expression. This is done using the assignment operator "=".
To change the name of a column during data selection, in your SQL statement, on the right side of SELECT, type the desired name, followed by the assignment operator, followed by the actual name of the column. If the name you want to use is in one word, simply use it. If the name is in more than one word, include it either in single-quotes or between [ and ]. Here are examples:
SELECT TicketNumber 'Ticket #',
	   CameraNumber Device,
	   VehicleTagNumber AS [Tag Nbr],
	   Period = ViolationPeriod,
	   ViolationCategory [Type of Violation],
	   'Camera Position' = ViolationLocation,
	   PaymentDueDate [Payment Due Date],
	   AmountDue AS 'Pmt Amt'
FROM CitationDivision.CamerasTickets;
GO
WHEN a Column's Value Meets a Criterion
Consider the following table:
CREATE DATABASE DepartmentStore;
GO
USE DepartmentStore;
GO
CREATE TABLE Employees
(
    FirstName	 nvarchar(20),
    MI		     nchar(2),
    LastName	 nvarchar(20),
    HourlySalary smallmoney,
    [Status]	 tinyint
);
GO
INSERT INTO Employees
VALUES(N'Christopher', N'L', N'Larsen', 14.50, 3),
      (N'Henry', N'C', N'Jonathan', 12.85, 1),
      (N'Lance', N'A', N'Seagal', 16.95, 1);
GO
INSERT INTO Employees(FirstName, LastName, Status)
VALUES(N'Roberta', N'Ortez', 1);
GO
INSERT INTO Employees(FirstName, LastName, HourlySalary)
VALUES(N'Paul', N'Swanson', 10.90);
GO
INSERT INTO Employees VALUES(N'Kristofer', N'L', N'Michaels', 12.85, 2);
GO
INSERT INTO Employees VALUES(N'Ivan', N'N', N'Sanders', 15.00, 2),
							(N'David', N'P', N'Monahan', 13.05, 1);
GO
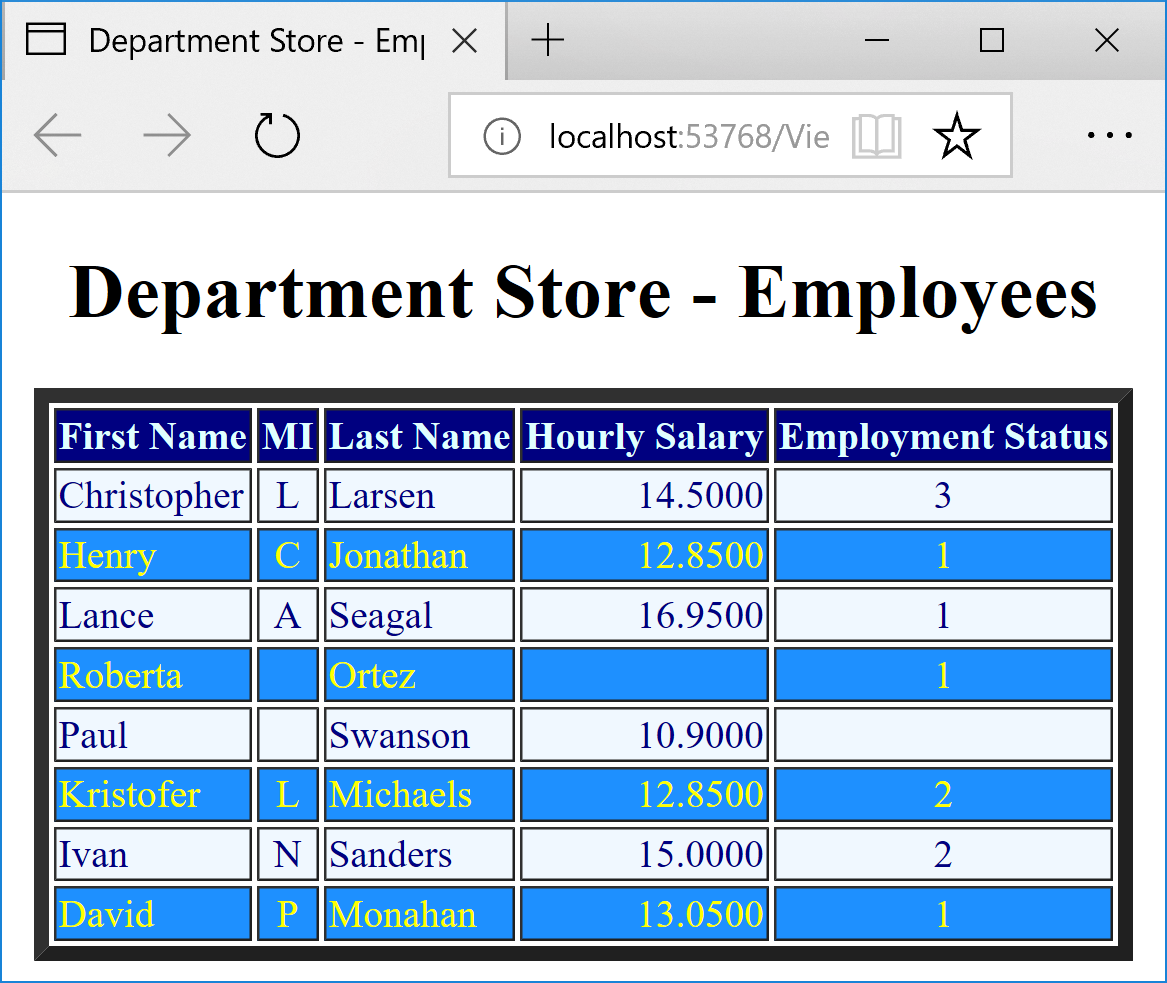
When writing your SELECT statement, the value of a column may not be clear to the user. Consider the Employment column in the following query:
<!DOCTYPE html>
<html>
<head>
<title>Department Store - Employees</title>
</head>
<body>
<div align="center">
    <h1>Department Store - Employees</h1>

    @{
        using(System.Data.SqlClient.SqlConnection scDepartmentStores =
                new System.Data.SqlClient.SqlConnection("Integrated Security='True';Initial Catalog='DepartmentStore';Data Source=(Local)"))
        {
            string strEmployees = "SELECT FirstName, MI, LastName, HourlySalary, [Status] " +
                                  "FROM Employees;";

            System.Data.SqlClient.SqlCommand cmdEmployees = new System.Data.SqlClient.SqlCommand(strEmployees, scDepartmentStores);

            scDepartmentStores.Open();

            cmdEmployees.ExecuteNonQuery();

            System.Data.SqlClient.SqlDataAdapter sdaEmployees = new System.Data.SqlClient.SqlDataAdapter(cmdEmployees);


            System.Data.DataSet dsEmployees = new System.Data.DataSet("EmployeesSet");
            sdaEmployees.Fill(dsEmployees);

            <table border="6">
                <tr style="font-weight: 600; background-color: navy; color: lightcyan">
                    <td>First Name</td>
                    <td style="text-align: center">MI</td>
                    <td>Last Name</td>
                    <td style="text-align: right">Hourly Salary</td>
                    <td style="text-align: center">Employment Status</td>
                </tr>
            @for (int i = 0; i < dsEmployees.Tables[0].Rows.Count; i++)
            {
                System.Data.DataRow drProperty = dsEmployees.Tables[0].Rows[i];
                if (i % 2 == 0)
                {
                    <tr style="background-color: aliceblue; color: navy;">
                        <td>@drProperty[0]</td>
                        <td style="text-align: center">@drProperty[1]</td>
                        <td>@drProperty[2]</td>
                        <td style="text-align: right">@drProperty[3]</td>
                        <td style="text-align: center;">@drProperty[4]</td>
                    </tr>
                }
                else
                {
                    <tr style="background-color: dodgerblue; color: yellow;">
                        <td>@drProperty[0]</td>
                        <td style="text-align: center">@drProperty[1]</td>
                        <td>@drProperty[2]</td>
                        <td style="text-align: right">@drProperty[3]</td>
                        <td style="text-align: center;">@drProperty[4]</td>
                    </tr>
                }
            }
            </table>
        }
    }
</div>
</body>
</html>
This would produce:
If the value of a column is not very clear, to let you provide some type of explanation to the user, Transact-SQL provides a conditional statement that uses a combination of CASE and WHEN keywords. It roughly resembles the switch statement of the C-based and Visual Basic languages. The formula to follow is:
CASE proposition
    WHEN expression_1 THEN result_1
    WHEN expression_2 THEN result_2
    . . .
    WHEN expression_n THEN result_n
END
You can first apply an expression to the CASE keywork to consider a value. The expression can also be the name of a column of a table. The CASE statement ends with an END keyword. The section between the CASE line and the END keyword is the body of the CASE statement.
In the body of the CASE statement, create a number of statements that start with a WHEN expression followed by a THEN expression. Each WHEN expression considers a possible value of the CASE expression. If the value is found, deal with it in a THEN expression. In the same way, create as many WHEN expression_n THEN result_n expression as you need.
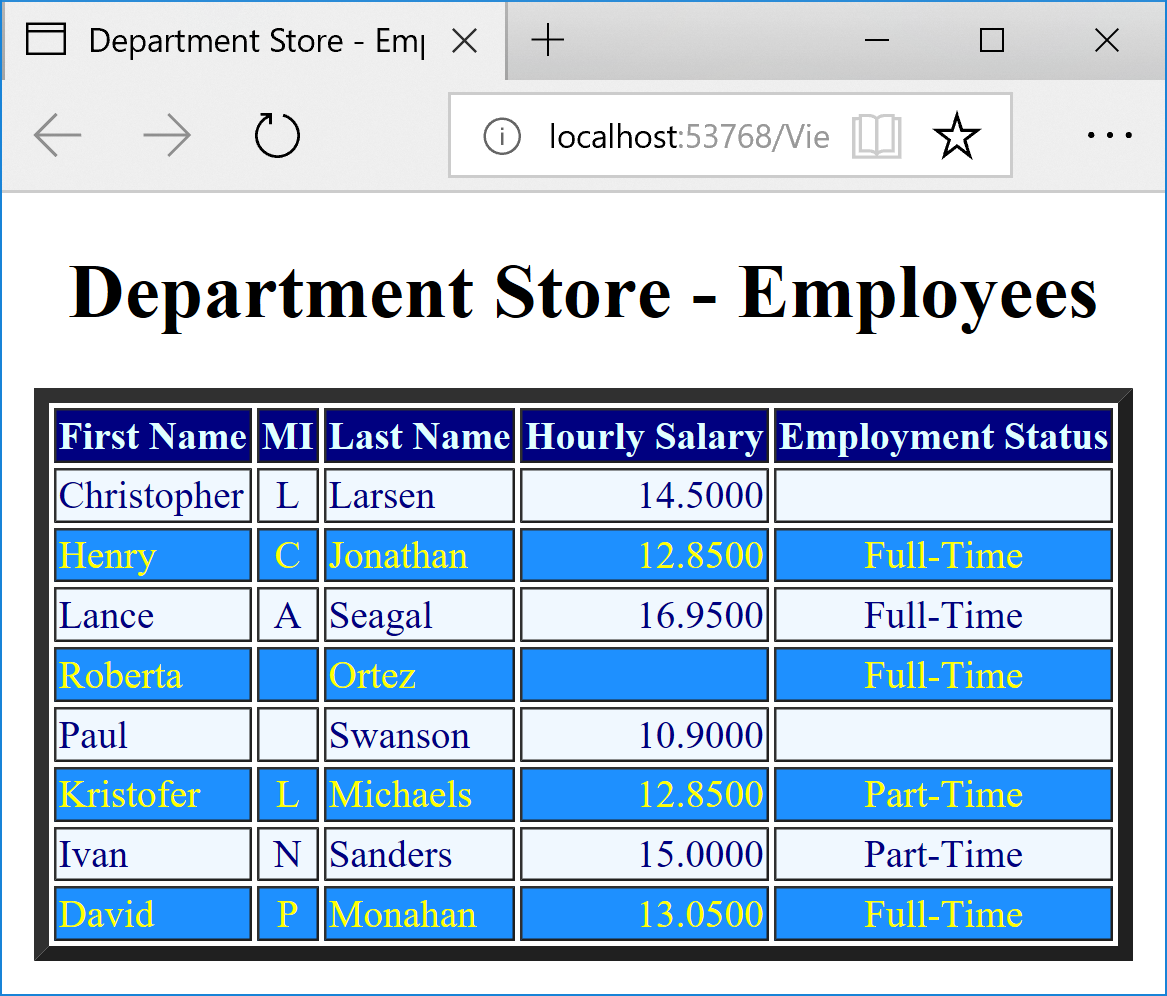
Here is an example of creating and using a CASE statement:
<!DOCTYPE html>
<html>
<head>
<title>Department Store - Employees</title>
</head>
<body>
<div align="center">
    <h1>Department Store - Employees</h1>

    @{
        using(System.Data.SqlClient.SqlConnection scDepartmentStores =
                new System.Data.SqlClient.SqlConnection("Integrated Security='True';Initial Catalog='DepartmentStore';Data Source=(Local)"))
        {
            string strEmployees = "SELECT FirstName, MI, LastName, " +
                                  "       HourlySalary, " +
                                  "[Status] = " +
                                  "CASE Status " +
                                  "    WHEN 1 THEN N'Full-Time' " +
                                  "    WHEN 2 THEN N'Part-Time' " +
                                  "END " +
                                  "FROM Employees;";

            System.Data.SqlClient.SqlCommand cmdEmployees = new System.Data.SqlClient.SqlCommand(strEmployees, scDepartmentStores);

            scDepartmentStores.Open();

            cmdEmployees.ExecuteNonQuery();

            System.Data.SqlClient.SqlDataAdapter sdaEmployees = new System.Data.SqlClient.SqlDataAdapter(cmdEmployees);

            System.Data.DataSet dsEmployees = new System.Data.DataSet("EmployeesSet");
            sdaEmployees.Fill(dsEmployees);

            <table border="6">
                <tr style="font-weight: 600; background-color: navy; color: lightcyan">
                    <td>First Name</td>
                    <td style="text-align: center">MI</td>
                    <td>Last Name</td>
                    <td style="text-align: right">Hourly Salary</td>
                    <td style="text-align: center">Employment Status</td>
                </tr>
            @for (int i = 0; i < dsEmployees.Tables[0].Rows.Count; i++)
            {
                System.Data.DataRow drProperty = dsEmployees.Tables[0].Rows[i];
                if (i % 2 == 0)
                {
                    <tr style="background-color: aliceblue; color: navy;">
                        <td>@drProperty[0]</td>
                        <td style="text-align: center">@drProperty[1]</td>
                        <td>@drProperty[2]</td>
                        <td style="text-align: right">@drProperty[3]</td>
                        <td style="text-align: center;">@drProperty[4]</td>
                    </tr>
                }
                else
                {
                    <tr style="background-color: dodgerblue; color: yellow;">
                        <td>@drProperty[0]</td>
                        <td style="text-align: center">@drProperty[1]</td>
                        <td>@drProperty[2]</td>
                        <td style="text-align: right">@drProperty[3]</td>
                        <td style="text-align: center;">@drProperty[4]</td>
                    </tr>
                }
            }
            </table>
        }
    }
</div>
</body>
</html>
This would produce:
If none of the WHEN expression_n expressions matches a CASE value, you can create a last statement using the ELSE keyword. The formula to follow would become:
CASE proposition
    WHEN expression_1 THEN result_1
    WHEN expression_2 THEN result_2
    . . .
    WHEN expression_n THEN result_n
    ELSE else_result
END
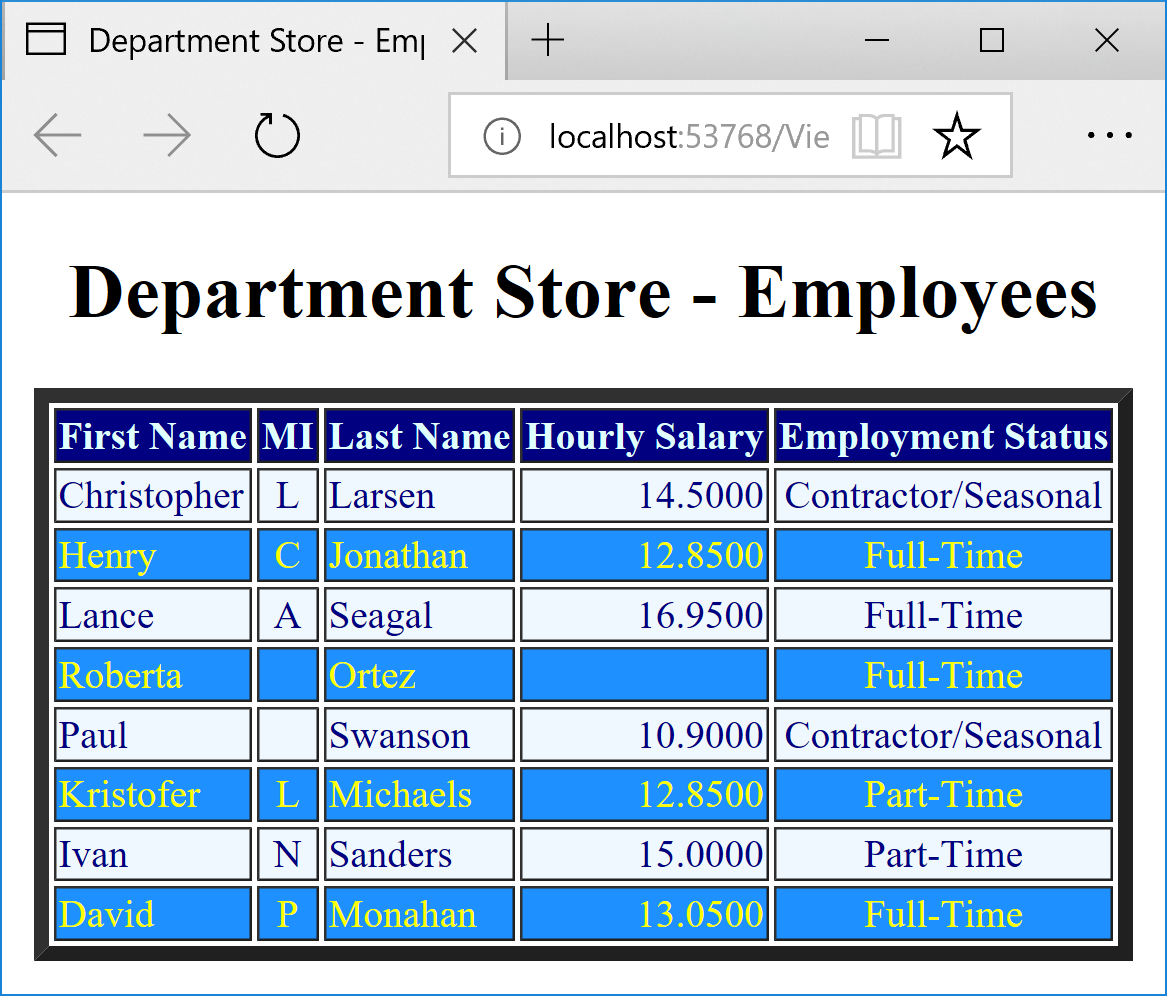
Here is an example of using it:
SELECT FirstName, MI, LastName,
       HourlySalary,
       [Status] =
	    CASE Status
		WHEN 1 THEN N'Full-Time'
		WHEN 2 THEN N'Part-Time'
		ELSE N'Contractor/Seasonal'
	    END
FROM Employees;
This would produce:
Data Selection and ASP.NET MVC Web Controls
Data Selection and Labels
To display a value of a SELECT statement in a label, call the Html.Label() method. Pass the first argument from a value of an indexer of a data reader. Here are examples:
@{
    ViewBag.Title = "Gas Meters";
}

<h2>Gas Meters</h2>

@using (Html.BeginForm())
{
    using (System.Data.SqlClient.SqlConnection scGasDistribution = new System.Data.SqlClient.SqlConnection("Data Source=(local); Database='GasDistribution1'; Integrated Security=True"))
    {
        System.Data.SqlClient.SqlCommand cmdGasMeters =
            new System.Data.SqlClient.SqlCommand("SELECT MeterID, MeterNumber, Make, Model, MeterSize, DateLastUpdate, CounterValue FROM GasMeters",
            scGasDistribution);

        scGasDistribution.Open();

        System.Data.SqlClient.SqlDataReader sdrGasMeters = cmdGasMeters.ExecuteReader();

    <table border="6">
        <tr>
            <td style="text-align: center; font-weight: 600">Meter ID</td>
            <td><b>Meter #</b></td>
            <td><b>Make</b></td>
            <td><b>Model</b></td>
            <td><b>MeterSize</b></td>
            <td><b>DateLastUpdate</b></td>
            <td><b>CounterValue</b></td>
        </tr>
        @while (sdrGasMeters.Read())
        {
            <tr>
                <td>@Html.Label(@sdrGasMeters[0].ToString())</td>
                <td>@Html.Label(@sdrGasMeters[1].ToString())</td>
                <td>@Html.Label(@sdrGasMeters[2].ToString())</td>
                <td>@Html.Label(@sdrGasMeters[3].ToString())</td>
                <td>@Html.Label(@sdrGasMeters[4].ToString())</td>
                <td>@Html.Label(@sdrGasMeters[5].ToString())</td>
                <td>@Html.Label(@sdrGasMeters[6].ToString())</td>
            </tr>
        }
    </table>
    }
}
Text Boxes
After getting a value from a SELECT statement, to display that value in a text box, call the Html.TextBox() method and pass the second argument as an indexed value of a data reader.
Check Boxes
A check box is used to display a true or false value. If you are using a data reader to get the value of a column that has Boolean values, parse that value before applying it to the check box.
Combo Boxes and List Boxes
A combo box, also called a drop-down-list, is a list-based control that can show one, some, or all of the values of a column of a table. To put those values in the control, you can use a data reader to get each value and add it to the combo box.
If the column has repeating values and you use the same technique, the combo box also would have repeating values. In most cases, this would not be professional. To make sure the combo box displays unique values, you have various alternatives. You can use a loop to check whether the combo box has a certain value already and decide whether to add or ignore the value. An alternative is to apply the DISTINCT keyword to the SELECT statement.
Radio Buttons
Radio buttons work as a mutually-exclusive group. The user can select one item at a time. As you may know already, to create a radio button, you can call the Html.RadioButton() method and pass at least two arguments. One issue is that, when creating a group of radio buttons, all of the radio buttons in the same group must use the same name, which is the first argument of their method. This means that all radio buttons in the group must be passed the same first argument. The second argument should be different for each radio button and it would hold the value of the control.
![]() Practical Learning: Ending the Lesson
Practical Learning: Ending the Lesson
|
|
||
| Previous | Copyright © 2001-2021, FunctionX | Next |
|
|
||