Introduction to the Views of a Web Site

Introduction to the Views of a Web Site
Introduction to Views in ASP.NET MVC
Overview
A website is a set of documents that are accessed by an application called a Web browser. Most of the time, a website is created to be used on the Internet, but a website can also be used on one or more computers that is or are not connected to the Internet. In fact, a website can be created to work as a desktop application that is used or accessed only on the computer on which it is installed.
A website contains various types of documents such as text, photos, videos, etc. A text-based document that displays in a browser is called a webpage or a view.
Microsoft Visual Studio is a friendly programming environment that makes it easy to create and manage (and to publish) a website. Microsoft Visual Studio provides various techniques and approaches to creating a website. To make it easy to create applications, Microsoft creates a library named the .NET Framework. To make it possible to create interactive websites, Microsoft created ASP.NET as a subset (a part) of the .NET Framework. ASP.NET itself supports various ways to create a website.
One approach of ASP.NET to create websites use a technique referred to as model-view-controller, or MVC. In MVC, V stands for the view. A view is a text-based webpage whose document primarily contains HTML code. It may also contain CSS and JavaScript code. The view is what displays in the browser for a visitor of your webpage to see. A view is meant to process Razor syntax. For this reason, the code of a view can also contain Razor code. A file that contains Razor code has the extension .cshtml (or .vbhtml). This also applies to views. There are various ways to create a view.
![]() Practical Learning: Introducing the Views of a Web Site
Practical Learning: Introducing the Views of a Web Site
body {
    margin: 0;
    background-color: white;
}

.container
{
    margin: auto;
    width:  250px;
}
.accent    { font-weight: bold;   }
.alignment { text-align:  center; }
Introduction to Creating a Razor-Based View
The most fundamental way to create a view is to create a Razor view. To better organize the views of your web project, you can create a folder named Views in your project (this is not a requirement but a recommendation). In simple cases you should manually create that folder.
![]() Practical Learning: Creating a View
Practical Learning: Creating a View
<!DOCTYPE html>
<html>
<head>
    <title>Liquidity Analysis</title>
</head>
<body>
    <h1>Liquidity Analysis</h1>

    <p>This website is used to perform business analyses and predictions.</p>
</body>
</html>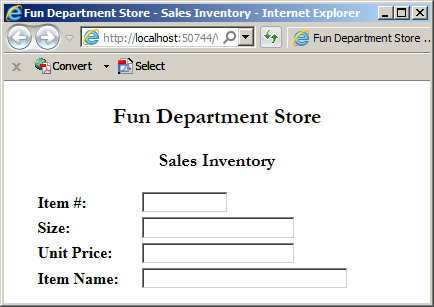
Views and the Layout Page
As you may be aware already, you should use a layout page as the central document of your Web project to coordinate the display of your webpages. By tradition, the layout page should be created in a folder named Shared. The Shared folder should be created as a sub-folder of the Views folder.
Introduction to the Actions Results of a View
Introduction to the Results of a View
In an ASP.NET MVC application, a view displays the content of a webpage in a browser. The content can consist of text, photos, videos, etc, including the design of the webpage. That whole group is referred to as the result of a view.
To support the results of a view of an ASP.NET MVC website, the .NET Framework provides a class named ViewResult. The ViewResult class is derived from ViewResultBase, which is an abstract class:
public class ViewResult : ViewResultBase
As is the case for any regular class, to get a ViewResult object, you can declare a variable of this class and initialize it using its default constructor. Here is an example:
@{
    Square sqr = new Square();
}
Of course, you can create a method that produces a ViewResult object. This can be done as follows:
using System.Web.Mvc;

public class InternetPage
{
    public ViewResult Create()
    {
        ViewResult vr = new ViewResult();

        return vr;
    }
}
You can also pass a ViewResult object as argument to a method. Here is an example:
using System.Web.Mvc;

public class CustomerInvoice : BillPreparation
{
    public ViewResult Create()
    {
        ViewResult vr = new ViewResult();

        return vr;
    }

    public void Present(ViewResult vr)
    {
    }
}
ViewResultBase is not a particularly large class but it contains a few valuable properties.
Introduction to Actions Results
If a view is made to ensure continuous communication with a webserver, such as the visitor submitting some values through a Web form, the server must process the information it receives. The processing may include calculations, validations, rejections, etc. These processing operations are also referred to as actions.
To suppport the actions performed on data sent to the webserver of an ASP.NET MVC website, the .NET Framework prodives an abstract class named ActionResult:
public abstract class ActionResult
As an abstract class, ActionResult is in fact the parent to many classes that represent various types of actions. The abstract ViewResultBase class that we reviewed above is one of the classes that derive from ActionResult:
public abstract class ViewResultBase : ActionResult
As we saw in our study of abstract classes, you can create a method that produces an ActionResult type of object.
Using an Action Result
You can use any of the techniques we have studied so far for abstract classes. For example, you can declare a variable of type ActionResult and initialize it with one of its derived classes, which includes ViewResult. This can be done as follows:
using System.Web.Mvc;

namespace GasUtilityCompany.App_Code
{
    public class CustomerInvoice : BillPreparation
    {
        public void Create()
        {
            ActionResult ar = new ViewResult();
        }
    }
}
ActionResult is a very simple abstract class. It contains only one constructor and one method. The single constructor of the abstract ActionResult class is protected. The single method of the ActionResult class is named ExecuteResult. Its job is to process an action from a class that derives from ActionResult. As a conclusion, although you can declare a variable of type ActionResult and initialize it with one of its derived classes, you actually need one of its derived classes to use an ActionResult object.
Based on our current knowledge of abstract classes, you can create a method that takes an ActionResult object as argument. Here is an example:
using System.Web.Mvc;

namespace GasUtilityCompany.App_Code
{
    public class CustomerInvoice : BillPreparation
    {
        public void Create()
        {
            ActionResult ar = new ViewResult();
        }

        public void Create(ActionResult ar)
        {

        }
    }
}
On the other hand, you can create a method that returns an ActionResult object. In the method, you can either declare a variable of type ActionResult or a variable of one of its derived classes. Initialize the variable as you see fit. Before the end of the method, make sure you return an appropriate object. Here is an example:
using System;
using System.Collections.Generic;
using System.Linq;
using System.Web.Mvc;

namespace GasUtilityCompany.App_Code
{
    public class CustomerInvoice : BillPreparation
    {
        public void Create()
        {
            ActionResult ar = new ViewResult();
        }

        public ActionResult View()
        {
            ViewResult vr = new ViewResult();

            return vr;
        }
    }
}
Based on our current knowledge of abstract classes, in our example, you can omit declaring a variable and return a reference to the class instead. This can be done as follows:
using System;
using System.Collections.Generic;
using System.Linq;
using System.Web.Mvc;

namespace GasUtilityCompany.App_Code
{
    public class CustomerInvoice : BillPreparation
    {
        public void Create()
        {
            ActionResult ar = new ViewResult();
        }

        public ActionResult View()
        {
            return new ViewResult();
        }
    }
}
In the same way, you can create other methods that return an ActionResult or one of its derived classes. If you create a method that performs the same type(s) of operation(s) as a previous method and returns an ActionResult, you can call the first method in your new class. Here is an example:
using System;
using System.Collections.Generic;
using System.Linq;
using System.Web.Mvc;

namespace GasUtilityCompany.App_Code
{
    public class CustomerInvoice : BillPreparation
    {
        public void Create()
        {
            ActionResult ar = new ViewResult();
        }

        public ActionResult View()
        {
            return new ViewResult();
        }

        public ActionResult AboutThisWebSite()
        {
            ActionResult ar = new ViewResult();

            ar = this.View();

            return ar;
        }
    }
}
Remember that you don't have to first declare an initialize a variable before calling a method that returns the type of that variable. Here is an example:
using System;
using System.Collections.Generic;
using System.Linq;
using System.Web.Mvc;

namespace GasUtilityCompany.App_Code
{
    public class CustomerInvoice : BillPreparation
    {
        public void Create()
        {
            ActionResult ar = new ViewResult();
        }

        public ActionResult View()
        {
            return new ViewResult();
        }

        public ActionResult AboutThisWebSite()
        {
            ActionResult ar = this.View();

            return ar;
        }
    }
}
In fact, you can call the method directly where its call is needed. Here are examples:
using System;
using System.Collections.Generic;
using System.Linq;
using System.Web.Mvc;

namespace GasUtilityCompany.App_Code
{
    public class CustomerInvoice : BillPreparation
    {
        public void Create()
        {
            ActionResult ar = new ViewResult();
        }

        public ActionResult View()
        {
            return new ViewResult();
        }

        public ActionResult AboutUs()
        {
            return this.View();
        }

        public ActionResult Index()
        {
            return View();
        }

        public ActionResult Training() => this.View();

        public ActionResult TodaysWeather() => View();
    }
}
A Web View Page
Introduction
To prepare what to display to a visitor of your webpage, you typically create a view as a Razor-based document. To support the views of a website, the .NET Framework provides an abstract class named WebViewPage. This class is derived from the WebPageBase. This class is also the parent of the WebPage class that manages a webpage.
As a child of the WebPageBase class, the WebViewPage class inherits such properties as Page and IsPost.
The HTML Helper of a View
To support the HTML code in an ASP.NET MVC application, the .NET Framework provides a class named HtmlHelper. The HtmlHelper class is defined in the System.Web.Mvc namespace of the System.Web.Mvc.dll library. You will never need to declare or use a variable of type HtmlHelper. Instead, the classes that need its services are equipped with a property named Html. It is that property that you will need to access the members of the HtmlHelper class.
![]() Practical Learning: Introducing Views Helpers
Practical Learning: Introducing Views Helpers
<!DOCTYPE html>
<html>
<head>
    <link href="~/Content/LiquidityAnalysis.css" rel="stylesheet" />
    <title>Fun Department Store - @Page.Title</title>
    @RenderSection("head", required: false)
</head>
<body>
    <div class="container">
        <h2 class="alignment">@Page.Title</h2>
        <h3 class="alignment">@Page.SubTitle</h3>

        @RenderBody()

    </div>
</body>
</html>
@{
    Layout = "~/Views/Shared/_Layout.cshtml";
}

@{
    Page.Title = "Business Annual Report";
    Page.SubTitle = "Liquidity Analysis";
}
Introduction to the Forms of a View
Introduction to the HTML Code of a View
To support the HTML code that is used in a view, the WebViewPage class is equipped with a property named remove. This property is of type HtmlHelper. This property gives you access to various HTML characteristics of a webpage but it uses some particular names.
Creating a Form
As you may know already and as we have done so far, to start a form, you can create a FORM tag. Here is an example of starting a form in HTML:
<!DOCTYPE html>
<html>
<head>
<title>Employment Application</title>
</head>
<body>
<h2>Employment Application</h2>

<form name="frmEmploymentApplication" method="post">

</form>

</body>
</html>
To support the controls of a webform, the HtmlHelper class is equipped with various extension methods.
![]() Practical Learning: Creating a Form
Practical Learning: Creating a Form
@{
Layout = "~/Views/Shared/_Layout.cshtml";
}
@{
Page.Title = "Business Annual Report";
Page.SubTitle = "Liquidity Analysis";
}
<form name="frmBusiness" method="post">
<table>
<tr>
<td></td>
<td></td>
</tr>
<tr>
<td></td>
<td></td>
</tr>
<tr>
<td> </td>
<td></td>
</tr>
<tr>
<td>Ratio:</td>
<td></td>
</tr>
<tr>
<td> </td>
<td></td>
</tr>
</table>
</form>
Introduction to Creating a Web Control
To let you add a webcontrol to a form, the HtmlHelper class is extended with various overloaded methods for different HTML objects. Actually, the HtmlHelper-oriented method of a control is an MVC adaptation of the corresponding HTML control. For example, the method for a text box is named TextBox and it is represented in HTML as an INPUT tag whose type is TEXT. The HtmlHelper method used to create a check box is named CheckBox. The HtmlHelper method that represents a radio button is named RadioButton, and so on.
Based on this, to create a control in MVC, in plain HTML code, follow this formula:
@Html.method-name(parameter(s))
For example, the simplest HtmlHelper method used to create a text box uses the following syntax:
public static MvcHtmlString TextBox(this HtmlHelper htmlHelper,
				                    string name)
The Name of a Control
Probably the most fundamental programmatic piece of information about a control is its name. In HTML, this is represented as the NAME attribute of a control. To support this, the first argument of each HtmlHelper method used is to create a control is for the name.
The other controls have the same type of version of a method. This version allows you to specify only the name of the control. Here is an example for a text box:
<!DOCTYPE html>
<html>
<head>
<title>Employment Application</title>
</head>
<body>
<h2>Employment Application</h2>

<form name="frmEmploymentApplication" method="post">

    <p>@Html.TextBox("txtFirstName")</p>

</form>
</body>
</html>
The Value of a Control
Many controls are made to display text or some type of value. To support this detail, each of the methods used to create a control has a second version that takes a second argument that represents the value of the control. The method for a text box uses the following syntax:
public static MvcHtmlString TextBox(this HtmlHelper htmlHelper,
                                    string name,
                                    object value)
To specify the value of a control as a constant, put it in double-quotes. If the value is from another control or a variable, precede it with an @ symbol.
![]() Practical Learning: Creating Web Controls
Practical Learning: Creating Web Controls
@{
Layout = "~/Views/Shared/_Layout.cshtml";
}
@{
Page.Title = "Business Annual Report";
Page.SubTitle = "Liquidity Analysis";
}
<form name="frmBusiness" method="post">
<table>
<tr>
<td></td>
<td>@Html.TextBox("txtAssets", "")</td>
</tr>
<tr>
<td></td>
<td>@Html.TextBox("txtLiabilities", "")</td>
</tr>
<tr>
<td> </td>
<td></td>
</tr>
<tr>
<td></td>
<td>@Html.TextBox("txtRatio", "") Times</td>
</tr>
<tr>
<td> </td>
<td></td>
</tr>
</table>
</form>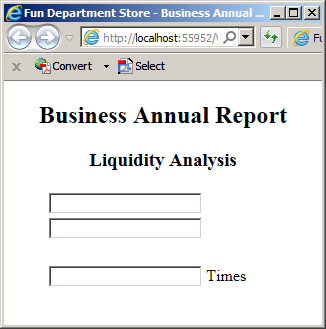
The Null Value of a Control
When creating a control, if you don't have a value for it, set its value to null. Here are examples:
><form name="frmEmploymentApplication" method="post">
    <table>
        <tr>
            <td>Employment #:</td>
            <td>@Html.TextBox("EmploymentNumber", null)</td>
        </tr>
        <tr>
            <td>First Name:</td>
            <td>@Html.TextBox("FirstName", null)</td>
        </tr>
        <tr>
            <td>Last Name:</td>
            <td>@Html.TextBox("LastName", null)</td>
        </tr>
    </table>

    <p><input type="submit" name="btnSubmitApplication" value="Submit Application" /></p>
</html>
Processing a Web Form
There are two primary things you need to do to process the controls of a form. To start, create an INPUT tag (for the control) and set its type as SUBMIT. Here is an example:
<!DOCTYPE html>
<html>
<head>
<title>Employment Application</title>
</head>
<body>
<h2>Employment Application</h2>

<form name="frmEmploymentApplication" method="post">

    <p><input type="submit" /></p>

</form>
</body>
</html>
Second, create a Razor code section that contains a conditional statement that checks the value of an IsPost property. Here is an example:
<!DOCTYPE html>
<html>
<head>
<title>Employment Application</title>
</head>
<body>
@{
    if(IsPost)
    {

    }
}

<h2>Employment Application</h2>

<form name="frmEmploymentApplication" method="post">

    <p><input type="submit" /></p>

</form>
</body>
</html>
![]() Practical Learning: Processing Web Controls
Practical Learning: Processing Web Controls
@{
Layout = "~/Views/Shared/_Layout.cshtml";
}
@{
Page.Title = "Business Annual Report";
Page.SubTitle = "Liquidity Analysis";
}
@{
double ratio = 0.00;
double assets = 0.00;
double liabilities = 0.00;
if (IsPost)
{
assets = Convert.ToDouble(Request["txtAssets"]);
liabilities = Convert.ToDouble(Request["txtLiabilities"]);
ratio = assets / liabilities;
}
}
<form name="frmBusiness" method="post">
<table>
<tr>
<td></td>
<td>@Html.TextBox("txtAssets", @assets)</td>
</tr>
<tr>
<td></td>
<td>@Html.TextBox("txtLiabilities", @liabilities)</td>
</tr>
<tr>
<td> </td>
<td><input type="submit" value="Calculate Ratio" name="btnCalculate" /></td>
</tr>
<tr>
<td></td>
<td>@Html.TextBox("txtRatio", @ratio.ToString("F")) Times</td>
</tr>
<tr>
<td> </td>
<td></td>
</tr>
</table>
</form>The HTML Attributes of a Web Control
Introduction
As mentioned earlier, ASP.NET MVC provides its own adaptation of HTML controls. Since HTML provides a large list of attributes, and the list of those attributes can grow independantly of ASP.NET MVC, instead of creating a property for each attribute, each method used to create a control has another version that takes a third argument of type object. The syntax of this method for the text box is:
public static MvcHtmlString TextBox(this HtmlHelper htmlHelper,
								    string name,
								    object value,
							        object htmlAttributes)
The new argument is provided as an anonymous object. To pass it, you can use the following formula:
new { html-attribute1 = value1, html-attribute2 = value2, html-attribute_n = value_n}
You can also precede the new operator with htmlAttributes: to indicate the name of the argument whose value you are providing.
Specifying an HTML Attribute
Each attribute must be provided by its HTML name and assgn the desired value to it. Normally, a value is provided in double-quotes. Here is an example:
<form method="post" name="frmEmploymentApplication">
    <p>Employee #: @Html.TextBox("txtEmployeeNumber",
                                 "------",
                                 new { title = "The employee number must be unique to each staff member." })</p>
</form>
Adding a Style Attribute
You can format a webcontrol directly when creating it. To do this, adding an attribute named style. For its value, create the style(s) inside the doule-quotes.
![]() Practical Learning: Adding a Style Attribute
Practical Learning: Adding a Style Attribute
@{
Layout = "~/Views/Shared/_Layout.cshtml";
}
@{
Page.Title = "Business Annual Report";
Page.SubTitle = "Liquidity Analysis";
}
@{
double ratio = 0.00;
double assets = 0.00;
double liabilities = 0.00;
if (IsPost)
{
assets = Convert.ToDouble(Request["txtAssets"]);
liabilities = Convert.ToDouble(Request["txtLiabilities"]);
ratio = assets / liabilities;
}
}
<form name="frmBusiness" method="post">
<table>
<tr>
<td></td>
<td>@Html.TextBox("txtAssets", @assets, new { style = "width: 100px" })</td>
</tr>
<tr>
<td></td>
<td>@Html.TextBox("txtLiabilities", @liabilities, htmlAttributes: new { style = "width: 100px" })</td>
</tr>
<tr>
<td> </td>
<td><input type="submit" value="Calculate Ratio" name="btnCalculate" /></td>
</tr>
<tr>
<td></td>
<td>@Html.TextBox("txtRatio",
@ratio.ToString("F"),
new { style = "background-color: LightGreen; width: 110px" }) Times</td>
</tr>
<tr>
<td> </td>
<td></td>
</tr>
</table>
</form>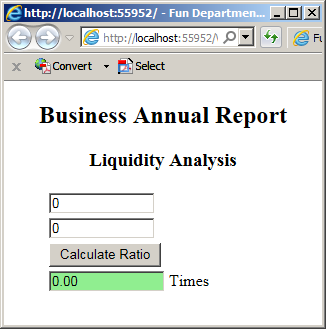
A C# Keyword for an Attribute
If an HTML attribute has the name as a C# keyword and you need to use that attribute, precede its name with @. Here are examples that use the class keyword:
@{
Layout = "~/Views/Shared/_Layout.cshtml";
}
<style>
.regular-text { width: 100px;
border: 1px solid maroon; }
.result { background-color: lightblue; }
</style>
@{
Page.Title = "Business Annual Report";
Page.SubTitle = "Liquidity Analysis";
}
@{
double ratio = 0.00;
double assets = 0.00;
double liabilities = 0.00;
if (IsPost)
{
assets = Convert.ToDouble(Request["txtAssets"]);
liabilities = Convert.ToDouble(Request["txtLiabilities"]);
ratio = assets / liabilities;
}
}
<form name="frmBusiness" method="post">
<table>
<tr>
<td></td>
<td>@Html.TextBox("txtAssets", @assets, new { @class = "regular-text" })</td>
</tr>
<tr>
<td></td>
<td>@Html.TextBox("txtLiabilities", @liabilities, htmlAttributes: new { @class = "regular-text" })</td>
</tr>
<tr>
<td> </td>
<td><input type="submit" value="Calculate Ratio" name="btnCalculate" /></td>
</tr>
<tr>
<td></td>
<td>
@Html.TextBox("txtRatio",
@ratio.ToString("F"),
new { @class = "result regular-text" }) Times
</td>
</tr>
<tr>
<td> </td>
<td></td>
</tr>
</table>
</form>
Characteristics of Web Controls
Resetting a Form
Resetting a form consists of putting each control to its default state. To prepare a form for this operation in HTML, create an INPUT tag and set its TYPE as RESET. To do this in Razor, call the Html.TextBox() method. For its third argument, add a property named type and set value as reset.
![]() Practical Learning: Resetting a Web Form
Practical Learning: Resetting a Web Form
@{
Layout = "~/Views/Shared/_Layout.cshtml";
}
@{
Page.Title = "Business Annual Report";
Page.SubTitle = "Liquidity Analysis";
}
@{
double ratio = 0.00;
double assets = 0.00;
double liabilities = 0.00;
if (IsPost)
{
assets = Convert.ToDouble(Request["txtAssets"]);
liabilities = Convert.ToDouble(Request["txtLiabilities"]);
ratio = assets / liabilities;
}
}
<form name="frmBusiness" method="post">
<table>
<tr>
<td></td>
<td>@Html.TextBox("txtAssets", @assets, new { style = "width: 100px" })</td>
</tr>
<tr>
<td></td>
<td>@Html.TextBox("txtLiabilities", @liabilities, new { style = "width: 100px" })</td>
</tr>
<tr>
<td> </td>
<td><input type="submit" value="Calculate Ratio" name="btnCalculate" /></td>
</tr>
<tr>
<td></td>
<td>@Html.TextBox("txtRatio",
@ratio.ToString("F"),
new { style = "background-color: LightGreen; width: 110px" }) Times</td>
</tr>
<tr>
<td> </td>
<td><input type="reset" value="Reset Form" name="btnReset" /></td>
</tr>
</table>
</form>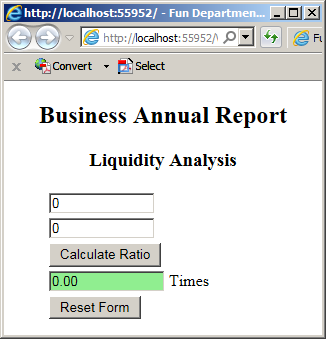
The Label and Caption of a Control
To indicate what it is used for, a visual control should be accompanied by text, also called its caption, close to it (usually above or to the left of the control). Although you can use any text, to make it more professional, in HTML, create a LABEL tag and include the intended control in it. Here is an example:
<!DOCTYPE html>
<html>
<head>
<title>Employment Application</title>
</head>
<body>
<h2>Employment Application</h2>

<form name="frmEmploymentApplication" method="post">

    <p><label>Employeee #: @Html.TextBox("txtEmployeeNumber")</label></p>

</form>
</body>
</html>
To support the controls captions, the HtmlHelper class is extended with an overloaded mehod named Label. The simplest version of this method takes one argument as the string (caption) that will display. The syntax of that version is:
public static MvcHtmlString Label(this HtmlHelper html,
								  string expression)
The single argument of this method is the text of the label. Here are two examples.
<form name="frmEmploymentApplication" method="post">
    <table>
        <tr>
            <td>@Html.Label("First Name:")</td>
            <td>@Html.TextBox("txtFirstName")</td>
        </tr>
        <tr>
            <td>@Html.Label("Last Name:")</td>
            <td>@Html.TextBox("txtLastName")</td>
        </tr>
    </table>
</form>
When a user clicks a label, it is convenient to give focus to the control close to it. To make this possible, the Label() method has another version that takes a second argument. Its syntax is:
public static MvcHtmlString Label(this HtmlHelper html,
								  string expression,
								  string labelText)
The second argument the name of the control that will receive focus when the user clicks this label.
If you want to add HTML attributes to the label, the or HtmlHelper class is extended with this version of the Label() method:
public static MvcHtmlString Label(this HtmlHelper html,
								  string expression,
								  string labelText,
								  object htmlAttributes)
![]() Practical Learning: Adding Labels to Web Controls
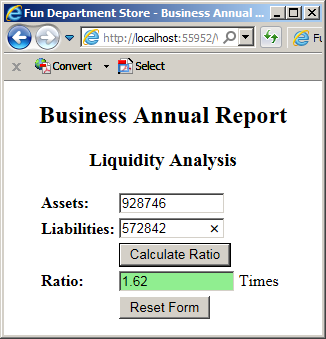
Practical Learning: Adding Labels to Web Controls
@{
Layout = "~/Views/Shared/_Layout.cshtml";
}
@{
Page.Title = "Business Annual Report";
Page.SubTitle = "Liquidity Analysis";
}
@{
double ratio = 0.00;
double assets = 0.00;
double liabilities = 0.00;
if (IsPost)
{
assets = Convert.ToDouble(Request["txtAssets"]);
liabilities = Convert.ToDouble(Request["txtLiabilities"]);
ratio = assets / liabilities;
}
}
<form name="frmBusiness" method="post">
<table>
<tr>
<td>@Html.Label("Assets:", "txtAssets", new { @class = "accent" })</td>
<td>@Html.TextBox("txtAssets", @assets, new { style = "width: 100px" })</td>
</tr>
<tr>
<td>@Html.Label("Liabilities:", "txtLiabilities", new { @class = "accent" })</td>
<td>@Html.TextBox("txtLiabilities", @liabilities, new { style = "width: 100px" })</td>
</tr>
<tr>
<td> </td>
<td><input type="submit" value="Calculate Ratio" name="btnCalculate" /></td>
</tr>
<tr>
<td>@Html.Label("Ratio:", "txttRatio", new { @class = "accent" })</td>
<td>@Html.TextBox("txtRatio",
@ratio.ToString("F"),
new { style = "background-color: LightGreen; width: 110px" }) Times</td>
</tr>
<tr>
<td> </td>
<td><input type="reset" value="Reset Form" name="btnReset" /></td>
</tr>
</table>
</form>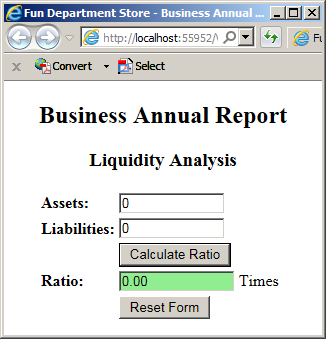
Other Web Controls
A Hidden Control
A hidden control is an object that exists on the form but your visitor cannot see it. To get a hidden control in HTML, create an INPUT tag and set its TYPE as HIDDEN. Here is an example:
<form method="post" name="frmEmployeeApplication">

    <p><input type="hidden" name="txtSocialSecurityNumber" value="000-00-0000" /></p>

</form>
To create a hidden control in Razor, call the Html.TextBox() method. For its third argument, add a property named type and assign a value of hidden to it. Here is an example:
<form method="post" name="frmEmployeeApplication">
    <p><input type="hidden" name="txtSocialSecurityNumber" value="000-00-0000" /></p>

    <p>@Html.TextBox("txtDataofBirth", "01/01/1900", new { type = "HIDDEN" })</p>
</form>
A Text Area
A text area is a multiline text box. In HTML it is created with a tag named TEXTAREA. To support multiline text boxes, the HtmlHelper class is extended with an overloaded method named TextArea. The simplest version of this method uses the following syntax:
public static MvcHtmlString TextArea(this HtmlHelper htmlHelper,
									 string name)
This version takes only one argument as the name of the control. The text area in Razor supports all the attributes of the HTML's counterpart. To let you support those attributes, the HtmlHelper is extended with another version of the TextArea() method whose syntax is:
public static MvcHtmlString TextArea(this HtmlHelper htmlHelper,
									 string name,
									 object htmlAttributes)
A Progress Bar
A progress bar is an animated control that indicates to the user that an operation is currently going. Despite this definition or description, a progress bar is not related (not tied) to any control on its form. It is just a fancy object you can add to your form to indicate that an operation is going on.
To support progress bars, HTML provides a tag named PROGRESS tag. Here is an example of using it:
<!DOCTYPE html>
<html>
<head>
<title>Animation Rendering</title>
</head>
<body>
<h2 style="text-align: center">Animation Rendering</h2>

<form method="post" name="frmAnimation">

    <progress></progress>

</form>
</body>
</html>
This would produce:
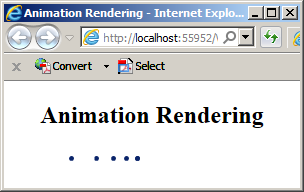
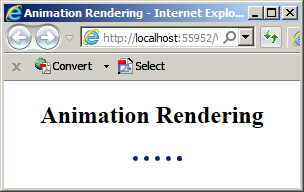

To let you specify the minimum and maximum vallues, the tag has a MIN and MAX attributes to which you can assign the desired integral values.
A Slider Control
Usually when you need a number, you can ask the user to type. A slider is a control that allows a user to select a number from a ranger. To get a slider, in HTML, create an INPUT tag and set its TYPE as RANGE. To create a slider in Razor code, call the Html.TextBox() method. For its third argument, add a property named type and set its value to range. Here is an example::
<!DOCTYPE html>
<html>
<head>
<title>Research and Development</title>
</head>
<body>
<h2>Research and Development</h2>

<form name="frmResearch" method="post">
    <p>Indicate the number of samples you want to test: @Html.TextBox("txtSamples", "35", new { type = "range" })</p>
</form>
</body>
</html>
This would produce:
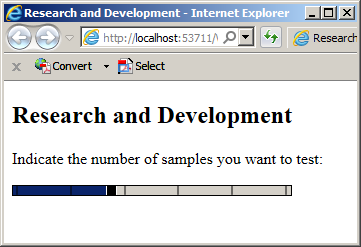
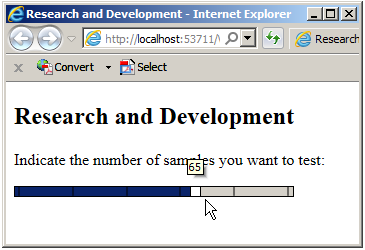
To let you specify the range of values allowed, the slider control is equipped with properties named min, max and step.
File Upload Selection
You can create a special text box that allows a visotor to select a file from a local computer. In HTML, the text box is created with an INPUT control whose TYPE is FILE. Here is an example:
<form name="frmEmploymentApplication" method="post">

    <p>Please upload your résumé: <input type="file"></p>

</form>
In MVC, to get this control, call the HtmlHelper.TextBox() method. For the object argument, add a type property and specify its value as file. Here is an example:
<!DOCTYPE html>
<html>
<head>
<title>Employment Application</title>
</head>
<body>
<h2>Employment Application</h2>

<form name="frmEmploymentApplication" method="post">
    <p>Please a résumé to upload:
     @Html.TextBox("txtFile", "", new { type = "file" })</p>
</form>
</body>
</html>
This would produce:
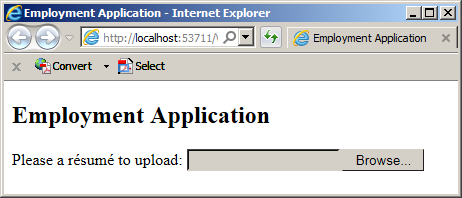
Neither the HTML version of this control nor its Razor counter part takes care of actually uploading the file to the server. You must take care of that yourseft.
![]() Practical Learning: Ending the Lesson
Practical Learning: Ending the Lesson
|
|
||
| Home | Copyright © 2003-2019, FunctionX | Next |
|
|
||