Records Maintenance

Records Maintenance
Updating Records
Introduction
Record maintenance includes modifying one or more records, or deleting one or more records. These operations can be performed visually or programmatically using a Data Definition Language (DDL) command.
To visually modify one or more records on a table, first open it to view its records. Locate the record and the field you want to work on and perform the desired operation.
![]() Practical Learning: Introducing Record Maintenance
Practical Learning: Introducing Record Maintenance
| Column Name | Data Type |
| [Address] | nvarchar(50) |
| City | nvarchar(40) |
| [State] | nvarchar(40) |
| ZIPCode | nvarchar(10) |
Updating a record consists of changing its value for a particular column. To visually update a record, in the Object Explorer, right-click its table (or view, in some cases) and click Edit Top 200 Rows. This would open the table as a spreadsheet, as seen above. Locate the value under the desired column header, and modify the value as you see fit.
|
Programmatically Updating all Records |
 |
To programmatically update a record, you use a Data Definition Language (DDL) command. If you are working in Microsoft SQL Server:
The DDL command to update a record is UPDATE. The basic formula to use is: |
UPDATE TableName SET ColumnName Operator Expression
You must specify the name of the involved table as the TableName factor of our formula. The SET statement allows you to specify a new value, Expression, for the field under the ColumnName column.
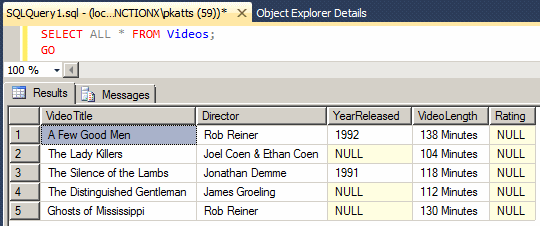
Consider the following code to create a new database named VideoCollection and to add a table named Videos to it:
CREATE DATABASE VideoCollection2;
GO
USE VideoCollection2;
GO

CREATE TABLE Videos
(
  VideoTitle nvarchar(120) NOT NULL,
  Director nvarchar(100) NULL,
  YearReleased SMALLINT,
  VideoLength nvarchar(30) NULL,
  Rating nchar(6)
);
GO

INSERT INTO Videos(VideoTitle, Director, YearReleased, VideoLength)
VALUES(N'A Few Good Men','Rob Reiner',1992,'138 Minutes');

INSERT INTO Videos(VideoTitle, Director, VideoLength)
VALUES(N'The Lady Killers', N'Joel Coen & Ethan Coen', N'104 Minutes');

INSERT INTO Videos(VideoTitle, Director, YearReleased, VideoLength)
VALUES(N'The Silence of the Lambs','Jonathan Demme',1991,'118 Minutes');

INSERT INTO Videos(VideoTitle, Director, VideoLength)
VALUES(N'The Distinguished Gentleman', N'James Groeling', N'112 Minutes');

INSERT INTO Videos(VideoTitle, Director, VideoLength)
VALUES(N'Ghosts of Mississippi', N'Rob Reiner', N'130 Minutes');
GO
Imagine you want to indicate that all these videos are rated R. To do this, in our formula, specify the table name. In the SET expression, specify the column name as Rating and assign it R as a string. This would be done as follows:
USE VideoCollection2;
GO

UPDATE Videos SET Rating = N'R';
GO
If you use the UPDATE statement like this, it acts on all records. The above code would produce:
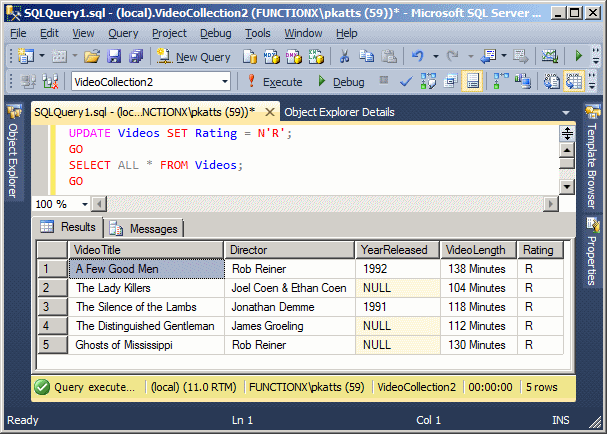
To update one column on all records, use the above formula. To update more than one column, use one SET operator, assign a value to each column but separate them with commas.
|
|
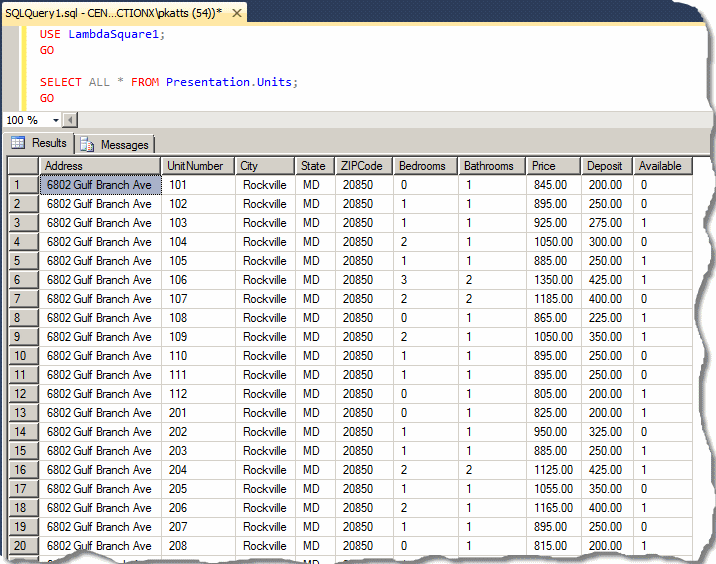
USE LambdaSquare1;
GO

UPDATE Presentation.Units
SET Address = N'6802 Gulf Branch Ave';
GO
To update, press F5)
USE LambdaSquare1;
GO

UPDATE Presentation.Units
SET City = N'Rockville', [State] = N'MD', ZIPCode = N'20850';
GO
USE LambdaSquare1;
GO

SELECT ALL * FROM Presentation.Units;
GO
|
Updating One or Some Records |
Editing a record consists of changing a value in a field. It could be that the field is empty, such as the � Year of the the N'The Lady Killers' video of the following table. It could be that the value is wrong, such as the Director of the the N'The Distinguished Gentleman' video of this table:
| Video | Director | � Year | Length | Rating |
| A Few Good Men | Rob Reiner | 1992 | 138 Minutes | R |
| The Silence of the Lambs | Jonathan Demme | 1991 | 118 Minutes | |
| The Distinguished Gentleman | James Groeling | 112 Minutes | R | |
| The Lady Killers | Joel Coen & Ethan Coen | 104 Minutes | R | |
| Ghosts of Mississippi | Rob Reiner | 130 Minutes |
To visually edit a record, first open the table to view its records. Locate the record, the column on which you want to work, and locate the value you want to change, then change it.
To programmatically edit a record, we mentioned earlier that you must use the WHERE keyword to create a Boolean expression that specify what column to use and what value must bee application. In reality, the WHERE expression is preceded by an UPDATE statement. This is done using the following formula:
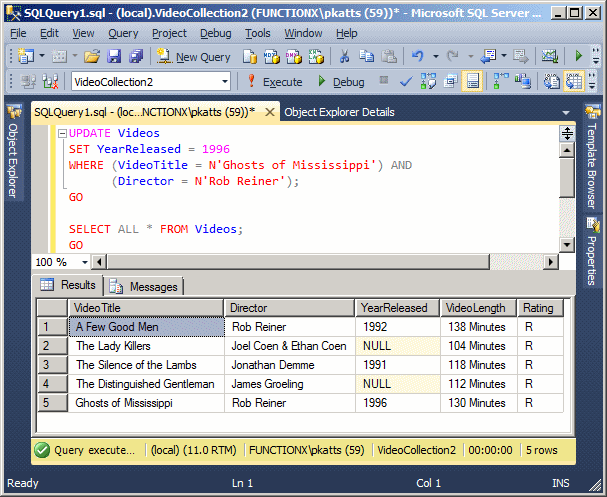
UPDATE TableName
SET ColumnName = Expression
WHERE Condition(s)
The WHERE operator allows you to specify how the particular record involved would be identified. It is very important, in most cases, that the criterion used be able to uniquely identify the record(s). In the above table, imagine that you want the SQL interpreter to change the released year to 1996 where the director of the video is Rob Reiner. The UPDATE statement would be written as follows: UPDATE Videos SET YearReleased = 1996 WHERE Director = N'Rob Reiner'; In the above table, there are at least two videos directed by Rob Reiner. When this statement executes, all video records whose director is Rob Reiner would be changed, which would compromise existing records that didn't need this change. One solution is to use a column that uniquely identifies each record. We will see them in the next lesson. The real rule is to make sure that the WHERE condition uniquely identifies a record. Here is an example used to change the name of the director of a particular video: |
 |
UPDATE Videos
SET Director = N'Jonathan Lynn'
WHERE VideoTitle = N'The Distinguished Gentleman';
Another solution is to use a combination of columns so that the combination uniquely identifies or isolates the record. Here is an example:
UPDATE Videos
SET YearReleased = 1996
WHERE (VideoTitle = N'Ghosts of Mississippi') AND
      (Director = N'Rob Reiner');
GO
|
|
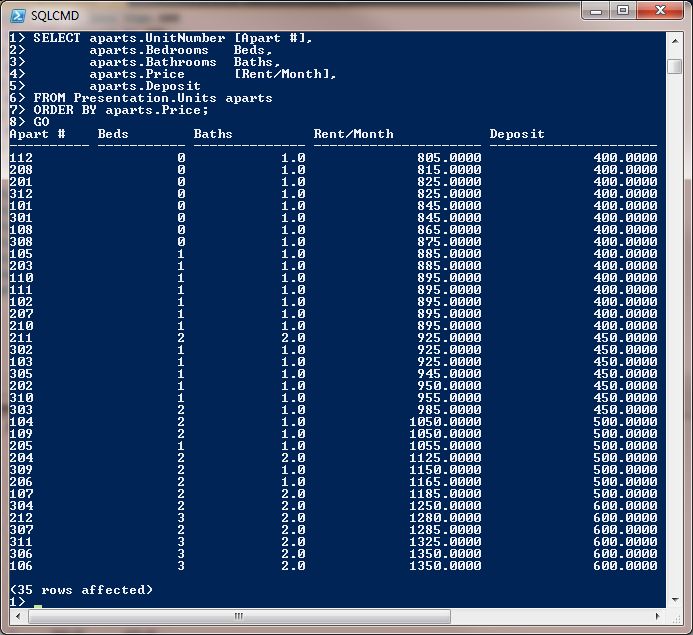
USE LambdaSquare1;
GO

UPDATE Presentation.Units
SET Deposit = 400
WHERE Price < 900;
GO
UPDATE Presentation.Units
SET Deposit = 450
WHERE Price >= 900;
GO
UPDATE Presentation.Units
SET Deposit = 500
WHERE Price >= 1000;
GO
UPDATE Presentation.Units
SET Deposit = 600
WHERE Price >= 1250;
GO
UPDATE Presentation.Units
SET Deposit = 800
WHERE Price >= 1500;
GO
SELECT aparts.UnitNumber [Aprt #],
       aparts.Bedrooms Beds,
       aparts.Bathrooms Baths,
       aparts.Price [Rent/Month],
       aparts.Deposit
FROM Presentation.Units aparts
ORDER BY aparts.Price;
GO
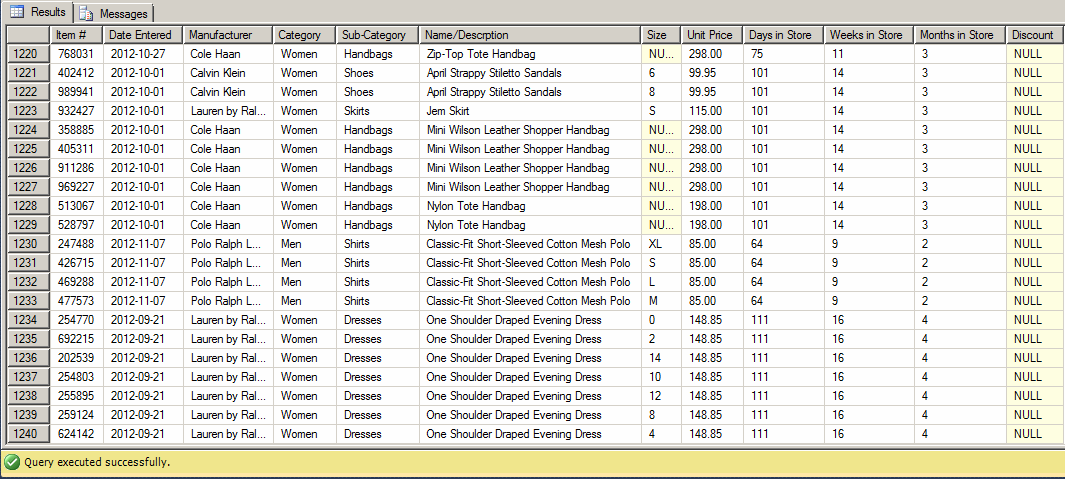
USE FunDS1;
GO

SELECT ItemNumber    [Item #],
       DateEntered   [Date Entered],
       Manufacturer,
       Category,
       SubCategory   [Sub-Category],
       ItemName      [Name/Descrption],
       ItemSize      Size,
       UnitPrice     [Unit Price],
       DATEDIFF(Day, DateEntered, SYSDATETIME()) [Days in Store],
       IIF(DATEDIFF(Week, DateEntered, SYSDATETIME()) != 0, DATEDIFF(Week, DateEntered, SYSDATETIME()), NULL) [Weeks in Store],
       IIF(DATEDIFF(Month, DateEntered, SYSDATETIME()) != 0, DATEDIFF(Month, DateEntered, SYSDATETIME()), NULL) [Months in Store]
FROM Inventory.StoreItems;
GO
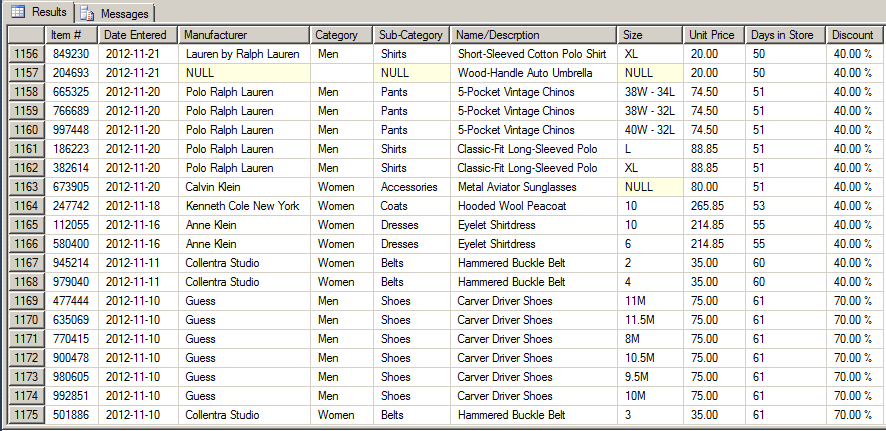
USE FunDS1;
GO

/* We will set the discount rates as follows:
   * If an item has been displayed in the store for less than a month, there will be no discount
   * If an item has been in the store for more than a month but less than a month and half, a discount of 20% will be applied
   * If an item has been in the store for more than a month and half but less than 2 months, a discount of 40% will be applied
   * If an item has been in the store for more than 2 months, a discount of 70% will be applied */

UPDATE Inventory.StoreItems
SET DiscountRate = 0.20
WHERE DATEDIFF(Day, DateEntered, SYSDATETIME()) > 30;
GO
UPDATE Inventory.StoreItems
SET DiscountRate = 0.40
WHERE DATEDIFF(Day, DateEntered, SYSDATETIME()) > 45;
GO
UPDATE Inventory.StoreItems
SET DiscountRate = 0.70
WHERE DATEDIFF(Day, DateEntered, SYSDATETIME()) > 60;
GO
USE FunDS1;
GO

SELECT ItemNumber    [Item #],
       DateEntered   [Date Entered],
       Manufacturer,
       Category,
       SubCategory   [Sub-Category],
       ItemName      [Name/Descrption],
       ItemSize      Size,
       UnitPrice     [Unit Price],
       DATEDIFF(Day, DateEntered, SYSDATETIME()) [Days in Store],
       FORMAT(DiscountRate, N'P') Discount
FROM Inventory.StoreItems;
GO

|
Updating a Range of Top Records |
Consider the following table named Employees:
USE Exercise;
GO

CREATE TABLE Employees
(
	EmployeeNumber int,
	FirstName nvarchar(20),
	LastName nvarchar(20),
	HourlySalary money
);
GO

INSERT INTO Employees
VALUES(283007, N'Megan',    N'Wright',    8.50),
      (480295, N'Horace',   N'Taylor',   20.25),
      (804805, N'Marc',     N'Knights',  10.85),
      (294117, N'Bryan',    N'Tenant',   30.25),
      (837479, N'Paul',     N'Motto',    18.02),
      (280304, N'Joyce',    N'Holliday', 11.66),
      (924802, N'Peter',    N'Mukoko',    8.68),
      (725381, N'Marianne', N'Brooks',   22.64);
GO
By default, the UPDATE statement checks all records of a table to see which one(s) need(s) to be changed. As an alternative, you can ask the database engine to check only a specify range of the first records of a table based on a percentage of the number of records. To do this, the formula to use is:
UPDATE TOP (Number) PERCENT TableName
SET ColumnName = Expression
WHERE Condition(s)
Based on this formula, after the UPDATE keyword, use TOP, followed by parentheses, and followed by PERCENT. In the parentheses, enter a value between 0.00 and 100.00 of the percentage of records to check. For example, imagine you want to change the hourly salary of the Employees table but you want to make the changes only for the first 40% of records. You can create an UPDATE expression as follows: UPDATE TOP (40) PERCENT Employees
SET HourlySalary = 12.50
WHERE HourlySalary < 12.50;
GO
|
 |
This code asks the database engine to change the hourly salary of the first 40% employees. Since the table contains 8 records, the top 40% produces 8 / (100 / 40) = 8 / 2.5 = 3.2. Rounding to the highest integer, the expression produces 4. As a result, 4 and only the first 4 records are checked. Even though there are records beyond the fourth where the hourly salary is less than 12.50, only the first four records are checked.
After making changes to a table using SQL, you don't get a visual display of what happened. With Transact-SQL, you can temporarily display the result of this operation or you can store it in a table. We already saw how to do this when creating records. You follow the same formula when updating records. The formula is:
UPDATE TableName
SET ColumnName = Expression
OUTPUT INSERTED.Columns
VALUES(Value_1, Value_2, Value_X)
Besides the formula we have used so far, after the SET statement, start with an OUTPUT INSERTED expression, followed by a period. If you want to show all columns of the table, add the * operator. Otherwise, type INSERTED followed by a period, followed by the name(s) of the column(s) you want to show.
Removing all Records
If you think all records of a particular table are, or have become, useless, you can clear the whole table, which would still keep its structure. To delete all records from a table, first select all of them in the Query Designer, and:
You would receive a warning:
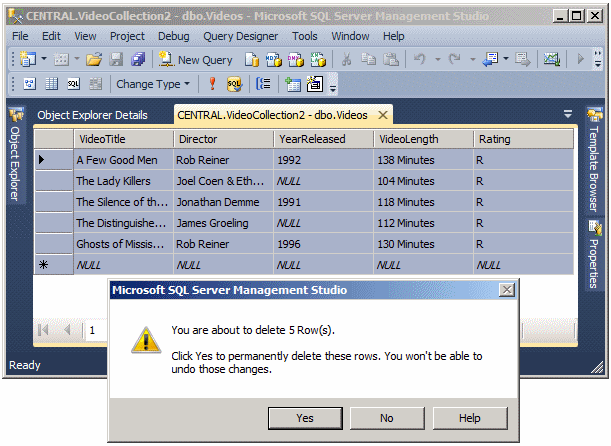
If you still want to delete the records, click Yes. If you change your mind, click No.
The DDL command to clear a table of all records is DELETE. It uses the following formula:
DELETE [FROM] TableName;
The FROM keyword is optional. When this statement is executed, all records from the TableName factor would be removed from the table. Be careful when doing this because once the records have been deleted, you cannot get them back. Here is an example:
DELETE Employees;
GO
This statement asks the database engine to clear the Employees table of all records. Alternatively, you can precede the name of the table with FROM. Here is an example used to clear the table of all videos:
DELETE FROM Videos;
GO
|
Removing the First n Records |
Instead of removing all records, to delete only the first n of a table, use the following formula:
DELETE TOP (Number) TableName;
In the parentheses, enter the desired number of records. When the statement executes, the first n records of the table would be deleted. Here is an example:
DELETE TOP (2) Employees;
GO
This statement asks the database engine to delete the first two records of the Employees table.
|
Removing a Specific Record |
If you find out that a record is not necessary, not anymore, or is misplaced, you can remove it from a table.
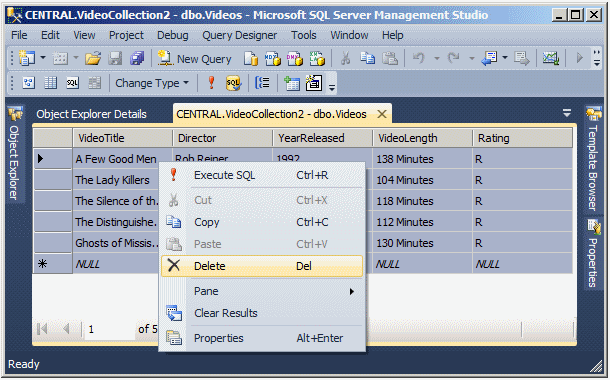
To visually remove a record from a table, open the table in Table view, right-click the gray box of the record and click Delete. You can also first select the record and press Delete. You would receive a warning to confirm your intention.
To programmatically delete a record:
In SQL, to delete a record, use the DELETE FROM statement associated with the WHERE operator. The formula to follow is:
DELETE FROM TableName
WHERE Condition(s)
The TableName factor is used to identify a table whose record(s) would be removed.
The Condition(s) factor allows you to identify a record or a group of records that carries a criterion. Once again, make sure you are precise in your criteria so you would not delete the wrong record(s).
Here is an example used to remove a particular record from the table:
DELETE FROM Videos
WHERE VideoTitle = N'The Lady Killers';
|
|
USE FunDS1;
GO

/* Any item that has been displayed in the store and not sold for more
   than 80 days must be transferred to the UnsoldItems table.
   This is done in two steps:
   1. First copy those records to the UnsoldItems table
   2. Then delete those items from the StoreItems table. */
INSERT INTO Inventory.UnsoldItems
SELECT ItemNumber, DateEntered, SYSDATETIME(), Manufacturer, Category,
       SubCategory, ItemName, ItemSize, UnitPrice, DiscountRate
FROM Inventory.StoreItems
WHERE DATEDIFF(Day, DateEntered, SYSDATETIME()) >= 80;
GO

DELETE FROM Inventory.StoreItems
WHERE DATEDIFF(Day, DateEntered, SYSDATETIME()) >= 80;
GO
USE FunDS1;
GO

SELECT ItemNumber    [Item #],
       DateEntered   [Date Entered],
       Manufacturer,
       Category,
       SubCategory   [Sub-Category],
       ItemName      [Name/Descrption],
       ItemSize      Size,
       UnitPrice     [Unit Price],
       DATEDIFF(Day, DateEntered, SYSDATETIME()) [Days in Store],
       FORMAT(DiscountRate, N'P') Discount
FROM Inventory.StoreItems
ORDER BY DateEntered DESC;
GO
USE FunDS1;
GO

SELECT *
FROM Inventory.UnsoldItems;
GO
|
Conditionally Removing the First n Records |
Consider the following table:
CREATE TABLE Employees
(
	EmployeeNumber int,
	FirstName nvarchar(20),
	LastName nvarchar(20),
	HourlySalary money
);
GO
INSERT INTO Employees
VALUES(283007, N'Megan',    N'Wright',    8.50),
      (480295, N'Horace',   N'Taylor',   20.25),
      (804805, N'Marc',     N'Knights',  10.85),
      (294117, N'Bryan',    N'Tenant',   30.25),
      (837479, N'Paul',     N'Motto',    18.02),
      (280304, N'Joyce',    N'Holliday', 11.66),
      (924802, N'Peter',    N'Mukoko',    8.68),
      (725381, N'Marianne', N'Brooks',   22.64);
GO
By default, the DELETE expression acts on all records of a table. As an alternative, you can ask the database engine to consider only the first n records of a table. The formula to do this is:
DELETE TOP (Number) FROM TableName
WHERE Condition(s)
In the parentheses after TOP, enter the desired number of records. When the statement executes, the WHERE condition would be applied on only the first Number of records. Any record that falls in that condition would be deleted. Here is an example:
DELETE TOP (4) FROM Employees
WHERE HourlySalary < 12.50;
GO
This code asks the database engine to delete any record in the first four records of the Employees table if that hourly salary of the employee in less than 12.50.
|
Conditionally Removing the First Percentage of Records |
If you don't want to specify a fixed number of records, you can use a percentage instead. The formula to follow is:
DELETE TOP (Number) PERCENT FROM TableName
WHERE Condition(s)
In the parentheses, enter a number between 0.00 and 100.00 included. The number of records to consider is based on the total number of the records using a percentage. Here is an example:
DELETE TOP (40) PERCENT FROM Employees
WHERE HourlySalary < 12.50;
GO
This code delete any record whose salary is less than 12.50 but the record must be among the first 40% of the records.
When some record(s) has(have) been deleted, the operation is performed behind the scenes and you don't see the result. If you want to see a list of the records that were deleted, you can use the OUTPUT operator to display the result. To show the list of the records from a table that was completely emptied, you can use the following formula:
DELETE FROM TableName
OUTPUT DELETED.Columns
The OUTPUT INSERTED expression follows the description we have seen for the record update. Here is an example:
USE VideoCollection6;
GO

DELETE FROM Videos
OUTPUT deleted.*
GO
To show the list of the records that were deleted based on a condition, use the following formula:
DELETE FROM TableName
OUTPUT DELETED.Columns
WHERE Condition(s)
Here is an example:
USE VideoCollection6;
GO

DELETE FROM Videos
OUTPUT deleted.*
WHERE YearReleased IS NULL;
GO
|
|
||
| Previous | CCopyright © 2000-2022, FunctionX | Next |
|
|
||