XML Reading and Writing
|
XML Reading and Writing |
|
Fundamentals of Writing to an XML File
Introduction
You may know already how to process XML files using the Document Object Model as implemented by the XmlDocument class. To go further and make XML friendlier, the .NET Framework provides many other classes for different purposes, allowing you to create and manage nodes from custom .NET classes.
![]() Practical Learning: Introducing XML Reading
Practical Learning: Introducing XML Reading
| MenuItem | DropDownItems | |||
| Text | Name | Text | Name | Shortcut |
| &File | mnuFile | &New Repair Order | mnuFileNew | Ctrl+N |
| &Open Existing Order... | mnuFileOpen | Ctrl+O | ||
| &Save Current Order | mnuFileSave | Ctrl+S | ||
| Separator | ||||
| &Print... | mnuFilePrint | Ctrl+P | ||
| Print Pre&view... | mnuFilePrintPreview | |||
| Separator | ||||
| E&xit | mnuFileExit | |||

| Control | Name | Text | Other Properties |
| GroupBox | Order Identification | ||
| Label | Customer Name: | ||
| TextBox | txtCustomerName | ||
| Label | Address | ||
| TextBox | txtAddress | ||
| Label | City: | ||
| TextBox | txtCity | ||
| Label | State: | ||
| TextBox | txtState | ||
| Label | ZIP Code: | ||
| TextBox | txtZIPCode | TextAlign: Right | |
| Label | Make / Model: | ||
| TextBox | txtMake | ||
| TextBox | txtModel | ||
| Label | Year: | ||
| TextBox | txtCarYear | TextAlign: Right | |
| Label | Problem Description: | ||
| TextBox | txtProblem | ||
| GroupBox | Parts Used | ||
| Label | Part Name | ||
| Label | Unit Price | ||
| Label | Qty | ||
| Label | Sub Total | ||
| TextBox | txtPartName1 | ||
| TextBox | txtUnitPrice1 | 0.00 | TextAlign: Right |
| TextBox | txtQuantity1 | 0 | TextAlign: Right |
| TextBox | txtSubTotal1 | 0.00 | TextAlign: Right Enabled: False |
| TextBox | txtPartName2 | ||
| TextBox | txtUnitPrice2 | 0.00 | TextAlign: Right |
| TextBox | txtQuantity2 | 0 | TextAlign: Right |
| TextBox | txtSubTotal2 | 0.00 | TextAlign: Right Enabled: False |
| TextBox | txtPartName3 | ||
| TextBox | txtUnitPrice3 | 0.00 | TextAlign: Right |
| TextBox | txtQuantity3 | 0 | TextAlign: Right |
| TextBox | txtSubTotal3 | 0.00 | TextAlign: Right Enabled: False |
| TextBox | txtPartName4 | ||
| TextBox | txtUnitPrice4 | 0.00 | TextAlign: Right |
| TextBox | txtQuantity4 | 0 | TextAlign: Right |
| TextBox | txtSubTotal4 | 0.00 | TextAlign: Right Enabled: False |
| TextBox | txtPartName5 | ||
| TextBox | txtUnitPrice5 | 0.00 | TextAlign: Right |
| TextBox | txtQuantity5 | 0 | TextAlign: Right |
| TextBox | txtSubTotal5 | 0.00 | TextAlign: Right Enabled: False |
| GroupBox | Jobs Performed | ||
| Label | Price | ||
| TextBox | txtJobPerformed1 | ||
| TextBox | txtJobPrice1 | 0.00 | TextAlign: Right |
| TextBox | txtJobPerformed2 | ||
| TextBox | txtJobPrice2 | 0.00 | TextAlign: Right |
| TextBox | txtJobPerformed3 | ||
| TextBox | txtJobPrice3 | 0.00 | TextAlign: Right |
| TextBox | txtJobPerformed4 | ||
| TextBox | txtJobPrice4 | 0.00 | TextAlign: Right |
| TextBox | txtJobPerformed5 | ||
| TextBox | txtJobPrice5 | 0.00 | TextAlign: Right |
| GroupBox | Order Summary | ||
| Label | Total Parts: | ||
| TextBox | txtTotalParts | 0.00 | TextAlign: Right |
| Label | Total Labor: | ||
| TextBox | txtTotalLabor | 0.00 | TextAlign: Right |
| Label | Tax Rate: | ||
| TextBox | txtTaxRate | 7.75 | TextAlign: Right |
| Label | % | ||
| Label | Tax Amount: | ||
| TextBox | txtTaxAmount | 0.00 | TextAlign: Right |
| Label | Total Order: | ||
| TextBox | txtTotalOrder | 0.00 | TextAlign: Right |
| Label | Recommendations | ||
| TextBox | txtRecommendations | Multiline: True ScrollBars: Vertical |
using System;
using System.Collections.Generic;
using System.ComponentModel;
using System.Data;
using System.Drawing;
using System.Linq;
using System.Text;
using System.Windows.Forms;
using System.IO;
using System.Xml;

namespace CollegeParkAutoRepair2
{
    public partial class Exercise : Form
    {
        public Exercise()
        {
            InitializeComponent();
        }

        void Calculate()
        {
            double part1UnitPrice = 0.00, part2UnitPrice = 0.00,
                   part3UnitPrice = 0.00, part4UnitPrice = 0.00,
                   part5UnitPrice = 0.00;
            double part1SubTotal, part2SubTotal, part3SubTotal,
                   part4SubTotal, part5SubTotal, totalParts;
            int part1Quantity = 0, part2Quantity = 0, part3Quantity = 0,
                   part4Quantity = 0, part5Quantity = 0;
            double job1Price = 0.00, job2Price = 0.00, job3Price = 0.00,
                   job4Price = 0.00, job5Price = 0.00;
            double totalLabor;
            double taxRate = 0.00, taxAmount, totalOrder;

            // Don't charge a part unless it is clearly identified
            if (txtPartName1.Text == "")
            {
                txtUnitPrice1.Text = "0.00";
                txtQuantity1.Text = "0";
                txtSubTotal1.Text = "0.00";
                part1UnitPrice = 0.00;
            }
            else
            {
                try
                {
                    part1UnitPrice = double.Parse(txtUnitPrice1.Text);
                }
                catch (FormatException)
                {
                    MessageBox.Show("Invalid Unit Price");
                    txtUnitPrice1.Text = "0.00";
                    txtUnitPrice1.Focus();
                }

                try
                {
                    part1Quantity = int.Parse(txtQuantity1.Text);
                }
                catch (FormatException)
                {
                    MessageBox.Show("Invalid Quantity");
                    txtQuantity1.Text = "0";
                    txtQuantity1.Focus();
                }
            }

            if (this.txtPartName2.Text == "" )
            {
                txtUnitPrice2.Text = "0.00";
                txtQuantity2.Text = "0";
                txtSubTotal2.Text = "0.00";
                part2UnitPrice = 0.00;
            }
            else
            {
                try
                {
                    part2UnitPrice = double.Parse(txtUnitPrice2.Text);
                }
                catch (FormatException)
                {
                    MessageBox.Show("Invalid Unit Price");
                    this.txtUnitPrice2.Text = "0.00";
                    this.txtUnitPrice2.Focus();
                }

                try
                {
                    part2Quantity = int.Parse(txtQuantity2.Text);
                }
                catch (FormatException)
                {
                    MessageBox.Show("Invalid Quantity");
                    txtQuantity2.Text = "0";
                    txtQuantity2.Focus();
                }
            }

            if (txtPartName3.Text == "" )
            {
                txtUnitPrice3.Text = "0.00";
                txtQuantity3.Text = "0";
                txtSubTotal3.Text = "0.00";
                part3UnitPrice = 0.00;
            }
            else
            {
                try
                {
                    part3UnitPrice = double.Parse(txtUnitPrice3.Text);
                }
                catch (FormatException)
                {
                    MessageBox.Show("Invalid Unit Price");
                    txtUnitPrice3.Text = "0.00";
                    txtUnitPrice3.Focus();
                }

                try
                {
                    part3Quantity = int.Parse(txtQuantity3.Text);
                }
                catch (FormatException)
                {
                    MessageBox.Show("Invalid Quantity");
                    txtQuantity3.Text = "0";
                    txtQuantity3.Focus();
                }
            }

            if (txtPartName4.Text == "" )
            {
                txtUnitPrice4.Text = "0.00";
                txtQuantity4.Text = "0";
                txtSubTotal4.Text = "0.00";
                part4UnitPrice = 0.00;
            }
            else
            {
                try
                {
                    part4UnitPrice = double.Parse(txtUnitPrice4.Text);
                }
                catch (FormatException)
                {
                    MessageBox.Show("Invalid Unit Price");
                    txtUnitPrice4.Text = "0.00";
                    txtUnitPrice4.Focus();
                }

                try
                {
                    part4Quantity = int.Parse(txtQuantity4.Text);
                }
                catch (FormatException)
                {
                    MessageBox.Show("Invalid Quantity");
                    txtQuantity4.Text = "0";
                    txtQuantity4.Focus();
                }
            }

            if (txtPartName5.Text == "" )
            {
                txtUnitPrice5.Text = "0.00";
                txtQuantity5.Text = "0";
                txtSubTotal5.Text = "0.00";
                part5UnitPrice = 0.00;
            }
            else
            {
                try
                {
                    part5UnitPrice = double.Parse(txtUnitPrice5.Text);
                }
                catch (FormatException)
                {
                    MessageBox.Show("Invalid Unit Price");
                    txtUnitPrice5.Text = "0.00";
                    txtUnitPrice5.Focus();
                }

                try
                {
                    part5Quantity = int.Parse(txtQuantity5.Text);
                }
                catch (FormatException)
                {
                    MessageBox.Show("Invalid Quantity");
                    txtQuantity5.Text = "0";
                    txtQuantity5.Focus();
                }
            }

            // Don't bill the customer for a job that is not specified
            if (txtJobDescription1.Text == "")
            {
                txtJobPrice1.Text = "0.00";
                job1Price = 0.00;
            }
            else
            {
                try
                {
                    job1Price = double.Parse(txtJobPrice1.Text);
                }
                catch (FormatException)
                {
                    MessageBox.Show("Invalid Job Price");
                    txtJobPrice1.Text = "0.00";
                    txtJobPrice1.Focus();
                }
            }

            if (txtJobDescription2.Text == "")
            {
                txtJobPrice2.Text = "0.00";
                job2Price = 0.00;
            }
            else
            {
                try
                {
                    job2Price = double.Parse(txtJobPrice2.Text);
                }
                catch (FormatException)
                {
                    MessageBox.Show("Invalid Job Price");
                    txtJobPrice2.Text = "0.00";
                    txtJobPrice2.Focus();
                }
            }

            if (txtJobDescription3.Text == "")
            {
                txtJobPrice3.Text = "0.00";
                job3Price = 0.00;
            }
            else
            {
                try
                {
                    job3Price = double.Parse(txtJobPrice3.Text);
                }
                catch (FormatException)
                {
                    MessageBox.Show("Invalid Job Price");
                    txtJobPrice3.Text = "0.00";
                    txtJobPrice3.Focus();
                }
            }

            if (txtJobDescription4.Text == "")
            {
                txtJobPrice4.Text = "0.00";
                job4Price = 0.00;
            }
            else
            {
                try
                {
                    job4Price = double.Parse(txtJobPrice4.Text);
                }
                catch (FormatException)
                {
                    MessageBox.Show("Invalid Job Price");
                    txtJobPrice4.Text = "0.00";
                    txtJobPrice4.Focus();
                }
            }

            if (txtJobDescription5.Text == "")
            {
                txtJobPrice5.Text = "0.00";
                job5Price = 0.00;
            }
            else
            {
                try
                {
                    job5Price = double.Parse(txtJobPrice5.Text);
                }
                catch (FormatException)
                {
                    MessageBox.Show("Invalid Job Price");
                    txtJobPrice5.Text = "0.00";
                    txtJobPrice5.Focus();
                }
            }

            part1SubTotal = part1UnitPrice * part1Quantity;
            part2SubTotal = part2UnitPrice * part2Quantity;
            part3SubTotal = part3UnitPrice * part3Quantity;
            part4SubTotal = part4UnitPrice * part4Quantity;
            part5SubTotal = part5UnitPrice * part5Quantity;

            txtSubTotal1.Text = part1SubTotal.ToString("F");
            txtSubTotal2.Text = part2SubTotal.ToString("F");
            txtSubTotal3.Text = part3SubTotal.ToString("F");
            txtSubTotal4.Text = part4SubTotal.ToString("F");
            txtSubTotal5.Text = part5SubTotal.ToString("F");

            totalParts = part1SubTotal + part2SubTotal + part3SubTotal +
                    part4SubTotal + part5SubTotal;

            totalLabor = job1Price + job2Price + job3Price +
                            job4Price + job5Price;

            try
            {
                taxRate = double.Parse(txtTaxRate.Text);
            }
            catch (FormatException)
            {
                MessageBox.Show("Invalid Tax Rate");
                txtTaxRate.Text = "7.75";
                txtTaxRate.Focus();
            }

            double totalPartsAndLabor = totalParts + totalLabor;
            taxAmount = totalPartsAndLabor * taxRate / 100;
            totalOrder = totalPartsAndLabor + taxAmount;

            txtTotalParts.Text = totalParts.ToString("F");
            txtTotalLabor.Text = totalLabor.ToString("F");
            txtTaxAmount.Text = taxAmount.ToString("F");
            txtTotalOrder.Text = totalOrder.ToString("F");
        }
    }
}
private void mnuFileNew_Click(object sender, EventArgs e)
{
    this.txtCustomerName.Text = "";
    this.txtAddress.Text = "";
    this.txtCity.Text = "";
    this.txtState.Text = "";
    this.txtZIPCode.Text = "";
    this.txtMake.Text = "";
    this.txtModel.Text = "";
    this.txtCarYear.Text = "";
    this.txtProblem.Text = "";

    this.txtPartName1.Text = "";
    this.txtUnitPrice1.Text = "0.00";
    this.txtQuantity1.Text = "0";
    this.txtSubTotal1.Text = "0.00";
    this.txtPartName2.Text = "";
    this.txtUnitPrice2.Text = "0.00";
    this.txtQuantity2.Text = "0";
    this.txtSubTotal2.Text = "0.00";
    this.txtPartName3.Text = "";
    this.txtUnitPrice3.Text = "0.00";
    this.txtQuantity3.Text = "0";
    this.txtSubTotal3.Text = "0.00";
    this.txtPartName4.Text = "";
    this.txtUnitPrice4.Text = "0.00";
    this.txtQuantity4.Text = "0";
    this.txtSubTotal4.Text = "0.00";
    this.txtPartName5.Text = "";
    this.txtUnitPrice5.Text = "0.00";
    this.txtQuantity5.Text = "0";
    this.txtSubTotal5.Text = "0.00";

    this.txtJobDescription1.Text = "";
    this.txtJobPrice1.Text = "0.00";
    this.txtJobDescription2.Text = "";
    this.txtJobPrice2.Text = "0.00";
    this.txtJobDescription3.Text = "";
    this.txtJobPrice3.Text = "0.00";
    this.txtJobDescription4.Text = "";
    this.txtJobPrice4.Text = "0.00";
    this.txtJobDescription5.Text = "";
    this.txtJobPrice5.Text = "0.00";

    this.txtTotalParts.Text = "0.00";
    this.txtTotalLabor.Text = "0.00";
    this.txtTaxRate.Text = "7.75";
    this.txtTaxAmount.Text = "0.00";
    this.txtTotalOrder.Text = "0.00";

    this.txtRecommendations.Text = "";
    this.txtCustomerName.Focus();
}
private void txtUnitPrice1_Leave(object sender, EventArgs e)
{
    Calculate();
}
private void docPrint_PrintPage(object sender,
            System.Drawing.Printing.PrintPageEventArgs e)
{
            e.Graphics.DrawLine(new Pen(Color.Black, 2), 60, 90, 680, 90);
            e.Graphics.DrawLine(new Pen(Color.Black, 1), 60, 93, 680, 93);

            string strDisplay = "College Park Auto Repair";
            System.Drawing.Font fntString = new Font("Times New Roman", 28,
                FontStyle.Bold);
            e.Graphics.DrawString(strDisplay, fntString,
                Brushes.Black, 160, 100);

            strDisplay = "Customer Car Repair Order";
            fntString = new System.Drawing.Font("Times New Roman", 18,
                FontStyle.Bold);
            e.Graphics.DrawString(strDisplay, fntString,
                Brushes.Black, 220, 150);

            e.Graphics.DrawLine(new Pen(Color.Black, 1), 60, 184, 680, 184);
            e.Graphics.DrawLine(new Pen(Color.Black, 2), 60, 187, 680, 187);

            fntString = new System.Drawing.Font("Times New Roman", 12,
                FontStyle.Bold);
            e.Graphics.DrawString("Order Identification", fntString,
                Brushes.Black, 80, 200);

            e.Graphics.DrawLine(new Pen(Color.Black, 1), 100, 250, 640, 250);

            fntString = new System.Drawing.Font("Times New Roman", 10,
                FontStyle.Bold);
            e.Graphics.DrawString("Customer Name:", fntString,
                Brushes.Black, 100, 260);
            fntString = new System.Drawing.Font("Times New Roman", 10,
                FontStyle.Regular);
            e.Graphics.DrawString(txtCustomerName.Text, fntString,
                Brushes.Black, 260, 260); ;

            e.Graphics.DrawLine(new Pen(Color.Black, 1), 100, 280, 640, 280);

            fntString = new Font("Times New Roman", 10, FontStyle.Bold);
            e.Graphics.DrawString("Address:", fntString,
                Brushes.Black, 100, 290);
            fntString = new Font("Times New Roman", 10, FontStyle.Regular);
            e.Graphics.DrawString(txtAddress.Text, fntString,
                Brushes.Black, 260, 290); ;

            e.Graphics.DrawLine(new Pen(Color.Black, 1), 100, 310, 640, 310);

            fntString = new Font("Times New Roman", 10, FontStyle.Regular);
            string strAddress = txtCity.Text.ToString() + ", " +
                                txtState.Text + " " + txtZIPCode.Text;
            e.Graphics.DrawString(strAddress, fntString, Brushes.Black, 260, 320);
            e.Graphics.DrawLine(new Pen(Color.Black, 1), 100, 340, 640, 340);

            fntString = new Font("Times New Roman", 10, FontStyle.Bold);
            e.Graphics.DrawString("Car:", fntString, Brushes.Black, 100, 350);
            fntString = new Font("Times New Roman", 10, FontStyle.Regular);
            string strCar = txtMake.Text + ", " + txtModel.Text +
                            ", " + txtCarYear.Text;
            e.Graphics.DrawString(strCar, fntString, Brushes.Black, 260, 350);
            e.Graphics.DrawLine(new Pen(Color.Black, 1), 100, 370, 640, 370);

            fntString = new Font("Times New Roman", 10, FontStyle.Bold);
            e.Graphics.DrawString("Problem Description:", fntString,
                Brushes.Black, 100, 380);
            fntString = new Font("Times New Roman", 10, FontStyle.Regular);
            e.Graphics.DrawString(txtProblem.Text, fntString,
                                  Brushes.Black,
                                  new RectangleF(260, 380, 420, 380));
            e.Graphics.DrawLine(new Pen(Color.Black, 1), 100, 400, 640, 400);

            fntString = new System.Drawing.Font("Times New Roman", 12, FontStyle.Bold);
            e.Graphics.DrawString("Parts Used", fntString,
                Brushes.Black, 80, 430);

            e.Graphics.DrawLine(new Pen(Color.Black, 2), 80, 450, 680, 450);

            e.Graphics.DrawString("Parts Name", fntString,
                Brushes.Black, 100, 460);
            e.Graphics.DrawString("Unit Price", fntString,
                Brushes.Black, 420, 460);
            e.Graphics.DrawString("Qty", fntString,
                Brushes.Black, 520, 460);
            e.Graphics.DrawString("Sub-Total", fntString,
                Brushes.Black, 562, 460);

            e.Graphics.DrawLine(new Pen(Color.Black, 1), 100, 480, 640, 480);

            fntString = new Font("Times New Roman", 10, FontStyle.Regular);
            StringFormat fmtString = new StringFormat();
            fmtString.Alignment = StringAlignment.Far;

            e.Graphics.DrawString(txtPartName1.Text, fntString,
                Brushes.Black, 100, 490);
            e.Graphics.DrawString(txtUnitPrice1.Text, fntString,
                Brushes.Black, 480, 490, fmtString);
            e.Graphics.DrawString(txtQuantity1.Text, fntString,
                Brushes.Black, 540, 490, fmtString);
            e.Graphics.DrawString(txtSubTotal1.Text, fntString,
                Brushes.Black, 630, 490, fmtString);
            e.Graphics.DrawLine(new Pen(Color.Black, 1),
                100, 510, 640, 510);

            e.Graphics.DrawString(txtPartName2.Text, fntString,
                Brushes.Black, 100, 520);
            e.Graphics.DrawString(txtUnitPrice2.Text, fntString,
                Brushes.Black, 480, 520, fmtString);
            e.Graphics.DrawString(txtQuantity2.Text, fntString,
                Brushes.Black, 540, 520, fmtString);
            e.Graphics.DrawString(txtSubTotal2.Text, fntString,
                Brushes.Black, 630, 520, fmtString);
            e.Graphics.DrawLine(new Pen(Color.Black, 1), 100, 540, 640, 540);

            e.Graphics.DrawString(txtPartName3.Text, fntString,
                Brushes.Black, 100, 550);
            e.Graphics.DrawString(txtUnitPrice3.Text, fntString,
                Brushes.Black, 480, 550, fmtString);
            e.Graphics.DrawString(txtQuantity3.Text, fntString,
                Brushes.Black, 540, 550, fmtString);
            e.Graphics.DrawString(txtSubTotal3.Text, fntString,
                Brushes.Black, 630, 550, fmtString);
            e.Graphics.DrawLine(new Pen(Color.Black, 1),
                100, 570, 640, 570);

            e.Graphics.DrawString(txtPartName4.Text, fntString,
                Brushes.Black, 100, 580);
            e.Graphics.DrawString(txtUnitPrice4.Text, fntString,
                Brushes.Black, 480, 580, fmtString);
            e.Graphics.DrawString(txtQuantity4.Text, fntString,
                Brushes.Black, 540, 580, fmtString);
            e.Graphics.DrawString(txtSubTotal4.Text, fntString,
                Brushes.Black, 630, 580, fmtString);
            e.Graphics.DrawLine(new Pen(Color.Black, 1), 100, 600, 640, 600);

            e.Graphics.DrawString(txtPartName5.Text, fntString,
                Brushes.Black, 100, 610);
            e.Graphics.DrawString(txtUnitPrice5.Text, fntString,
                Brushes.Black, 480, 610, fmtString);
            e.Graphics.DrawString(txtQuantity5.Text, fntString,
                Brushes.Black, 540, 610, fmtString);
            e.Graphics.DrawString(txtSubTotal5.Text, fntString,
                Brushes.Black, 630, 610, fmtString);
            e.Graphics.DrawLine(new Pen(Color.Black, 1), 100, 630, 640, 630);

            fntString = new Font("Times New Roman", 12, FontStyle.Bold);
            e.Graphics.DrawString("Jobs Performed", fntString,
                Brushes.Black, 80, 650);
            e.Graphics.DrawLine(new Pen(Color.Black, 2), 80, 670, 680, 670);

            e.Graphics.DrawString("Job Name", fntString, Brushes.Black, 100, 680);
            e.Graphics.DrawString("Price", fntString, Brushes.Black, 562, 680);
            e.Graphics.DrawLine(new Pen(Color.Black, 1), 100, 700, 640, 700);

            fntString = new Font("Times New Roman", 10, FontStyle.Regular);

            e.Graphics.DrawString(txtJobDescription1.Text, fntString,
                Brushes.Black, 100, 710);
            e.Graphics.DrawString(txtJobPrice1.Text, fntString,
                Brushes.Black, 600, 710, fmtString);
            e.Graphics.DrawLine(new Pen(Color.Black, 1), 100, 730, 640, 730);

            e.Graphics.DrawString(txtJobDescription2.Text, fntString,
                Brushes.Black, 100, 740);
            e.Graphics.DrawString(txtJobPrice2.Text, fntString,
                Brushes.Black, 600, 740, fmtString);
            e.Graphics.DrawLine(new Pen(Color.Black, 1), 100, 760, 640, 760);

            e.Graphics.DrawString(txtJobDescription3.Text, fntString,
                Brushes.Black, 100, 770);
            e.Graphics.DrawString(txtJobPrice3.Text, fntString,
                Brushes.Black, 600, 770, fmtString);
            e.Graphics.DrawLine(new Pen(Color.Black, 1), 100, 790, 640, 790);

            e.Graphics.DrawString(txtJobDescription4.Text, fntString,
                Brushes.Black, 100, 800);
            e.Graphics.DrawString(txtJobPrice4.Text, fntString,
                Brushes.Black, 600, 800, fmtString);
            e.Graphics.DrawLine(new Pen(Color.Black, 1), 100, 820, 640, 820);

            e.Graphics.DrawString(txtJobDescription5.Text, fntString,
                Brushes.Black, 100, 830);
            e.Graphics.DrawString(txtJobPrice5.Text, fntString,
                Brushes.Black, 600, 830, fmtString);
            e.Graphics.DrawLine(new Pen(Color.Black, 1), 100, 850, 640, 850);

            fntString = new System.Drawing.Font("Times New Roman", 12, FontStyle.Bold);
            e.Graphics.DrawString("Order Summary", fntString,
                Brushes.Black, 80, 870);
            e.Graphics.DrawLine(new Pen(Color.Black, 2), 80, 890, 680, 890);

            fntString = new System.Drawing.Font("Times New Roman", 10, FontStyle.Bold);
            e.Graphics.DrawString("Total Parts:", fntString,
                Brushes.Black, 500, 900);
            fntString = new System.Drawing.Font("Times New Roman", 10, FontStyle.Regular);
            e.Graphics.DrawString(txtTotalParts.Text, fntString,
                Brushes.Black, 640, 900, fmtString);

            fntString = new System.Drawing.Font("Times New Roman", 10, FontStyle.Bold);
            e.Graphics.DrawString("Total Labor:", fntString,
                Brushes.Black, 500, 920);
            fntString = new System.Drawing.Font("Times New Roman", 10, FontStyle.Regular);
            e.Graphics.DrawString(txtTotalLabor.Text, fntString,
                Brushes.Black, 640, 920, fmtString);

            fntString = new System.Drawing.Font("Times New Roman", 10, FontStyle.Bold);
            e.Graphics.DrawString("Tax Rate:", fntString,
                Brushes.Black, 500, 940);
            fntString = new System.Drawing.Font("Times New Roman", 10, FontStyle.Regular);
            e.Graphics.DrawString(txtTaxRate.Text, fntString,
                Brushes.Black, 640, 940, fmtString);

            fntString = new System.Drawing.Font("Times New Roman", 10, FontStyle.Bold);
            e.Graphics.DrawString("Tax Amount:", fntString,
                Brushes.Black, 500, 960);
            fntString = new System.Drawing.Font("Times New Roman", 10, FontStyle.Regular);
            e.Graphics.DrawString(txtTaxAmount.Text, fntString,
                Brushes.Black, 640, 960, fmtString);

            fntString = new System.Drawing.Font("Times New Roman", 10, FontStyle.Bold);
            e.Graphics.DrawString("Repair Total:", fntString,
                Brushes.Black, 500, 980);
            fntString = new System.Drawing.Font("Times New Roman", 10, FontStyle.Regular);
            e.Graphics.DrawString(txtTotalOrder.Text, fntString,
                Brushes.Black, 640, 980, fmtString);

            fntString = new System.Drawing.Font("Times New Roman", 10, FontStyle.Bold);
            e.Graphics.DrawString("Recommendations:", fntString,
                Brushes.Black, 100, 900);
            fntString = new System.Drawing.Font("Times New Roman", 10, FontStyle.Regular);
            e.Graphics.DrawString(txtRecommendations.Text, fntString,
                Brushes.Black, new RectangleF(100, 920, 350, 280));
}
private void mnuFilePrint_Click(object sender, EventArgs e)
{
    if ( dlgPrint.ShowDialog() == DialogResult.OK)
    {
        docPrint.Print();
    }
}
private void mnuFilePrintPreview_Click(object sender, EventArgs e)
{
    dlgPrintPreview.ShowDialog();
}
The XML Text Writer Fundamentals
Besides the XmlDocument and the derived classes of XmlNode, the .NET Framework provides the XmlTextWriter class, which is derived from XmlWriter. The XmlTextWriter class works in a top-down approach to create, or deal with, the contents of an XML file. This class writes an XML node and moves down without referring back:

This means that, once you have created a node using the XmlTextWriter, you have no way of referring back to it.
To use an XmlTextWriter object, first declare a variable of the type of this class and initialize it using one of its three constructors.
If you had already created a Stream-based object such as declaring a variable of type FileStream but you didn't define an encoding scheme, you can pass the Stream-based object to an XmlTextWriter but you must take this time to specify the encoding scheme. To support this concept, the XmlTextWriter provides a constructor with the following syntax:
public XmlTextWriter(Stream w, Encoding encoding);
The first argument of this constructor can be a Stream-derived variable. The second argument specifies the encoding scheme that would be applied. The default is UTF-8. Based on this, if you want to use the UTF-8 encoding scheme, you can pass it or pass the argument as 0. If you want to use another encoding scheme, pass it to the constructor.
To work from scratch, that is, to initiate a file with manually-created nodes, you can pass the desired name of the file to the XmlTextWriter constructor using the following syntax:
public XmlTextWriter(string filename, Encoding encoding);
In this case, you must provide the name of, or path to, the file, whose content you are creating, as the first argument. You must pass the desired encoding scheme as the second argument. Here is an example:
using System;
using System.Collections.Generic;
using System.ComponentModel;
using System.Data;
using System.Drawing;
using System.Linq;
using System.Text;
using System.Windows.Forms;
using System.Xml;

namespace SchoolRegistration
{
    public partial class Exercise : Form
    {
        public Exercise()
        {
            InitializeComponent();
        }

        private void btnDocument_Click(object sender, EventArgs e)
        {
            XmlTextWriter xmlTxtWriter = new XmlTextWriter("students.xml",
                                                           Encoding.UTF8);
        }
    }
}
Eventually, when you have finished using the XmlTextWriter object, you must free the memory it was using by calling the XmlTextWriter.Flush() method. To release the resources that the object was using, call the XmlTextWriter.Close() method. Here is an example:
private void btnDocument_Click(object sender, EventArgs e)
{
    XmlTextWriter xmlTxtWriter = new XmlTextWriter("students.xml",
                                                   Encoding.UTF8);

    xmlTxtWriter.Flush();
    xmlTxtWriter.Close();
}
Creating the XML Declaration
Declaring an XmlTextWriter variable allows you to indicate that you intend to create a new XML file. With the variable ready, you can start writing the file's content. As mentioned in previous lessons, an XML file starts at the top with an XML declaration. To create this declaration, you can call the XmlTextWriter.WriteStartDocument() method. This method is overloaded with two versions. The syntax of one of them is:
public void WriteStartDocument();
This method creates a declaration, sets the XML version to 1.0, and includes the encoding scheme you specified in the constructor. Here is an example:
private void btnDocument_Click(object sender, EventArgs e)
{
    XmlTextWriter xmlTxtWriter = new XmlTextWriter("students.xml",
                                                   Encoding.UTF8);

    xmlTxtWriter.WriteStartDocument();

    xmlTxtWriter.Flush();
    xmlTxtWriter.Close();
}
To } an XML file, you must close its declaration. This is done by calling the XmlTextWriter.WriteEndDocument() method. Its syntax is:
public void WriteEndDocument();
This method indicates that the XML file has ended and allows the compiler to stop reading it down. This would be done as follows:
private void btnDocument_Click(object sender, EventArgs e)
{
    XmlTextWriter xmlTxtWriter = new XmlTextWriter("students.xml",
                                                    Encoding.UTF8);

    xmlTxtWriter.WriteStartDocument();

    xmlTxtWriter.WriteEndDocument();

    xmlTxtWriter.Flush();
    xmlTxtWriter.Close();
}
Creating the Root Element
Between the XML declaration and the end of the file, that is, between the call to XmlTextWriter.WriteStartDocument() and the call to XmlTextWriter.WriteEndDocument() methods, you can create the necessary nodes of the file. As reviewed in previous lessons, the most regular node of an XML file is the element. To create an element, the XmlTextWriter class provides the WriteStartElement() method that is overloaded with various versions. One of the versions of this method and that is inherited from the XmlWriter class uses the following syntax:
public void WriteStartElement(string localName);
This method takes as argument the name of the element that will be created. Here is an example:
private void btnDocument_Click(object sender, EventArgs e)
{
    XmlTextWriter xmlTxtWriter = new XmlTextWriter("students.xml",
                                                    Encoding.UTF8);

    xmlTxtWriter.WriteStartDocument();

    xmlTxtWriter.WriteStartElement("students");

    xmlTxtWriter.WriteEndDocument();

    xmlTxtWriter.Flush();
    xmlTxtWriter.Close();
}
As you may know from XML, every element must be closed. To close an XML element, call the XmlTextWriter.WriteEndElement() method. Its syntax is:
public override void WriteEndElement();
When calling this method, always make sure that you know the element it is closing, which must correspond to an appropriate previous call to a WriteStartElement() method. Here is an example:
private void btnDocument_Click(object sender, EventArgs e)
{
    XmlTextWriter xmlTxtWriter = new XmlTextWriter("students.xml",
                                                    Encoding.UTF8);

    xmlTxtWriter.WriteStartDocument();

    xmlTxtWriter.WriteStartElement("students");
    xmlTxtWriter.WriteEndElement();

    xmlTxtWriter.WriteEndDocument();

    xmlTxtWriter.Flush();
    xmlTxtWriter.Close();
}
This would produce:
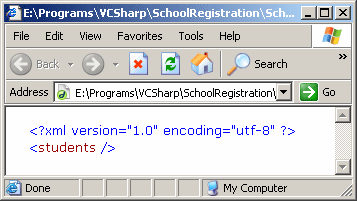
As you can see from the result, a single or the first call to the WriteStartElement() method creates the root element that is required for every XML file. This means that, after this (first) call but before its corresponding WriteEndElement() call, you can create the necessary nodes that you want to include as part of the file.
Creating the Child Elements of the Root
To help you create child elements of the root node, you can keep calling the XmlTextWriter.WriteStartElement() method as necessary and appropriately closing it. Here is an example:
private void btnDocument_Click(object sender, EventArgs e)
{
    XmlTextWriter xmlTxtWriter = new XmlTextWriter("students.xml",
                                                    Encoding.UTF8);

    xmlTxtWriter.WriteStartDocument();

    xmlTxtWriter.WriteStartElement("students");
    xmlTxtWriter.WriteStartElement("student");

    xmlTxtWriter.WriteEndElement();
    xmlTxtWriter.WriteEndElement();

    xmlTxtWriter.WriteEndDocument();

    xmlTxtWriter.Flush();
    xmlTxtWriter.Close();
}
If you simply call this method as done above, the element would be empty. Based on this, the above code would produce:

If you want the element to have a value, call the XmlTextWriter.WriteString() method. Its syntax is:
public void WriteString(string text);
This method must immediately follow the call to WriteStartElement() that creates a new element. It takes as argument the value for the immediately previously defined element. Here is an example:
private void btnDocument_Click(object sender, EventArgs e)
{
XmlTextWriter xmlTxtWriter = new XmlTextWriter("students.xml",
Encoding.UTF8);
xmlTxtWriter.WriteStartDocument();
xmlTxtWriter.WriteStartElement("students");
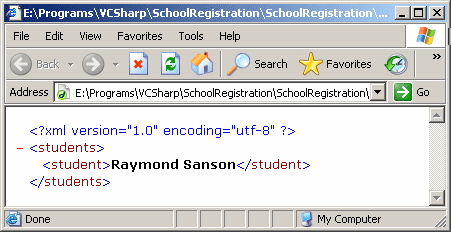
xmlTxtWriter.WriteStartElement("student");
xmlTxtWriter.WriteString("Raymond Sanson");
xmlTxtWriter.WriteEndElement();
xmlTxtWriter.WriteEndDocument();
xmlTxtWriter.Flush();
xmlTxtWriter.Close();
}
This would produce:
If you call the XmlTextWriter.WriteStartElement() method and you want the element to have a value, remember to call the XmlTextWriter.WriteString() method, and then call the XmlTextWriter.WriteEndElement() method. An alternative is to call the XmlWriter.WriteElementString() method that comes in two versions. The syntax of one of these versions is:
public void WriteElementString(string localName, string value);
The first argument to this method is the name of the element that will be created. The second argument is the value of the element. This method creates and closes its element. Here is an example:
private void btnDocument_Click(object sender, EventArgs e)
{
XmlTextWriter xmlTxtWriter = new XmlTextWriter("students.xml",
Encoding.UTF8);
xmlTxtWriter.WriteStartDocument();
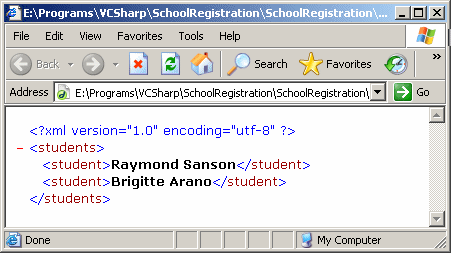
xmlTxtWriter.WriteStartElement("students");
xmlTxtWriter.WriteStartElement("student");
xmlTxtWriter.WriteString("Raymond Sanson");
xmlTxtWriter.WriteEndElement();
xmlTxtWriter.WriteElementString("student", "Brigitte Arano");
xmlTxtWriter.WriteEndElement();
xmlTxtWriter.WriteEndDocument();
xmlTxtWriter.Flush();
xmlTxtWriter.Close();
}
This would produce:
In the same way, you can create the necessary elements and their child elements as necessary. Be careful to appropriately start an element and remember to close it if necessary. Here are examples:
private void btnDocument_Click(object sender, EventArgs e)
{
    XmlTextWriter xmlTxtWriter = new XmlTextWriter("students.xml",
                                                    Encoding.UTF8);

    xmlTxtWriter.WriteStartDocument();

    // Create the root element named students
    xmlTxtWriter.WriteStartElement("students");

    // Start a child element named student
    xmlTxtWriter.WriteStartElement("student");

    // Create a number for the student
    xmlTxtWriter.WriteStartElement("studentnumber");
    xmlTxtWriter.WriteString("740597");
    xmlTxtWriter.WriteEndElement();

    // Create a name for the student
    xmlTxtWriter.WriteStartElement("fullname");
    xmlTxtWriter.WriteString("Christie Aronson");
    xmlTxtWriter.WriteEndElement();

    // Create a date of birth for the student
    xmlTxtWriter.WriteStartElement("dateofbirth");
    xmlTxtWriter.WriteString("02/16/1988");
    xmlTxtWriter.WriteEndElement();

    // Create a Format child element to the Video element
    xmlTxtWriter.WriteStartElement("Gender");
    xmlTxtWriter.WriteString("Female");
    xmlTxtWriter.WriteEndElement();

    // Close the student node
    xmlTxtWriter.WriteEndElement();

    // Start a new student element
    xmlTxtWriter.WriteStartElement("student");

    // Create the child elements of the new student element
    xmlTxtWriter.WriteElementString("studentnumber", "249575");
    xmlTxtWriter.WriteElementString("fullname", "Julius Raymonds");
    xmlTxtWriter.WriteElementString("dateofbirth", "12/07/1992");
    xmlTxtWriter.WriteElementString("Gender", "Male");
    // The current student node
    xmlTxtWriter.WriteEndElement();

    // Close the root element
    xmlTxtWriter.WriteEndElement();

    xmlTxtWriter.WriteEndDocument();

    xmlTxtWriter.Flush();
    xmlTxtWriter.Close();
}
This would produce:
![]() Practical Learning: Creating the Elements of an XML File
Practical Learning: Creating the Elements of an XML File
private void mnuFileSave_Click(object sender, EventArgs e)
{
    // Just in case, calculate the order now
    Calculate();
    // This number will be used to incrementally
    // create the files by their names
    int iFilename;
    string strFilename;

    // If this directory doesn't exist, create it
    // Also, get a reference to this directory for later use
    string strDirectory = @"C:\College Park Auto Repair";
    DirectoryInfo dirInfo =
                Directory.CreateDirectory(strDirectory);

    // Get the list of files, if any, from the above folder
    FileInfo[] fleList = dirInfo.GetFiles("*.xml");

    // If there is no XML file in the directory,
    // then get ready to create the first file
    if (fleList.Length == 0)
    {
        // Create the name of the (initial) file
        iFilename = 1000;
    }
    else // If there was at least one file in the directory
    {
                // Get a reference to the last file
                FileInfo fleLast = fleList[fleList.Length - 1];
                // Get the name of the last file without its extension
                string fwe = Path.GetFileNameWithoutExtension(fleLast.FullName);
                // Get the name of the file
                iFilename = int.Parse(fwe);
            }

            strFilename = strDirectory + "\\" + (iFilename + 1).ToString() + ".xml";

            // Get ready to display it in the Save dialog box
            dlgSave.FileName = strFilename;

            // Find out if the user clicked OK after displaying the Save dialog box
            if (dlgSave.ShowDialog() == DialogResult.OK)
            {
                XmlTextWriter wtrRepairOrder = new XmlTextWriter(strFilename,
                    Encoding.UTF8);
                wtrRepairOrder.Formatting = Formatting.Indented;
                wtrRepairOrder.Indentation = 4;

                // Create the contents of the XML file
                // Notice that we are not making an attempt to check the values
                wtrRepairOrder.WriteStartDocument();

                wtrRepairOrder.WriteStartElement("RepairOrders");
                wtrRepairOrder.WriteStartElement("Invoice");

                wtrRepairOrder.WriteElementString("CustomerName", this.txtCustomerName.Text);
                wtrRepairOrder.WriteElementString("Addres", this.txtAddress.Text);
                wtrRepairOrder.WriteElementString("City", this.txtCity.Text);
                wtrRepairOrder.WriteElementString("State", this.txtState.Text);
                wtrRepairOrder.WriteElementString("ZIPCode", this.txtZIPCode.Text);
                wtrRepairOrder.WriteElementString("Make", this.txtMake.Text);
                wtrRepairOrder.WriteElementString("Model", this.txtModel.Text);
                wtrRepairOrder.WriteElementString("CarYear", this.txtCarYear.Text);
                wtrRepairOrder.WriteElementString("ProbDescription", this.txtProblem.Text);
                wtrRepairOrder.WriteElementString("PartName1", this.txtPartName1.Text);
                wtrRepairOrder.WriteElementString("UnitPrice1", this.txtUnitPrice1.Text);
                wtrRepairOrder.WriteElementString("Quantity1", this.txtQuantity1.Text);
                wtrRepairOrder.WriteElementString("SubTotal1", this.txtSubTotal1.Text);
                wtrRepairOrder.WriteElementString("PartName2", this.txtPartName2.Text);
                wtrRepairOrder.WriteElementString("UnitPrice2", this.txtUnitPrice2.Text);
                wtrRepairOrder.WriteElementString("Quantity2", this.txtQuantity2.Text);
                wtrRepairOrder.WriteElementString("SubTotal2", this.txtSubTotal2.Text);
                wtrRepairOrder.WriteElementString("PartName3", this.txtPartName3.Text);
                wtrRepairOrder.WriteElementString("UnitPrice3", this.txtUnitPrice3.Text);
                wtrRepairOrder.WriteElementString("Quantity3", this.txtQuantity3.Text);
                wtrRepairOrder.WriteElementString("SubTotal3", this.txtSubTotal3.Text);
                wtrRepairOrder.WriteElementString("PartName4", this.txtPartName4.Text);
                wtrRepairOrder.WriteElementString("UnitPrice4", this.txtUnitPrice4.Text);
                wtrRepairOrder.WriteElementString("Quantity4", this.txtQuantity4.Text);
                wtrRepairOrder.WriteElementString("SubTotal4", this.txtSubTotal4.Text);
                wtrRepairOrder.WriteElementString("PartName5", this.txtPartName5.Text);
                wtrRepairOrder.WriteElementString("UnitPrice5", this.txtUnitPrice5.Text);
                wtrRepairOrder.WriteElementString("Quantity5", this.txtQuantity5.Text);
                wtrRepairOrder.WriteElementString("SubTotal5", this.txtSubTotal5.Text);
                wtrRepairOrder.WriteElementString("JobDescription1", this.txtJobDescription1.Text);
                wtrRepairOrder.WriteElementString("JobPrice1", this.txtJobPrice1.Text);
                wtrRepairOrder.WriteElementString("JobDescription2", this.txtJobDescription2.Text);
                wtrRepairOrder.WriteElementString("JobPrice2", this.txtJobPrice2.Text);
                wtrRepairOrder.WriteElementString("JobDescription3", this.txtJobDescription3.Text);
                wtrRepairOrder.WriteElementString("JobPrice3", this.txtJobPrice3.Text);
                wtrRepairOrder.WriteElementString("JobDescription4", this.txtJobDescription4.Text);
                wtrRepairOrder.WriteElementString("JobPrice4", this.txtJobPrice4.Text);
                wtrRepairOrder.WriteElementString("JobDescription5", this.txtJobDescription5.Text);
                wtrRepairOrder.WriteElementString("JobPrice5", this.txtJobPrice5.Text);
                wtrRepairOrder.WriteElementString("TotalPart", this.txtTotalParts.Text);
                wtrRepairOrder.WriteElementString("TotalLabor", this.txtTotalLabor.Text);
                wtrRepairOrder.WriteElementString("TaxRate", this.txtTaxRate.Text);
                wtrRepairOrder.WriteElementString("TaxAmount", this.txtTaxAmount.Text);
                wtrRepairOrder.WriteElementString("TotalOrder", this.txtTotalOrder.Text);
                wtrRepairOrder.WriteElementString("Recommendation", this.txtRecommendations.Text);

                wtrRepairOrder.WriteEndElement();
                wtrRepairOrder.WriteEndElement();

                wtrRepairOrder.WriteEndDocument();

                wtrRepairOrder.Flush();
                wtrRepairOrder.Close();
    }
}


Saving a File As XML
If you are creating a text-intensive document and you want to save it as an XML file, for example if you have declared a variable of type TextWriter-derived class (such as StringWriter or StreamWriter), you can use that file to initialize the XmlTextWriter variable. To support TextWriter documents, the XmlTextWriter provides a constructor with the following syntax:
public XmlTextWriter(TextWriter w);
This constructor expects as argument TextWriter-based object. This means that you should have defined the TextWriter object prior to passing it to this constructor. This also implies that the TextWriter was used to specify the encoding scheme that would be used. Here is an example:
private void btnDocument_Click(object sender, EventArgs e)
{
    string strFilename = "students.xml";

    FileStream fleStream = new FileStream("students.xml",
                      FileMode.Create,
                      FileAccess.Write,
                      FileShare.None);
    StreamWriter stmWriter = new StreamWriter(fleStream);
    XmlTextWriter xmlTxtWriter = new XmlTextWriter(stmWriter);

    stmWriter.Flush();
    stmWriter.Close();
}
To actually write the contents of the document, you can create each paragraph by calling the XmlTextWriter.WriteStartElement() method the same way we did earlier. Here is an example:
private void btnDocument_Click(object sender, EventArgs e)
{
    string strFilename = "students.xml";

    FileStream fleStream = new FileStream("memo.xml",
                      FileMode.Create,
                      FileAccess.Write,
                      FileShare.None);
    StreamWriter stmWriter = new StreamWriter(fleStream);
    XmlTextWriter xmlTxtWriter = new XmlTextWriter(stmWriter);

    xmlTxtWriter.WriteStartDocument();
    xmlTxtWriter.WriteStartElement("ToAllEmployees");

    for (int i = 0; i < txtEditor.Lines.Length; i++)
    {
        xmlTxtWriter.WriteStartElement("Notice");
        xmlTxtWriter.WriteString(this.txtEditor.Lines[i].ToString());
        xmlTxtWriter.WriteEndElement();
    }

    xmlTxtWriter.WriteEndDocument();

    stmWriter.Flush();
    stmWriter.Close();
}
Reading From an XML File
Introduction
Once an XML file exists, you can read it to retrieve the values of its nodes. To support opening an XML file and reading its contents, the .NET Framework provides the XmlTextReader class that is derived from the XmlReader class. The XmlTextReader class is equipped with all the necessary properties and methods to explore the contents of an XML file.
Like XmlTextWriter, the XmlTextReader class reads a file from top to bottom without going back up once it has passed a node:

This means that, when using the XmlTextReader class to read an XML file, once you have read a node and moved down the file, you cannot refer back to the previous node and you cannot access a previous node: once you have passed a node, you cannot access it anymore.
Using and XML Text Reader
To use an XML text reader, declare a variable of type XmlTextReader and initialize it with one of its constructors. This class is equipped with 14 constructors. If you want to open a file whose name or path you know, use the following constructor:
public XmlTextReader(string url);
This constructor takes as argument the name of, or path to, an XML file. If the file is found, it would be opened. If the file doesn't exist or there is an error in the string that specifies its path, the compiler would throw an XmlException exception.
Reading Nodes
After declaring an XmlTextReader variable, you can start reading the content of the file. To support this, you can call the XmlTextReader.Read() method. Its syntax is:
public override bool Read();
As mentioned previously, the file is read from top to bottom. Based on this, when you call the Read() method, it reads the first node, moves to the next, and so on until it reaches the end of the file. While reading the file, every time this method reaches a node, you can find out what type of node it is by checking the XmlTextReader.NodeType property. This can help you take a specific action if the reached node meets a certain criterion.
As reviewed in our introductions to XML, each node has a name and possibly a value. You can find out the name of a node by checking the XmlTextReader.Name property. To know the value of a node, retrieve its XmlTextReader.Value property.
![]() Practical Learning: Reading the Elements of an XML File
Practical Learning: Reading the Elements of an XML File
private void mnuFileOpen_Click(object sender, EventArgs e)
{
    XmlTextReader rdrRepairOrder = null;

    try
    {
        if( dlgOpen.ShowDialog() == DialogResult.OK )
        {
            rdrRepairOrder = new XmlTextReader(dlgOpen.FileName);

            // Scan the XML file
            while( rdrRepairOrder.Read() )
            {
                // every time you find an element, find out what type it is
                // If you find text, put it in the combo box' list
                if( (XmlNodeType.Element != 0) &&
		    (rdrRepairOrder.Name == "CustomerName") )
                {
                    txtCustomerName.Text = rdrRepairOrder.ReadElementString("CustomerName");
                    txtAddress.Text = rdrRepairOrder.ReadElementString("Addres");
                    txtCity.Text = rdrRepairOrder.ReadElementString("City");
                    txtState.Text = rdrRepairOrder.ReadElementString("State");
                    txtZIPCode.Text = rdrRepairOrder.ReadElementString("ZIPCode");
                    txtMake.Text = rdrRepairOrder.ReadElementString("Make");
                    txtModel.Text = rdrRepairOrder.ReadElementString("Model");
                    txtCarYear.Text = rdrRepairOrder.ReadElementString("CarYear");
                    txtProblem.Text = rdrRepairOrder.ReadElementString("ProbDescription");
                    txtPartName1.Text = rdrRepairOrder.ReadElementString("PartName1");
                    txtUnitPrice1.Text = rdrRepairOrder.ReadElementString("UnitPrice1");
                    txtQuantity1.Text = rdrRepairOrder.ReadElementString("Quantity1");
                    txtSubTotal1.Text = rdrRepairOrder.ReadElementString("SubTotal1");
                    txtPartName2.Text = rdrRepairOrder.ReadElementString("PartName2");
                    txtUnitPrice2.Text = rdrRepairOrder.ReadElementString("UnitPrice2");
                    txtQuantity2.Text = rdrRepairOrder.ReadElementString("Quantity2");
                    txtSubTotal2.Text = rdrRepairOrder.ReadElementString("SubTotal2");
                    txtPartName3.Text = rdrRepairOrder.ReadElementString("PartName3");
                    txtUnitPrice3.Text = rdrRepairOrder.ReadElementString("UnitPrice3");
                    txtQuantity3.Text = rdrRepairOrder.ReadElementString("Quantity3");
                    txtSubTotal3.Text = rdrRepairOrder.ReadElementString("SubTotal3");
                    txtPartName4.Text = rdrRepairOrder.ReadElementString("PartName4");
                    txtUnitPrice4.Text = rdrRepairOrder.ReadElementString("UnitPrice4");
                    txtQuantity4.Text = rdrRepairOrder.ReadElementString("Quantity4");
                    txtSubTotal4.Text = rdrRepairOrder.ReadElementString("SubTotal4");
                    txtPartName5.Text = rdrRepairOrder.ReadElementString("PartName5");
                    txtUnitPrice5.Text = rdrRepairOrder.ReadElementString("UnitPrice5");
                    txtQuantity5.Text = rdrRepairOrder.ReadElementString("Quantity5");
                    txtSubTotal5.Text = rdrRepairOrder.ReadElementString("SubTotal5");
                    txtJobDescription1.Text = rdrRepairOrder.ReadElementString("JobDescription1");
                    txtJobPrice1.Text = rdrRepairOrder.ReadElementString("JobPrice1");
                    txtJobDescription2.Text = rdrRepairOrder.ReadElementString("JobDescription2");
                    txtJobPrice2.Text = rdrRepairOrder.ReadElementString("JobPrice2");
                    txtJobDescription3.Text = rdrRepairOrder.ReadElementString("JobDescription3");
                    txtJobPrice3.Text = rdrRepairOrder.ReadElementString("JobPrice3");
                    txtJobDescription4.Text = rdrRepairOrder.ReadElementString("JobDescription4");
                    txtJobPrice4.Text = rdrRepairOrder.ReadElementString("JobPrice4");
                    txtJobDescription5.Text = rdrRepairOrder.ReadElementString("JobDescription5");
                    txtJobPrice5.Text = rdrRepairOrder.ReadElementString("JobPrice5");
                    txtTotalParts.Text = rdrRepairOrder.ReadElementString("TotalPart");
                    txtTotalLabor.Text = rdrRepairOrder.ReadElementString("TotalLabor");
                    txtTaxRate.Text = rdrRepairOrder.ReadElementString("TaxRate");
                    txtTaxAmount.Text = rdrRepairOrder.ReadElementString("TaxAmount");
                    txtTotalOrder.Text = rdrRepairOrder.ReadElementString("TotalOrder");
                    txtRecommendations.Text = rdrRepairOrder.ReadElementString("Recommendation");
                }
            }
        }
    }
    catch (XmlException)
    {
        MessageBox.Show("The file name you provided is not valid");
    }
    finally
    {
        rdrRepairOrder.Close();
    }
}
Details on XML Reading and Writing
Indentation
Consider a valid XML file such as the following, opened in Notepad:

If you were asked to examine this file, you can see that its crowded words make it difficult to read. To include a white space when writing to the file, you can call the XmlTextWriter.WriteWhiteSpace() method. Its syntax is:
public override void WriteWhitespace(string ws);
Besides white spaces, indentation consists of setting empty spaces on the left of child nodes to make the file easier to read. Based on this, indentation is not a requirement but a convenience. While the WriteWhiteSpace() method allows you to explicitly create a white space in the file, the XmlTextWriter class is equipped with the Formatting property. This property is a value of the Formatting enumeration. The Formatting enumeration has two members. The Indented value ensures that each child node would be indented from its parent.
If you manually create an XML file, whether using Notepad, Visual Studio, or another text editor, you can indent the nodes as you see fit. To let the compiler know that you want the nodes to be indented, assign the Formatting.Indented member to its Formatting property. Here is an example:
void BtnSaveClick(System.object sender, System.EventArgs e)
{
    XmlTextWriter xmlTxtWriter = new XmlTextWriter("students.xml",
						   Encoding.UTF8);
    xmlTxtWriter.Formatting = Formatting.Indented;

    xmlTxtWriter.Flush();
    xmlTxtWriter.Close();
}
If you manually create an XML file, you can specify the number of empty spaces on the left of a node by pressing the Space bar a few times before typing the node. Most people use 2 or 4 characters for the indentation. If you are programmatically creating the file, to specify the number of characters that should be used during indentation, assign the desired integer to the XmlTextWriter.Indentation property. If you don't use this property, the compiler would use two characters. You can also find out the number of characters used for indentation by retrieving the value of this property.
As mentioned above, indentation consists of entering white spaces on the left of child nodes. Instead of empty spaces, if you want to use another character, assign it to the XmlTextWriter.IndentChar property.
![]() Practical Learning: Indenting XML Nodes
Practical Learning: Indenting XML Nodes
private void mnuFileSave_Click(object sender, EventArgs e)
{
    . . . No Change

    // Find out if the user clicked OK after displaying the Save dialog box
    if (dlgSave.ShowDialog() == DialogResult.OK)
    {
        XmlTextWriter wtrRepairOrder = new XmlTextWriter(strFilename,
                    Encoding.UTF8);
        wtrRepairOrder.Formatting = Formatting.Indented;
        wtrRepairOrder.Indentation = 4;

    }

    . . . No Change
}
private void mnuFileExit_Click(object sender, EventArgs e)
{
    Close();
}
|
|
||
| Previous | Copyright © 2005-2020, FunctionX | Home |
|
|
||