|
A list box is used to display a list of
strings and all items of that control are primarily strings. To go a little
further than a simple list of strings, the Microsoft Windows operating system
provides the list view control. A list view is used to display a list of items
to the user but it can be configured to change the type of display. |
|
The list view control is made available in the .NET
Framework through the ListView class that is represented in the Windows
Forms section of the Toolbox by the TreeView button. To add a
list view to your application, you can click ListView in the Toolbox and
click the form or another container. To programmatically
create a list view, you can declare a variable of type ListView, use the new operator to instantiate it and
add it to
its host's list of controls through a call to the Controls.Add()
method. Here is an example:
private void btnCreate_Click(object sender, System.EventArgs e)
{
	ListView lvwCountries = new ListView();
	lvwCountries.Location  = new Point(10, 40);
	lvwCountries.Width      = 420;
	lvwCountries.Height     = 160;
	Controls.Add(lvwCountries);
}
|
 |
After this declaration, an empty rectangular control
is created and added to
your application. You can then start populating it.
|
|
 Practical
Learning: Introducing the Tree View Control Practical
Learning: Introducing the Tree View Control
|
|
- Start a new Windows Forms Application named DeptStore2
- Change the form's Text to Department Store
- In the Windows Forms section of the Toolbox, click ListView and
click the form
- Using the Properties window, change its properties as follows:
(Name): lvwStoreItems
Anchor: Top, Bottom, Left, Right
- Add a Button to the form and change its properties as follows:
(Name): btnClose
Text: Close
Anchor: Bottom, Right
- Double-click the Close button and implement its Click event as
follows:
private void btnClose_Click(object sender, System.EventArgs e)
{
	Close();
}
|
- Save all
|
|
Introduction to Creating List View Items |
|
|
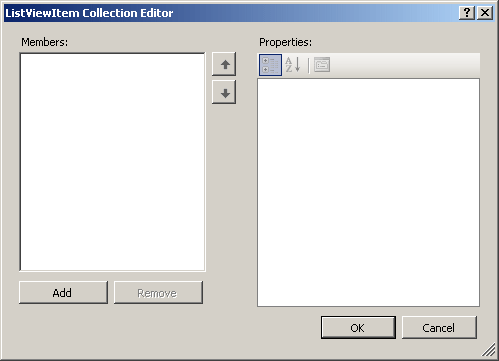
To
create the items of a list view, you can use the ListViewItem Collection Editor
of Microsoft Visual Studio .NET. To access it, after adding a ListView objectto your
application, you can click the ellipsis button of its Items field
in the Properties window:
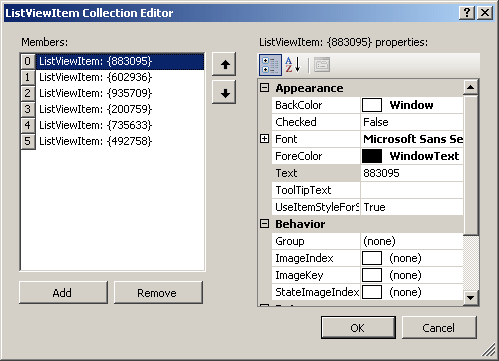
At design time and in the ListViewItem Collection Editor, to create
a new item, you can click the Add button:
The items of a list view are stored in a property called Items. The Items
property is based on the ListView.ListViewItemCollection class. To
create a new list view item, the ListViewItemCollection class is equipped
with the Add() method which is overloaded with three versions. One of the
versions of this method uses the following syntax: public virtual ListViewItem Add(string text);
This method expects a string that will display as the new item. Here is an
example:
private void btnCreate_Click(object sender, System.EventArgs e)
{
	ListView lvwCountries = new ListView();
	lvwCountries.Location  = new Point(10, 40);
	lvwCountries.Width      = 420;
	lvwCountries.Height     = 160;
	Controls.Add(lvwCountries);

	lvwCountries.Items.Add("Egypt");
}
|
 |
As the Items property is in fact a list, each item of this collection is
represented by the Item property of the ListViewItemCollection
class. This Item property is based on the ListViewItem class. The ListViewItem
class is equipped with various constructors, the default of which allows you to
instantiate an item without giving much details.
Instead of directly passing a string to the ListViewItemCollection.Add()
method, you can first create a ListViewItem object and pass it to the following version
of the ListViewItemCollection.Add() method: public virtual ListViewItem Add(ListViewItem value);
This method expects a ListViewItem value. One way you can use it consists
of providing the string the item would display. To do this, you can use the
following constructor of the ListViewItem class:
public ListViewItem(string text);
This constructor expects as argument the text that the new item will display.
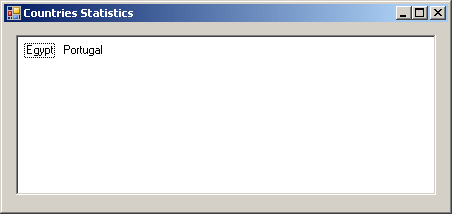
Here is an example:
private void btnCreate_Click(object sender, System.EventArgs e)
{
	ListView lvwCountries = new ListView();
	lvwCountries.Location  = new Point(10, 40);
	lvwCountries.Width      = 420;
	lvwCountries.Height     = 160;
	Controls.Add(lvwCountries);

	lvwCountries.Items.Add("Egypt");

	ListViewItem lviPortugal = new ListViewItem("Portugal");
	lvwCountries.Items.Add(lviPortugal);
}
|
 |
You can use any of these techniques to create as many items as necessary. Alternatively,
if you have many items to create, you can first store them in an array of ListViewItem
values,
then call the ListView.ListViewItemCollection.AddRange() method. The syntax
of this method is: public void AddRange(ListViewItem[] items);
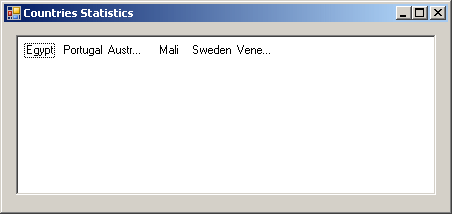
This method takes as argument an array of ListViewItem objects. Here is an
example: |
private void btnCreate_Click(object sender, System.EventArgs e)
{
	ListView lvwCountries = new ListView();
	lvwCountries.Location  = new Point(10, 40);
	lvwCountries.Width      = 420;
	lvwCountries.Height     = 160;
	Controls.Add(lvwCountries);

	lvwCountries.Items.Add("Egypt");

	ListViewItem lviPortugal = new ListViewItem("Portugal");
	lvwCountries.Items.Add(lviPortugal);

	ListViewItem[] lviCountries = { new ListViewItem("Australia"),
				  new ListViewItem("Mali"),
				  new ListViewItem("Sweden"),
				  new ListViewItem("Venezuela") };

	lvwCountries.Items.AddRange(lviCountries);
}
|
 |
Alternatively, you can create an array of strings and pass
it to the following constructor of the ListView class:
public ListViewItem(string[] items);
|
 Practical
Learning: Creating List View Items
|
|
- To add a new form to the application, on the main menu, click
Project -> Add Windows Form...
- In the Templates section, make sure that click Windows Forms is
selected. Set the name to NewStoreItem and press Enter
- Design the form as follows:
 |
| Control |
Name |
Text |
Other Properties |
| Label |
|
Item #: |
|
| TextBox |
txtItemNumber |
|
Modifiers: Public |
| Button |
btnOK |
OK |
DialogResult: OK |
| Button |
btnCancel |
Cancel |
DialogResult: Cancel |
| Form |
|
New Make |
AcceptButton: btnOK
CancelButton: btnCancel
FormBorderStyle: FixedDialog
MaximizeBox: False
MinimizeBox: False
ShowInTaskbar: False
StartPosition: CenterScreen |
|
- Display the first form (Form1.cs [Design]). Add a Button to it and change
its properties as follows:
(Name): btnNewItem
Text: New Item
Anchor: Bottom, Left
- Double-click the button
- To create a new item, implement the event as follows:
private void btnNewItem_Click(object sender, System.EventArgs e)
{
	NewStoreItem frmItem = new NewStoreItem();

	Random rndNumber = new Random(DateTime.Now.Millisecond);
	int number1 = rndNumber.Next(100, 999);
	int number2 = rndNumber.Next(100, 999);
	String itemNumber = number1 + "-" + number2;

	frmItem.txtItemNumber.Text = itemNumber;
	if( frmItem.ShowDialog() == DialogResult.OK )
	{
		ListViewItem lviStoreItem = new ListViewItem(frmItem.txtItemNumber.Text);
		this.lvwStoreItems.Items.Add(lviStoreItem);
	}
}
|
- Return to the first form (Form1.cs [Design]). In the Windows Forms section of
the Toolbox, click ContextMenu and click the form
- On the form, click ContextMenu and click Type Here. Create the following
menu items:
| Text |
(Name) |
Shortcut |
| New Item |
btnNewItem |
CtrlN |
| Edit |
mnuEditItem |
CtrlE |
| Delete |
mnuDelItem |
Del |
| Remove all Items |
mnuDeleteAll |
ShiftDel |
- On the form, click the list view. In the Properties window, set its
ContextMenu to contextMenu1
- Under the form, click contextMenu1
- In the form, click Context Menu and click New Item
- In the Properties window, click the Events button
- In the Click field, select btnNewItem_Click
- Execute the application to test the form
- Close the form and return to your programming environment
|
List View Items and Their Icons |
|
One of the fundamental differences between a list box and a
list view is that this one has a built-in capability to display icons but this
is only an option. Unlike the tree
view, the list view uses two sets of pictures. This means that two icons would be
associated to each item. One of the icons should have a 32x32 pixels size and
the other should have a 16x16 pixels size. The set of 32x32 pixels list is
referred to as large icons. The other set is referred to as small icons. Before
using the pictures, you should first store them in image lists. Each set must be
stored in its own ImageList object.
To support the various sets of icons, the ListView
class is equipped with a property called LargeImageList for the 32x32
icons and another property called SmallImageList for the 16x16 icons. After creating both ImageList
objects, you can assign each to the appropriate property.
When creating an item using the ListViewItemCollection.Add()
method, if you plan to display an icon next to
it, you can use the following version of the method:
public virtual ListViewItem Add(string text, int imageIndex);
The first argument is the string that will display for the
item. The second argument is the index of the icon in the ImageList property.
This method returns a reference to the ListViewItem object that was added
to the control.
We saw that you can also first create a ListViewItem
object to add to the control. If you use this approach and you want the item to
display an icon, you can use the following constructor of the TreeViewItem
class:
public ListViewItem(string text, int imageIndex);
This constructor uses the same arguments as the version of
the ListViewItemCollection.Add()
method above. You can also create an array of strings and assign them the same
icon. To do this, you can create the item with the following constructor of the TreeViewItem
class:
public ListViewItem(string items, int imageIndex);
|
 Practical
Learning: Associating Icons With Nodes Practical
Learning: Associating Icons With Nodes
|
|
- To create an icon, on the main menu, click File -> New -> File...
In the New File dialog box, click Icon File and click New
- Design the icon as follows:

- Right-click a white area in the main window -> Current Image Type -> 16x16, 16 colors
- Design the icon as follows:

- To save the icon, on the main menu, click File -> Save Icon1 As...
- Locate the folder that contains the current project and display it in the
Save In combo box. Change the Filename to Babies.ico and click Save
- Following the same steps, create a New Icon File and
design it as follows:

- As done above, display the 16x16, 16
colors version of the icon and design the icon as follows:

- Save the icon as Teens.ico
- Follow the same steps to add a New Icon File and
design it as follows:

- Display its 16x16, 16
colors version and design it as follows:

- Save the icon as Women.ico
- Add another Icon File and
design it as follows:

- Access its 16x16, 16
colors version and design it as follows:

- Save the icon as Men.ico
- Add one more Icon File and
design it as follows:

- Display its 16x16, 16
colors version and design it as follows:

- Save the icon as Misc.ico
- Display the first form.
In the Toolbox, click ImageList and click the form
- In the Properties window, change its name to imgLarge
- Change the ImageSize to 32, 32
- Click the ellipsis button of the Images field
- In Image Collection Editor, click Add
- Locate the folder that contains the current project and display it in the
Look In combo box
- Select Babies.ico and click Open
- In the same way, add the other pictures in the following order: Teens.ico,
Women.ico, Men.ico, and Misc.ico
- Click OK
-
In the Toolbox, click ImageList and click the form
- In the Properties window, change its name to imgSmall
- In the Properties window, click the ellipsis button of the Images field
- In Image Collection Editor, click Add
- Select Babies.ico, Teens.ico, Women.ico, Men.ico, and Misc.ico
- Click OK
- Access the NewStoreItem form and change its design as follows:
 |
| Control |
Name |
Text |
Other Properties |
| Label |
|
Category: |
|
| ComboBox |
cboCategories |
Miscellaneous |
Modifiers: Public
Items: Babies, Teens, Women, Men, Miscellaneous |
|
- Display the first form and click the list view on it
- In the Properties window, change the following properties:
LargeImageList: imgLarge
SmallImageList: imgSmall
- Double-click the New Item button and change its Click event as
follows:
private void btnNewItem_Click(object sender, System.EventArgs e)
{
	NewStoreItem frmItem = new NewStoreItem();
	int icoSelected = 4;
	string strCatSelected = "Miscellaneous";

	Random rndNumber = new Random(DateTime.Now.Millisecond);
	int number1 = rndNumber.Next(100, 999);
	int number2 = rndNumber.Next(100, 999);
	String itemNumber = number1 + "-" + number2;

	frmItem.txtItemNumber.Text = itemNumber;
	if( frmItem.ShowDialog() == DialogResult.OK )
	{
		strCatSelected =  frmItem.cboCategories.Text;

		if( strCatSelected.Equals("Babies") )
			icoSelected = 0;
		else if( strCatSelected.Equals("Teens") )
			icoSelected = 1;
		else if( strCatSelected.Equals("Women") )
			icoSelected = 2;
		else if( strCatSelected.Equals("Men") )
			icoSelected = 3;

	ListViewItem lviStoreItem = new ListViewItem(frmItem.txtItemNumber.Text, icoSelected);
		this.lvwStoreItems.Items.Add(lviStoreItem);
	}
}
|
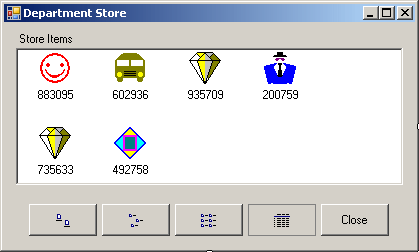
- Execute the application to test it
- Try creating an item for each category (use the random numbers generated
by the application)
- Close the form and return to your programming environment
To set it apart from the list box, a list view provides various options of
displaying its items. To support this, the ListView class is equipped with the
View property that is based on the View enumerator. Three of its members are:
- LargeIcon: In this view, the control displays a list of items using icons with a 32x32 pixels size of icons.
The string of the item displays under its corresponding icon:

- List: Each item appears with a small icon to its left. The
first item appears to the left side of the view. The next item
(usually in alphabetical order) appears under it, and so on. If there
are more items to fit in one column, the list continues with a new
column to the right of the previous one. This continues until the list
is complete:

- SmallIcon: Like the List option, this view uses small icons to display
its items. The icon of an item appears to the left of its string. The
first item appears in the top-left section of the view. The next item
is positioned to the right of the previous item. The list continues to
the right. If there are more items, the subsequent ones display on the
next line, until the list is complete

As seen so far, you can use one of four different
displays on a list view. Furthermore, you can give the user the ability to
change views as needed. The different displays of the list view are controlled
by the View property of the ListView class. To specify the type of view to use, assign the desired member of the View
enumerator to the ListView.View property.
|
 Practical
Learning: Using View Styles Practical
Learning: Using View Styles
|
|
- To create an icon, on the main menu, click File -> New -> File...
In the New File dialog box, click Icon File and click New
- Right-click the white area and click Delete Image Type
- Design the 16x16 pixels version of the icon as follows:

- Save the icon as LrgIcon.ico in the folder of the current project
- In the same way, add another Icon File. Delete its 32x32 version. Design
the 16x16 version as follows:

- Save the icon as SmIcon.ico
- Add another Icon File. Delete its 32x32 version and
design the 16x16 version as follows:

- Save the icon as List.ico
- Add another Icon File. Delete its 32x32 version and
design the 16x16 version as follows:

- Save the icon as Details.ico
- Change the design of the first form as follows:
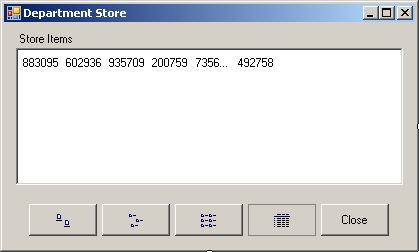 |
| Control |
Name |
Appearance |
Checked |
Image |
| RadioButton |
btnLargeIcons |
Button |
|
LrgIcons.ico |
| RadioButton |
btnSmallIcons |
Button |
|
SmIcons.ico |
| RadioButton |
btnList |
Button |
|
List.ico |
| RadioButton |
btnDetails |
Button |
True |
Details.ico |
|
- Double-click each of the new buttons from left to right and implement
their Click events as follows:
private void btnLargeIcons_CheckedChanged(object sender, System.EventArgs e)
{
	this.lvwStoreItems.View = View.LargeIcon;
}

private void btnSmallIcons_CheckedChanged(object sender, System.EventArgs e)
{
	this.lvwStoreItems.View = View.SmallIcon;
}

private void btnList_CheckedChanged(object sender, System.EventArgs e)
{
	this.lvwStoreItems.View = View.List;
}

private void btnDetails_CheckedChanged(object sender, System.EventArgs e)
{
	this.lvwStoreItems.View = View.Details;
}
|
- Return to the first form. Under the form, click contextMenu1
- On the form, click Context Menu and click Type Here under the other menu
items
- Type View and click Type Here on its right
- Create the sub-menu items and select the events in the Events section of
the Properties window as follows:
| Menu Text |
(Name) |
Event -> Click |
| Large Icons |
mnuLargeIcons |
btnLargeIcons_CheckedChanged |
| Small Icons |
mnuSmallIcons |
btnSmallIcons_CheckedChanged |
| List |
mnuList |
btnList_CheckedChanged |
| Details |
mnuDetails |
btnDetails_CheckedChanged |

- Save all
|
The Columns of a List View |
|
|
Another characteristic that sets the list view apart
from the list box is that the former can provide more information about
each item of its list. Based on this, each type of item we have created so
far can be equipped with its own list of sub-items. The view would appear
as follows:

|
Before creating the sub-items of a list view, you may need
to plan it first to identify the types of information you want to provide. To
guide the user with the type of information that each item would display, you
can create a column for each type. To support columns, the ListView
class is equipped with the Columns property. The Columns property
is an object of type ListView.ColumnHeaderCollection. As its name
indicates, the Columns property represents a list of columns. Each column is
based on the ColumnHeader class.
To create a column, you can call the ColumnHeaderCollection.Add()
method that is overloaded with two versions. One of the versions of this method
uses the following syntax:
public virtual ColumnHeader Add(string caption, int width, HorizontalAlignment textAlign);
The first argument of this method is referred to as the column's
caption. It is text that would display in the column header. The second argument
is a natural number that represents the distance from the left to the right
borders of the column. The last argument specifies how the caption of the column
would be aligned. The options are the same as those of the text box: Left,
Center, or Right. The default value is Left.
Here is an example of creating a column by calling this
method:
private void btnCreate_Click(object sender, System.EventArgs e)
{
	ListView lvwCountries = new ListView();
	lvwCountries.Location  = new Point(10, 40);
	lvwCountries.Width      = 420;
	lvwCountries.Height     = 160;
	lvwCountries.View = View.Details;
	Controls.Add(lvwCountries);

	lvwCountries.Columns.Add("Name", 120, HorizontalAlignment.Left);
}
|
 |
As mentioned earlier, a column is in fact an object of type ColumnHeader.
This class is equipped with all the necessary characteristics of a column header:
- Caption: The Text property holds the string that displays on top of
the column
- Width: This property represents the width of the column
- Text Alignment: The TextAlign property specifies the horizontal
alignment of its string. This property uses a value of type HorizontalAlignment,
which is the same as that of the text box
- Index: Since the columns are stored in a collection, this property
allows you to get the index of this column in the collection it belongs to
- The Parent List View: If you want to know what list view the current
column header belongs to, you can access its ColumnHeader.ListView
property
Instead of defining a column in the Add() method, you
can first create an object based on the ColumnHeader class and then pass
it to the following version of the ColumnHeaderCollection.Add() method:
public virtual int Add(ColumnHeader value);
This method takes as argument a ColumnHeader object.
Here is an example:
private void btnCreate_Click(object sender, System.EventArgs e)
{
	ListView lvwCountries = new ListView();
	lvwCountries.Location  = new Point(10, 40);
	lvwCountries.Width      = 420;
	lvwCountries.Height     = 160;
	lvwCountries.View = View.Details;
	Controls.Add(lvwCountries);

	lvwCountries.Columns.Add("Name", 120, HorizontalAlignment.Left);
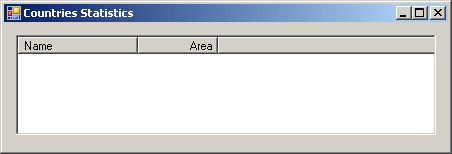
	ColumnHeader colArea = new ColumnHeader();
	colArea.Text = "Area";
	colArea.Width = 80;
	colArea.TextAlign = HorizontalAlignment.Right;
	lvwCountries.Columns.Add(colArea);
}
|
 |
Instead of adding one column at a time as we have done
above, you can first create
an array of ColumnHeader objects and pass it to the ListView.ColumnHeaderCollection.AddRange()
method. Its syntax is:
public virtual void AddRange(ColumnHeader values[]);
Here is an example of using it:
private void btnCreate_Click(object sender, System.EventArgs e)
{
	ListView lvwCountries = new ListView();
	lvwCountries.Location  = new Point(10, 40);
	lvwCountries.Width      = 420;
	lvwCountries.View = View.Details;
	Controls.Add(lvwCountries);

	lvwCountries.Columns.Add("Name", 120, HorizontalAlignment.Left);
	ColumnHeader colArea = new ColumnHeader();
	colArea.Text = "Area";
	colArea.Width = 80;
	colArea.TextAlign = HorizontalAlignment.Right;
	lvwCountries.Columns.Add(colArea);

	ColumnHeader colPopulation = new ColumnHeader();
	colPopulation.Text = "Population";
	colPopulation.Width = 78;
	colPopulation.TextAlign = HorizontalAlignment.Right;

	ColumnHeader colCapital = new ColumnHeader();
	colCapital.Text = "Capital";
	colCapital.Width = 96;
	colCapital.TextAlign = HorizontalAlignment.Left;

	ColumnHeader colCode = new ColumnHeader();
	colCode.Text = "Code";
	colCode.Width = 40;
	colCode.TextAlign = HorizontalAlignment.Center;

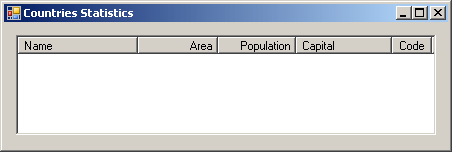
	ColumnHeader[] cols = { colPopulation, colCapital, colCode };
	lvwCountries.Columns.AddRange(cols);
}
|
 |
|
 Practical
Learning: Creating Columns Practical
Learning: Creating Columns
|
|
- Display the first form if necessary and click its list view
- In the Properties window, click Columns and click its ellipsis button
- In the ColumnHeader Collection Editor, click Add
- In the columnHeader1 properties list, change the following properties
(Name): colItemNumber
Text: Item #
Width: 70
- Click Add again and set the new column as follows:
(Name): colCategory
Text: Category
Width: 70
- Click Add again and set the new column as follows:
(Name): colItemName
Text: Item Name
Width: 200
- Click Add again and set the new column as follows:
(Name): colItemSize
Text: Size
Width: 80
- Click Add again and set the new column as follows:
(Name): colUnitPrice
Text: Unit Price
TextAlign: Right
- Click Add again and set the new column as follows:
(Name): colQuantity
Text: Qty
TextAlign: Right
- Click OK
- While the list view is still selected in the form, change its View
property to Details
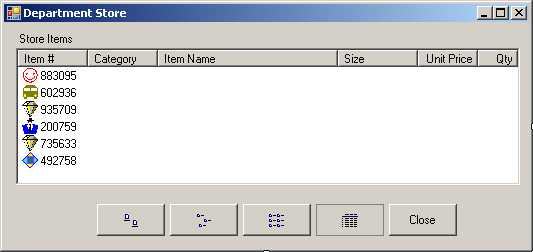
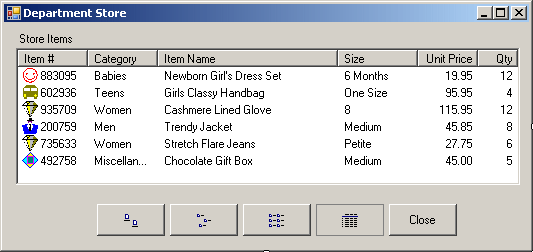
- Execute the application to test it
- After viewing the form, close it
If you call the AddRange() method, its list of
columns is created at the end of any existing column, unless there was no other column. If you call the Add() method to create a column, the new
column is added at the end of the existing columns, unless it is the first
column. If you don't want the new column to simply be created at the end of the
other column(s), if any, you can call the ColumnHeaderCollection.Insert()
method. It is overloaded with two versions and their syntaxes are:
public void Insert(int index, ColumnHeader value);
public void Insert(int index, string str, int width, HorizontalAlignment textAlign);
In both versions, the first argument specifies the index
where the new column will be created inside the Columns collection.
|
The Number of Columns of a List View |
|
As reviewed above, the columns of a list view are stored in
a collection. To know the number of columns of a list view, you can check its ColumnHeaderCollection.Count
property.
To find out if a certain column is part of a list view, you
can call the ColumnHeaderCollection.Contains() method. Its
syntax is:
public bool Contains(ColumnHeader value);
This method takes as argument a defined ColumnHeader
object and scans the list of columns looking for it. If it finds it, it
returns true. If it doesn't find a column that matches this object, it returns
false. As opposed to looking for a column, you can perform two
searches in one by calling the ColumnHeaderCollection.IndexOf()
method. Its syntax is:
public int IndexOf(ColumnHeader value);
This method looks for the value ColumnHeader.
If it finds it, it returns the column's index from the collection. If the
method doesn't find it, it returns -1.
If you don't need a column any more, you can delete it. In
the same way, you can delete all columns of a list view. To delete a
ColumnHeader object, you can call the ColumnHeaderCollection.Remove()
method. Its syntax is:
public virtual void Remove(ColumnHeader column);
To delete a column based on its position in the collection,
you can call the ColumnHeaderCollection.RemoveAt() method. Its
syntax is:
public virtual void RemoveAt(int index);
To delete all columns of a list view, you can call the ListView.ColumnHeaderCollection.Clear()
method. Its syntax is:
public virtual void Clear();
The idea of having columns is to provide more
information about each item of a list view instead of a simple string for
each. Consider the following example:
private void btnCreate_Click(object sender, System.EventArgs e)
{
	ListView lvwCountries = new ListView();
	lvwCountries.Location  = new Point(10, 40);
	lvwCountries.Width     = 420;
	lvwCountries.Height    = 100;
	lvwCountries.View      = View.Details;
	Controls.Add(lvwCountries);

	lvwCountries.Columns.Add("Name", 120, HorizontalAlignment.Left);
	ColumnHeader colArea = new ColumnHeader();
	colArea.Text = "Area";
	colArea.Width = 80;
	colArea.TextAlign = HorizontalAlignment.Right;
	lvwCountries.Columns.Add(colArea);

	ColumnHeader colPopulation = new ColumnHeader();
	colPopulation.Text = "Population";
	colPopulation.Width = 78;
	colPopulation.TextAlign = HorizontalAlignment.Right;

	ColumnHeader colCapital = new ColumnHeader();
	colCapital.Text = "Capital";
	colCapital.Width = 96;
	colCapital.TextAlign = HorizontalAlignment.Left;

	ColumnHeader colCode = new ColumnHeader();
	colCode.Text = "Code";
	colCode.Width = 40;
	colCode.TextAlign = HorizontalAlignment.Center;

	ColumnHeader[] cols = { colPopulation, colCapital, colCode };
	lvwCountries.Columns.AddRange(cols);

	lvwCountries.Items.Add("Egypt");

	ListViewItem lviEngland = new ListViewItem("Portugal");
	lvwCountries.Items.Add(lviEngland);

	ListViewItem lviCountry = new ListViewItem("Australia");
	lvwCountries.Items.Add(lviCountry);
	lviCountry = new ListViewItem("Mali");
	lvwCountries.Items.Add(lviCountry);
	lviCountry = new ListViewItem("Sweden");
	lvwCountries.Items.Add(lviCountry);
}
|
 |
To support sub-items, the ListViewItem class is
equipped with a property called SubItems. This property is of type ListViewSubItemCollection.
To create a sub-item, you can directly specify its text by passing a string
to the ListViewSubItemCollection.Add() method. The ListViewSubItemCollection.Add()
method is overloaded with three versions. The version referred to in this
case uses the following syntax: public ListViewSubItem Add(string text);
To identify each piece of information concerning a
sub-item, the ListViewSubItemCollection class is equipped with a
property called Item, which in turn is based on the ListViewSubItem
class. As you can see, the above Add() method returns a ListViewSubItem value.
Here are two examples of calling the above Add()
method:
private void btnCreate_Click(object sender, System.EventArgs e)
{
	ListView lvwCountries = new ListView();
	lvwCountries.Location  = new Point(10, 40);
	lvwCountries.Width     = 420;
	lvwCountries.Height    = 100;
	lvwCountries.View      = View.Details;
	Controls.Add(lvwCountries);

	lvwCountries.Columns.Add("Name", 120, HorizontalAlignment.Left);
	ColumnHeader colArea = new ColumnHeader();
	colArea.Text = "Area";
	colArea.Width = 80;
	colArea.TextAlign = HorizontalAlignment.Right;
	lvwCountries.Columns.Add(colArea);

	ColumnHeader colPopulation = new ColumnHeader();
	colPopulation.Text = "Population";
	colPopulation.Width = 78;
	colPopulation.TextAlign = HorizontalAlignment.Right;

	ColumnHeader colCapital = new ColumnHeader();
	colCapital.Text = "Capital";
	colCapital.Width = 96;
	colCapital.TextAlign = HorizontalAlignment.Left;

	ColumnHeader colCode = new ColumnHeader();
	colCode.Text = "Code";
	colCode.Width = 40;
	colCode.TextAlign = HorizontalAlignment.Center;

	ColumnHeader[] cols = { colPopulation, colCapital, colCode };
	lvwCountries.Columns.AddRange(cols);

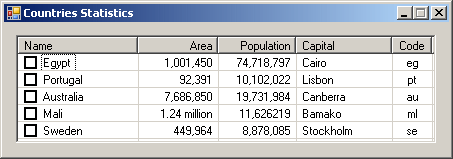
	ListViewItem lviEgypt = lvwCountries.Items.Add("Egypt");
	lviEgypt.SubItems.Add("1,001,450");
	lviEgypt.SubItems.Add("74,718,797");
	lviEgypt.SubItems.Add("Cairo");
	lviEgypt.SubItems.Add("eg");

	ListViewItem lviPortugal = new ListViewItem("Portugal");
	lviPortugal.SubItems.Add("92,391");
	lviPortugal.SubItems.Add("10,102,022");
	lviPortugal.SubItems.Add("Lisbon");
	lviPortugal.SubItems.Add("pt");
	lvwCountries.Items.Add(lviPortugal);

	ListViewItem lviCountry = new ListViewItem("Australia");
	lvwCountries.Items.Add(lviCountry);
	lviCountry = new ListViewItem("Mali");
	lvwCountries.Items.Add(lviCountry);
	lviCountry = new ListViewItem("Sweden");
	lvwCountries.Items.Add(lviCountry);
}
|
 |
As mentioned above, each sub-item is of type ListViewSubItem.
The ListViewSubItem class is equipped with
three constructors. The default allows you to create an empty sub-item.
After declaring a sub-item, you can specify its text by assigning the
desired string to the ListViewSubItem.Text property. Instead of
directly passing the text of a sub-item to the ListViewSubItemCollection.Add()
method as done above, you can first define a ListViewSubItem object
using the following constructor of the ListViewSubItem class: public ListViewSubItem(ListViewItem owner, string text);
The first argument of this constructor specifies the ListViewItem
object that this sub-item will belong to. The second argument is simply
the string that this sub-item will display. After defining a ListViewSubItem
object, you can pass it to the following version of the ListViewSubItemCollection.Add()
method: public ListViewSubItem Add(ListViewItem.ListViewSubItem item);
|
|


