|
Although the records of a database are stored in
tables, data sheets sometimes provide unfriendly environment for data
entry. Of course, to avoid using database tables that can appear boring,
you can use the DataGrid control. One of the characteristics of
data grids is that they display all of their record set, or at least as
much as their width and height can allow. If some fields require much
room, a data grid as good looking as it can be, would not be suitable.
Imagine that one of the columns contains fields of text of various paragraphs.
In this case, the records should be displayed one at a time.
If you want to display one record at a time on a form,
you can use Windows controls and provide a means for the user to navigate
back and forth in the records.
|
 Practical
Learning: Display Data in Windows Controls Practical
Learning: Display Data in Windows Controls
|
|
- Start Microsoft Visual Studio .Net and create a new Windows Forms
Application named BCR2
- From the Server Explorer, expand the Servers node, the server that
holds your SQL Server Installation, the SQL Servers node, and the name
of the server you will be using
- Expand the BCR1 node and expand the Tables node
- Drag the CompanyAssets table and drop
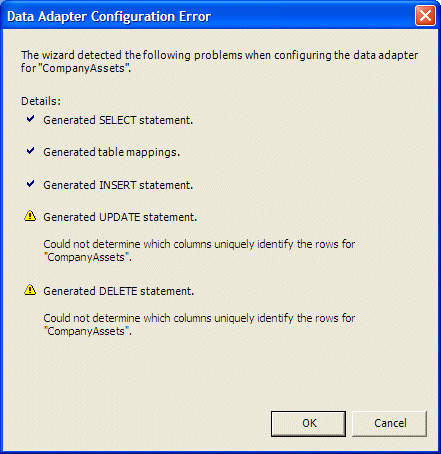
it on the form. You will receive a dialog box

- Click OK
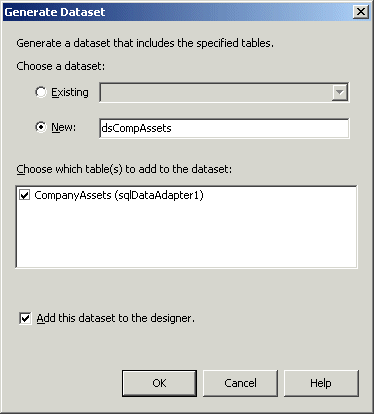
- On the main menu, click Data -> Generate Dataset...
- Click the text box to the right of the New radio button and change
it to dsCompAssets

- Click OK
- Click the Toolbox tab and click Windows Forms
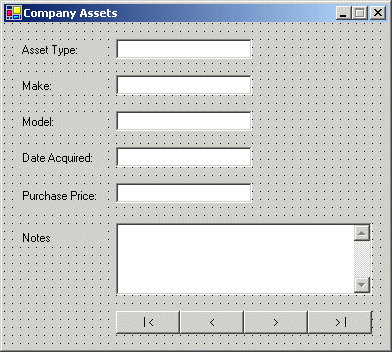
- Design the form as follows:
 |
| Control |
Name |
DataBindings -> Text
dsCompAssets1 - CompanyAssets. |
Text |
Other Properties |
| Form |
|
|
|
Text: Company Assets |
| Label |
|
|
Asset Type: |
|
| TextBox |
txtAssetType |
AssetType |
|
|
| Label |
|
|
Make: |
|
| TextBox |
txtMake |
Make |
|
|
| Label |
|
|
Model: |
|
| TextBox |
txtModel |
Model |
|
|
| Label |
|
|
Date Acquired: |
|
| TextBox |
txtDateAcquired |
DateAcquired |
|
|
| Label |
|
|
Purchase Price: |
|
| TextBox |
txtPurchasePrice |
PurchasePrice |
|
TextAlign: Right |
| Label |
|
|
Notes: |
|
| TextBox |
txtNotes |
Notes |
|
Multiline: True
ScrollBars: Vertical |
| Button |
btnFirst |
|
| < |
|
| Button |
btnPrevious |
|
< |
|
| Button |
btnNext |
|
> |
|
| Button |
btnLast |
|
> | |
|
|
- Save the project
- Double-click an empty area on the form to access its Load event and
implement it as follows:
private void btnLoad_Click(object sender, System.EventArgs e)
{
	 this.sqlDataAdapter1.Fill(this.dsCompAssets1);
}
|
- Double-click each of the buttons and implement them as
follows:
private void btnFirst_Click(object sender, System.EventArgs e)
{
	this.BindingContext[this.dsCompAssets1, "CompanyAssets"].Position = 0;
}

private void btnPrevious_Click(object sender, System.EventArgs e)
{
	this.BindingContext[this.dsCompAssets1, "CompanyAssets"].Position =
		this.BindingContext[this.dsCompAssets1, "CompanyAssets"].Position - 1;
}

private void btnNext_Click(object sender, System.EventArgs e)
{
	this.BindingContext[this.dsCompAssets1, "CompanyAssets"].Position =
		this.BindingContext[this.dsCompAssets1, "CompanyAssets"].Position + 1;
}

private void btnLast_Click(object sender, System.EventArgs e)
{
	this.BindingContext[this.dsCompAssets1, "CompanyAssets"].Position =
		this.BindingContext[this.dsCompAssets1, "CompanyAssets"].Count - 1;
}
|
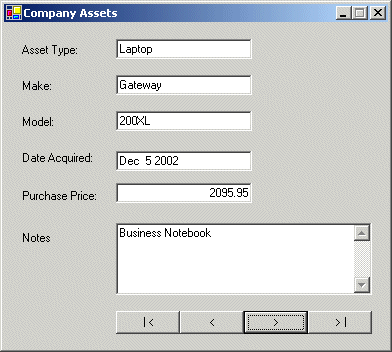
- Test the application

- Close the form and the application
|
|

